What is WordPress Admin Dashboard?

Table of Contents
Table of Contents
The WordPressWordPressOpen-source content management system (CMS) that allows users to create and manage websites and blogs.
More About WordPress Content Management System (CMSCMSA content management system is software aiding users to create, manage, and modify website content.
More About CMS) revolves around the admin dashboard, which is the central hub for all site management activities. From essential customizing settings to publishing content, installing plugins and themes, and much more, the WP admin dashboard lets you oversee every aspect of your website. Managing a website may be challenging if you are unfamiliar with the WordPress admin dashboard. To make things easier for you, let’s find out, “What is WordPress admin dashboard?” and how you can use it to its maximum.
WordPress Dashboard Explained
The WP admin dashboard, also known as the WP Admin or WP admin panel, is essentially the nerve center of your WordPress website. It provides a centralized platform for creating and managing content, installing plugins to add functionality, changing themes to modify the appearance, and much more.
If you are using WordPress, the WP admin panel will be integral to your experience. Therefore, it is crucial to understand its functionalities, locate the admin area, and use it effectively to manage your site.
How to Access the WordPress Admin Dashboard?
Typically, locating the WordPress admin dashboard is a hassle-free task. You simply need to add “/wp-admin” to the end of your WordPress installation URL, and voila! You’ll be directed to the WordPress admin dashboard. This means that you can find the WordPress admin dashboard at the following URL: https://yourdomain.com/wp-admin
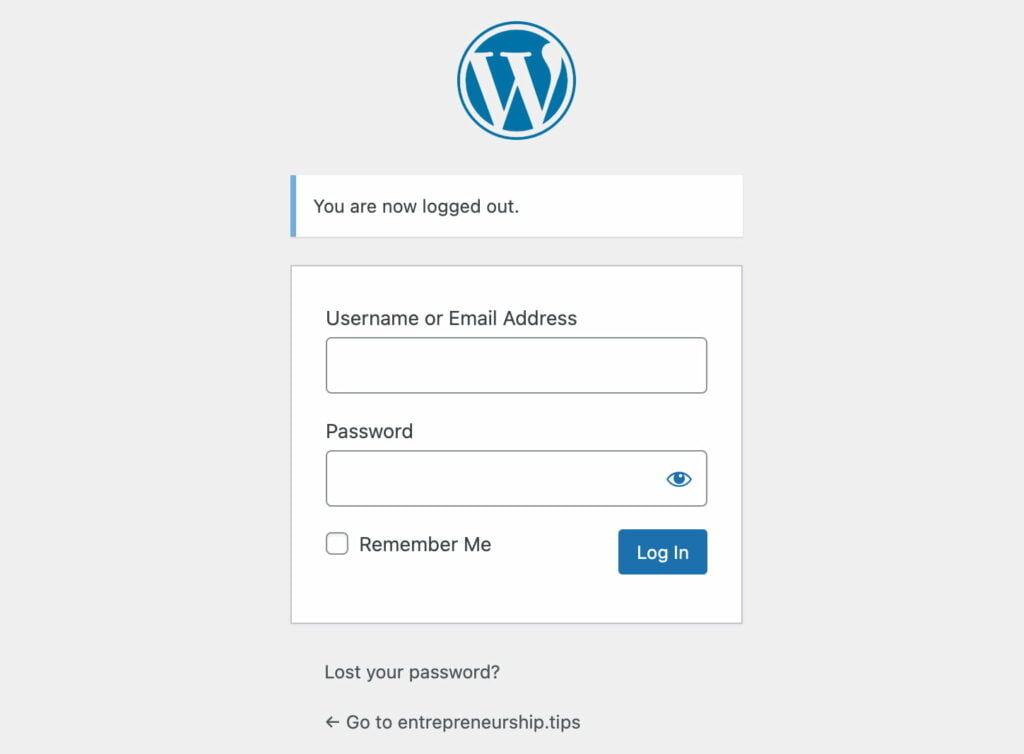
WordPress will automatically redirect you to the WordPress admin login page if you attempt to access your admin dashboard by adding /wp-admin to your URL while not logged in. However, you can also directly visit the WordPress admin login page URL by accessing: https://yourdomain.com/wp-login.php
We highly recommend changing the default login URL as bots, hackers, and scripts constantly scan for this common URL. Changing it to a different URL can be a simple yet effective way to significantly reduce the number of malicious login attempts made to your website. By doing so, you make yourself less of a target, safeguard your website against brute force attacks, and decrease the amount of bandwidthBandwidthThe maximum amount of data that can be transmitted over an internet connection in a given amount of time.
More About Bandwidth used by bots repeatedly hitting this URL. This trick alone won’t completely secure your website, but it’s a helpful security measure. If you forget your WordPress password, you can reset it by clicking the “Lost your password?” button.
How to Use WordPress Admin Dashboard?
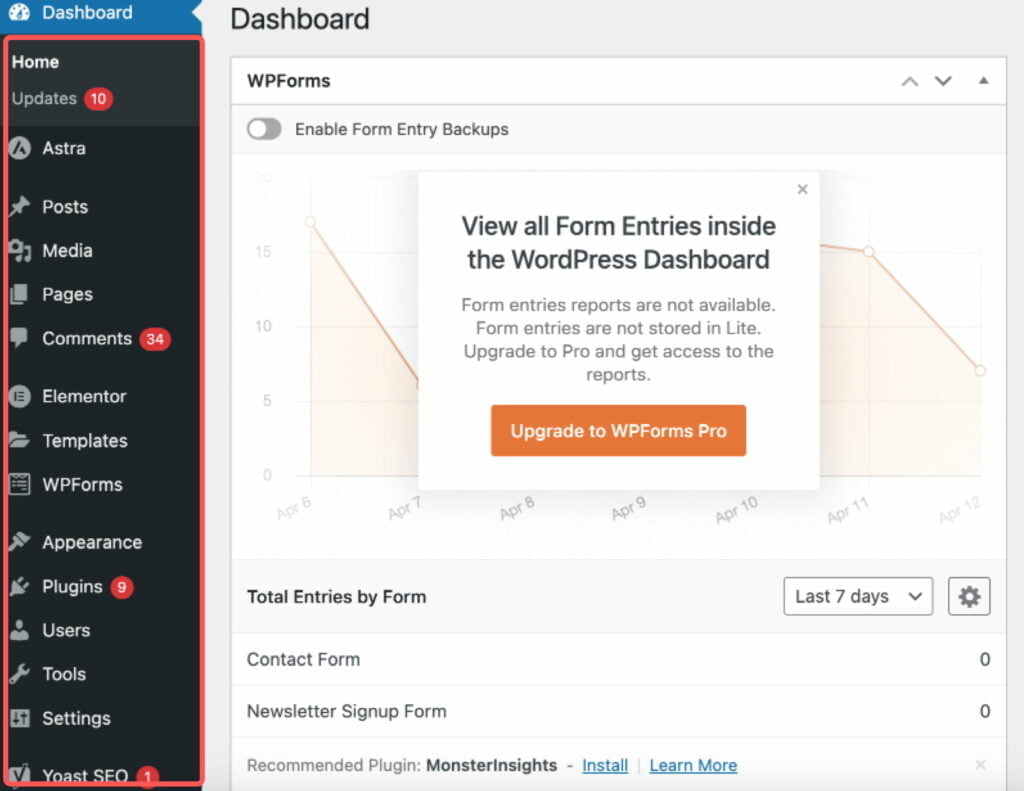
Upon initially logging into the WordPress admin dashboard, you will be directed to the default screen containing various widgets such as activity, quick draft, WordPress events and news, and at a glance. This screen briefly overviews all the necessary details for your WordPress website.
However, you will likely spend most of your time navigating other areas within the WordPress admin dashboard. You can utilize the menu options in the sidebarSidebarA vertical column that appears alongside the main content, providing additional information, links, or widgets that are relevant to the main content.
More About Sidebar to access these areas. While WordPress includes several default options, various themes and plugins may add additional menu items, meaning your WordPress site may display a slightly different menu.
How to Manage Pages and Posts
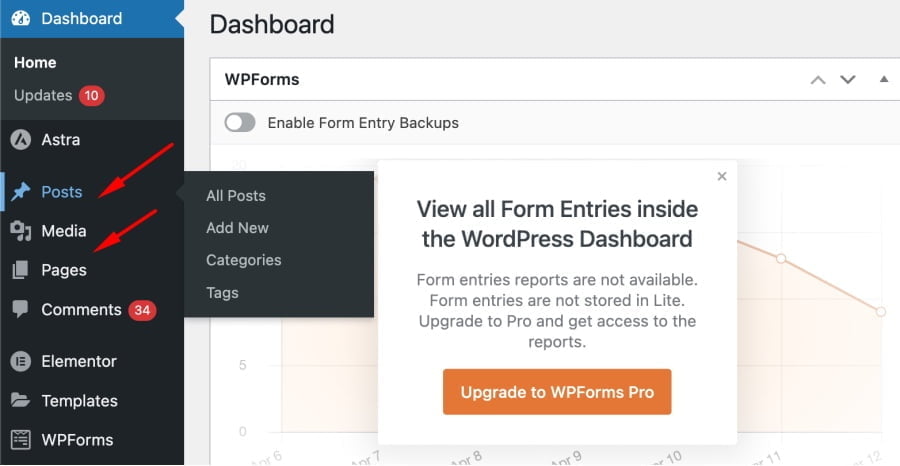
One of the primary tasks you will perform in WordPress is creating and managing pages and posts. To access this functionality, look at the left-hand menu in the admin dashboard. You’ll see two options called Pages and Posts.
Clicking on either option will direct you to a page containing a comprehensive list of all the pages or posts you’ve created. This list encompasses all published content, drafts, and even a trash bin for pages you choose to delete.
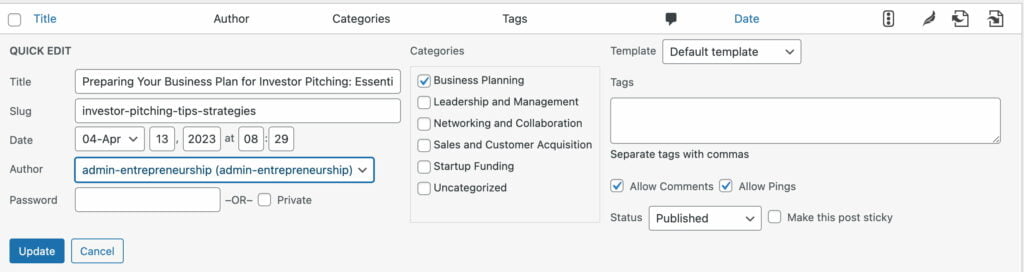
The list of posts contains pertinent information about each entry, including the author, category, tags, comments, and publish date. Additionally, hovering over individual entries will reveal various editing options.
You can access options to launch the editorEditorThe interface that allows you to write and format text, add images, embed media, and much more.
More About Editor or perform a quick edit by hovering over a page or post. If you’re interested in learning how to use the WordPress editor (also referred to as the Block Editor), we suggest checking out what Gutenberg is and how to use Gutenberg blocks.
The Quick Edit option allows you to modify a post’s basic settings without navigating to a new page.
To create a new page or post on your website, navigate to Posts → Add New or Pages → Add New. This will open up the Block Editor. Alternatively, you can click the Add New button on the main Posts or Pages screen.
In practical terms, creating and managing posts and pages in WordPress follows a similar process. The only distinction is that you’re working with two different types of content.
How to Manage WordPress Categories and Tags
WordPress uses a taxonomy system to help classify posts, consisting of categories and tags. Categories are broader classifications, while tags are more specific. For example, this article could fall under the WP Development category.
You can create any number of categories and tags and apply them to posts in any combination you choose. To get started, go to Posts → Categories. Here, you’ll find a list of existing categories and a menu to add new ones.
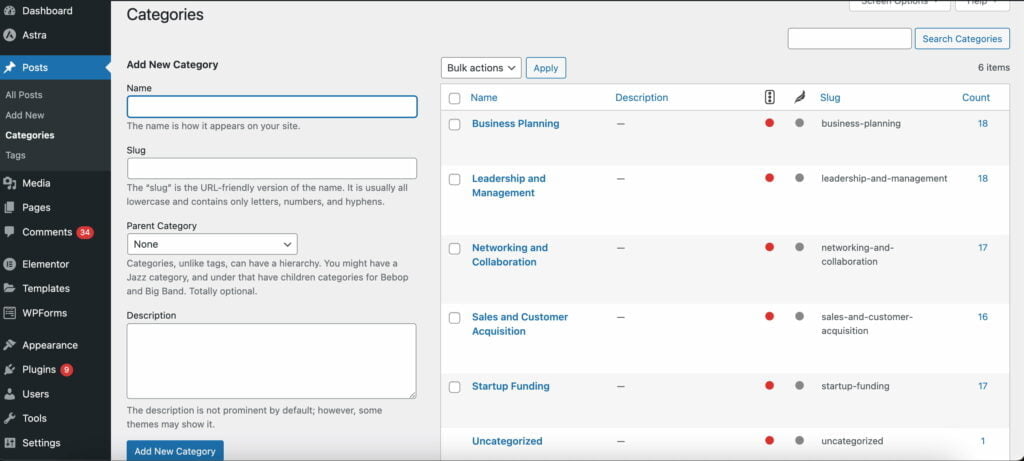
To add a new category, choose a name and provide a short description if desired. You can also opt for it to fall under a parent category.
The slug, on the other hand, is the URL-friendly version of the category name. For instance, if you have a Business Planning category, the slug would be /business-planning or something similar.
Once you add a category, it will appear on the list to the right. You will need to use the editor to assign a category to a post.
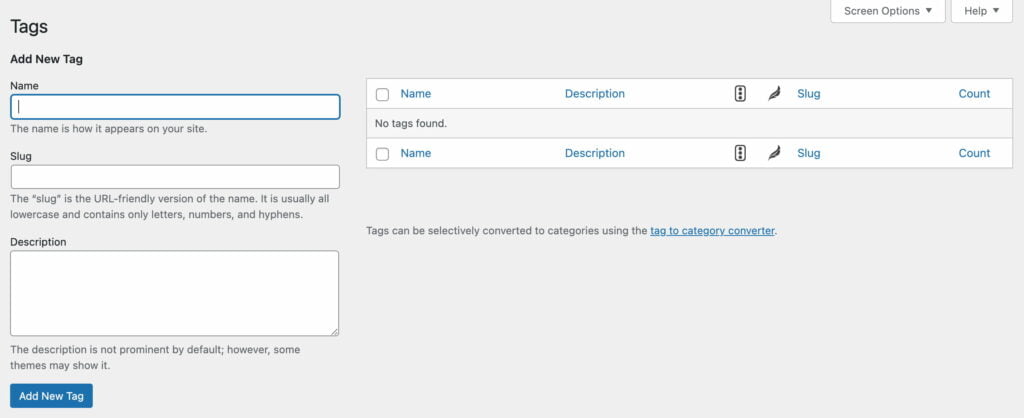
Next, let’s talk about the Tags page. The process for creating and managing WordPress tags is similar to that of categories. You can choose a name and a slug and set a description for each tag you add. Similarly to categories, you can assign tags to posts through the editor.
Categories and tags make it easier for visitors to navigate your content library and find related posts. As your content library grows, your website’s taxonomy should also expand to improve organization and searchability.
How to Manage Media Files
Media files are an essential element of any website, and WordPress supports a wide range of file formats for media. You can upload and display popular images, video, and audio file types using the WordPress media library, accessed from the Media → Library option in the dashboard.
The media library is a centralized location to view all the media files you’ve uploaded to your WordPress site. You can search for specific files using the search bar and filter them based on type, date, and more.
WordPress automatically generates several versions in different sizes when you upload a file. Insert these files into posts or pages or use them in a widget or custom templateTemplateA website template is a pre-designed webpage that is a starting point for creating a website.
More About Template. The media library also enables you to manage your files by editing metadata, adding captions, and organizing them into folders.
Media files are an important part of any website and WordPress supports a wide variety of file formats for images, videos, and audio. You can upload and manage media files using the WordPress media library located under Media → Library.
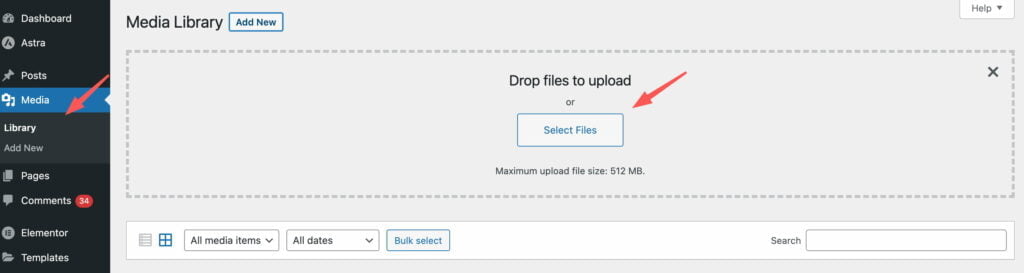
You can upload new files from the library using the Add New button or by clicking on Media → Add New. WordPress allows you to upload multiple files simultaneously, but the maximum size depends on your web host and site’s configuration.
Each media file displays its name, metadata, alt text, captions, descriptions, and URL in the library. You can use the Attachment Details screen to edit metadata, and for images, there is an Edit Image option for cropping, rotating, flipping, and resizing.
Using the Library page’s filtering tools, you can sort, filter, and search for files. There is no limit to how many media files you can upload, but it is important to manage your media library to avoid using up all of your hostingHostingThe process of storing and serving website files on a remote server, making them accessible to visitors around the world.
More About Hosting plan’s storage space.
How to Manage WordPress Comments
WordPress has a built-in comments system that allows users to post responses to your posts and pages, allowing you to control the comments on your site fully. To begin, you can access the Comments page to view all comments published on your website, including their status.
In WordPress, comments can have different statuses, such as approved, pending, trashed, or marked as spam. Although WordPress has some built-in spam recognition capabilities, it is up to you to filter and approve comments, so you’ll want to keep an eye on your Comments page to manage them effectively.
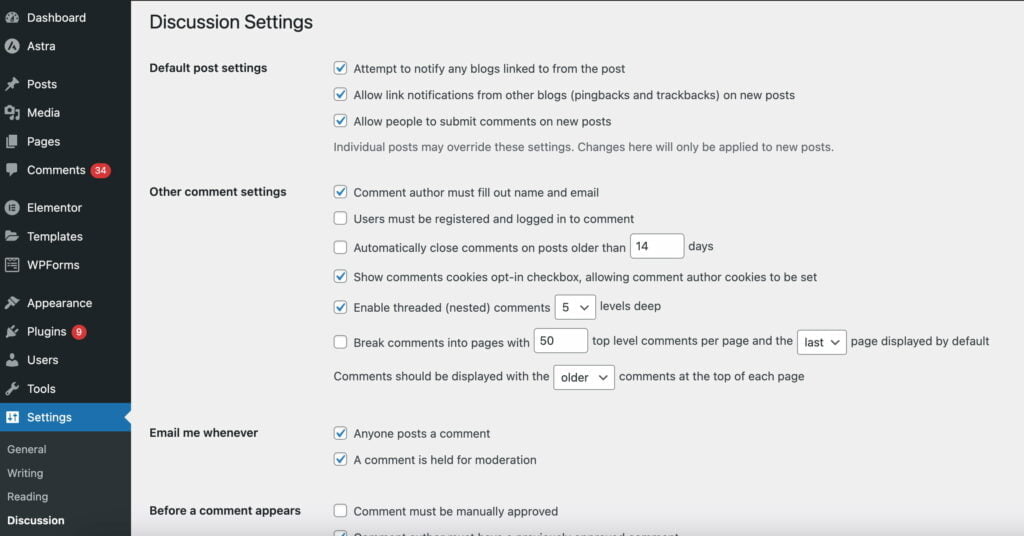
To configure your website’s comment settings, go to Settings → Discussion. This page allows you to configure various comment settings and settings for your regular posts.
The “Allow people to submit comments on new posts” option determines whether visitors can leave comments or not. If you disable this setting, the entire commenting system will be disabled.
If you enable the commenting system, you can scroll down to the “Other comment settings” section. Here, you can configure the information users need to share to comment and whether they need to register. This section also includes options for automatically closing comment sections, controlling cookiesCookiesSmall text files that websites store on your computer or mobile device when you visit them.
More About Cookies, enabling nested comments, and adding paginationPaginationThe process of dividing content into discrete pages or sections.
More About Pagination to comments.
The “Discussion settings” page also includes options for receiving notifications when visitors leave comments or if there are entries that require moderation. In the “Before a comment appears” section, you can configure whether comments require manual approval. There’s also an option that allows users with previously-approved comments to bypass the moderation queue.
To make moderation easier, WordPress includes a feature that allows you to automatically flag comments that contain specific words or identifying data, such as usernames, emails, or IP addresses.
The default WordPress commenting system works fairly well but can struggle to filter spam as your site becomes more popular. Consider installing a pluginPluginA piece of software that can be easily installed and activated on a CMS platform to enhance its capabilities.
More About Plugin to prevent comment spam on WordPress.
How to Manage WordPress Site’s Appearance
The Appearance menu in the WordPress admin dashboard allows you to select which theme to use on your site. You can also access the WordPress full-site editor from this menu. To choose a theme, navigate to Appearance → Themes. By default, WordPress comes with a few built-in themes that you can use.
You can select any theme and activate it by hovering over the selection and clicking on Activate. Keep in mind that changing your theme will significantly alter the appearance of your website. Therefore, it’s recommended that you use the Live Preview tool to see how the theme looks in action before making any permanent changes.
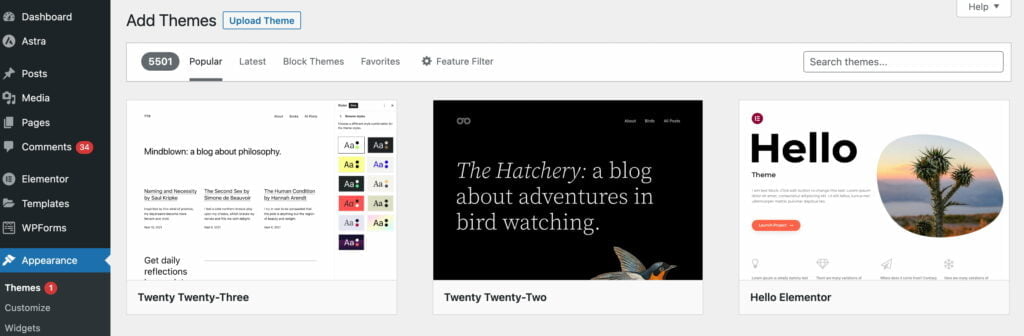
The preview feature in WordPress allows you to test out a theme’s style and see if it fits your needs. If you are not satisfied with a particular theme, you can search for new options by going to the Themes tab and clicking on either Add New or Add New Theme. This will take you to the WordPress.org theme repository, where you can browse a vast collection of free themes.
Once you find a theme, you can install or preview it. If you have purchased a premium theme from another source, you can upload it directly using the Upload Theme button. This option allows you to upload themes in .zip format.
After you install a theme, it will appear in your collection under Appearance → Themes. While you can install as many themes as you want, you can only use one at a time.
If you navigate to Appearance → Editor, you can access the WordPress full-site editor. This feature is relatively new in WordPress and allows you to edit your theme templates using the Block Editor.
How to Manage WordPress Plugins
Thousands of plugins are available for WordPress, each adding new features and tools to the CMS. This is one of the reasons why WordPress is so popular.
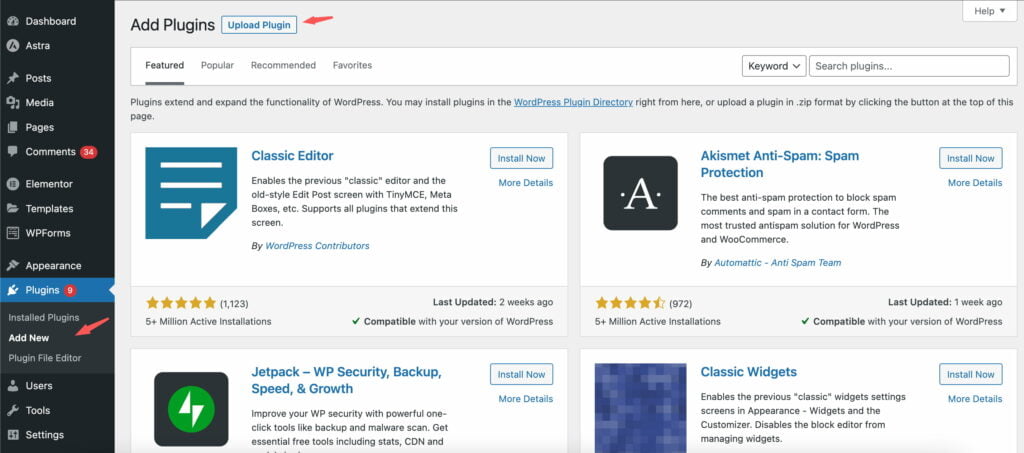
When you launch a new website, your web host may pre-install some plugins for you. To see what plugins you have installed, go to Plugins → Installed Plugins.
Here, you will find a list of installed, active, and inactive plugins. You can see basic information and enable automatic updates for each one.
To activate an inactive plugin, select the Activate option under its name. To disable a plugin, select the Deactivate option.
To add new plugins, click Add New at the top of the screen. This will display the official plugin repository, which includes thousands of options.
To install a plugin, click Install Now and wait for WordPress to download its files. Once the plugin is ready, you can activate it by clicking on the Activate button.
You can also upload plugin files directly to WordPress by clicking on Upload Plugin, and selecting the .zip file you want to upload.
How to Manage WordPress Updates
Regularly updating your WordPress site, plugins, and themes is essential for maintaining security and optimal performancePerformanceRefers to how fast a website or web application loads and responds to user interactions.
More About Performance.
You can check for available updates by navigating to the Plugins and Themes pages, where WordPress will notify you if updates are available. Select the “Update Now” option under the plugin entry to update a plugin. You can also enable auto-updates for individual plugins to ensure they stay up to date without manual intervention.
To view a comprehensive list of all available updates, go to Dashboard → Updates. This page will show any plugins or themes that require updating and notify you if a new version of WordPress is available.
Staying up to date with WordPress updates is crucial for keeping your site secure and functioning properly. Regularly checking for updates and performing them promptly is highly recommended.
How to Manage the Way WordPress Admin Panels Looks?
Various methods exist to customize the WordPress admin panel to suit your preferences. Here are a couple of the most commonly used methods.
Hiding Admin Panel Elements You Don’t Use
If there are certain elements of the admin panel that you do not use, you can hide them to simplify your workflow. To do this, click the Screen Options button in the top-right corner of any WordPress admin page. Next, uncheck the boxes for items you no longer wish to see.

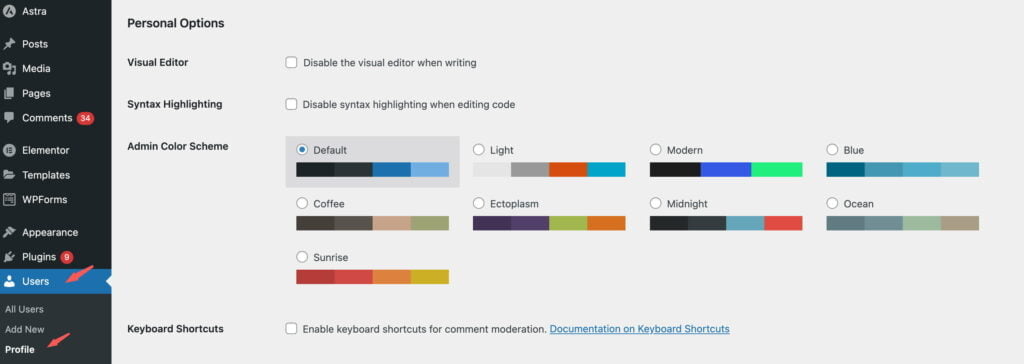
Changing the Color Scheme for the WordPress Admin Panel
If you want to change the color scheme of your WordPress admin panel, you can do so by going to Users → Your Profile and selecting a new Admin Color Scheme. This is purely an aesthetic change and won’t affect how the admin panel functions.
There are also WordPress plugins available that let you apply admin themes for more advanced customization of the admin panel’s appearance.
What Is The WordPress Toolbar?
The WordPress Toolbar, previously known as the Admin Bar, is a small bar at the top of your screen that appears when viewing your website’s live version or browsing the WordPress admin panel while logged in to WordPress.
Regular site visitors won’t see the Toolbar, but if you’re logged in, you’ll see a floating bar that allows you to perform actions quickly, no matter where you are on your site. You can use the various menu options on the Toolbar to access features and functions.

If you prefer not to use the WordPress Toolbar, turn it off by going to Users → Your Profile and unchecking the box for “Show Toolbar when viewing site.”

Bottom Line
The WordPress admin dashboard is the nerve center of your WordPress site. It provides a powerful and user-friendly interface for managing your website’s content, appearance, and functionality. Whether you’re a beginner or an experienced user, the WordPress admin dashboard is an essential tool that can help you create and maintain a successful website. By exploring all the features and settings available in the dashboard, you can customize your site to suit your needs and achieve your goals.