How to Set up WooCommerce Shipping at Your Store

Table of Contents

You’ve done all the hard work building your web store and driving customers to visit its pages. Your client can easily find the needed products using intuitive navigation patterns and advanced search on your website. They find your offers good enough to be added to the shopping cart. So, they click on the Buy button and proceed to the checkout to get their payment processed. Does this mean you’ve just made a sale? Not really. No sale is considered completed until a customer gets the product. To achieve this, you should set up shipping options on your website. This guide discusses how to set up WooCommerceWooCommerceA free, open-source e-commerce plugin for WordPress.
More About WooCommerce shipping at your web store.
Shipping plays a big role for customers. The delivery time and the cost your clients pay for the shipping services are among the main factors impacting their decision to buy from you. To avoid misunderstanding and lessen the number of refunds caused by inappropriate shipping options to a minimum, website owners should take proper care of managing shipping methods on their websites. Luckily, WooCommerce includes several built-in shipping methods and extendable features to let you provide more accurate shipping information on your website.
Default WooCommerce Shipping Options
WooCommerce provides many built-in features for managing online stores. However, you can often find the default functionality rather simple compared to what you can get with WordPressWordPressOpen-source content management system (CMS) that allows users to create and manage websites and blogs.
More About WordPress plugins and extensions.
The default WooCommerce shipping functionality looks like this – you can add a shipping calculator to your web page, which includes the shipping rates and methods described below.
Pre-defined WooCommerce shipping rates include three options:
- Free shipping – the customer doesn’t pay anything to deliver the order to their address. Usually, the free shipping option is triggered through coupons that customers can use after spending a minimum amount on a website.
- Flat rate – customers are charged the same rate for all shipments. Although this is considered one of the simplest and most predictable shipping rate options for companies and their clients, it may mean that one of the parties ends up paying too much for the order delivery.
- Local pickup – the option is free for customers, meaning they come to pick up their orders from the company’s local stores.
You can always add more shipping methods to your online store using plugins and extensions. Depending on what pluginPluginA piece of software that can be easily installed and activated on a CMS platform to enhance its capabilities.
More About Plugin you select, you can start offering local delivery services. You can also display the real-time carrier rates on your website or the table rate shipping that lets users check the shipment pricing based on their unique conditions. These are all default shipping options you get with WooCommmerce.
How to Handle Default WooCommerce Shipping Features
You should start setting up WooCommerce shipping options with the shipping zone configuration, setting up the shipping method for that zone, and the price the customers should pay for each shipping method. Additional settings include the configuration of conditions for receiving a free shipment and special shipping classes.
First, let’s see how to set up shipping zones in WooCommerce.
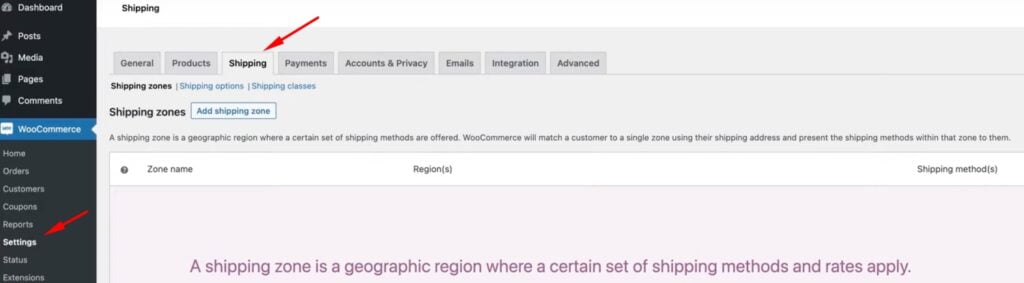
Log in to your WordPress dashboard and navigate WooCommerce > Settings, and select the Shipping tab. This is where you can find the Shipping Zones and the option to Add Shipping Zone. A WooCommerce shipping zone is a geographic region you set for your web store. It lets you specify the shipping cost and shipping method for each region.
To add a new shipping zone, enter the Zone Name (which will be used for your reference) and Zone Region. WooCommerce lets you use the convenient dropdown feature to search for the needed regions and locations.
For example, let’s add the United States shipping zone.
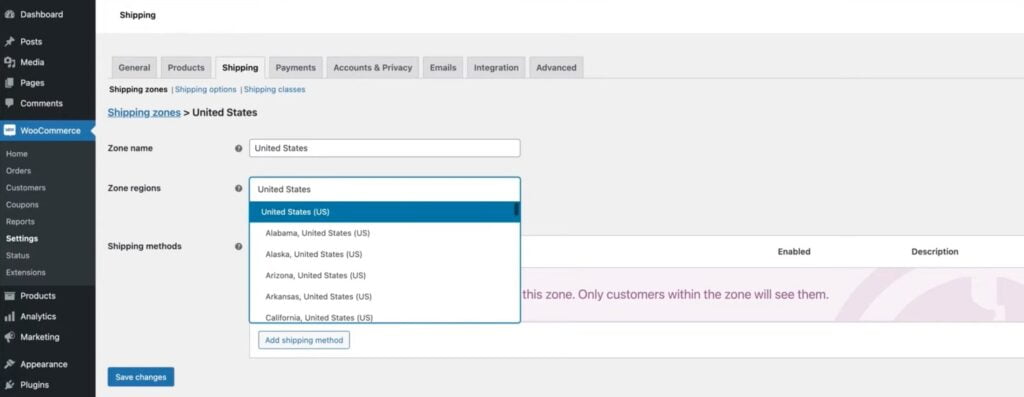
In the Zone regions field, you can select the United States option or specify which states should be included in the shipping zone.
Next, you should specify the shipping method for the shipping zone. Out of the box, WooCommerce lets you choose from flat rate, free shipping, and local pickup.
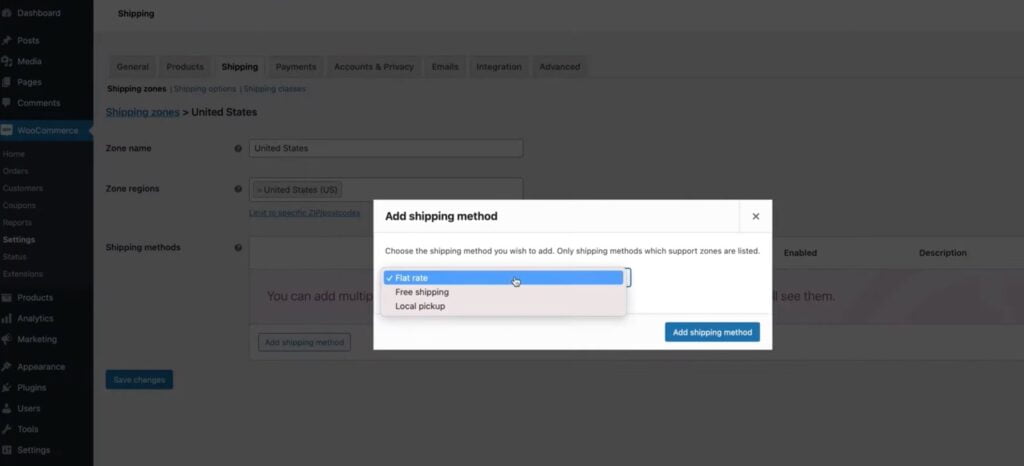
Save the changes once done.
It’s vital to specify the shipping method for each shipping zone to let your customers ensure their orders will be delivered to their location with their preferred shipping method. For example, you can implement the flat rate shipping method for most shipping zones and offer free shipping to the customers living in the state where your main office is located.
Besides, you can add several shipping methods for each geographical zone. To add one more shipping method, click the Add Shipping Method button again and add another shipping method for the chosen location. After you’ve created a shipping method, you can edit or delete it.
For example, if you need to edit the settings of the free shipping method, you need to click on the Edit button for Free Shipping. You will see a question asking when the free shipping should be activated for customers.

One of the most popular approaches to offering free shipping to customers is by setting the minimum order amount, meaning that the free shipping method will only become available to a client after reaching a certain dollar amount in their shopping carts.
There are a few optional settings that you can configure for the free shipping method. You can activate settings for chipping calculations and shipping destinations or enable/disable debug mode.
How to Set Up WooCommerce Shipping Classes
Shipping Classes let you group similar product types and offer similar shipping methods and rates for those groups. To access the shipping classes setup options in WooCommerce, navigate to Settings > Shipping, click on the Shipping classes tab, and follow the instructions from the video below.
Final Words
You can install third-party plugins and extensions on your WooCommerce site to smooth the shipping process. Some of the most popular options include WooCommerce Advanced Shipping (used for table rate shipping), WooCommerce Shipping Tracking (for checking shipping timelines), USPS Shipping Method (to calculate real-time shipping rates from the USPS), FedEx Shipping Method (to calculate real-time shipping rates from FedEx). One of the major recommendations for shipping plugin selection is to choose the option that supports the opportunity to calculate shipping costs in real time. It will help you improve your website’s user-friendliness manifolds.