How to Configure WooCommerce Payments in Your Store’s Settings

Table of Contents
In one of our earlier blog posts, we have already discussed the best payment gateway plugins that are worth being used on your WooCommerceWooCommerceA free, open-source e-commerce plugin for WordPress.
More About WooCommerce site. This time, let’s focus on the process of setting up a WooCommerce payment gateway to start accepting WooCommerce payments on your site. Is it PayPal, Stripe, bank transfer, or an offline payment method that you would define at the stages of setting up your WooCommerce project? Let’s see how to configure payment gateways that will bring maximum comfort to you and your customers.
WooCommerce is widely-known for its ease and usabilityUsabilityThe measure of a product’s effectiveness, efficiency, and satisfaction for its intended users.
More About Usability. At the initial stages of your web store setup, there are a few online and offline payment methods available, so you can proceed with adding WooCommerce payment gateways in the set-up wizard. Whenever you decide to add extra payment gateways, navigate through settings WooCommerce > Settings > Payments. This section will contain all payment gateways that you will install.
Which Payment Options to Choose?
A payment gateway is a pluginPluginA piece of software that can be easily installed and activated on a CMS platform to enhance its capabilities.
More About Plugin that lets your customers pay for goods and services using a payment system integrated into your web store. All WooCommerce payment methods require you to have a merchant account registered at the payment gateway company. Besides the WooCommerce extension subscription, payment payment gateways have additional fees, which are set by your Payment Gateway company.
The choice of WooCommerce payment gateways depends on such factors as cost, location, security, and whether or not a chosen payment gateway provides support for WooCommerce subscriptions.
- Speaking about the cost, some payment gateways are free, while others come with a fee. Every payment gateway company has a specific signup charge, subscription fees that are paid monthly or yearly, and transaction fees.
- A payment gateway company may be serving customers based in certain countries. For example, shop owners from Europe won’t be able to integrate payment gateways that accept the US dollars and accept US shops only. It’s an important factor to consider while choosing the best WooCommerce payment gateway for your site, especially if you are going to work with customers locally and globally.
- Security plays a significant role for online customers and shops. Whenever an online store asks you to provide personal details and sensitive customer information, you need to feel certain that your details won’t leak. That’s why payment gateways require an SSL certificate that encrypts communication between your customers and your web store.
- If you are going to sell recurring manual or automatic payments on your website, you need to use a payment gateway plugin that is compatible with the WooCommerce Subscriptions extension.
How Many Payment Methods Should You Add to Your Store?
Your web store should include at least one online payment method. Offering additional payment methods increases the chances that your customers will finish the browsing session by placing an order on your site. At the same time, adding too many payment methods can overwhelm your buyers. While making your choice, focus on adding only those payment gateways and methods that your customers prefer. The best way to find it out is by running A/B tests on your site.
There is an ongoing discussion of whether you should choose free or paid WooCommerce gateways. Freebies are also called core payment options. They do not have an annual subscription cost, but still charge you fees for transactions or other services. You may also opt for WooCommerce Payments that are free to install and do not feature any setup or monthly fees. Still, be ready to be charged for pay-as-you-go fees starting from just 2.9% + $0.30 per transaction for the U.S.-issued cards.
If you are looking for premium payment gateways for your site, you may check out the entire list of available options at WooCommerce extensions store. While opting for paid solutions, you will be charged an annual subscription fee along with transaction fees.
Important notice!Whenever you sell to the european customers, ensure that you choose a WooCommerce payment gateway that is compliant with GDPR.
WooCommerce Payment Gateways Configuration
The Payments tab of your WooCommerce store includes 4 default payment gateways: direct bank transfer, check payments, cash on delivery, and PayPal. Let’s see how to configure each of them.
Direct Bank Transfer
To get started, log in to your WordPressWordPressOpen-source content management system (CMS) that allows users to create and manage websites and blogs.
More About WordPress Dashboard and navigate WooCommerce > Settings > Checkout > BACS (see the screenshot below).
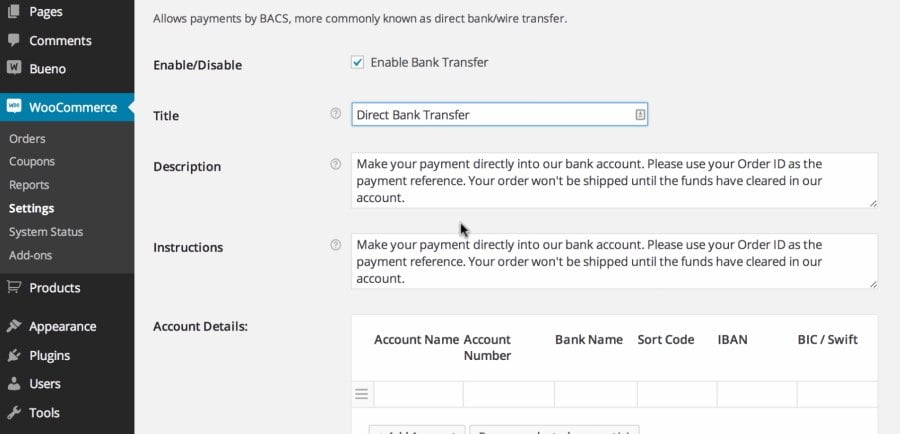
Put a tick in the checkbox next to the Enable Bank transfer option to enable or disable the respective functionality on your store. Next come several fields that WooCommerce fills in with the default next. You can leave it as it is or put your custom information.
The most important section that requires your maximum attention is the Account Details section, where you should enter the details of the account you would like to display on the storefront:
- Account Name
- Account Number
- Bank Name
- Routing number
- IBAN
- BIC/Swift
One more thing you should consider is that WooCommerce won’t automatically process transactions under this payment gateway. You need to manually check the transaction status and update the order details to proceed with the shipping.
Check Payments
Check Payments are set up similarly to the Direct Bank Transfer. You can enable or disable the option while simply ticking the checkbox. WooCommerce provides default texts for TitleTitleA text that appears at the top of a web page or within a section of content.
More About Title, Description, and Instructions fields, but you may feel free to replace them with your own content. Once done, click Save changes. See the instruction on the video below.
Cash on Delivery
The setup process is similar to what we have discussed in the Direct Bank Transfer and Check Payments sections. Traditionally, you will get some default texts, which you can replace with your own to add a personal touch to your WooCommerce payments. You can also enable the Cash on Delivery for the shipping methods of your own choice. WooCommerce includes three default shipping options – flat rate, free shipping, and local pickup. Besides, WooCommerce lets you enable Cash on Delivery for virtual orders.
The thing that should be pointed out is this WooCommerce gateway is not processed automatically. So, you will need to manually verify if you have received payment on delivery.
PayPal
Here comes one of the most preferred payment gateways that are accepted globally. PayPal is also easy to configure in your WooCommerce store settings, though it includes a little bit more setup procedures if compared to other payment gateways we’ve already discussed.
- To get started, activate PayPal as a payment gateway (at this stage, you need to ensure your website supports fstockopen/cURL – see the video below for detailed instructions). If everything is OK, go back to the PayPal settings and enable it.
- Next, you will be asked to fill in the Title and Description fields or leave the default texts if you are OK with that.
- In the next step, enter your PayPal email. Make sure that you enter it right since it’s the most important setting on this page.
- You can also enable the PayPal sandbox and Debug log tools. With the PayPal sandbox enabled, you can accept text orders on your store before it becomes available for other users on the web. Once your web store goes live, do not forget to disable this option to be able to accept money from your real customers. Debug Log lets PayPal log all events to a specific file on your server. Enabling this option will be especially useful for debugging any kind of issues that you may have. You may also leave this option disabled and move further.
- In the Advanced Settings, you can enter the second email address that will be used for sending Instant Payment Notification (IPN) to notify your store whether payments are successful or not. In case you face any kind of issues with IPN, you can enter the PayPal Identity token in the field below (to locate your token, you need to navigate to your PayPal account > Profile and Settings > My Selling Tools > Website Preferences).
- In the Invoice Prefix field, you can specify if you use the same PayPal account to receive payments from multiple stores. It’s recommended to use a custom prefix for different stores. With its help, you will be able to identify invoices from different stores.
- While enabling the Shipping Details option, you can tell WooCommerce to send PayPal your customer’s shipping address instead of billing.
- Keep the Address Override option disabled if you are just beginning to set up your web store with WooCommerce. The Address Override option is used to prevent address information from being changed on PayPal site.
- Payment Action includes the capture option (which means charging customers and capturing the funds immediately) or authorize (which means the WooCommerce store won’t charge the customer upfront and the store manager needs to capture the order manually).
- PayPal style is optional. It lets you manage the style of the page to which your customers will be taken.
- Image URL is also optional. It’s used to display a branded signature when your customer finishes the checkout.
- APIAPIApplication Programming Interface serves as a bridge that enables different software systems to communicate and interact with each other.
More About API credentials should be specified if you offer refunds through PayPal through your WooCommerce store. You may leave this option disabled and process refunds through your PayPal account every time a customer wants to get money back. Still, it’s more convenient to get orders and refunds processed in the same place.
Save the changes once done. Now, PayPal payment gateway is already added to your WooCommerce store.
That’s pretty much it. We hope the instructions we shared in this article will come in handy to you while managing WooCommerce payments.