What is Gravity Forms?
Table of Contents
Table of Contents
Gravity Forms is undoubtedly one of the must-have WordPress plugins for every website aiming to build better contact with the audience. Unlike other free form plugins, Gravity Forms provides extensive customization options for your forms and efficient management of the data collected from submitted forms. This blog post discusses what is Gravity Forms, how to use the plugin, and embed forms into your website.
What is Gravity Forms?
Gravity Forms is a premium WordPress plugin that enables the effortless creation of various forms for your website. This versatile plugin seamlessly incorporates contact forms, quizzes, and surveys. One of its standout features is conditional formatting, which dynamically shows or hides specific questions based on users’ responses to previous questions. Additionally, Gravity Forms offers routing functionality, directing form submissions to designated email addresses.
Having been established for over a decade, Gravity Forms has earned a solid reputation as a leading solution in WordPress form plugins. In this article, we will guide you through the installation process of Gravity Forms on your website and explore how to maximize its features.
Why Use Gravity Forms?
You may have encountered various form plugins if you’re a WordPress user. So, what sets Gravity Forms apart from the rest?
- Gravity Forms excels in web form accessibility, ensuring that websites are easily navigable for individuals with visual impairments or disabilities. Gravity Forms 2.5 introduced several accessibility enhancements, allowing the creation of WCAG-compliant forms. Key accessibility features include robust HTML5 markup, improved screen reader feedback, error feedback options, enhanced keyboard navigation, and warnings for accessibility issues. Optimizing your forms for accessibility not only benefits the estimated 26% of US adults with disabilities but also expands your user base, improves SEO, and enhances the overall online experience for everyone.
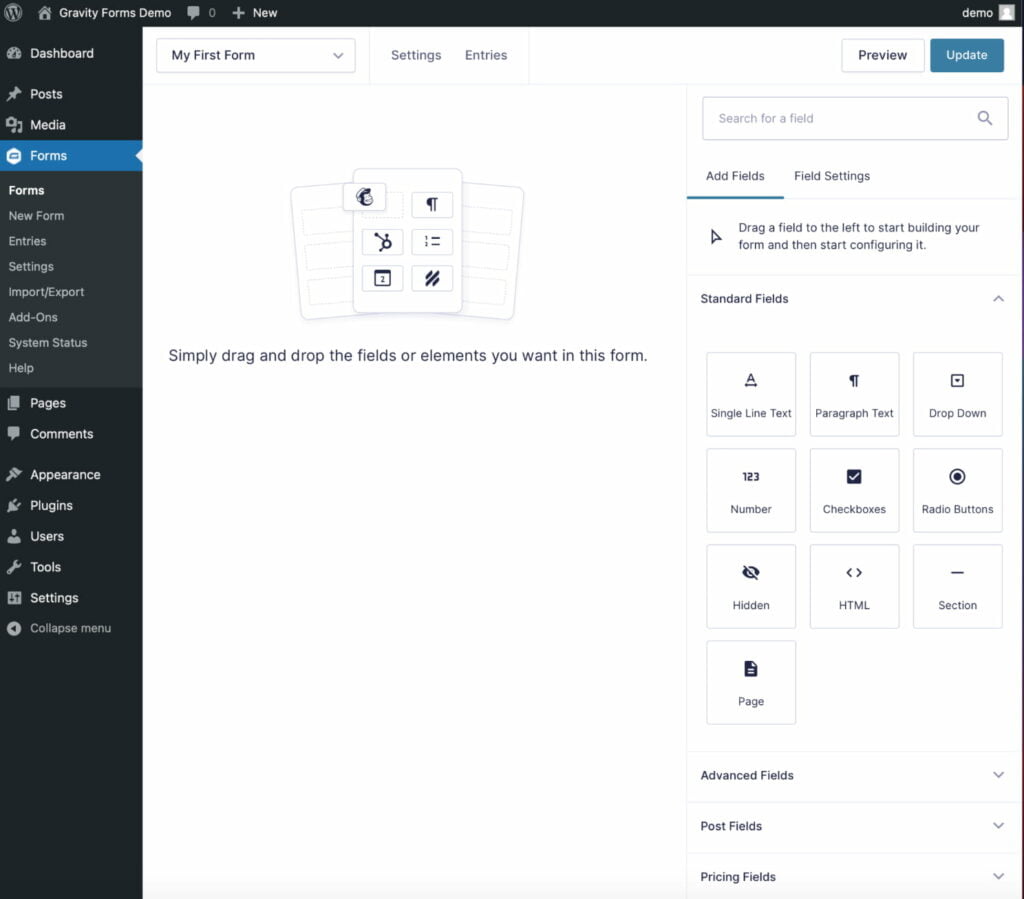
- Gravity Forms prioritizes user-friendly design. Its intuitive drag-and-drop form editor, resembling the Gutenberg block editor, simplifies the creation of complex forms with just a few clicks. Field settings are neatly organized, and conditional logic settings are conveniently displayed in a fly-out panel, allowing easy management of intricate rules. The form editor includes a search field for quick field selection, and effortless column organization eliminates the need for CSS classes. Setting up a new form is swift, with various templates available in the library.
- Gravity Forms stands out for its extensibility and flexibility. It can be utilized to create a wide range of forms, such as product order forms, event registration forms, email opt-ins, and more. Numerous extensions enable seamless integration with popular applications, while third-party certified Gravity Forms developers offer additional add-ons to extend its functionality. These add-ons empower users to display form submissions on the front end, export data to PDF, perform advanced calculations, and unlock various other features. Gravity Forms is a solid foundation for membership websites, online stores, employee databases, directories, and business workflows.
- Gravity Forms impresses with its comprehensive feature set. The plugin offers a diverse form fields, from basic input fields to advanced options like File Uploads, Product fields, Date fields, and Time fields. Built-in conditional logic allows the display or hiding of form fields based on user selections, facilitating the creation of personalized and relevant forms. Gravity Forms also enables the setup of notifications that function as autoresponders, keeping you informed whenever a user submits a form.
- Dealing with spam form submissions can be a nuisance for website owners. Gravity Forms addresses this issue with simple spam prevention measures. It includes sophisticated honeypot features and offers free add-ons to effectively prevent spam submissions, ensuring a cleaner and more manageable inbox.
Gravity Forms Pricing Plans
Gravity Forms offers three licensing options: Basic, Pro, and Elite, each providing access to different add-ons. Here’s an overview of each license:
- Gravity Forms “Basic” license. Priced at $59/year, the Basic license grants access to 15 add-ons, enabling integration of Gravity Forms with popular third-party applications. Add-ons include Hubspot, Aweber, Constant Contact, Mailchimp, and ActiveCampaign.
- Gravity Forms “Pro” license. Priced at $159/year, this option expands integration possibilities with platforms like Dropbox, Freshbooks, Help Scout, and Stripe. The Pro license includes all the Basic license features and provides an additional 18 add-ons.
- Gravity Forms “Elite” license. Priced at $259/year, this comprehensive option offers add-ons such as User Registration, Survey, Polls, Quiz, and Coupons. The Elite license encompasses all the features of the previous licenses and includes an extra 13 add-ons.
Gravity Forms Plugin Features
Gravity Forms provides many features to enhance the usability and effectiveness of your WordPress lead forms. Here are some standout features that will elevate your forms and improve the collection of user submissions:
- Form Editor. The Gravity Forms builder offers a user-friendly drag-and-drop interface. From simple text inputs to captchas and pricing fields, the plugin provides numerous options to capture the required information. With the form editor, you can effortlessly add new fields, choose from various field types, and rearrange fields as needed.
- Email Forwarding. Once visitors fill out your forms, Gravity Forms can automatically forward the submissions to designated team members based on the form content. For instance, if you have a pet grooming business with different employees specializing in different animals, you can route form submissions about rabbits to the email of the employee experience in grooming pet bunnies.
- Conditional Logic. Gravity Forms’ conditional formatting feature allows you to dynamically show or hide specific fields based on a user’s response or selection in the form. For example, if a field asks, “Do you have a pet?” and the user answers “Yes,” an additional question appears asking them to specify the types of pets they own. If the user selects “No,” the additional question remains hidden.
- Payments. Gravity Forms enables you to include pricing fields in your forms for accepting payments. The plugin integrates seamlessly with popular payment gateways such as PayPal, Stripe, and Square, allowing you to collect payments through your form securely.
- Gravity Forms allows you to export data as an Excel spreadsheet. This feature is useful for long-term data collection and analysis. Gravity Forms provides conversion data, enabling you to compare form submissions with form views.
- File Uploads. A notable advanced feature of Gravity Forms is the ability for users to upload files, including images or documents, as part of their form submissions. If you accept user-generated content, Gravity Forms can effectively handle it. You can create a form for visitors to submit WordPress posts directly to your website.
- Integrations. Gravity Forms integrates with leading marketing automation, cloud storage, payment processing, analytics, and messaging software. Noteworthy integrations include HubSpot, Slack, Mailchimp, Stripe, and Constant Contact. Users can utilize paid Gravity Forms add-ons to integrate with their preferred tools. You can explore the add-ons library to check compatibility with your desired applications.
How to Use Gravity Forms?
Download Gravity Forms
To start with the Gravity Forms plugin in WordPress, you need to buy an annual license, download the .zip file, and save it to your device.
Upload, Install, and Activate the Gravity Forms plugin in WordPress
To install Gravity Forms on your WordPress dashboard, follow these steps:
- Access your WordPress dashboard, navigate to “Plugins,” and select “Add New.”
- Choose the option “Upload Plugin”.
- Click on the “Choose File” button and locate the Gravity Forms .zip file on your computer.
- Select the file and click “Open” to upload it.
- Once the .zip file is uploaded, click “Install Now.”
- After the installation, click “Activate Plugin” to activate Gravity Forms on your website.
Add the License Key
To add the license key for Gravity Forms, follow these steps:
- Log into your account on the Gravity Forms website using your credentials.
- Once logged in, navigate to the “Your Licenses” section.
- Locate your license key and copy it.
- Return to your WordPress dashboard.
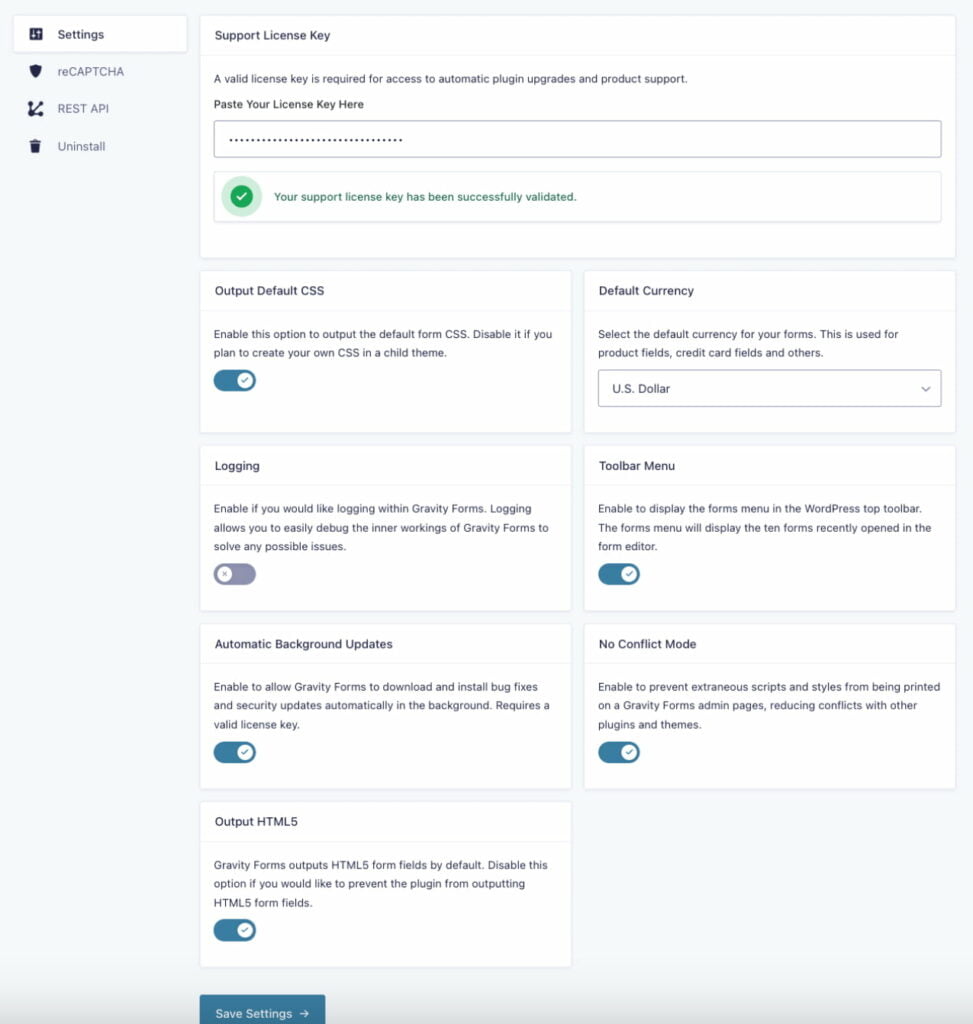
- Go to “Forms” in the dashboard menu and select “Settings.”
- Within the Settings page, click on the “Support” tab.
- Scroll down to the “Support License Key” section.
- Paste the license key you copied from your Gravity Forms account into the provided field.
- After pasting the key, click the “Save Settings” button at the bottom of the page.
Adding the license key will activate the full functionality of Gravity Forms, including support, automatic updates, and access to add-ons.

Configure the Gravity Forms plugin Settings
After successfully validating your license key, you can customize various general plugin settings on the same page. These settings allow you to configure your preferred currency for payments, enable error logging, and activate automatic background updates.
Automatic background updates are particularly convenient as they ensure that your installation of Gravity Forms is always up to date and secure.
To adjust these settings according to your preferences, toggle the options to enable or disable them. Once you have made your desired changes, click on the “Save Settings” button at the bottom of the page to save your updated settings.

Create a Form with Gravity Forms
After successfully installing and configuring the Gravity Forms plugin, you can create your first form. Follow these steps:
- Go to “Forms” in your WordPress dashboard and select “New Form.”
- Provide a title for your form and, if desired, add an optional description to provide more information about the form.
- Once you have entered the form details, click the “Create Form” button to proceed to the form editor.
- You can access a user-friendly drag-and-drop builder, various fields, and customization tools in the form editor. Use these features to design and structure your form according to your requirements.
You can drag and drop fields from the left-hand panel onto the form canvas, rearrange them as needed, and customize their settings to capture the desired information. The form editor provides various field types and customization options to cater to your specific form needs.
- As you make changes and add fields, the form preview on the right-hand side will reflect the updates in real-time, allowing you to visualize the form’s appearance.
- Once you have completed designing your form, click on the “Save Form” button to save your progress.

To add a Gravity Form to a WordPress page, follow these steps:
- Access your WordPress dashboard and go to “Pages.”
- Choose either “Add New” to create a new page or select an existing page where you want to add the form.
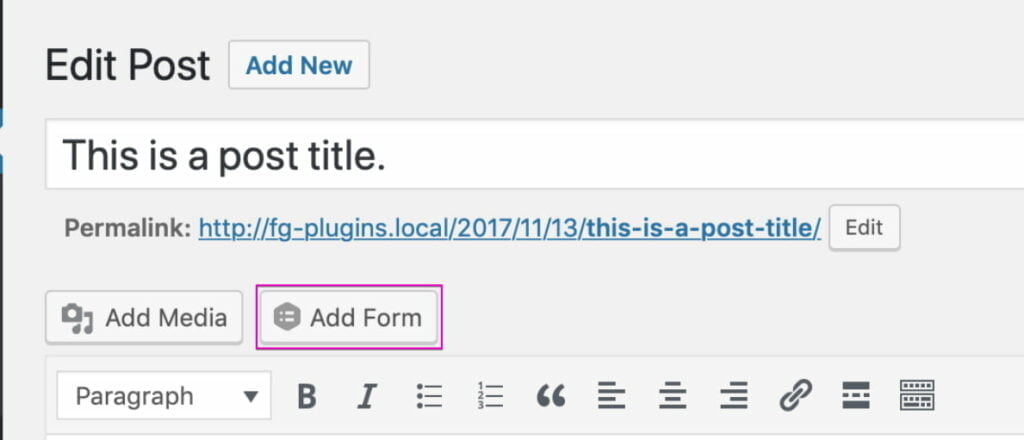
- In the page editor, locate the “Add Form” button above the visual editor. Click on it.
- A drop-down menu will appear, displaying a list of your created forms. Select the form from the drop-down menu to add to the page.
- After selecting the form, click on the “Insert Form” button.
The Gravity Form will now be inserted into your WordPress page. You can continue editing the page as needed; the form will be displayed where you inserted it.

Click “Update” and check how the new form appears on your web page.
Boost User Engagement with Gravity Forms
When it comes to building a trustworthy and effective WordPress website, incorporating forms is crucial. Investing in a top-notch plugin is highly recommended to ensure a seamless and pleasant user experience while collecting data.
Whether you require simple contact forms, email sign-ups, or even complex sales forms, Gravity Forms handles everything for your WordPress site.
By choosing Gravity Forms, you can instill trust in your visitors while effectively marketing to them. The flexibility and versatility of this plugin make it an invaluable tool for optimizing your data collection process.
Investing in a high-quality plugin like Gravity Forms will enhance your website’s functionality and user engagement.


