How to Make a WordPress Website
Table of Contents

WordPress is a powerful and versatile content management system allowing users to create and manage websites easily. It provides a user-friendly interface, customizable themes, and a wide range of plugins to enhance functionality. With WordPress, individuals and businesses can establish a professional online presence without requiring extensive technical expertise. WordPress offers a platform to showcase your ideas and engage with your audience effectively, whether you’re a blogger, an entrepreneur, or a small business owner. How to create a WordPress website from scratch, especially if you are not a coding guru? Let’s find it out in our step-by-step guide.
What is WordPress
WordPress is a world-known content management system CMS. It suits e-commerce website and blog development due to its user-friendly interface and customizable features.
There is an ongoing dispute on “Who is WordPress owned by?” In 2003, Matt Mullenweg and Mike Little created WordPress as a successor to b2/cafelog. The initial version laid the foundation for a powerful and versatile CMS. It has since evolved into a comprehensive platform supporting various website types beyond blogs.
Key Figures:
- Matt Mullenweg. Co-founder of WordPress and a prominent figure in the open-source community, playing a leading role in its development and direction through his involvement with Automattic and the WordPress Foundation.
- Mike Little. Co-founder of WordPress, with significant contributions to its early development, although not as actively involved in the community as Mullenweg.
Interesting Facts:
- Open Source. Released under the GNU General Public License (GPL), WordPress is free to use, modify, and distribute, contributing to its widespread adoption and vibrant community.
- Market Dominance. Powers over 40% of websites on the internet, showcasing its extensive usage.
- Extensibility. Offers a vast ecosystem of plugins and themes for customizing websites, appealing to beginners and experienced developers alike.
- Community. Known for its inclusive and collaborative nature, with contributors worldwide improving the platform and providing support.
- Multilingual. Available in numerous languages, making it accessible globally and aiding its traction in diverse regions and markets.
WordPress’s user-friendly features, extensive customization options, and robust community support have established it as a leading website-building and content management platform.
WrordPess.org vs. WordPress.com
Before deciding to create a WordPress website and add content, you must decide which platform to use.
WordPress.com and WordPress.org are popular options, but they cater to different websites.
- WordPress.com is a managed hosting platform and website builder that offers a user-friendly design, automatic backups, and technical support. However, you’ll need a premium package to access customizable features such as plugins.
- WordPress.org is a popular and free CMS that offers uncapped monetization possibilities, endless customization options, and plenty of resources for developers.
Let’s explore the difference in more detail.
1. Ease of Use
If your new website’s user-friendliness is a top priority, you might prefer WordPress.com. Creating a site on WordPress.com involves signing up for an account, choosing a website type, selecting a theme, and customizing details. For WordPress.org, you’ll need to purchase hosting and a domain name, then install the software on your hosting provider’s dashboard, which may have a steeper learning curve.
2. Ecommerce Sites
For online stores, WordPress.com requires a dedicated eCommerce package with specific features, while WordPress.org, being more affordable, includes access to multiple eCommerce plugins and allows integration with third-party payment providers, letting you launch a WordPress eCommerce website.
3. Monetization Opportunities
WordPress.org offers more freedom for monetization strategies, including affiliate links, membership websites, and advertising plugins. WordPress.com has restrictions on features like ecommerce capabilities and affiliate marketing, which require higher-tier plans.
4. Technical Support
WordPress.com provides varied technical support depending on your plan, while WordPress.org relies on documentation and support forums. Third-party companies can offer premium assistance.
5. Learning Web Development
WordPress.org is more suitable for developers, offering open-source software, extensive resources, and opportunities to create plugins and themes. WordPress.com has limited opportunities for developers.
6. Customization Possibilities
WordPress.org has thousands of plugin and theme options, allowing extensive customization. In contrast, WordPress.com restricts plugin usage and advanced design customization without higher-tier plans.
7. Pricing
WordPress.com offers multiple pricing options, while WordPress.org is free to use but requires independent hosting and domain name costs.
8. Security
Both platforms can be vulnerable to security threats, but WordPress.com automates updates for themes and plugins, whereas WordPress.org requires manual updates.
9. SEO
WordPress.org extensively controls SEO strategies with plugins like Yoast SEO and Google Analytics integration. WordPress.com has limited SEO options and requires higher-tier plans for advanced tools. Feel free to check out SEO steps for WordPress in our comprehensive guide.
How Much You Invest to Create a WordPress Website
When you build a website with WordPress, you can face a wide range of web design costs, depending on your requirements and objectives. Here are some general estimates on WordPress website pricing.
- Basic WordPress Website. Costs typically range from $100 to $600, covering a domain name, hosting, and a simple theme.
- WordPress Website with More Features. If you want additional features or a custom design, the cost may be between $600 and $2500.
- Custom WordPress Website. For a fully customized WordPress website, the cost can start at $10000 and go higher (depending on the scope of work, the type of website you create, and the team involved in your project).
- Ongoing Costs. Apart from initial setup expenses, ongoing costs like hosting, domain renewal, and premium plugins can range from $11 to $50 per month.
It’s important to note that these are estimates, and actual costs can vary based on website complexity, specific plugins and themes, and the rates of hired professionals. Defining your needs and budget before beginning a website project is always advisable.
Build a Website With WordPress
Let’s talk about building a WordPress website step-by-step. We’ll show you the most common example where anyone can launch their first website, even without coding skills. However, for a more advanced setup, you may need a WordPress website developer help.
1. Name of Your Website
Before you start creating a WordPress site, the first and most important step is to select a memorable and unique domain name. Your domain name, also known as your website name, is crucial for establishing your brand identity and is usually permanent, so choose wisely. To help you with this decision, here are some tips for choosing a domain name for your website and where to find cheap website hosting for WordPress.
Choosing the right domain name is essential for your WordPress website, as it represents your brand identity and influences how visitors perceive your site. Here are some guidelines for selecting a domain name:
- Memorability and Pronunciation: Opt for a name that is easy to remember and pronounce. This ensures that visitors can easily recall and share your website with others.
- Short and Concise: Keep your domain name short and concise to make it easier to type and remember. Avoid using long, complex names that are prone to typos.
- Avoid Hyphens and Numbers: Hyphens and numbers can make your domain name confusing and difficult to remember. Stick to letters only for a cleaner, more professional look.
Now, let’s explore the differences in various domain zones:
- .com: This is the most common and widely recognized domain extension, representing “commercial.” It’s suitable for all types of websites and is often preferred for its familiarity and credibility.
- .net: Originally intended for network-related websites, “.net” has become more versatile and is often used by businesses, organizations, and networking services.
- .us: This is the country code top-level domain (ccTLD) for the United States. It’s typically used by businesses, organizations, and individuals based in the U.S. to indicate their geographical location.
When determining which domain zone to choose, consider the following factors:
- Purpose of Your Website. Determine the primary purpose of your website (e.g., commercial, informational, personal) and choose a domain extension that aligns with it.
- Target Audience. Consider your target audience and geographical location. If your audience is primarily based in the United States, a “.us” domain may be suitable.
- Brand Identity. Choose a domain name and extension that reflect your brand identity and are memorable to your audience.
Now, let’s take a quick look at some top domain name service providers that you can consider:
- Domain.com
- Bluehost
- Namecheap
For example, if you decide to purchase a domain name from ‘Domain.com’, you can navigate to the domain search area, enter your desired name, and if it’s available, add it to your cart and complete the purchase.
Now that you understand the basics of choosing a domain name and the differences in domain zones, you can register your domain with a reputable domain name service provider such as Domain.com, Bluehost, or Namecheap. Search for your desired domain name, check its availability, and complete the purchase process to secure your website’s online identity.
Consider exploring the Fully Managed Client Hosting options provided by IT Monks. Opting for our hosting platform allows you to say goodbye to concerns regarding website maintenance. Our fully managed hosting packages remove the necessity of acquiring hosting knowledge or performing associated tasks. We deliver:
- Rapid SEO Cloud Hosting
- Secure Double Offsite Backups
- Protected Ubuntu Servers
- A 99.999% Uptime Assurance
By choosing our best website hosting for WordPress, you gain access to premium themes, plugins, and features as part of the inclusive package.
IT Monks presents three subscription plans, enabling you to choose the one that best suits your needs and budget.
2. Hosting
Web hosting is a service that allows individuals and organizations to make their websites accessible online. It provides the storage, computing power, and network infrastructure to keep a website running smoothly. Here’s why you need web hosting:
- Storage. Web hosting provides server space to store all the files and data that make up your website, including text, images, videos, and code.
- Accessibility. Hosting ensures that your website is accessible to visitors around the clock, allowing them to view your content and interact with your site’s features anytime.
- Performance. A reliable hosting service can improve your website’s performance by ensuring fast loading times and minimal downtime, crucial for user experience and search engine rankings.
Now, let’s highlight three of the most famous web hosting providers:
- Bluehost: As an official partner of WordPress, Bluehost offers a range of hosting plans tailored specifically for WordPress websites. They provide sophisticated web management tools, regular automatic updates, and support from their professional expert support team.
- HostGator: HostGator is known for its cost-effective yet powerful managed hosting plans for WordPress. They offer unlimited email addresses, fast and secure hosting, and affordable pricing options.
- Kinsta: Kinsta is a premium managed WordPress hosting provider suitable for users who prioritize ease of use and performance. While some packages may be priced higher, Kinsta offers user-friendly management tools and powerful hosting features.
When choosing the right hosting provider, consider the following factors:
- Performance: Look for a hosting provider with fast loading times, minimal downtime, and reliable performance.
- Scalability: Choose a hosting plan that can accommodate your website’s growth and scalability needs, allowing you to upgrade as your traffic increases easily.
- Support: Ensure the hosting provider offers reliable customer support, including responsive assistance via live chat, email, or phone.
- Features: Consider the features offered by the hosting provider, such as security measures, backup options, and ease of use for managing your website.
Now, let’s walk through the process of registering with Bluehost with step-by-step instructions.
Visit the Bluehost website and click on the “Get Started” button.
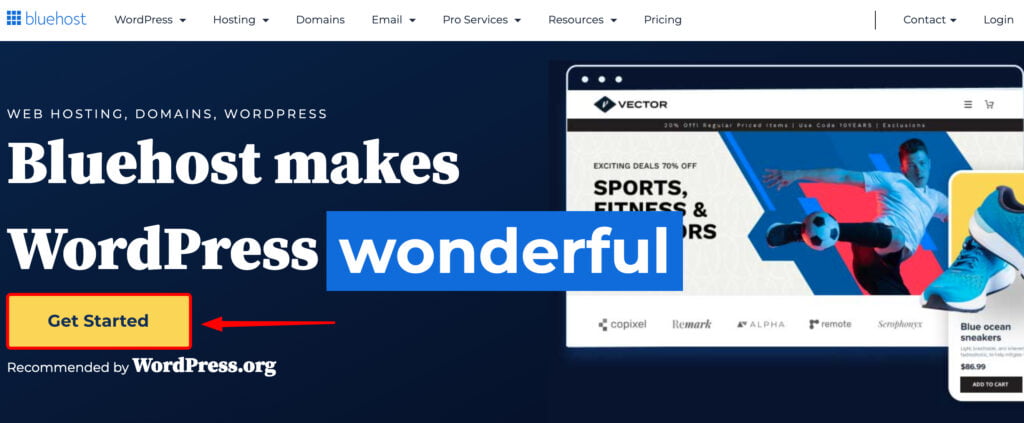
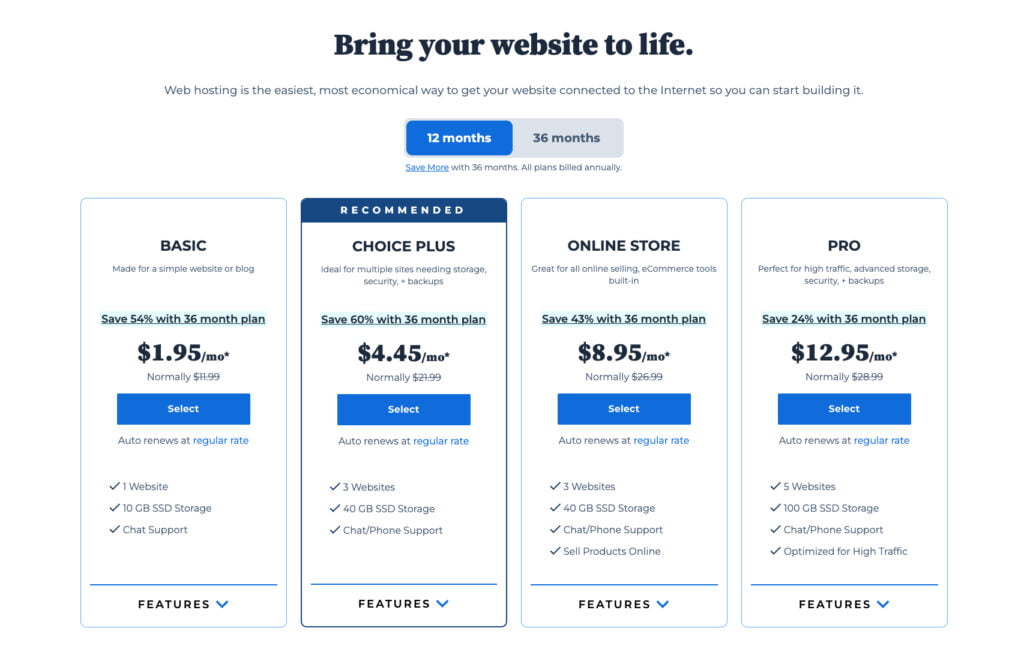
Select a hosting plan that best suits your WordPress website cost expectations.
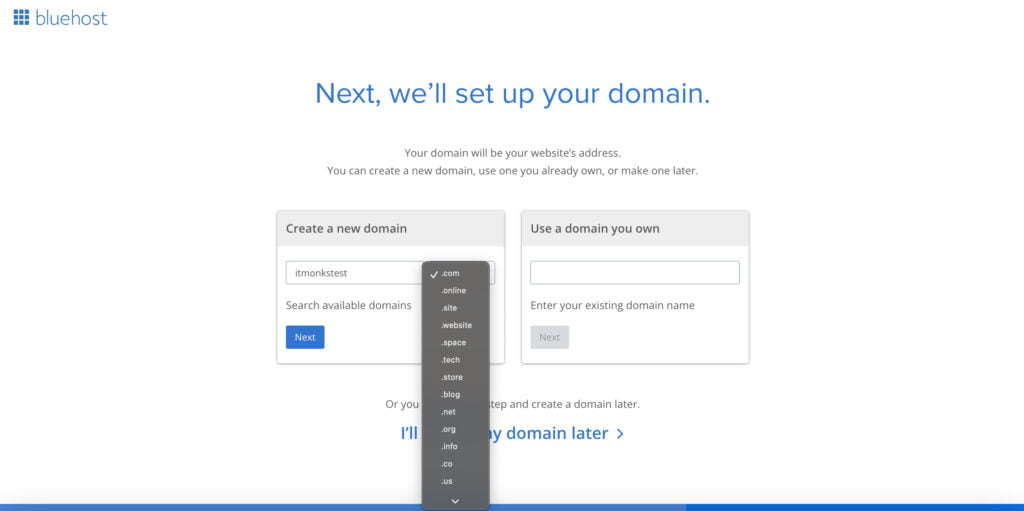
Enter your chosen domain name or register a new one with Bluehost. You can also choose a free WordPress website domain name with Bluehost later.
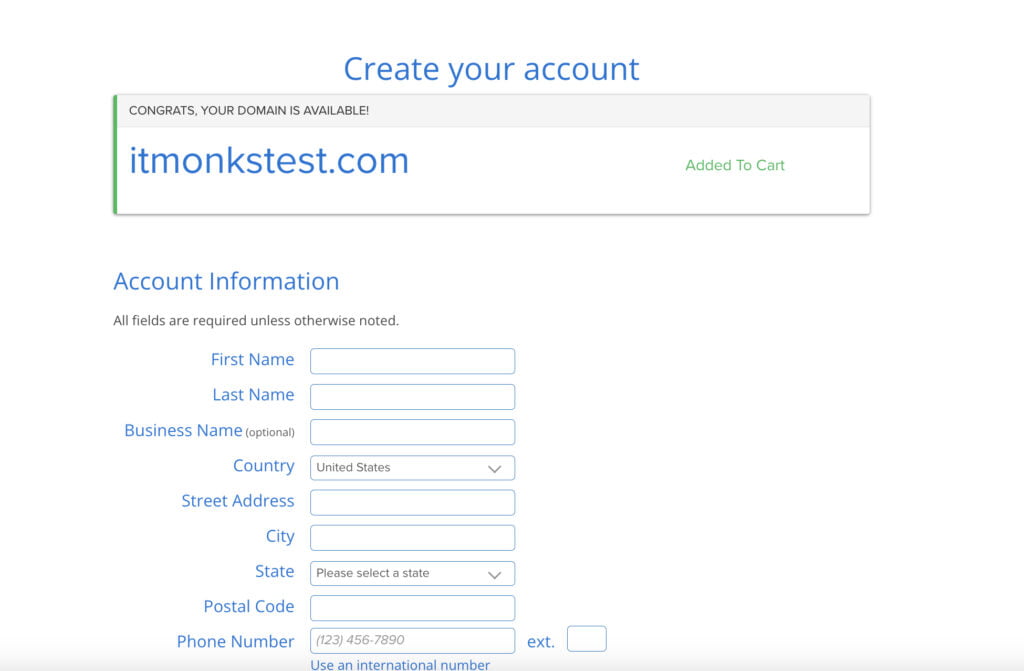
Fill out your account and payment information to complete the registration process.
Once your account is set up, you’ll receive login credentials and access to your hosting dashboard.
You can manage your website files from your hosting dashboard, install WordPress, and access customer support if needed.
3. WordPress Set Up
Setting up WordPress can be done in various ways, and we’ll walk you through two common methods: using a hosting provider’s one-click installation (such as Bluehost) and setting up WordPress manually using FTP.
Setting up WordPress on Bluehost (One-click Installation)
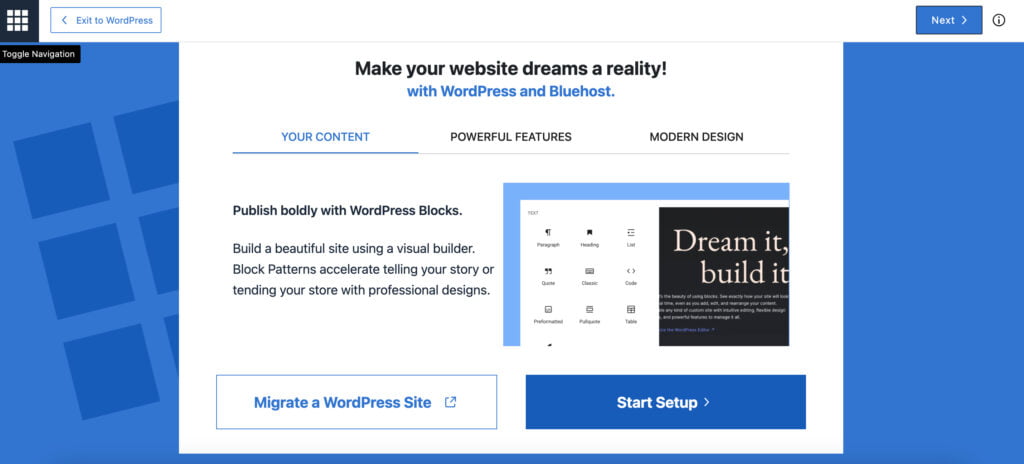
After purchasing a hosting plan, you’ll be asked whether you want to migrate your website or start a setup. We’ll choose the “Start Setup” option.
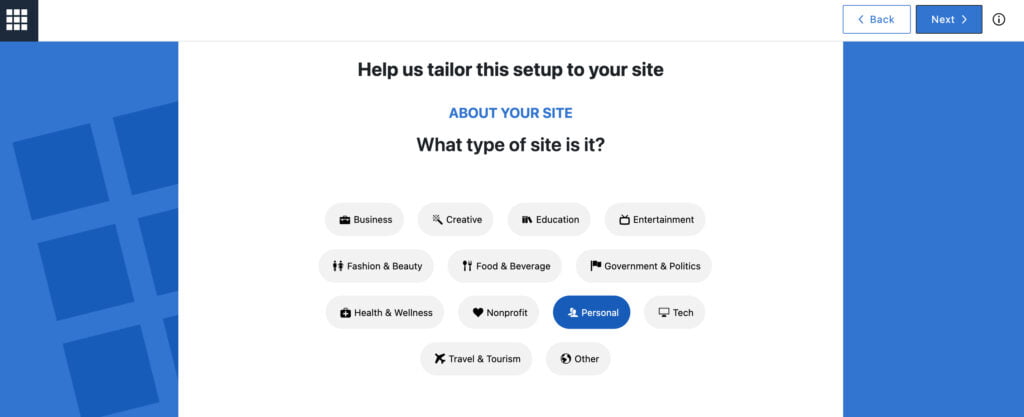
Once you click the respective button, you’ll be asked to pass a quick questionnaire. You’ll be asked about your experience with WP and what website type you’d like to create.
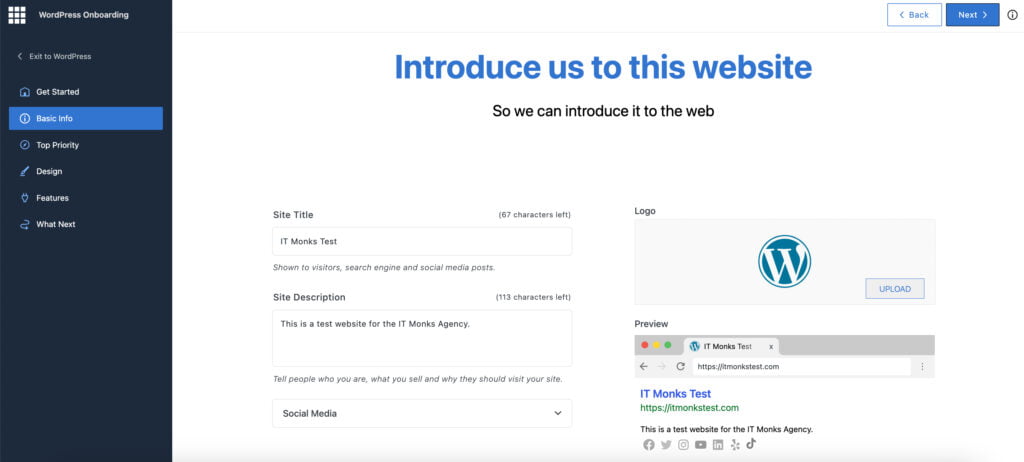
Fill in the basic information about your project (you can skip this step and get back to it later if you wish).
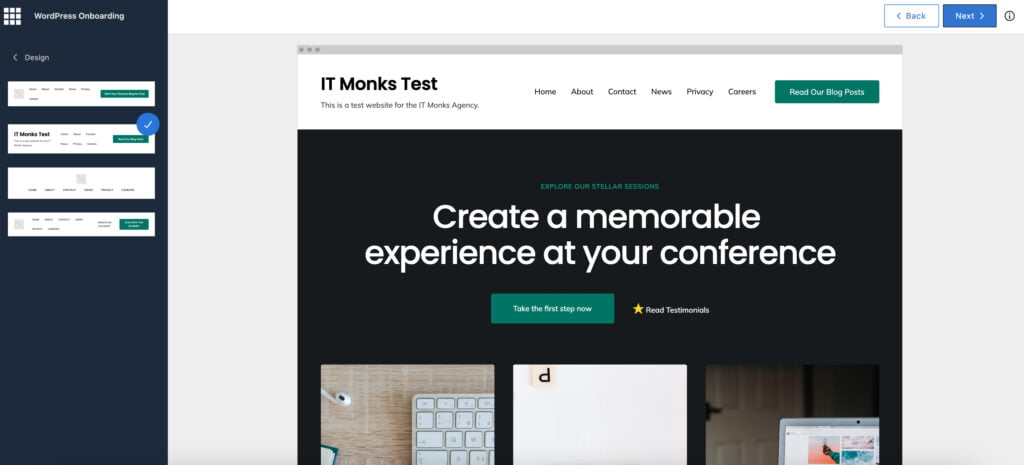
To complete onboarding, you’ll be asked to choose any pre-designed themes or pick a custom one (included in the Bluehost package), homepage layouts, and inner page layouts.
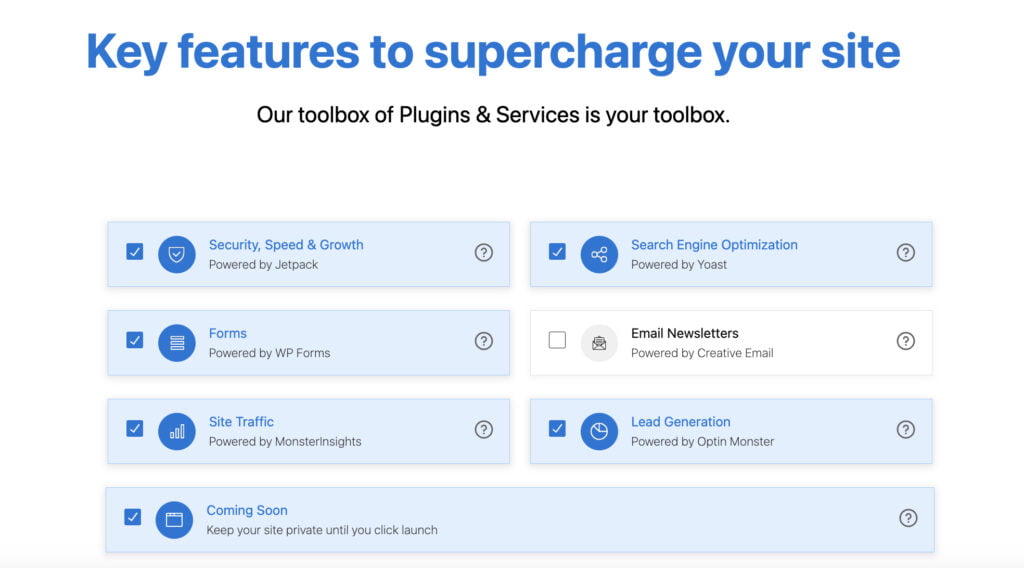
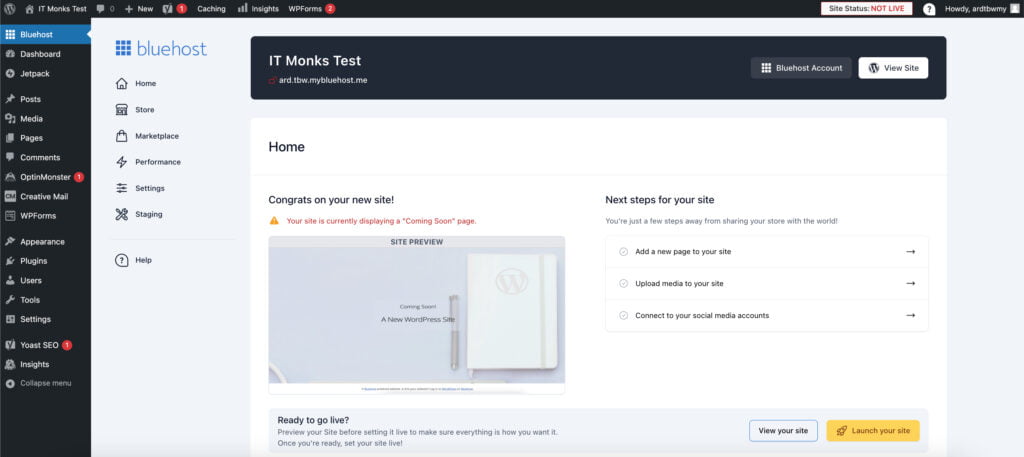
Additionally, Bluehost provides a set of key features to supercharge your site. You can also pick the “Coming Soon” feature, which keeps your site private until you click launch.
Click the “Install” button to start the installation process. Bluehost will automatically install WordPress on your selected domain. Wait for the installation to complete.
Setting up WordPress Manually with FTP
- Download WordPress: Visit wordpress.org and download WordPress’s latest version.
- Extract Files: Extract the downloaded WordPress zip file to your computer.
- Create Database: Log in to your hosting control panel and create a new MySQL database for your WordPress installation. Note down the database name, username, and password.
- Edit wp-config.php: In the extracted WordPress folder, find the wp-config-sample.php file and rename it to wp-config.php. Open the wp-config.php file in a text editor and enter your database information (name, username, password).
- Upload Files via FTP: Connect to your web server using an FTP client (such as FileZilla). Upload the entire WordPress folder (including all files and directories) to your desired location on the server (usually the public_html directory).
- Run WordPress Installer: Once the files are uploaded, visit your website’s URL in a web browser. You’ll see the WordPress installation page. Select your language and click on the “Let’s go!” button.
- Enter Database Information: Enter the database information you created earlier (database name, username, password) and click on the “Submit” button.
- Run Installation: WordPress will verify your database information. If everything is correct, click on the “Run the installation” button.
- Enter Site Details: Enter your site title, username, password, and email address. You can also choose whether to discourage search engines from indexing your site during installation.
- Click Install: Click the “Install WordPress” button to complete the installation process.
- Login to WordPress Admin: You’ll receive a success message once the installation is complete. Click the “Log in” button to access your WordPress admin dashboard.
- Begin Customizing: You’re now ready to customize your WordPress site manually! You can choose a theme, add plugins, and create content to make your website your own.
4. WordPress Theme
Choosing the best WordPress website themes is crucial as it affects your site’s appearance and functionality. Here’s a guide to help you choose a WordPress template for your website, along with steps to set it up. Whether you choose free WordPress website templates or a custom WordPress website, the following steps should help with your WordPress website management.
How to Choose a Theme
- Identify Your Needs: Consider the purpose of your website and the features you require. Are you creating a blog, portfolio, business site, or online store? Choose WordPress website templates that align with your goals.
- Design and Layout: Look for a theme with a design and layout that suits your brand and content. Pay attention to factors like color schemes, typography, and page templates. Ensure they will match your ideal WordPress website design.
- Responsiveness: Ensure that the theme is responsive, meaning it adapts to different screen sizes and devices. This is crucial for providing a consistent user experience across desktops, tablets, and smartphones.
- Customization Options: Choose a theme with built-in customization options or compatibility with page builders like Elementor or WPBakery. This allows you to personalize your site without needing coding skills.
- SEO-Friendly: Opt for a theme that is optimized for search engines to help improve your site’s visibility and rankings.
- Support and Updates: Select a theme from a reputable developer or marketplace that offers regular updates and reliable support in case you encounter any issues.
Types of Themes Available
- Multipurpose Themes: Versatile themes designed to suit various website types and industries.
- Niche-Specific Themes: Themes tailored for specific niches like photography, e-commerce, blogging, etc.
- Page Builder Compatible Themes: Themes optimized for use with popular page builders for easy customization.
Popular Themes:
Here are some of the most popular WordPress themes:
- Astra: A lightweight and customizable theme suitable for various website types.
- Divi: A powerful theme with a built-in drag-and-drop page builder, offering endless design possibilities.
- OceanWP: A flexible and feature-rich theme with a focus on speed and performance.
Considerations Before Selecting a Theme:
- Performance: Choose a theme optimized for speed and performance to ensure fast loading times and a smooth user experience.
- Compatibility: Ensure that the theme is compatible with the latest version of WordPress and popular plugins you plan to use.
- Reviews and Ratings: Check reviews and ratings from other users to gauge the theme’s quality and reliability.
- Demo and Documentation: Review the theme’s demo to see how it looks and functions. Also, check if comprehensive documentation and support resources are available.
How to Set Up the Theme
After installing the theme, go to your WordPress dashboard and navigate to Appearance > Themes.
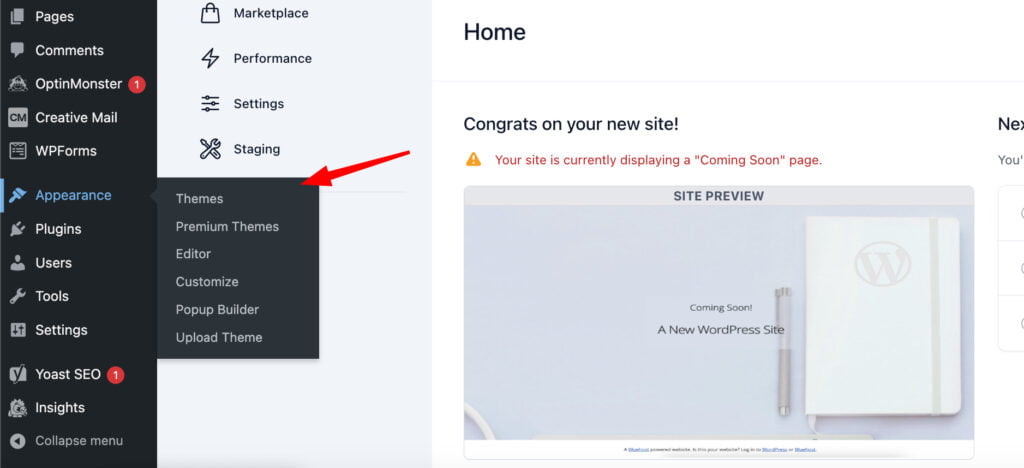
Find your desired theme from the list of installed themes and click on the “Activate” button.

Depending on the theme, you may have customization options available within the WordPress Customizer. Navigate to Appearance > Customize to access these settings.
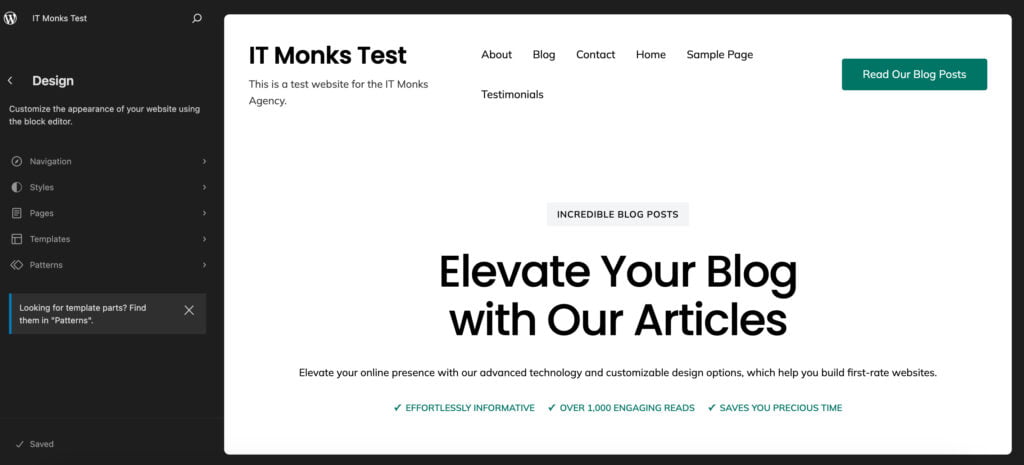
Some themes offer demo content that you can import to replicate the theme’s demo layout. Look for theme-specific documentation on how to import demo content if available.
Use additional customization options the theme or page builder provides to personalize your site further.
Preview your changes before publishing to ensure everything looks as desired.
5. Page Set Up
Following these step-by-step instructions, you can set up pages, configure meta tags, and create a linking menu for your WordPress website, ensuring an organized and optimized user experience.
To set up a new page, take the following steps:
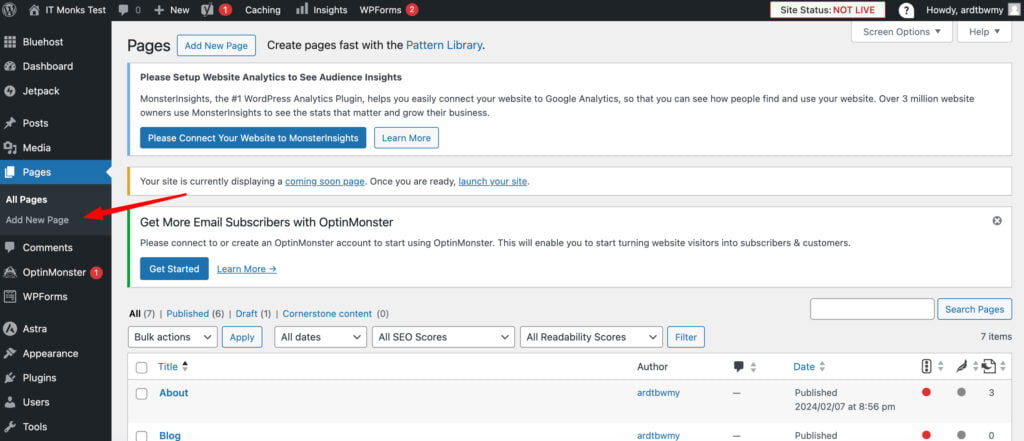
In the left sidebar of the WordPress dashboard, hover over “Pages” and click on “Add New.”
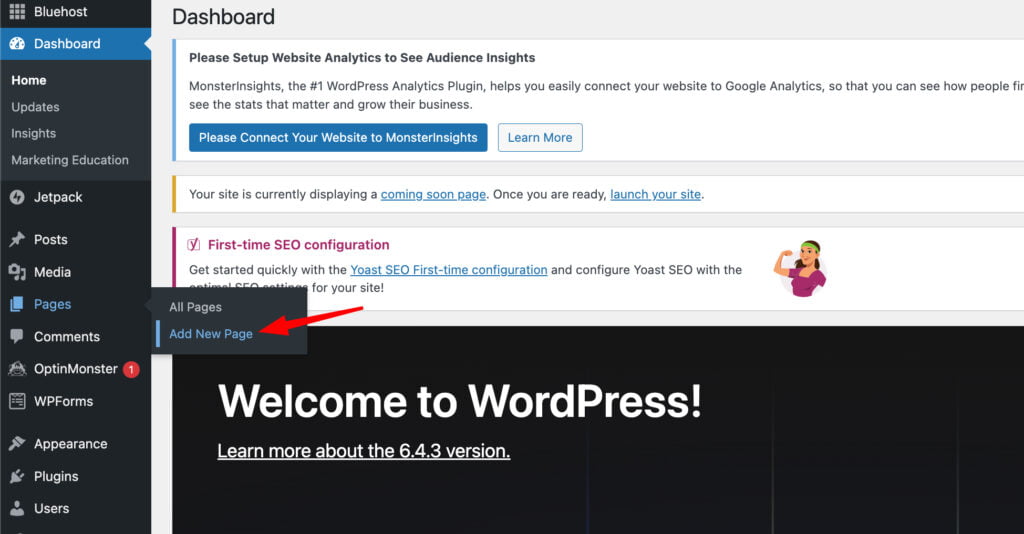
Enter a title for your homepage (e.g., “Home”) and add any desired content using the visual editor.
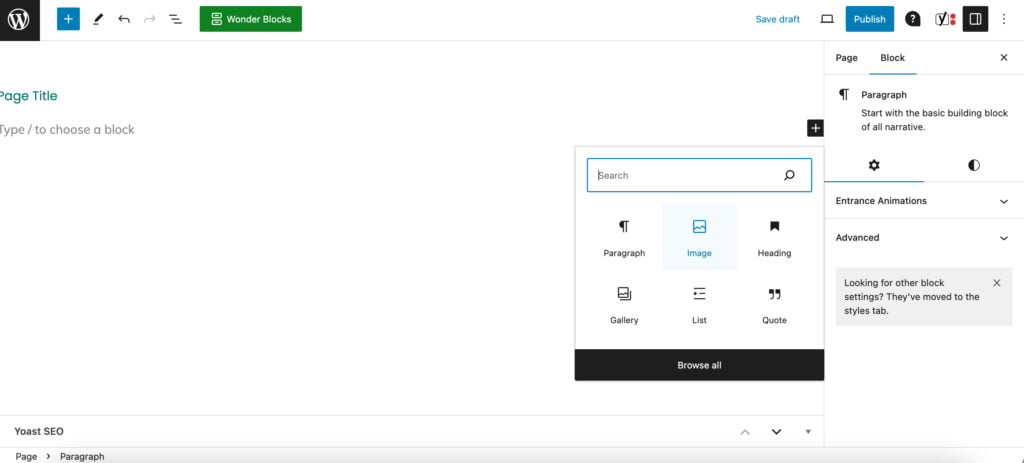
Once your page is ready, click on the “Publish” button to make it live.
Follow the same process to create other important pages such as Blog, Contact, About Us, etc., by clicking on “Add New” under “Pages” and entering the respective titles and content.
Configuring Meta Tags (Title, Description)
Install and activate the Yoast SEO plugin from the WordPress repository if you haven’t already. In our case, Bluhost did all the job for us and installed the Yoast SEO plugin (free) by default.
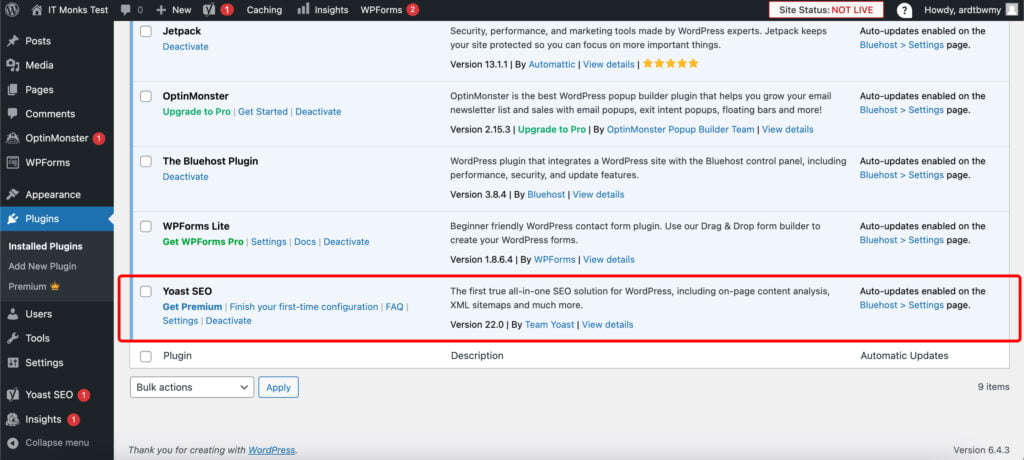
Go to the page you want to configure meta tags for (e.g., Homepage).
Below the visual editor, you’ll find the Yoast SEO section. Click on the “Edit Snippet” button.
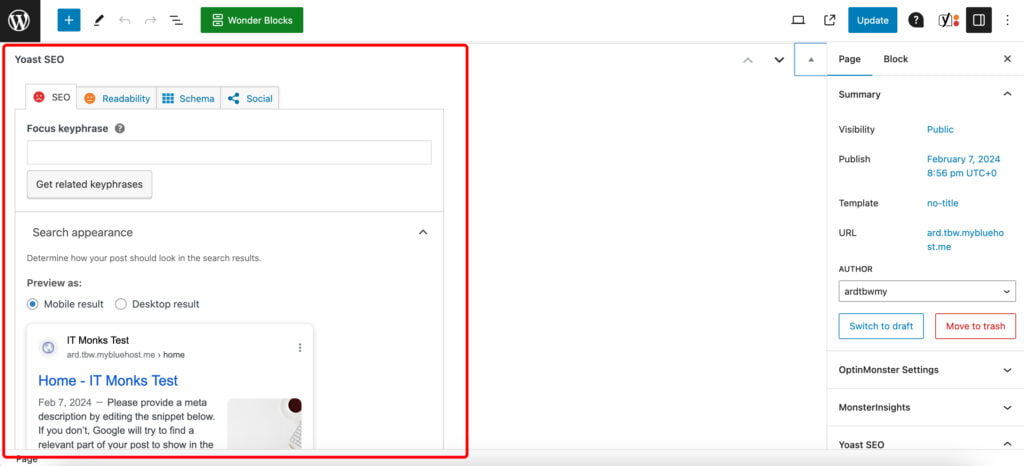
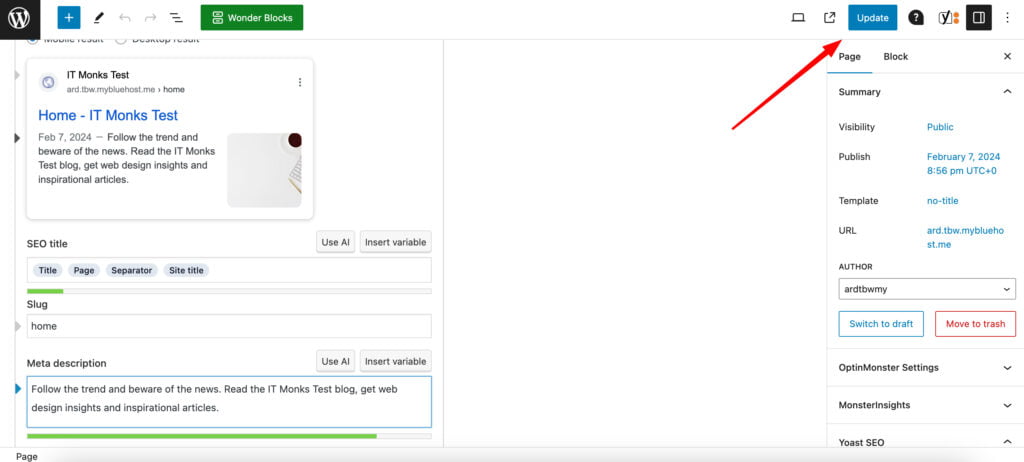
In the snippet editor, you can modify the title and meta description for the page. Make sure to include relevant keywords and compelling descriptions.
Yoast SEO previews how your page will appear in search engine results. Review the preview to ensure it looks optimized.
Once you’re satisfied with the title and description, click on the “Update” button to save your changes.
Creating a Linking Menu
In the WordPress admin page, go to Appearance > Menus.
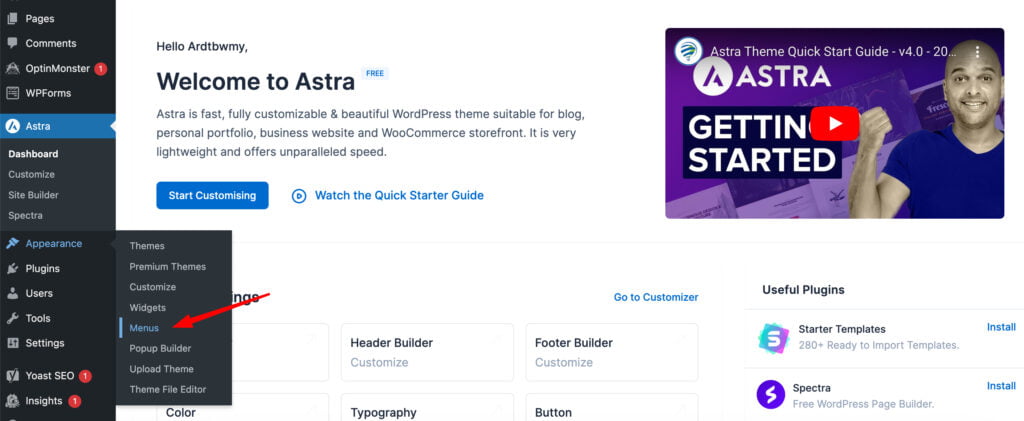
If you haven’t created a menu, click the “Create a new menu” link.
On the left side, you’ll see a list of available pages. Check the boxes next to the pages you want to add to your menu and click on the “Add to Menu” button.
Drag and drop the menu items to arrange them in the desired order. You can also create submenus by dragging items below and slightly to the right of the parent menu item.
Depending on your theme, you may have additional menu settings available. Configure these settings as desired.
In the “Menu Settings” section, select the menu location where you want the menu to appear (e.g., Primary Menu, Footer Menu).
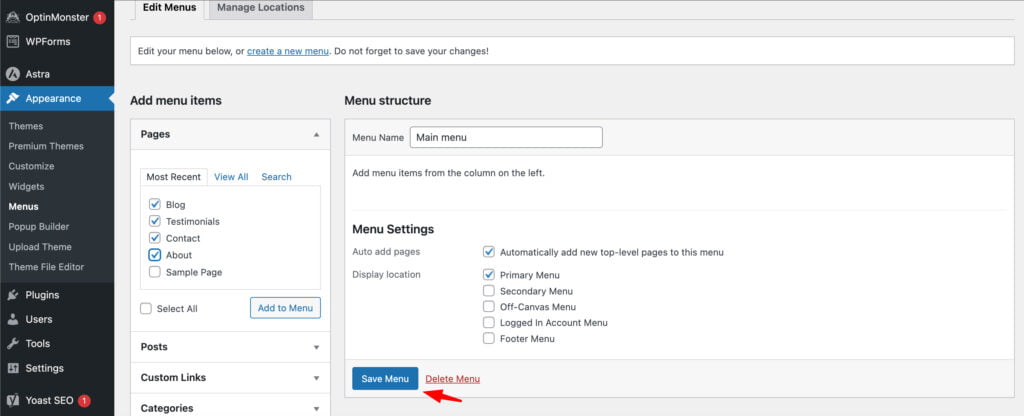
Once you’ve finished configuring your menu, click on the “Save Menu” button to save your changes.
6. Adding the Content
Following these step-by-step instructions, you can add content, including text, images, and videos, to your WordPress website’s pages and blog posts. This allows you to create engaging and informative content for your visitors.
In WordPress, you can add content to posts and pages. Consider the difference:
- Pages are static, standalone content typically used for permanent information such as About Us, Contact, Services, etc. They are hierarchical and can have sub-pages.
- Blog posts are dynamic, time-sensitive entries displayed in reverse chronological order on your blog page. They are used for publishing regular updates, articles, news, etc.
Adding Content to a Page
Go to Pages > All Pages in your WordPress dashboard and click on the page you want to edit.
Use the visual editor to enter text directly into the page. Format the text using the toolbar options (bold, italic, etc.).
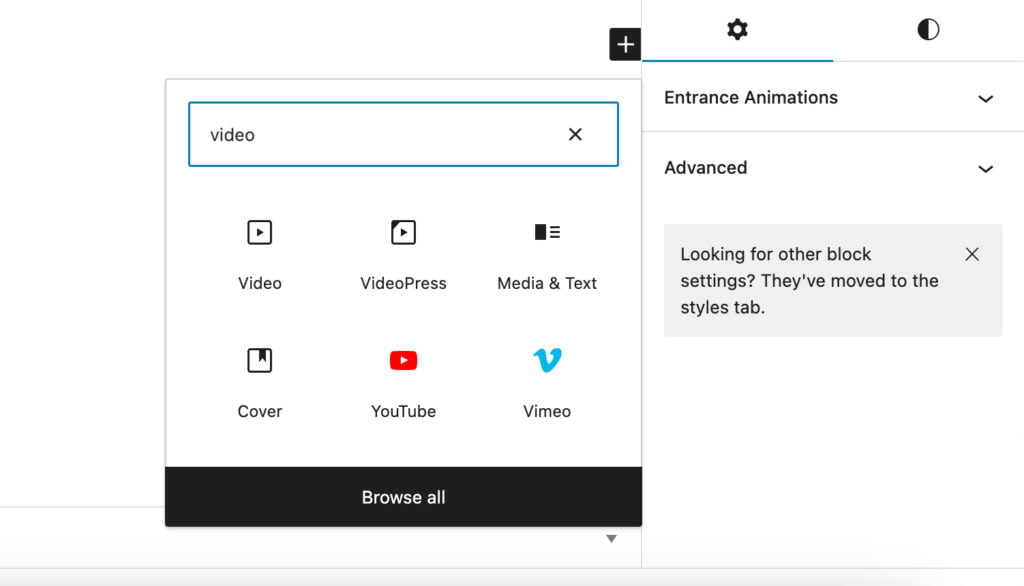
Click on the (+) icon to add a new block, then select “Image” block. Upload an image from your computer or choose from the media library.
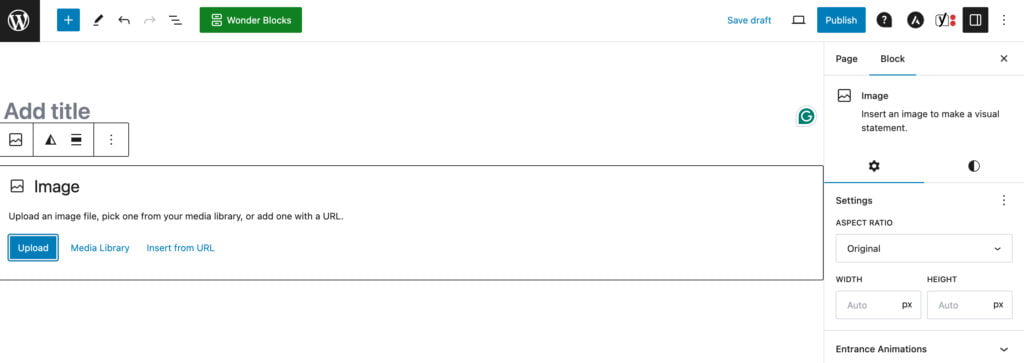
To embed a video, add a new block and select the “Video” block. Enter the video URL from YouTube, Vimeo, or other supported platforms.
Drag and drop blocks to rearrange the content as desired.
Once you’re satisfied with the content, click the “Publish” button to make the changes live.
Adding Content to a Blog Post

- Go to Posts > All Posts and click on “Add New” to create a new blog post.
- Like pages, use the visual editor to enter text into the post. Format the text using the toolbar options.
- Click on the (+) icon to add a new block, then select “Image” block. Upload an image or choose from the media library.
- To embed a video, add a new block and select the “Video” block. Enter the video URL.
- Set a featured image for the post, which will appear as the main image when the post is displayed.
- Categorize your post by selecting relevant categories and adding tags for better organization and discoverability.
- Once you’ve added content, click on the “Publish” button to publish the blog post.
7. WordPress Plugins
WordPress plugins are pieces of software that can be added to your WordPress website to extend its functionality or add new features. They are designed to enhance your site’s capabilities without requiring you to write custom code.
Uses of WordPress Plugins
- Enhancing Website Functionality: The best WordPress plugins for bloggers can add new features such as contact forms, social media integration, SEO optimization, etc.
- Improving Performance: Some plugins help improve website performance by caching, optimizing images, and minimizing code.
- Enhancing Security: Security plugins can help protect your website from malware, brute-force attacks, and other security threats.
- Managing Content: Content management plugins allow you to create custom post types, manage media files, and schedule content updates.
Free vs. Paid Plugins
- Free Plugins: These plugins are free in the WordPress plugin repository. The community develops them and can be installed directly from your WordPress dashboard.
- Paid Plugins: Paid plugins typically offer more advanced features, premium support, and regular updates. They are purchased from third-party developers or marketplaces.
Where to Find Plugins
You can find plugins directly from your WordPress dashboard or by visiting the official WordPress plugin repository at wordpress.org/plugins. Additionally, many premium plugins are available from third-party marketplaces like CodeCanyon, ThemeForest, and WooCommerce.
How to Install Plugins
In your WordPress dashboard, go to Plugins > Add New.
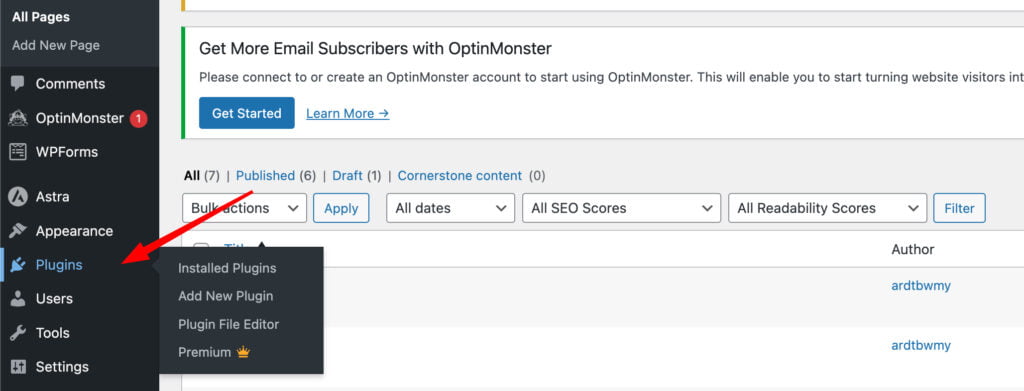
Use the search bar to find plugins by keyword, or browse through the featured, popular, or recommended plugins.
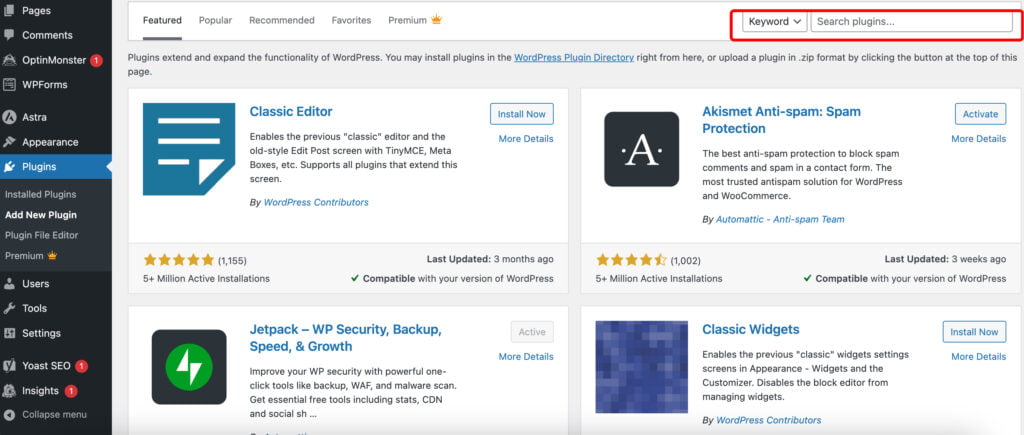
Click the “Install Now” button next to the plugin you want to install.
Once the installation is complete, click on the “Activate” button to activate the plugin on your website.

Some plugins may require you to configure settings or enter license keys after activation. Follow the plugin’s documentation for setup instructions.
Regularly check for plugin updates and install them to ensure compatibility and security.
Essential Plugins
Here’s a list of essential plugins categorized based on their purpose:
- Security:
- Wordfence Security
- Sucuri Security
- SEO:
- Yoast SEO
- Rank Math
- Performance:
- WP Rocket
- W3 Total Cache
- Backup:
- UpdraftPlus
- BackupBuddy
- Contact Form:
- Contact Form 7
- WPForms
- E-commerce:
- WooCommerce
- Easy Digital Downloads
- Social Media:
- Social Icons
- Jetpack by WordPress.com
By installing these essential plugins, you can improve the security, SEO, performance, and functionality of your WordPress website, providing a better experience for your visitors.
8. SEO for WordPress Website
SEO (Search Engine Optimization) for WordPress refers to optimizing your WordPress website to improve its visibility and ranking in search engine results pages (SERPs). It involves various strategies and techniques to make your site more accessible and appealing to search engines like Google, Bing, and Yahoo.
SEO is crucial for several reasons:
- Increased Visibility: Higher rankings in search engine results can lead to increased visibility and traffic to your website.
- Better User Experience: SEO practices improve the usability and user experience of your website, making it easier for visitors to find what they’re looking for.
- Credibility and Trust: Websites that appear at the top of search engine results are often perceived as more trustworthy and credible by users.
- Cost-Effective Marketing: Compared to paid advertising, SEO is a cost-effective way to attract organic traffic to your website over the long term.
Basic Recommendations for SEO:
- Title and H1 Heading: Ensure that each page has a unique and descriptive title tag. Additionally, each page should have only one H1 heading, which should accurately reflect the page’s content.
- Noindex Tag and Robots.txt: Important pages on your website should not be marked with a noindex tag, as this tells search engines not to index the page. Similarly, ensure that important pages are not blocked for scanning in robots.txt, as this can prevent them from appearing in search results.
- Optimize Images: Images on your website should be optimized for performance by reducing their file size. Aim for images to be under 150 KB in size while maintaining good quality. Additionally, all images should have descriptive alt text to improve accessibility and help search engines understand the image’s content.
- Core Web Vitals: Core Web Vitals are a set of metrics that measure the user experience of a website, including factors like loading speed, interactivity, and visual stability. Aim to improve your website’s Core Web Vitals by optimizing loading times, reducing page elements that shift during loading, and ensuring smooth interaction with page elements.
Master WordPress
While the guide above provides a basic example of creating a WordPress website, it’s important to note that WordPress offers many possibilities for website creation. WordPress can accommodate various types of websites from simple blogs to complex e-commerce sites and everything in between. Here’s a brief list outlining some types of websites that can be created on WordPress:
- Blog: Create a personal or professional blog to share your thoughts, experiences, and expertise with the world.
- E-commerce Store: Set up an online store to sell products or services, with features like product listings, shopping carts, and secure payment gateways.
- Portfolio: Showcase your work, projects, or creative endeavors in a visually appealing portfolio website.
- Podcast Site: Share and promote your podcast episodes, along with show notes, transcripts, and other related content.
- Multilingual Site: Reach a global audience by creating a multilingual website with content available in multiple languages.
- Review Site: Share reviews and recommendations for products, services, restaurants, movies, books, etc.
- Job Board: Create a platform for employers to post job listings and for job seekers to search and apply for positions.
- Membership Site: Offer exclusive content, resources, or services to members who subscribe or pay for access.
- Educational Site: Create an online course platform or resource hub with lessons, quizzes, and interactive learning materials.
- Community or Forum: Build a community-driven website where users can interact, share ideas, ask questions, and participate in discussions.
- Real Estate Listings: Showcase properties for sale or rent, with detailed listings, search filters, and interactive maps.
- Nonprofit or Charity Site: Raise awareness and funds for a cause by creating a website to share your mission, impact stories, and donation opportunities.
- Event Management: Promote and manage events such as conferences, workshops, concerts, and fundraisers, with features like event calendars, ticket sales, and RSVP forms.
- Portfolio: Showcase your work, projects, or creative endeavors in a visually appealing portfolio website.
- Photography Site: Display your photography portfolio, with galleries, slideshows, and image optimization features.
With WordPress’s flexibility and extensive ecosystem of themes, plugins, and customization options, the possibilities for website creation are virtually endless. WordPress empowers you to bring your vision to life online whether you’re a blogger, entrepreneur, freelancer, or organization.
FAQ
- What is a WordPress website?
A WordPress website is a website built using the WordPress platform, which is a popular content management system (CMS). It allows users to easily create and manage websites, offering a wide range of themes, plugins, and customization options.
- How to edit a WordPress website?
To edit a WordPress website, log in to the WordPress admin dashboard, navigate to the page or post you want to edit, and click on the u0022Editu0022 button. This will open the page or post in the WordPress editor, where you can change the content, formatting, and layout.
- How to start a WordPress blog website?
First, purchase a domain name and hosting plan to start a WordPress blog website. Install WordPress on your hosting server, choose a blog-friendly theme, and create content by writing blog posts. Customize your blog’s appearance and functionality using themes and plugins to suit your preferences.
- Is the WordPress website really free?
WordPress itself is free to use, but you’ll need to purchase a domain name and hosting plan to get your website online. While there are free themes and plugins available, premium themes and plugins may incur additional costs. Additionally, there may be other expenses such as web design services or premium features.
- How can I make money from my website?
There are several ways to make money from a WordPress website, including:rnu003culu003ern tu003cliu003eSelling products or servicesu003c/liu003ern tu003cliu003eDisplaying advertisementsu003c/liu003ern tu003cliu003eAffiliate marketingu003c/liu003ern tu003cliu003eOffering memberships or subscriptionsu003c/liu003ern tu003cliu003eProviding sponsored content or reviewsu003c/liu003ern tu003cliu003eOffering consulting or coaching servicesu003c/liu003ernu003c/ulu003e
- Do I need to know any programming languages to create a WordPress website?
No, you don’t need to know any programming languages to create a WordPress website. WordPress offers a user-friendly interface and intuitive tools for website creation and management, allowing users to build websites without any coding knowledge. However, having basic HTML, CSS, and PHP knowledge can be beneficial for customizing your website further.
Contact
Don't like forms?
Shoot us an email at [email protected]

