Guidelines on How to Delete WordPress Website

Table of Contents
There are many reasons why you may come up with the idea of bringing your WordPress blog to an end. You might decide to launch a different project or go offline and spend some time without the need to worry about your content lingering around the web. Whatever the reason is, in this blog post, we will discuss how to delete WordPress website with easy step-by-step instructions.
Please note that deleting your blog doesn’t guarantee that its content will no longer be accessible from third-party archives before we move further to the guidelines. People won’t be able to reach your site’s URL address. However, the content that you once shared on your blog pages may still be reachable somewhere online.
Depending on how you are using WordPress, there are different approaches to deleting your blog. Generally speaking, there are two major types of WordPress blogs:
- Blogs that are hosted at wordpress.com;
- Self-hosted blogs that run on the server of your own choice.
Our goal is to give you quick and easy-to-follow instructions on deleting your WordPress blog regardless of how you use it. Let’s begin with the guidelines on how to delete a blog running on WordPress.org.
How to Delete WordPress Website
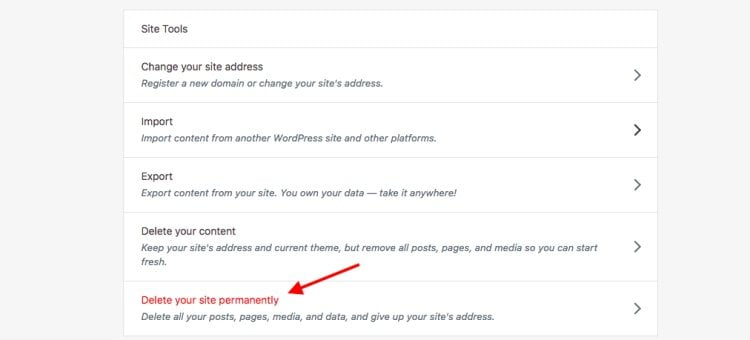
To begin deleting your blog, you need to log into your WordPress.com hosting account. Once you are there, scroll down to the bottom of the page. On the left-hand side, find the Settings tab and click on it to be taken to your WordPress blog’s settings panel.
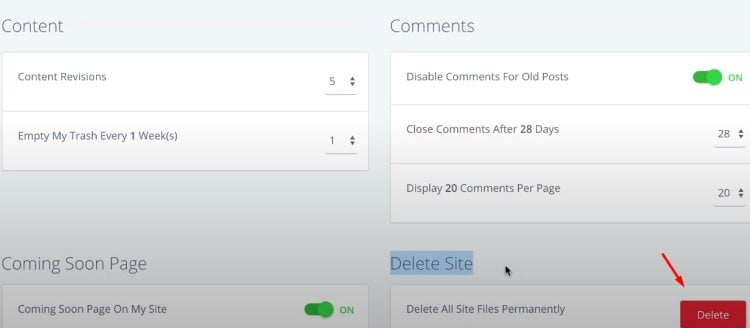
As soon as the Settings page loads, scroll to the bottom of the page and find the “Delete your site permanently” option. Click it to initiate the process of deleting your WordPress site.
Once you select this option, the website won’t delete immediately. You will need to take a few more steps to delete it.
One of your WordPress admin areas’ optional steps will ask you to take is to Export Content. You may export or skip this step. We would recommend you to take advantage of this option and export your data. It will make a .zip file of all your posts, pages, and site settings. Once you decide to re-create your WordPress blog, these files will come in handy to you. Simply import them to your new WordPress site, and you’ll be ready to go.
When you decide to export content, you will see two options: export content and media library. First things first. Begin with the export of your content, which includes blog posts, pages, and other available sections on your website. To begin the process, click “Export All.” You will receive an email with a download link that you can use to export your site’s data.

Besides the blog posts and the content of your pages, your WordPress blog also features media files that are hosted on WordPress. Before deleting your WordPress blog, you can also download media files to your computer.
Once you export all the needed files, click “Back” to resume deleting your WordPress blog. When the previous page loads, scroll down to its bottom and find the “Delete Site” button. Click on it to initiate the final process of deleting your WordPress blog. On the right-hand side of the page, you will see a list of files that will be permanently removed from your site, which includes Posts, Pages, Media, Users & Authors, Domains, Purchased Upgrades, and Premium Themes.
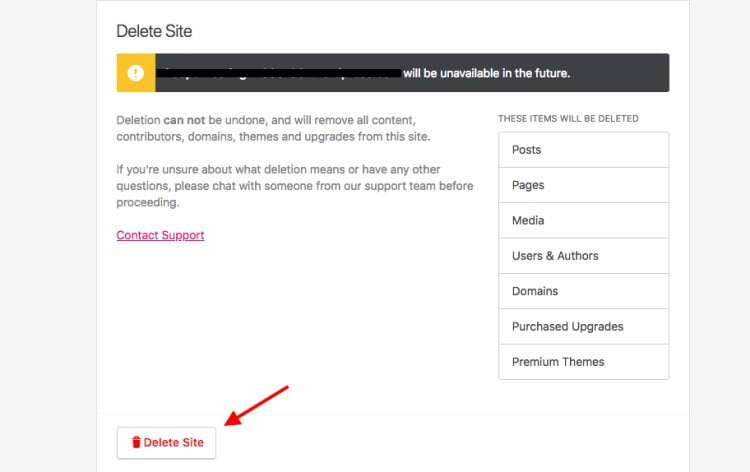
To ensure that you are not deleting your website by mistake, you will be asked to type in the entire URL of your WordPress blog to proceed with its removal.
After you enter the correct URL address of your site, the “Delete the Site” button will transform to red from grey. Clicking on it, you will initiate the final stage of removing your WordPress blog. There’s no going back. Along with your WordPress site’s content, you will lose access to your WordPress site’s URL.

Besides deleting your website permanently, WordPress gives you the option to keep your website’s theme and name, but remove its content. To delete the content, click on the respective “Delete Your Content” button that is placed above the “Delete Your Site Permanently” option. When you click the “Delete You Content” button, you may either remove your WordPress blog content manually or contact the WordPress support team that will remove content for you.
How to Delete WordPress Website Using cPanel
Many websites that choose WordPress as their CMS opt for external hosting options. When you are trying to build a powerful website, self-hosting turns out to be the best option for many. There is a simple explanation for this fact. Hosting your blog at wordpress.org, you will face many restrictions regarding themes, plugins, and other elements you use on your site.
If you don’t host your WordPress blog on wordpress.com, there is a high chance that you use cPanel to manage different components of your web resource. If you use cPanel, then the following instructions will help you permanently delete your WordPress blog whenever you need it.
Below, we provide step-by-step guidelines on how to delete your WordPress blog hosted on BlueHost.
To get started, access your BlueHost dashboard. Click on My Sites. You will see a list of all websites that you run on BlueHost.
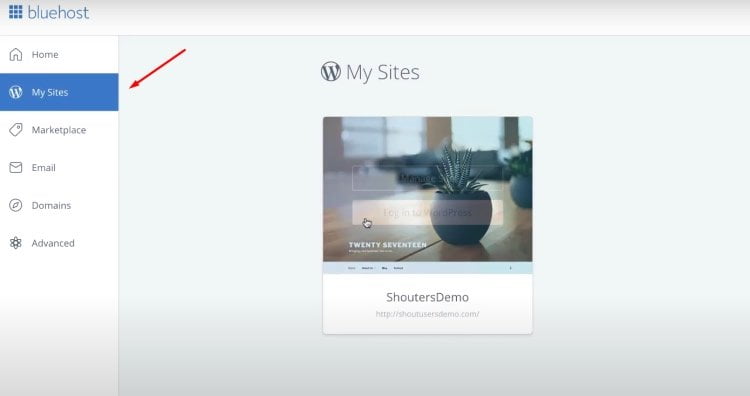
Hover over the WordPress website that you are going to work with. Click Manage Site.

In a new window that opens in front of you, find the Settings tab and click on it.
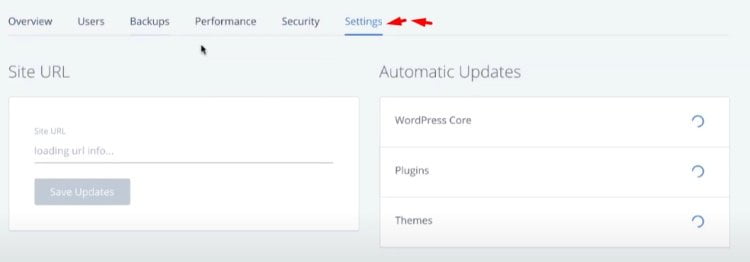
In the Settings tab, scroll down to the bottom of the page and find a bold red Delete button there. Click on it.
On the next page, you will be asked to confirm website deletion once again. If you feel confident that you’d like to remove your site, click Delete permanently. That’s it. You’ve deleted your WordPress blog successfully.
Final Considerations
When you decide to permanently delete WordPress website, it’s important to ensure that you back up all the needed files before you click “Delete.” Luckily, there are many backup WordPress plugins that you may access for free or for a fee.
Regardless of your business’s size, investing in a good WordPress backup plugin is totally worth it. Thanks to the wide choice of extensions, it can be a tricky thing to pick the plugin that perfectly meets your needs. So, before you decide, mind the following considerations. More specifically, what types of WordPress backups does the chosen plugin include:
- Database backup, which means that some plugins let you only backup your WordPress database;
- Complete backup, which lets you backup the entire WordPress site, including all files and your database;
- Scheduled backup, which lets you schedule automatic backups of your site’s content. This, you may ensure that none of your site’s valuable files is lost in case any issue occurs.


Contact
Don't like forms?
Shoot us an email at [email protected]
Send a Project Brief
You are currently viewing a placeholder content from Facebook. To access the actual content, click the button below. Please note that doing so will share data with third-party providers.
More InformationYou are currently viewing a placeholder content from Instagram. To access the actual content, click the button below. Please note that doing so will share data with third-party providers.
More InformationYou are currently viewing a placeholder content from X. To access the actual content, click the button below. Please note that doing so will share data with third-party providers.
More Information