How to Schedule a WordPress Post [Tips & Best Practices]


It can be frustrating to publish a post on time. You intended to hit publish yesterday, but life got in the way, and now it’s too late. This becomes even more problematic if the post is time-sensitive, related to a holiday, or an announcement for an upcoming event. Fortunately, scheduling your posts in advance can prevent this issue and keep your blog on track. This guide will walk you through the tips and best practices on how to schedule a WordPress post. Before diving into the methods, let’s take a moment to understand why scheduling posts is crucial.
Reasons for WordPress Post-Scheduling
Scheduling posts in WordPress can save you time and keep you organized. Whether you have a news site or a blog, publishing articles at regular intervals is crucial for maintaining a consistent flow of content and keeping your audience engaged.
Scheduling posts is especially beneficial if you’re going on vacation or taking a break from your site. Instead of leaving your blog inactive, you can schedule posts in advance to maintain activity while you’re away.
Now, let’s explore a few more reasons why scheduling posts in WordPress is a great idea:
- Post at peak traffic times. Publishing your posts when most of your readers are online ensures maximum visibility. For example, if you have a parenting blog, publishing during the daytime when moms are likely online is ideal.
- Consistent content publishing. To build a dedicated readership, it’s important to publish content regularly. Scheduling posts beforehand ensures your content goes live even when you’re busy with other commitments.
- Stagger content publication. If you have a lot of content to publish, scheduling posts allows you to control and pace the release of your content, preventing overwhelming your readers.
- Cater to different timezones. If you blog during nighttime, scheduling posts ensures your content goes live during daytime hours in your readers’ timezones.
- Reliable schedule for timely topics. Consistent and timely posting is crucial for your readers’ trust if your blog covers timely topics or events. Scheduling posts helps you meet deadlines and maintain your readers’ confidence.
- Prepare seasonal/holiday content in advance. Stay ahead by writing and scheduling seasonal or holiday-specific content in advance, reducing stress during busy periods.
- Maintain activity while on vacation. Don’t let your blog go silent when you’re on vacation. Simply write and schedule a few posts before you leave to keep your blog active.
- Test different publish times. With WordPress’s scheduling feature, you can experiment with different publish times to determine the optimal posting time for maximum traffic. Analyze when your readers are most active and adjust your schedule accordingly.
Now that we’ve covered why scheduling posts is crucial let’s explore how to schedule posts in WordPress.
How to Schedule a WordPress Post using Gutenberg Block Editor
To schedule posts using the WordPress block editor, follow these simple steps:
- Create a new post or page in WordPress.
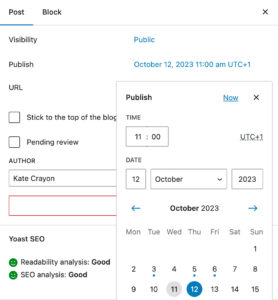
- In the post editor, navigate to the Publish panel.
- By default, the timing is set to Publish immediately.
- Click on “Publish immediately” to reveal a drop-down menu.
- Choose a date and time for your post to go live.
- You can schedule the post for October 12 at 11AM.
- After selecting the date and time, click on the Schedule button.
- Your post is now scheduled and will automatically go live on the designated date and time.
Using the WordPress block editor, scheduling posts is a breeze. No additional plugins are required, making it the recommended method for scheduling your content.
How to Can You Schedule Blog Posts on WordPress Using a Plugin?
You can utilize a plugin if you’re not using the WordPress Block Editor or want more control over post-scheduling. One popular plugin for post-scheduling is SchedulePress. This free plugin allows you to schedule posts in advance.
To begin, install and activate the SchedulePress plugin. Once activated, go to Posts > Add New in your WordPress admin panel. This will take you to the post editor screen, where you can write and schedule your post.
You’ll see the standard Classic Editor Publish box on the right-hand side of the screen. Here, you can choose a date and time for publishing your post. After selecting the date and time, click OK and then the blue Schedule button to set your post schedule as usual.
SchedulePress also provides a helpful feature that lets you publish your scheduled post immediately, reflecting either the current or future scheduled date.
The Pro version of SchedulePress offers additional features such as an auto-scheduler, a calendar view, the ability to plan projects well in advance and schedule multiple posts simultaneously, and the option to share your posts on top social media platforms automatically.
WordPress Post-Scheduling Tips
If you want to optimize your use of scheduled posts in WordPress, here are a few helpful tips and tricks:
Setting the Time Zone. Ensure your WordPress site is set to the correct time zone by going to Settings > General in your WordPress admin panel. This will ensure that your posts go live at the desired time.
Viewing All Scheduled Posts. To see all the posts you have scheduled for your WordPress site, navigate to Posts > All Posts and click the “Scheduled” link at the top. From here, you can manage your scheduled posts, including editing, deleting, or publishing them early.
Publishing Scheduled Posts Early. If you need to publish a post before its scheduled date and time, go to the All Posts page, select the post, and click on the Publish button in the post editor screen. This will immediately publish the post, regardless of its original schedule.
Managing a Missed Schedule Post in WordPress. If a post fails to publish at its scheduled time, WordPress will mark it as a “missed schedule” post. To view these posts, go to the All Posts page and select the post with the “Missed Schedule” label in red. You can then choose to publish, delete, or reschedule the post as needed.
How to Fix the Cron Job Error?
Cron jobs are background tasks that WordPress uses to perform various functions, including scheduling posts. If your WordPress site’s cron jobs are not functioning correctly, it can cause scheduled posts to fail.
Common reasons for cron job errors include issues with your hosting provider, recent host switching, website downtime, or conflicts with plugins or themes. To manually run the cron job, add the following line of code to your site’s wp-config.php file:
define('DISABLE_WP_CRON', true)Alternatively, you can use a WordPress plugin like Schedule Post Trigger to automatically run missed schedule posts in WordPress when someone visits your website.
Conclusion
Learning how to schedule a WordPress post is crucial in maintaining a consistent flow of content and keeping your audience engaged. By scheduling your posts in advance, you can save time and stay organized, ensuring that your blog or website remains on track even when you’re on vacation or taking a break. This guide has provided tips and best practices on scheduling a WordPress post, allowing you to avoid the frustration of missing deadlines and ensuring that your time-sensitive or event-related content is published on time. With these tools, you can confidently manage your content schedule and consistently deliver valuable information to your readers.
Contact
Don't like forms?
Shoot us an email at info@itmonks.com

 Gemini