Explore our specialized services, tailored solutions, and industry expertise to elevate your digital presence. From custom WordPress development to seamless integrations, we build high-performing websites that deliver impact.
After Gutenberg’s release in 2018, most WordPress site owners started to use the updated advanced content editor on their sites. The content creation gets faster and easier when you use ready-made blocks to manage headings, paragraphs, texts, visuals, galleries, and other content types your blog posts may feature. Gutenberg ships with a series of default blocks that you may use while writing your piece. However, sometimes you need more than what the default settings offer. This is when the knowledge on creating custom Gutenberg blocks comes in handy for you. If you look for simple step-by-step instructions on how to create custom Gutenberg blocks for content editing on your site, then you’ve reached the right place. If you are somewhat familiar with HTML and CSS, the following guidelines will come in handy for you.
Installing Block Lab
To get started, you need to download and install the Block Lab plugin that we’ll use to create custom Gutenberg blocks for your WordPress admin panel.
Adding New Block
In the steps described further in this tutorial, we’ll give you step-by-step guidelines on how to create a custom Gutenberg block to reveal testimonials on your site.
To create a new block, in the left sidebar of your WordPress dashboard, click on Block Lab > Add New, and enter any name for your custom block.
On this page, you need to give a name to your block. You can write any name of your choice in the “Enter block name here” textbox, let’s call it “Testimonials.”
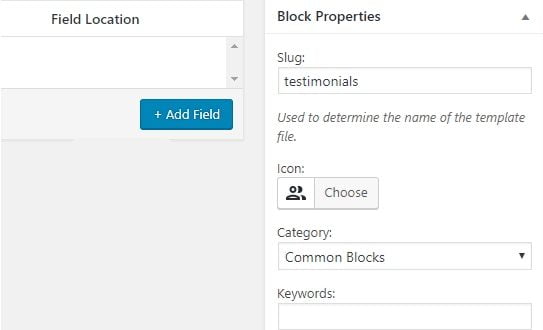
In the block properties in the right sidebar of the page, you can set a custom icon for your block and choose a block category in the Category dropdown box. The slug field will be automatically filled based on the block’s name. To make your block easily found in the WordPress Gutenberg dashboard, make sure the name of the custom Gutenberg block doesn’t feature more than three keywords.
You can also add different types of fields to your custom block, including text, email, URL, color, image, checkbox, radio buttons, etc.
To add a new field to your custom Gutenberg block, click on the + Add Field button.
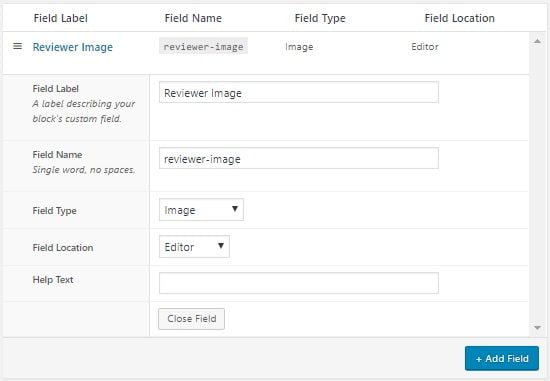
Each field features several tabs that you need to fill with custom details. The fields include:
Field Label – enter any name for the field label;
Field Name – it’s automatically generated based on the field label, ensure that you make it unique and easy to remember;
Field Type – there are several pre-defined field types that you can choose from the dropdown menu; let’s choose Image;
Field Location – decide whether you want the field to be added to the editor or the inspector;
Help Text – add some text to describe your field.
Click on the Close Field button once you finish editing the custom field.
Besides adding the Image field type, let’s add two more fields to the testimonials custom Gutenberg block.
You can reorder fields in the drag-and-drop mode. You can also edit or delete them while simply hovering your mouse over the selected field label. Once you finish, click on the publish button to save the changes you’ve applied to the custom Gutenberg block.
Create a Block Template
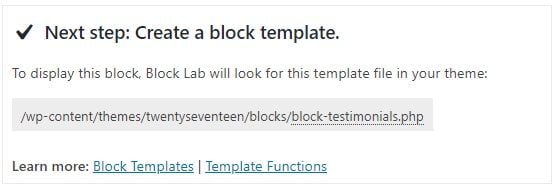
Creating a custom Gutenberg block is not enough if you want to get it added to your site. You need to create a block template and upload it to the theme folder. We’ll create the block-testimonials.php block template file.
Based on the details provided in the custom block template, the plugin will learn how to display your block fields inside the Gutenberg editor.
To create the block’s template file, take the following steps.
Create a folder on your PC and name it blocks. Create the block template file inside this folder and upload it to the directory of the theme you currently use on your WordPress site. Use Notepad or another plain text editor for creating the template file.
Whenever you add a new field to your custom Gutenberg block, ensure that you add the following PHP code to the block template file:
Save the file as block-testimonials.css inside the blocks folder.
Upload the Template File to Theme Folder
To upload the custom block template file to your current WordPress theme, you need to use an FTP file to connect to your site. Once done, navigate to the /wp-content/themes/ folder to open your current theme folder.
Once you’re connected, go to the /wp-content/themes/ folder. From here you need to open your current theme folder.
Upload the blocks folder with the block template file and CSS file provided above to the theme directory.
Once you complete all these steps, go ahead and test how your custom Gutenberg block works. Click on Pages > Add New > Add Block and search for the Testimonials block. Preview how the block looks like on your site, edit and publish it to let your customers access it.
 | updated:


 Gemini