How to Change WordPress Featured Image Size

Table of Contents

When creating a captivating WordPress post, the featured image plays a crucial role in catching the eye of potential readers. Selecting the right size of WordPress featured image is essential for making a solid first impression and maximizing the impact of your content. In this guide, we’ll delve into the importance of choosing the proper image size for WordPress featured images and how it can significantly influence the success of your WordPress posts. So, let’s explore how to change WordPress featured image size to elevate your WordPress posts to new heights!
What is a Featured Image in WordPress?
The featured image is a visual representation of your post or page content. It is the first thing people see after the title and is visible when a post or page is selected from a directory or search engine. This makes it crucial for driving traffic to your site.
Sometimes referred to as the header image, it is utilized by WordPress to create thumbnails, so its name can vary. The featured image will be displayed outside its original post or page in various locations. For example, it may appear on your homepage if you showcase the newest or most popular posts and your website’s search results after customers use the search bar in WordPress.
The placement of a featured image on your website depends on your theme. Usually, you can expect to find your image in these three main places:
- Anywhere on your website that links to the blog post associated with the featured image – such as the homepage, search results page, or recommended posts area. Here, the image acts as the “thumbnail” for the post.
- At or near the top of your posts or pages. The specific location may vary based on the theme.
- When you share your posts on other online platforms like Twitter or LinkedIn. If a featured image is set, these platforms will use it as the default thumbnail.
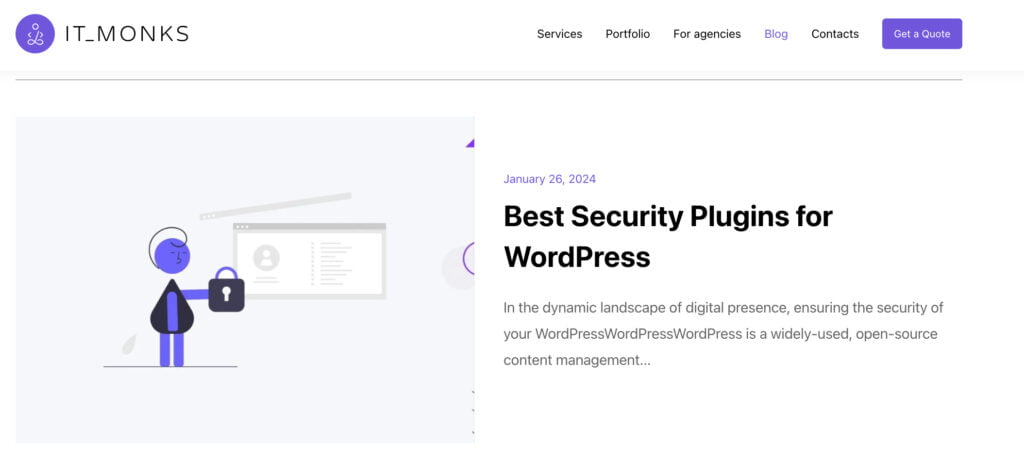
It’s also possible to spot featured images in other areas of your site, such as image galleries, background images, or image sliders on your homepage. Here’s a simple example of featured images on a homepage of a website built using WordPress.
It’s important to note that the possibility to change the size of a featured image in WordPress depends on the theme you select. Each theme supports different image sizing options, and referring to the theme documentation is necessary to determine the best options.
Thumbnail Image Size
In WordPress, a thumbnail image is a smaller-sized version of an original image used to represent the larger image across the website, particularly in image galleries, post listings, and other relevant sections. When an image is uploaded to WordPress, the system automatically generates various image sizes, including a thumbnail size, which can be configured in the WordPress settings.
The primary purpose of thumbnails is to enhance website performance by initially loading smaller images, thereby enabling faster page loads. Furthermore, themes commonly utilize thumbnails to ensure consistent layouts for posts and pages. WordPress themes and plugins offer customization options for displaying thumbnails, allowing users to define the size and cropping settings for thumbnails in the media settings of their WordPress dashboard. Ultimately, thumbnails improve a WordPress website’s visual appeal and user experience.
WordPress thumbnails and featured images typically have a default size of 150 x 150 pixels.
While this size may suit some users, it’s important to note that, like all other image resolutions, it may not be suitable for all design needs. Fortunately, you can adjust the thumbnail size by navigating to Settings > Media > Image sizes > Thumbnail size and modifying the width and height to better fit your requirements.
WordPress Featured Image Default Size
When you add an image to your WordPress site, it automatically creates three different versions of the original image. These include the thumbnail size (150×150 pixels), medium size (300×300 pixels), and large size (1024×1024 pixels).
The reason for creating these different versions is to optimize the image display based on where it is being used. For example, let’s take an image with dimensions of 1200px by 630px. The original file size is 86KB. However, when we create a smaller version of the same image, such as 150px by 150px, the file size reduces to 10KB.
This resizing is beneficial because using the original large image for thumbnail display would slow the page load speed and increase bandwidth usage, especially on mobile devices with smaller screens.
While WordPress automatically resizing images is helpful, it may not be suitable in some instances. For example, certain WordPress themes may require images of specific dimensions, and default resizing may not meet those requirements.
In such cases, manual resizing of the images is necessary. If you need to resize images yourself, WordPress enables this flexibility.
How to Add Featured Image
Adding a featured image in WordPress is straightforward. Follow these steps:
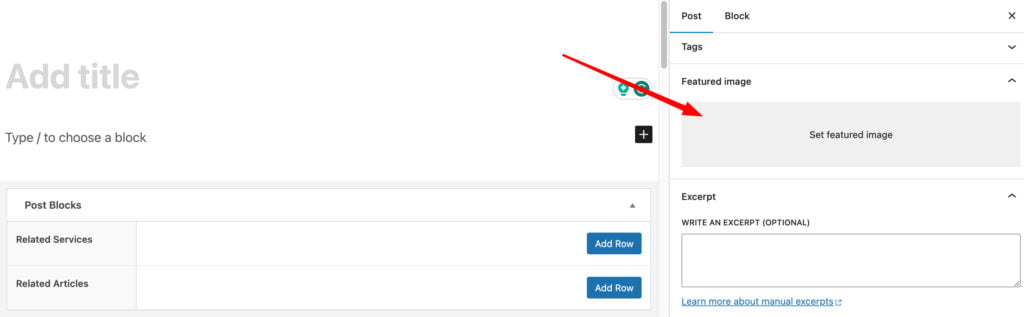
- Click the “Edit” button to open the post or page editor.
- Look for the “Featured Image” box on the right side of the editor screen.
- Click on the “Set featured image” link.
- A pop-up window will appear, allowing you to choose an image from your media library or upload a new one.
- Once you’ve selected the image, click the “Set Featured Image” button.
- WordPress will preview the featured image in the right column.
- You can now save or publish your post or preview it to see how the featured image will appear on your live website.
Featured Image Size in WordPress Themes
The featured image WordPress size can vary in modern WordPress themes, and adjusting them often requires different approaches. Below, we’ll explore how to change the featured image size for WordPress featured image in three popular themes: Astra, Divi, and Elementor.
Astra Theme Featured Image
To modify the WordPress featured image size in the Astra theme, follow these steps:
- Navigate to your WordPress dashboard.
- Go to “Appearance” and select “Customize.”
- In the customizer, find the “Layout” option.
- Click on “Blog,” then “Single Post.”
- Look for the “Featured Image” section, where you can adjust the dimensions as per your preference.
Divi Theme Featured Image
To change the WordPress featured image size in the Divi theme, use the following steps:
- Go to your WordPress dashboard.
- Navigate to “Divi” and select “Theme Options.”
- Find the “Single Post Layout” tab.
- Adjust the featured image dimensions under the “Post Title & Meta” settings.
Elementor Feature Image
To modify the WordPress featured image size when using Elementor, follow these instructions:
- Open the page or post in which you’re using Elementor.
- Locate the Elementor editor and find the “Featured Image” widget.
- Drag and drop the widget onto your desired section.
- Once added, click on the widget to reveal customization options, including image size.
- Adjust the size settings to your preference.
This method lets you directly control the featured image size within the Elementor editor.
How to Change Featured Image Size in WordPress
Before we begin, it’s important to emphasize that your theme determines the ideal featured image size in WordPress. Each theme has its specifications, so it’s crucial to choose sizes according to those recommendations.
Failing to adhere to your theme’s guidelines may lead to low-quality images that appear blurry or get cropped.
Make the Relevant Featured Image
Consider setting the relevant image and size to the page’s content.
- Select an image that aligns with the content and context of your webpage.
- Determine the recommended dimensions for your theme’s featured image. This information can often be found in the theme documentation.
- Resize the image using image editing tools such as Photoshop, ensuring it adheres to the preferred dimensions.
- Save the image with an appropriate file name to easily identify it later.
Change Image Size in WordPress
There’s an option to edit any image in your media library. You can locate this when selecting the image.
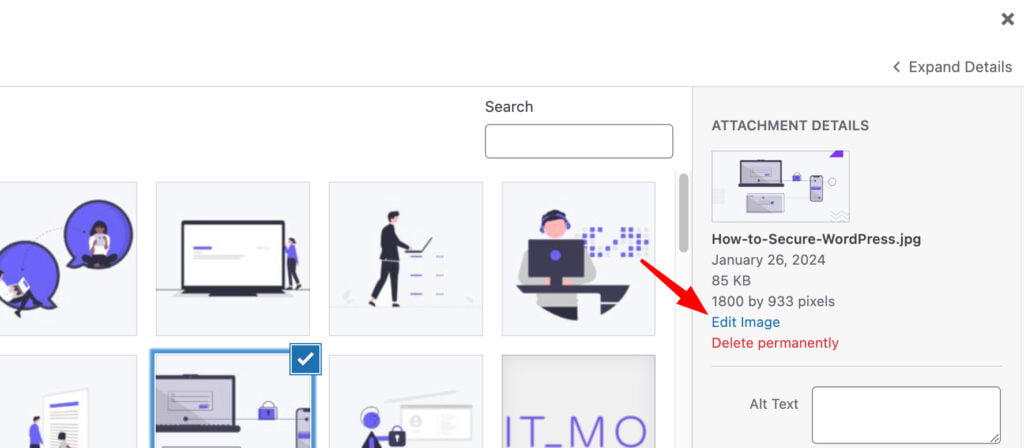
To adjust the featured image size in WordPress, simply edit the image. You’ll find basic photo editing options such as cropping, rotating the image right or left, and flipping it horizontally or vertically. Most importantly, you can scale the image.
To change the featured image size in WordPress, just adjust the dimensions (in pixels) and click the “Scale” button.
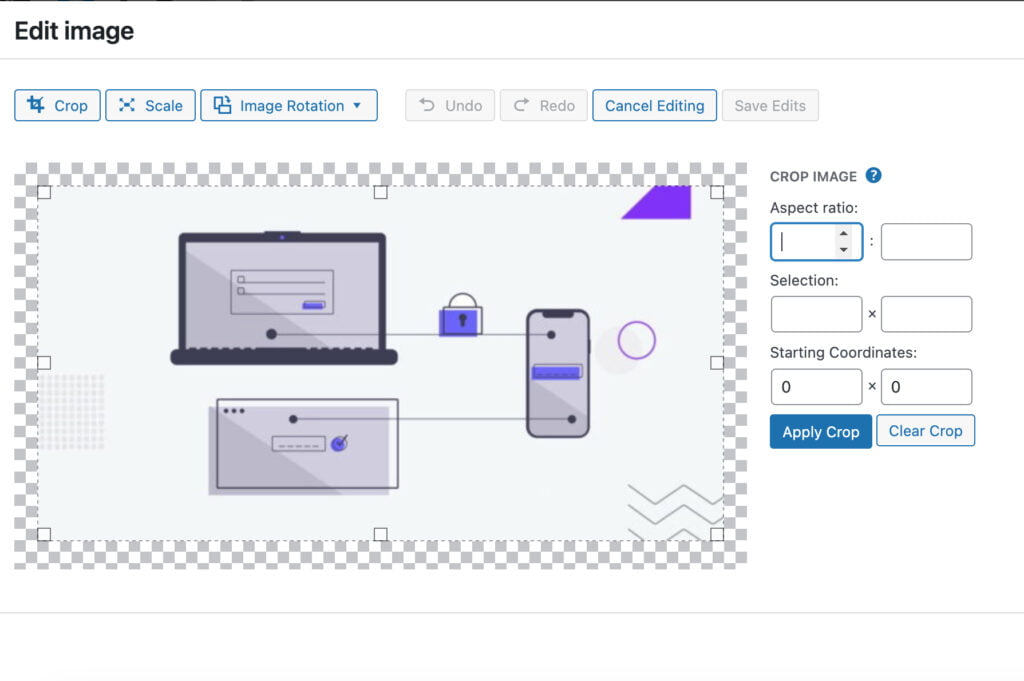
However, this method may only be effective in certain situations. Scaling the image can significantly reduce its quality and result in blurry images. The outcome depends on the image’s original dimensions and the scale applied.
Due to these limitations, many developers prefer to bypass these options in WordPress and opt for actual photo editing software like Photoshop, which is the next method.
Change the Default Image Size in WordPress
To modify the default image sizes in WordPress, go to Settings > Media.
Adjust the image sizes in the Max Width and Max Height fields.
After making the changes, save your settings.
Subsequently, any new image added to your WordPress site will be resized according to your specified dimensions.
Change Image Size by Yourself
The featured image will be displayed the same size as the original image, depending on the theme. One of the easiest ways to adjust its size is to use software such as Photoshop and make manual adjustments. Stock images can be cropped in Photoshop to achieve the desired size without compromising quality.
Generally, most blogs use Photoshop as it is widely available for photo editing, and numerous tutorials are available to assist beginners.
Another advantage is that you can keep the original image stored on your computer.
Throughout a website’s lifespan, you will likely need to make various changes to your images, such as adjusting the size, adding a border, changing a specific graphic element, or modifying the font.
Having the original image available allows you to make edits and re-upload it, saving you the effort of searching for the same stock image again or creating a new one from scratch.
In essence, ensure the image is properly sized before uploading it so you can simply place it and be done.
Change Image Size with PHP
There’s another, more complex approach that involves using PHP to code the featured image size. Specifically, you would add some code to your theme’s functions.php file.
Before proceeding, we highly recommend creating a backup. Regardless of your actions, it’s essential to make one.
A backup is an invaluable tool for developers because you essentially have a safety net, no matter what mistake occurs. And sometimes, it’s not even your mistake that necessitates a backup.
In any case, you need to locate your theme’s functions.php file and paste the following line of code into it:
<!--?php set_post_thumbnail_size( $width, $height, $crop );
?-->
This code isn’t ready for use as you need to make a small change to it. The $width should be replaced with the width of your image in pixels and the $height with the image’s height in pixels.
Finally, the $crop option will crop the image to the specified width and height. If you want to enable this, enter True. Alternatively, you can leave it blank or enter False.
Therefore, for a 100 x 100 image without cropping, the code will look like this:
<!--?php set_post_thumbnail_size(100, 100, False );
?-->
And that’s it. Save the changes, and any images you upload to your website after making this change will adhere to these rules.
Note: Since this code is in your theme’s functions.php file, you must add it again if you change themes. Some themes may not support this function, so consult your theme documentation.
Featured Image Optimization
Optimizing WordPress featured images goes beyond aesthetics; it’s a strategic effort to boost visibility and attract organic traffic. Technical details and visual appeal significantly affect how search engines perceive and rank your content. Let’s see how to improve your website’s SEO with WordPress featured image optimization.
- Alt Text. It is crucial to have descriptive and relevant alt text. Incorporate keywords that users might use to search for the image’s content. This not only aids accessibility but also contributes to search engine optimization.
- Size in KB. The size of your image files can impact website loading speed, a critical factor for user experience and search engine rankings. Compress images to reduce file size while maintaining quality for faster page loading times, a positive signal for search engines.
- Title of an Image. Provide a meaningful and descriptive title for your image that accurately reflects its content and context. Incorporate relevant keywords for indexing by search engines.
- Name of Image File. Rename image files to something descriptive, including keywords related to the image’s content. This helps search engines understand the context and relevance of the image, improving overall SEO.
- The uniqueness of an Image. Original and unique images set your content apart and can positively influence search rankings. Consider adding overlays, filters, or custom edits to differentiate them from stock photos.
In conclusion, optimizing WordPress featured images involves a holistic approach that combines visual appeal with technical considerations. Paying attention to Alt text, image size, titles, file names, and uniqueness can boost content visibility and improve its chances of ranking higher in search engine results, benefiting SEO efforts and enhancing the overall user experience on your website.
FAQ
- How to fix featured image size in WordPress?
To adjust the featured image size in WordPress, follow these steps:
- Each theme has its recommended dimensions, so refer to the theme documentation.
- If needed, resize the image using editing tools like Photoshop, ensuring it aligns with the preferred dimensions.
- Save the image with an appropriate file name.
- Alternatively, you can modify default image sizes in WordPress settings under Settings > Media.
- What is the size of the featured image in WordPress?
The size of the featured image in WordPress varies based on the theme you select. Refer to your theme documentation to determine the recommended dimensions. Generally, themes create three versions of an original image: thumbnail (150×150 pixels), medium (300×300 pixels), and large (1024×1024 pixels).
- What size should the featured image be in WordPress?
The recommended size for a featured image in WordPress depends on your theme’s specifications. Consult the theme documentation to find the optimal dimensions. Ensure you adhere to these guidelines to avoid low-quality or improperly displayed images.
- How to set featured image size in WordPress?
To set the featured image size in WordPress:
- Adjust dimensions in theme-specific settings for different themes like Astra, Divi, or Elementor.
- When adding a featured image, follow the recommended dimensions your theme provides.
- To manually adjust the size, use editing tools like Photoshop and save the image with an appropriate file name.
- Consider modifying default image sizes in WordPress settings under Settings > Media.

Contact
Don't like forms?
Shoot us an email at [email protected]
