Explore our specialized services, tailored solutions, and industry expertise to elevate your digital presence. From custom WordPress development to seamless integrations, we build high-performing websites that deliver impact.
If you are running a website, you should have a “plan B” for any unforeseen situation. Like keeping a fresh website backup stored in a safe place, learning how to restore WordPress from backup is crucial in dealing with an attacked or broken website. Now that we have shared detailed step-by-step guides for WordPress backup and database WordPress backup, let’s review the most popular methods to restore WordPress from backup.
Why Would You Need to Restore WordPress Website
Learning how to restore a WordPress website can be compared to attaining the skills and knowledge on how to reinstall WordPress. We all know about the most common risks associated with running online businesses, including but not limited to cyberattacks, hacks, broken code, web host malfunction, etc. To ensure you are always ready to face the challenges and keep your website back on track, it’s vital to have the latest copy of your website handy and know how to restore the affected content, settings, and other data.
Some of the major reasons why you may need to restore WP backup include:
Website hack. A common example is WordPress pharma hack, when hackers attack your website to place spammy pharmaceutical ads without you noticing it.
Broken code caused by a plugin update (which caused a conflict with other plugins or themes), theme issues (especially when they’re not compatible with your current WordPress version), or manual code updates, especially when the changes are made by a person who is not fully familiar with WordPress coding standards.
Since we are now familiar with the main reasons you may need to restore WP backup, let’s consider three methods of restoring WordPress from backup, which are explained step-by-step.
Restore WordPress Backup with cPanel
Restoring a WordPress website backup with a cPanel is one of the most popular methods most website owners can handle.
An important notice before proceeding with instructions: your hosting provider may feature a custom interface rather than cPanel. If you discover this, do not be afraid. Although restoring a WP backup with a custom panel slightly differs from working with a cPanel, most steps should be similar. Following these instructions, you should be able to restore WordPress from backup by adjusting our instructions to your situation.
For demonstration purposes, we show how to complete a WP backup restore using Bluehost’s cPanel.
Here are step-by-step instructions on how to restore WordPress from backup through cPanel.
Step 1. Log in to your web hosting account.
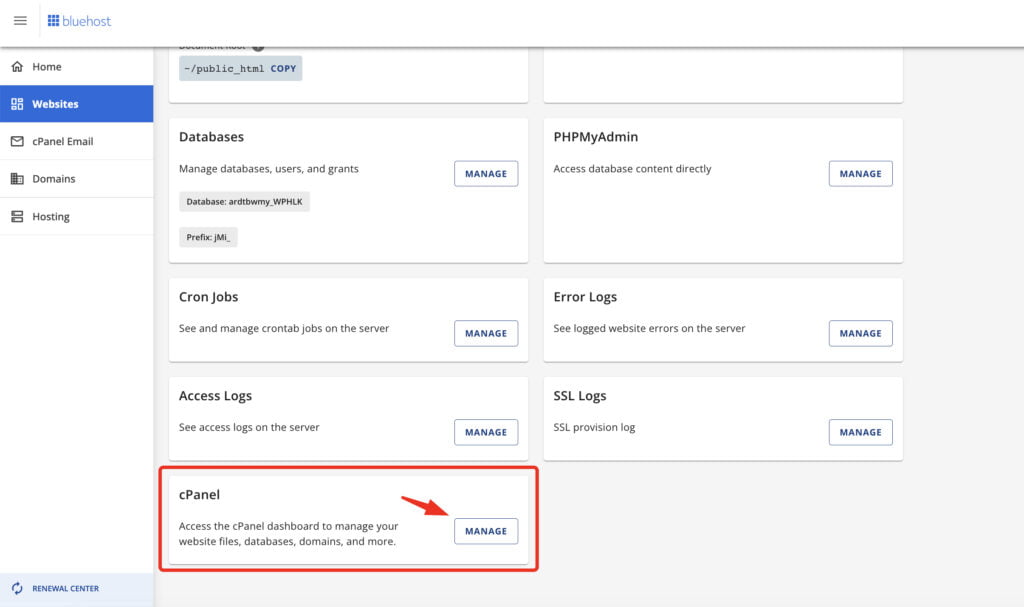
Step 2. Find cPanel by clicking on the website settings you are going to restore. Next, click “Advanced” and find cPanel. Click “Manage.”
Next, depending on whether you need to restore your website’s database or files, consider the following instructions:
Restore parts of your website using Backup Wizard
Restoring database using phpMyAdmin;
Restoring files with a File Manager or FTP.
Restore the Website Completely with a Backup Wizard
This is one of the easiest ways to restore a WordPress website. This method lets you restore your website’s data from an existing backup file. Depending on the items in your backup file, the Backup Wizard will restore the home directory, MySQL databases, email forwarder configurations, and email filter configurations.
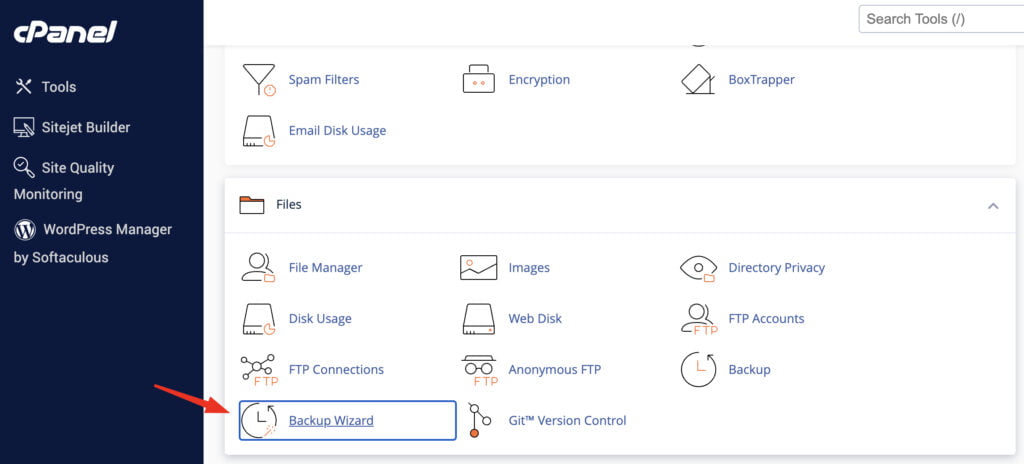
Step 1. The Backup Wizard can be found easily after clicking “Manage” in the cPanel. Click on the icon to open the wizard.
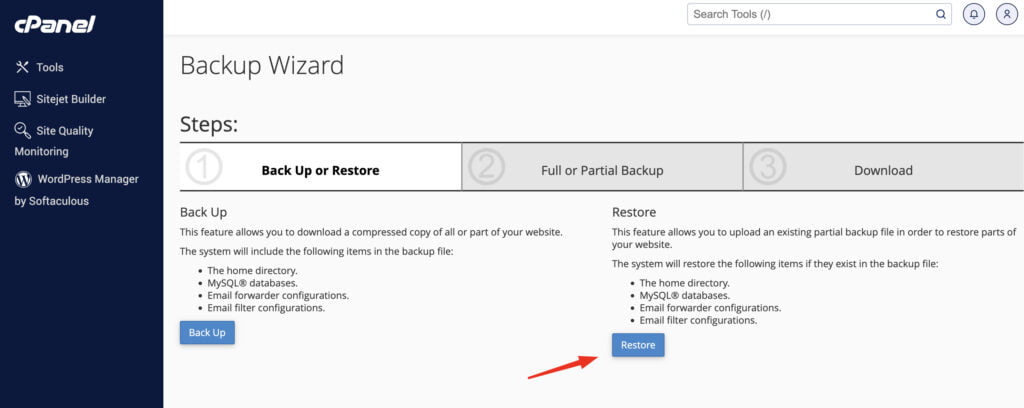
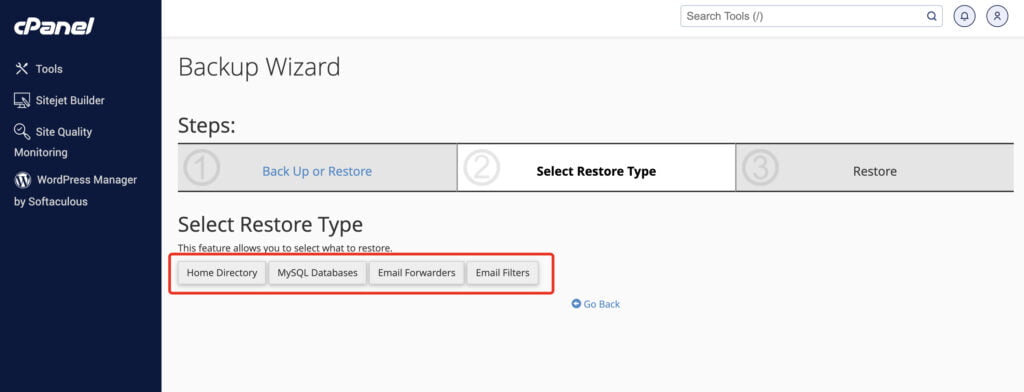
Step 2. In the next window, you will see the Backup and Restore buttons. Choose the “Restore” option.
Step 3. Select restore type. You’ll see four buttons with different options to restore your website: Home Directory, MySQL Databases, Email Forwarders, and Email Filters’. You should have a backup file for each of these purposes. If you choose to restore the Home Directory, click the respective button, and you’ll be taken to a separate window where you’ll be asked to upload a backup file. This file should be a ‘.tar.gz’ or ‘.zip’ file that contains your website’s data.
Restore Database Using phpMyAdmin
Restoring your website’s database and file more complicated methods, which we do not recommend newbies handle alone. However, as a website owner, you need to know how each method works. So, here are step-by-step instructions on how to restore your database using phpMyAdmin in Bluehost’s cPanel.
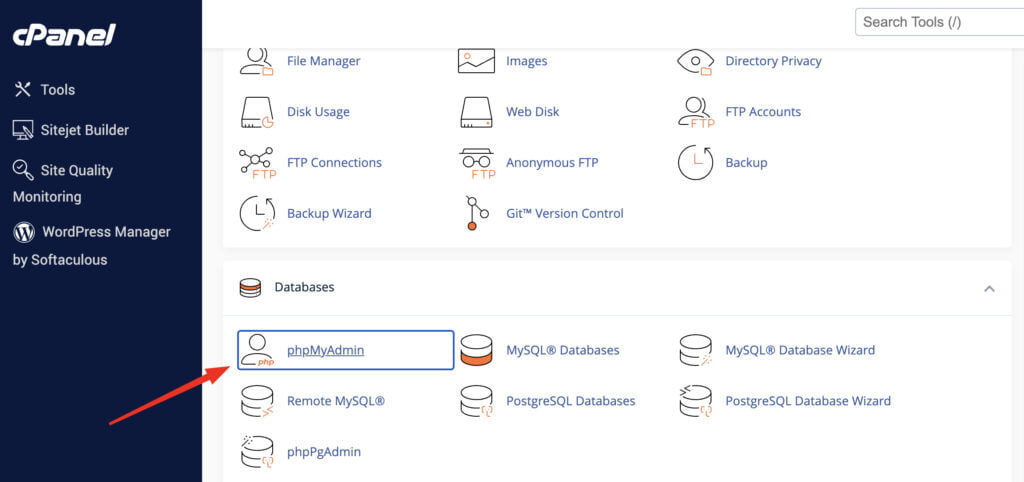
Step 1. In the cPanel interface, find the “Databases” section and choose phpMyAdmin.
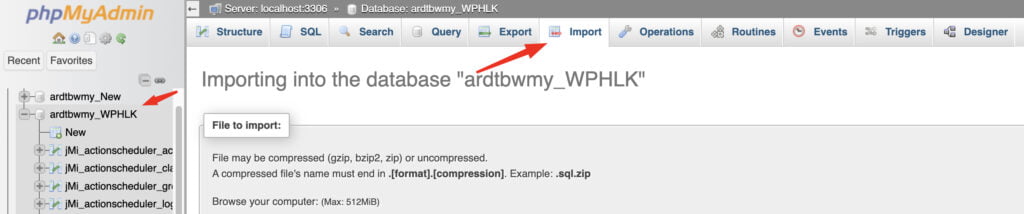
Step 2. On the left side of phpMyAdmin, you will see a list of all your databases. Click on the one you want to restore.
Step 3. To restore the chosen database, click the “Import” tab at the top of the screen and choose the database backup file on your local machine. The file should be in the ‘.sql’ format.
Once you choose the correct file, click “Go,” and the database restoration process will begin.
Restore WordPress Files
Two ways to restore your WordPress files are using a File Manager or an FTP client. Let’s consider how to restore your website’s files using each method.
Restore with File Manager
You must take the following steps to restore WordPress files with a hosting panel’s File Manager.
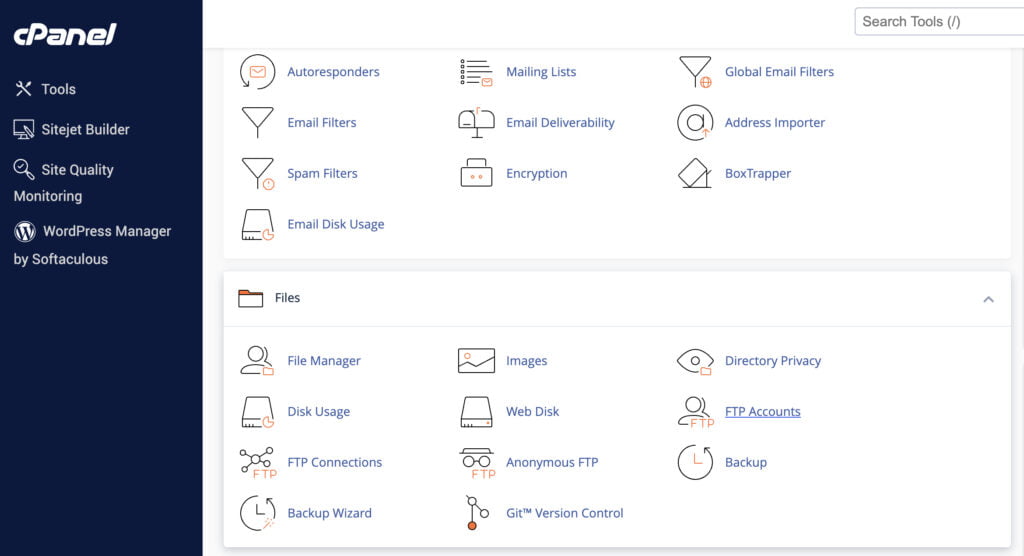
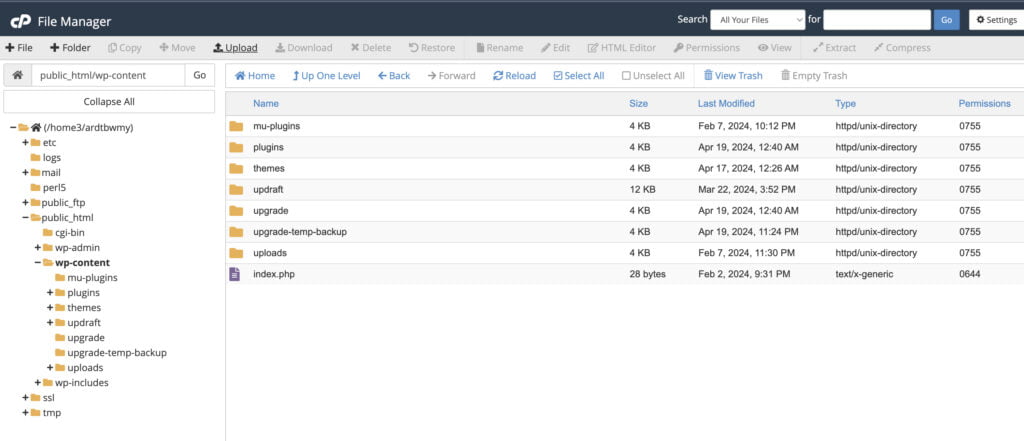
Step 1. In the cPanel interface, select File Manager.
Step 2. Navigate to the directory where your WordPress files are located. As a rule, they are stored in the public_html folder.
Step 3. Upload your backup. If you have a fresh backup of your WordPress files on your local machine, click the “Upload” button in the top menu and select the backup file. It should be in the .zip or .tar.gz formats.
After the extraction, ensure all files are uploaded to the right directory.
Restore with an FTP Client
Here are the steps you need to follow to restore WordPress files with a FileZilla FTP client.
Step 1. Launch the FileZilla application on your local computer. Enter your FTP credentials (host, username, password, and port). If you use Bluehost, you can find these details under the FTP section in cPanel.
Step 2. Navigate to the directory where your files are located. Depending on your server and its configuration, they are usually in the public_html, www, or another folder.
Step 3. Locate the backup files on your local computer and upload them to the server by dragging and dropping them from your computer to the FTP client. Ensure all files upload correctly.
Restore WordPress with Command Line (SSH)
Restoring WordPress using the command line involves using Secure Shell (SSH) to access your server’s command line. This is a more advanced method to restore WordPress from backup, which is preferred mainly by website administrators due to its efficiency and control. Unlike completing a WP backup restore with cPanel or plugin, using a command line requires the knowledge of command line syntax, which newbies will find difficult or impossible to handle. On the other hand, this method provides many advantages, especially if you own a large website, and it provides a higher degree of flexibility and speed during the WP backup restore process.
Using SSH to restore WordPress from a backup requires restoring the database and files separately. Here’s how to do it.
Please note that these are general instructions, which can vary depending on your web server setup.
Restore Files with the Command Line (SSH)
Step 1. Navigate to the directory where your WordPress files are located
cd /path/to/your/wordpress/files
Step 2. If you have a compressed backup, you can extract files using the command:
tar -xvf backup.tar.gz
Restore Database with Command Line (SSH)
Step 1. Log into MySQL
mysql -u username -p
Step 2. You’ll be asked to enter your password. Once you log on, you can restore the database.
Replace ‘database_name’ and ‘backup.sql’ with your actual database name and backup file.
mysql> use database_name;
mysql> source backup.sql;
Important notice: Remember to replace username, password, database_name, and backup.sql with your details when using the above examples.
Restore Website Using Plugin
WordPress plugins like UpdraftPlus are another way to restore WordPress from a backup. Both non-techies and more advanced users use this method.
It’s important to note that creating a WP backup restore using a plugin can be tricky since it can’t always make a full backup, only a part of it. Besides, when you decide to restore a previous version of a WordPress page with a plugin, you should remember that UpdraftPlus may not cover everything, especially if there are custom settings.
Here are the steps to restore your website using UpdraftPlus:
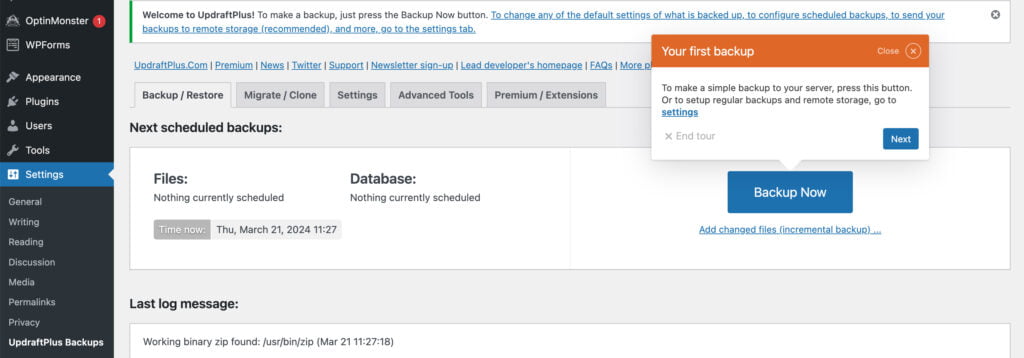
Step 1. Install the UpdraftPlus plugin on your website. The plugin is free; you can install and activate it via the admin panel.
Step 2. Navigate ‘Settings’ > ‘UpdraftPlus Backups’ to access the plugin’s settings.
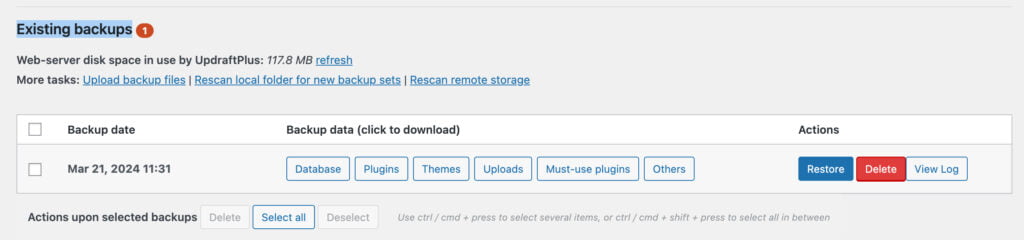
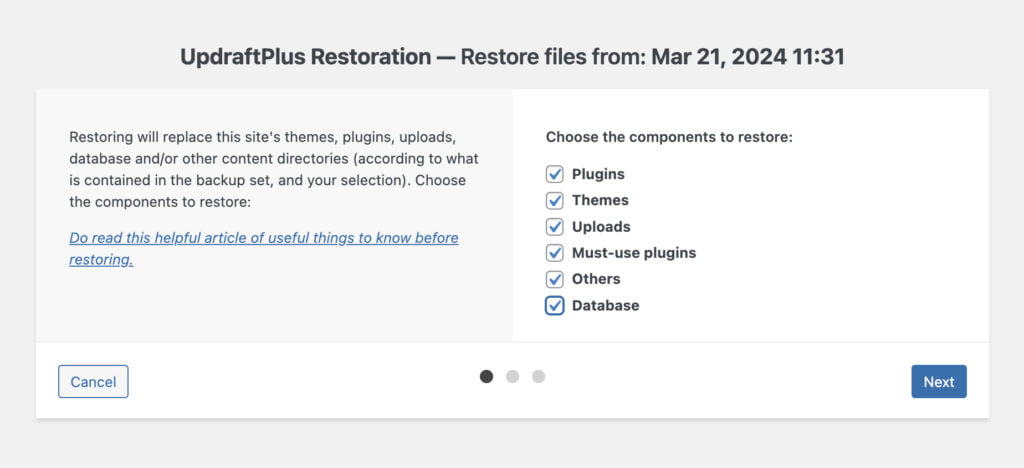
Step 3. To proceed with the UpdraftPlus Restoration, select the elements of your website you want to restore.
Click Next > Restore, and the restoration process will begin.
Check the restored version of your website once the process is complete.
What to Do After Restoring
After you restore your WordPress website from backup, take the following vital steps to ensure everything is set up and works as intended.
Check plugins. After restoring a WP backup, ensure that all essential WordPress plugins you have installed on your website work without any conflicts or errors. If you notice some plugins are not updated to the latest version, install the latest updates.
Review permalink structure. Navigate to the “Settings” > “Permalinks” section in your WordPress dashboard to check the permalink structure. If needed, choose the appropriate one and save the changes.
Change credentials. It will also be a good idea to update login credentials for the admin account and all other users with admin privileges. To do this, navigate to “Users” > “All Users” and select the user accounts you want to update. Set a new password for each user and save your changes.
Troubleshooting Website Restoring
While you restore your WP backup, you may encounter several issues that can affect your website’s functionality. Let’s briefly review each one and consider several quick troubleshooting steps.
Error Establishing a Database Connection. The error occurs when your website is unable to connect to the database. The issue could arise from entering incorrect credentials in the wp-config.php file or when the database server is unresponsive. To solve the error in establishing a database connection, check the wp-config.php file to ensure that the correct credentials are specified. If everything appears right on your end, contact the hosting provider to check the database server.
White Screen of Death. Every webmaster’s worst nightmare occurs when the website shows a white screen without any error message. A PHP or database error commonly causes the issue. To fix it, try increasing the memory limit in wp-config.php. If it doesn’t work, try switching to a default theme and deactivating all plugins installed on your website, and check if the issue persists.
Login Page Redirect or Refresh Issue. This is when the login page refreshes and takes you back to the login screen. Conflicting plugins or incorrect WordPress URL settings may cause the issue. Start by clearing your web browser’s cookies and cache to solve it. If it doesn’t work, go to the wp-options table in your WP database, check your WordPress URL settings, and deactivate all plugins.
Conclusion
Learning how to restore WordPress from backup is inevitable for everyone running a small or large website. You may be non-tech-savvy. However, learning the basics is vital to correctly managing all website processes. As you may have noticed, in our guide, we emphasize the restore WP backup methods that can be managed without any coding skills and the ones that professionals should better manage.
We recommend relying on expert help when managing WordPress backups and website restoration. At IT Monks, we provide website maintenance services, which include managing updates, backups, website security, and other tasks vital for maintaining your website’s health. If you want to ensure your website works as it should, contact us to discuss your project. Let us take care of your website while you are busy managing your business.
FAQ
Is it Mandatory to Restore Files and Databases at the Same Date to Make Data Sync?
No, it’s not mandatory to restore files and databases at the same date to synchronize data. While it’s ideal to restore both files and databases from the same backup set to ensure data consistency, it’s possible to restore them separately if needed.
How to Restore Just One File/Page?
To restore just one file or page from backup, you can access your backup files through your preferred method (e.g., cPanel File Manager, FTP client) and locate the specific file or page you want to restore. Once located, simply upload or transfer the file to your WordPress directory, overwriting the existing file if necessary.
 | updated:


 Gemini