Explore our specialized services, tailored solutions, and industry expertise to elevate your digital presence. From custom WordPress development to seamless integrations, we build high-performing websites that deliver impact.
Managing regular WordPress backups should be your ultimate choice if you are wondering, “How to secure a WordPress website from malware attacks?”
Unfortunately, most website owners understand the value of backing up website databases and files when it’s too late… To prevent unforeseen events from happening to your website, we share this guide with step-by-step instructions on how to back up your WordPress site.
Before providing the guidelines, we’d like to emphasize the importance of professional help with all the questions relating to maintaining your blog, business website, marketplace, or e-commerce store. Learning how to make backups on your own is great; every website owner should know the basics. However, when backing up your website, you’d better rely on the expert help of companies like IT Monks. We offer a complete suite of WordPress maintenance services, which also cover regular backups. Do you feel like it’s time to rely on pros? Click the button below to discuss your project.
What is Website Backup?
A website backup is a complete copy of your website (including your site’s core, database, files and other data that is part of its operation). By keeping a backup in a safe place, you ensure that you can always restore your website and its valuable data in case of a server crash, web security breach or any other unexpected condition.
Creating regular backups is vital for all types of projects. No matter how big or small your website is, whether it’s been launched recently or you have been running it for years, ensuring that you always have a fresh copy of your website ensures that you are always protected against the most unexpected scenarios, like a server failure, human error, malware attacks, etc.
Why Should You Back up a WordPress Site?
We have already touched upon the reasons for WordPress backups. However, there are other scenarios when you may need to restore your site from a copy.
Many web hosts offer backups. However, most, particularly significantly cheaper ones, do not store backups in a safe place. We recommend you work out your backup plan to prevent you from losing access to your website and its data. This way, the possible hosting provider’s malfunction shouldn’t affect your website.
In addition, you may encounter all sorts of other issues, including hacking and phishing attacks, bugs, and human errors. With a fresh site backup in place, you can restore your website without losing a single piece of its data.
How Often Should I Create a Backup for WordPress?
The answer to this question mainly depends on the frequency of posting new content on your website and editing its data. If you are looking for a one-size-fits-all solution, we will disappoint you. There isn’t one ultimate rule for everyone to follow. However, there are several suggestions on the backup frequency that you may apply to your website backup policy.
Weekly backups are mostly recommended for static business websites and online portfolios that don’t publish new content or make any edits or updates regularly.
Daily backups are recommended for blogs, especially those projects that publish content daily or several times daily and receive loads of comments for each publication.
Backing up the website twice daily or hourly should fit the WooCommerce store. Besides storing items in inventory and product details, such websites cannot miss order details and client information. In such cases, the more frequently you do backups, the better.
What Exactly You Need to Backup
Every element of your website matters. So, if you are looking for a quick answer, you need to back up everything, including the database and files. Of course, you can back up either of these elements separately. However, partial backups are less useful for restores.
Speaking about wordpressdatabase backup, we mean making copies of data stored in tables like wp_posts and wp_comments and covering everything from pages and posts to user information, links, comments, etc.
File backups suggest creating copies of your site’s core, plugin, theme, and media files.
The Ways to Backup WordPress Site
This guide covers the following site backup methods:
Using a plugin;
Creating a host backup;
Using FTP;
With the help of MySQL Command/SSH.
Let’s review each of them in detail.
How to Back up WordPress with a Plugin
It’s one of the easiest website backup methods. However, to ensure you do everything right, follow the steps below.
Let’s check how to back up a WordPress website using the BackWPup plugin. The plugin is free. You can use it for educational purposes if you have never done backups. It’s easy to use and will be mostly useful for making a copy of your complete WordPress installation, including /wp-content/, to store your backup on Dropbox, FTP, S3, etc.
Step 1. Install and Activate
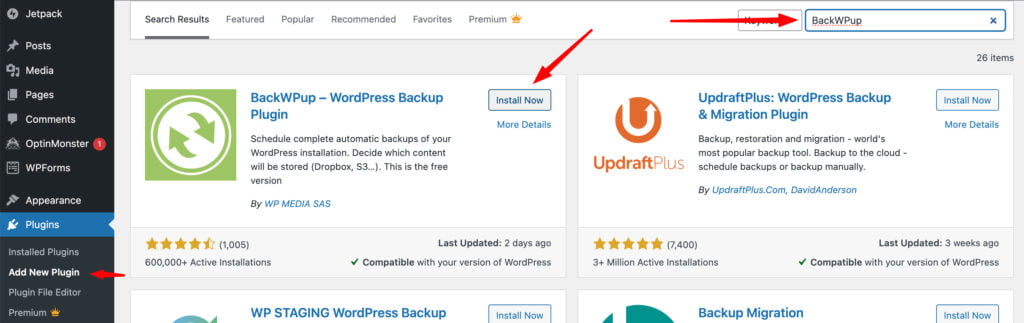
Traditionally, we start working with WordPress plugins by installing them on our websites. To do this, open your WordPress dashboard and navigate Plugins > Add New. Using the search bar, find the BackWPup plugin. Click Install > Activate.
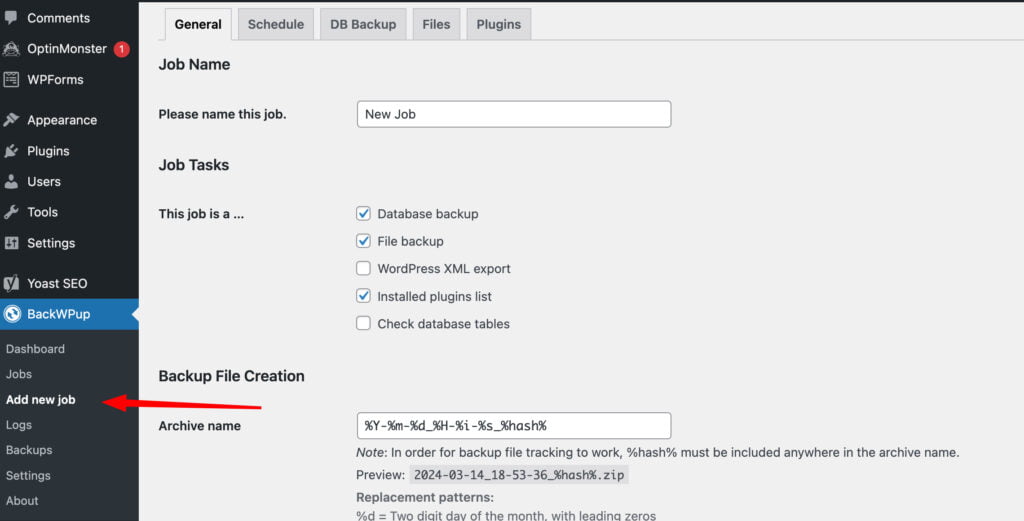
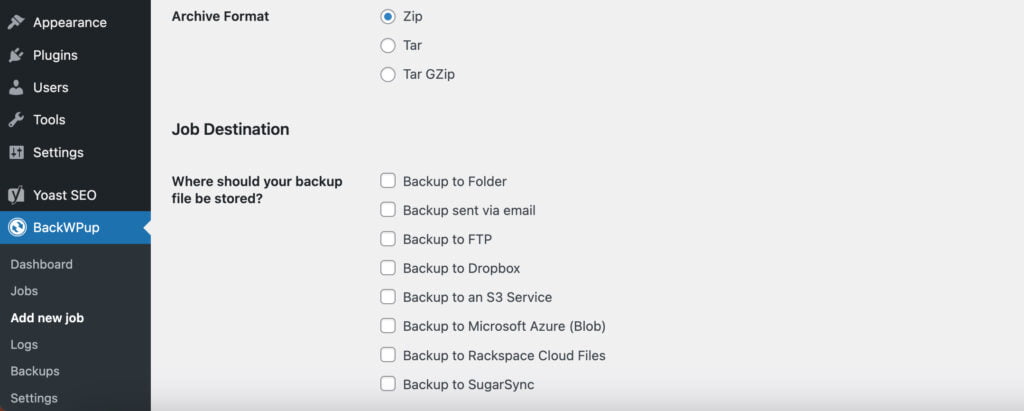
Step 2. Configure General Job Settings The next step is to configure the backup settings. To complete this step, locate the BackWPup menu in the left sidebar of your WordPress dashboard and click Add New Job.
In the new window in the dashboard, you can manage the Job settings, such as giving it a name specifying job tasks (do not leave any of the boxes unchecked if you want to create a full website backup; if you want to back up only files or database, then select the needed options), giving a name to the backup archive, and choosing the destination where you want to store the backup (Dropbox, Google Drive, FTP, etc.).
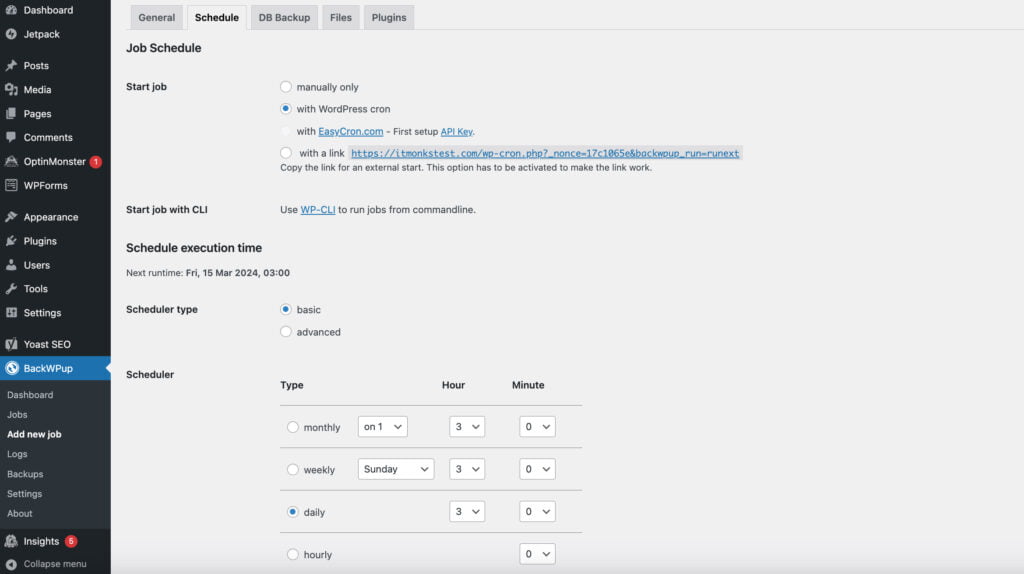
Step 3. Configure the Job Schedule
Decide on the frequency of making website backups based on the recommendations we’ve provided above, or specify your schedule.
Pros and Cons of Plugin Backup
There are always two sides to a coin, and backing up websites with plugins has pros and cons. Let’s examine them.
Pros:
This a beginner-friendly approach to website backups.
Some plugins integrate with cloud services for offsite backups.
Depending on the chosen plugin, you can get extra features like site migration, malware detection, and security scanning.
Cons:
Relying on third-party plugins brings potential security risks to your website, especially when the plugin doesn’t receive regular updates or originates from an untrustworthy provider.
If you choose a free version of a plugin, you may encounter limitations regarding the backup file size or the frequency at which backups are made.
There may be a conflict between different plugins installed on your website, leading to compatibility issues.
Host Backup
Most web hosts offer backups along with other services. Some offer backups as add-ons or sell them bundled with their hosting plans.
Depending on your web host’s interface, you can back up your website in two ways. Some hosts use custom interfaces, while others rely on third-party built-in programs like cPanel.
In both cases, the website backup process remains the same. Our guide shows how to back up with a cPanel since it’s the most common approach. Please remember that the following guidelines will also work for you if you use a host with a custom panel, though the navigation process may slightly differ.
cPanel WordPress Backup
cPanel (stands for ControlPanel) is a web hosting control panel with a graphical interface and automation tools. It offers backup functions, mail security, database, and domain management options, which may slightly differ based on the chosen hosting provider.
Depending on your web host’s specifications, you can back up your site using the cPanel Backup Wizard or the Web File Manager.
The Backup Wizard in cPanel is an interface that allows you to back up your WordPress website fully or partially. You can use the same interface to restore the most recent backups.
The Web File Manager in cPanel is a web-based file management tool that lets you manage files and directories in a web browser on your web hosting account without needing a separate FTP client or SSH access.
cPanel also provides a tool called phpMyAdmin for database backups. The tool lets you store, organize and retrieve data. While backing up a database, phpMyAdmin generates and saves the statements required to recreate the database (which is commonly called “exporting” or “dumping” the database). When restoring the database from a backup, MySQL executes those statements to restore the database to its previous state.
We give step-by-step instructions on creating a website backup using the Backup Wizard in cPanel.
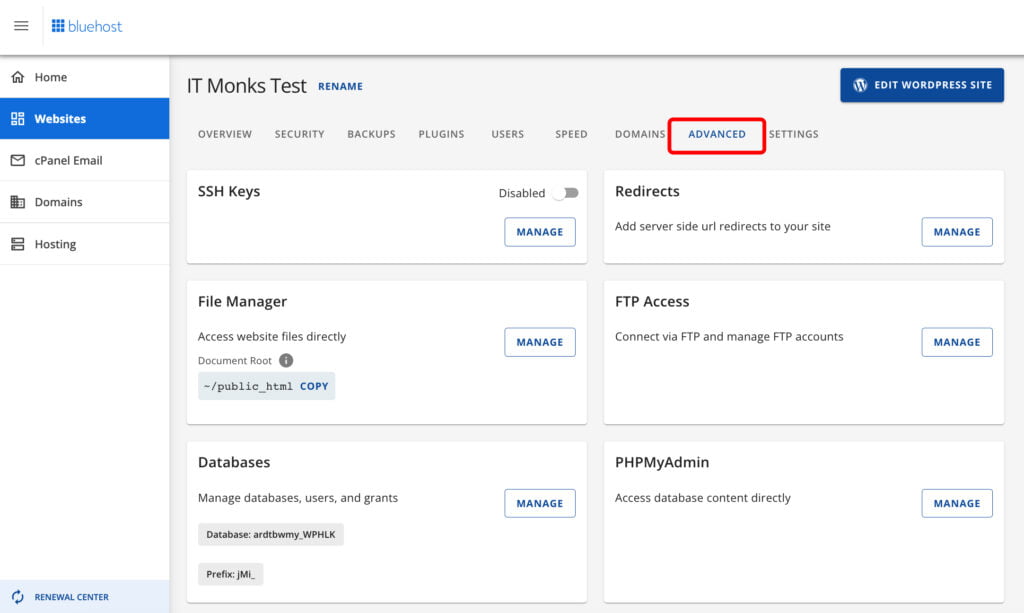
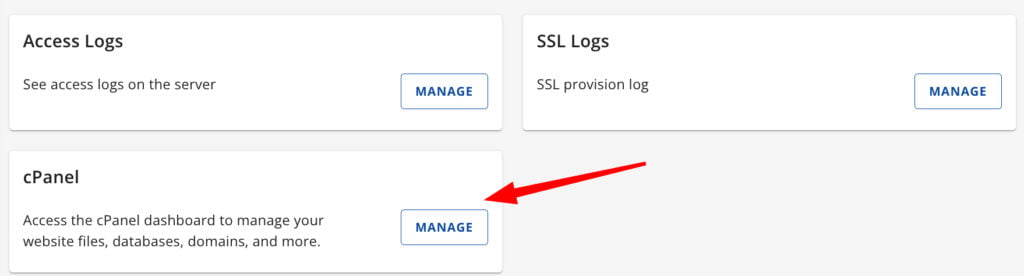
Step 1. Access cPanel
Log into your Bluehost account, click on the website you want to back up, and then select settings > advanced. Next, scroll down until you find the “cPanel” block. Then click “Manage.”
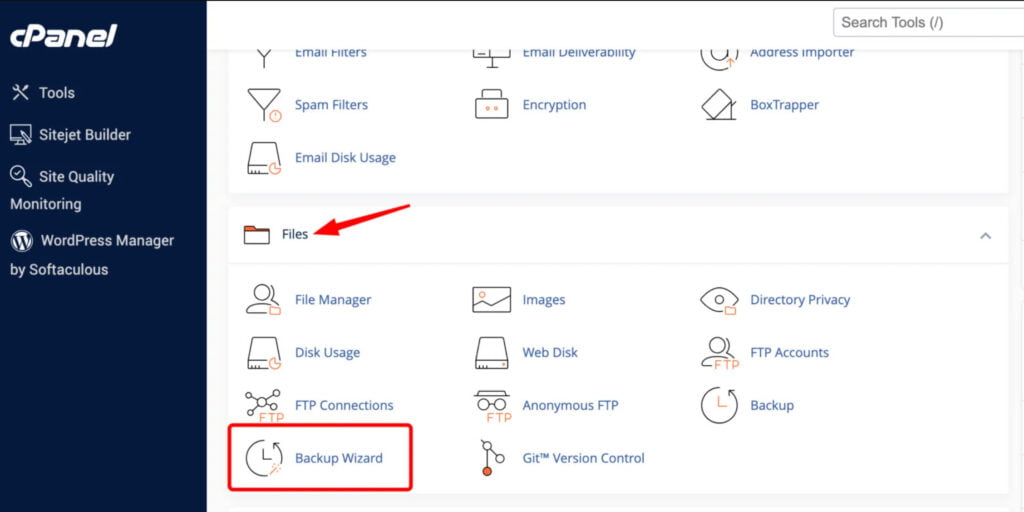
Step 2. Open Backup Wizard
Next, you’ll be taken to the cPanel interface, where you can find the Backup Wizard. Click it.
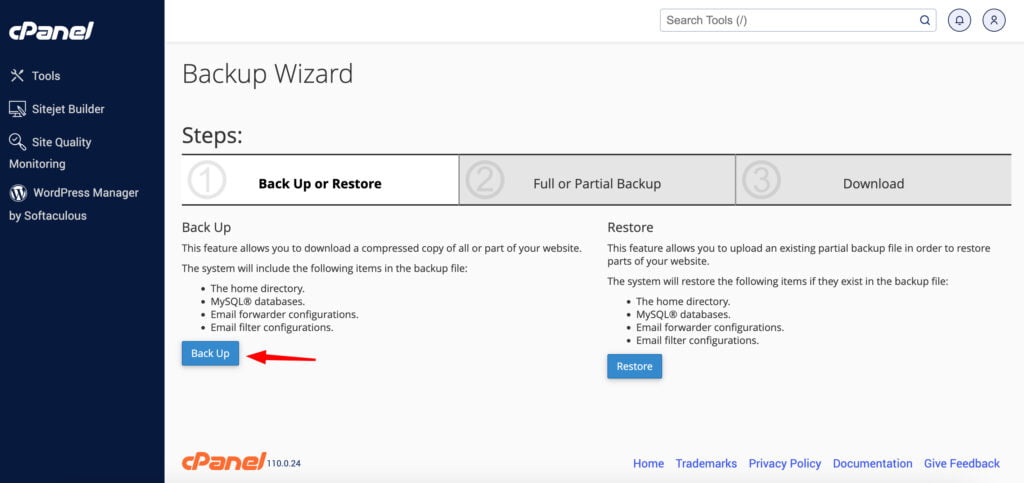
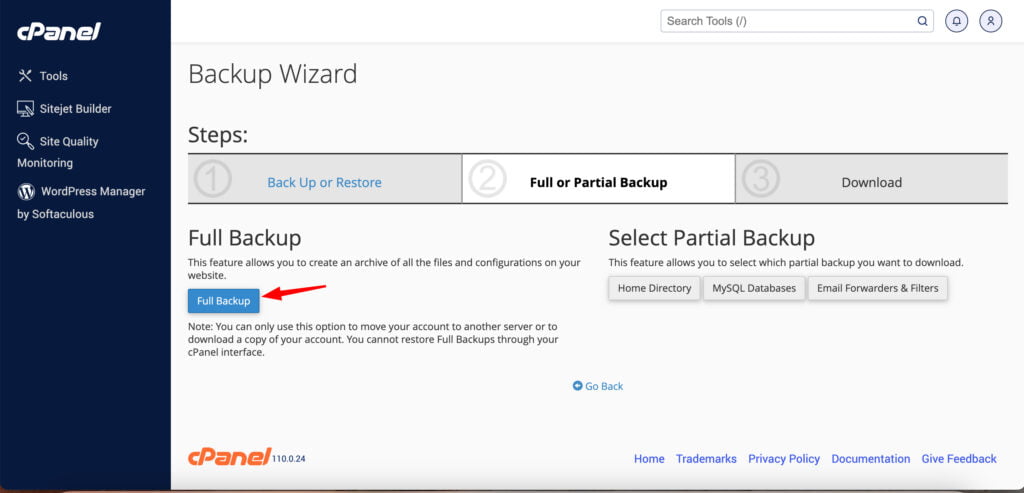
Step 3. Create a Full Backup
When you open the Backup Wizard, you will see two options: backup and restore. At this point, we need to back up a website.
Next, we choose “Full Backup.” This feature allows you to create an archive of all the files and configurations on your website.
(Note: When choosing the full backup in Bluehost cPanel, you can only use the backup archive to get a copy of your account or move your account to another server. You cannot restore Full Backups through Bluehost cPanel. In Bluehost, you can restore partial backups.)
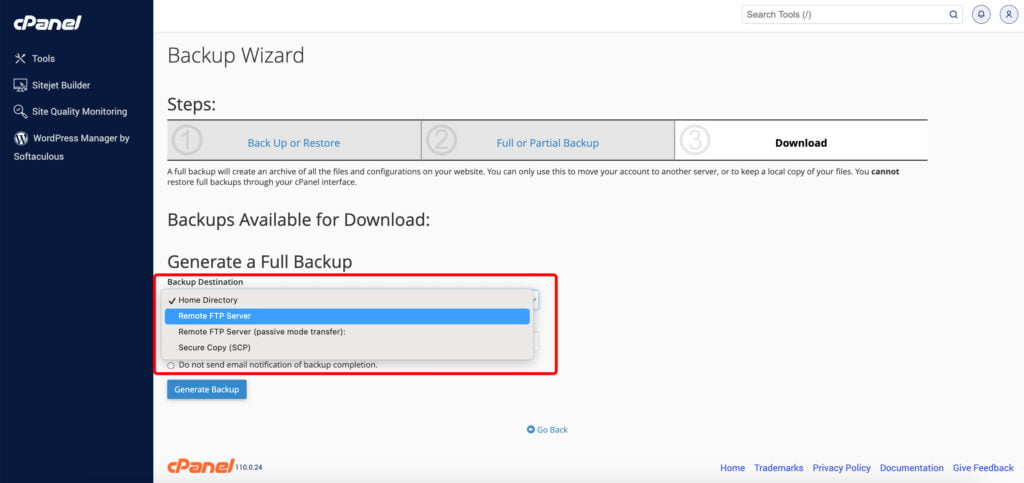
Step 4. Choose Backup Destination
The Download section with several options will appear in the next window. Bluehost cPanel lets you choose from 4 download options, namely:
Home Directory (the backup file will be saved in the server’s home/username directory);
Remote FTP Server;
Remote FTP Server (passive mode transfer);
Secure Copy (SCP).
Note: Only the first option of these four is advised for non-techies; the other three are recommended for advanced users.
Step 5. Click Generate Backup
This is the final step, after which the full backup will be created.
If the Backup Wizard and Web File Manager are unavailable, you can use the FTP method, which we further discuss in this guide.
Pros and Cons of Host Backup
Pros:
Rather than relying on plugins, many users select host backups to ensure the process works correctly.
Host backups refer to manual backups. This way, you get more control over the procedure.
You can choose whether to create a full or partial backup to make a copy of the most important data.
You can choose the exact location where your backup will be stored.
Cons:
Unlike working with a plugin, when opting for a host backup, you should ensure you understand what you do at every step since the process can be risky.
A tiny error made while accessing your site files directly can break your website,
This more time-consuming approach will not work for those planning to back up websites frequently.
FTP WordPress Backup
Some hosts do not provide control panels. You can use FTP (File Transfer Protocol) clients in such cases. Please note that this method only backs up files. You will need to do this separately if you need to make a copy of your website’s database.
There are many FTP clients available. For this guide, we have chosen FileZilla to demonstrate how to back up WordPress files on distance.
Step 1. Install FileZilla on your computer.
Step 2. Obtain FTP credentials (the FTP server address, username, and password) from your hosting provider.
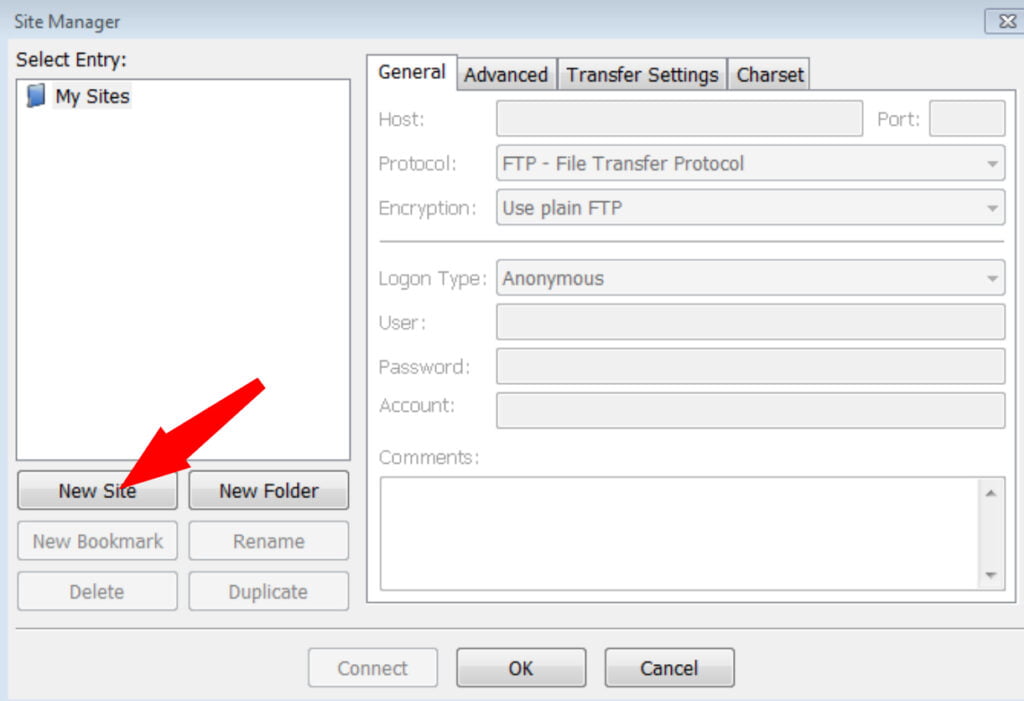
Step 3. Launch FileZilla to connect to your WordPress website. Click File > Site Manager > New Site, and type in the following information in the fields provided: Site Name, Host, Protocol, Encryption, Logon Type, User, and Password.
Once you fill in all these fields, click “Connect” to access your FTP directory.
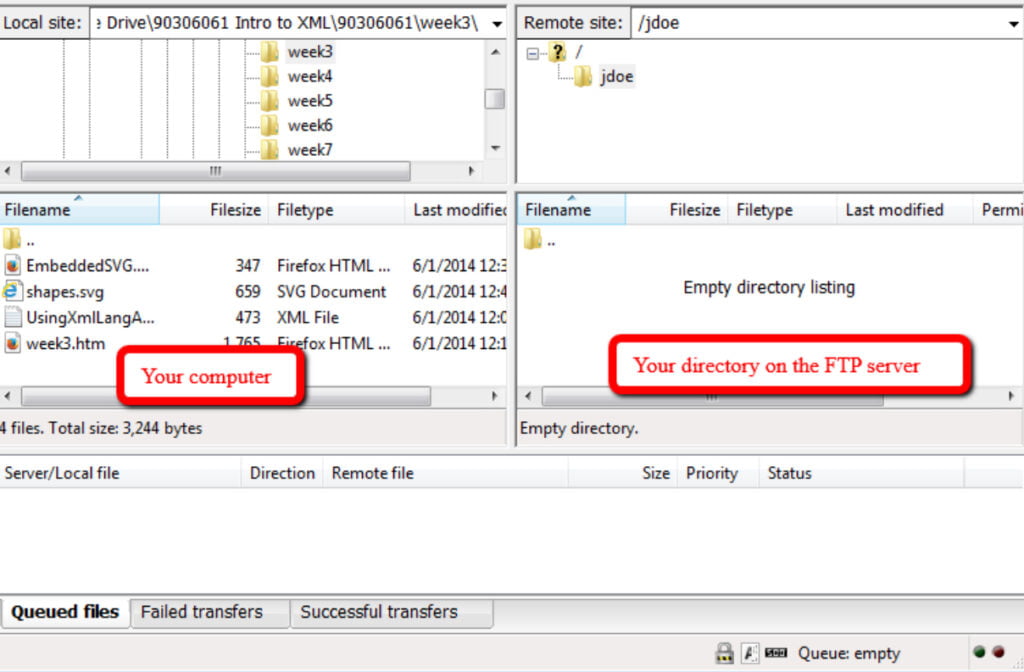
Step 4. Access the FTP directory. The directory on the FTP server should be listed on the right side of the interface, while the files on your computer will be listed on the left.
Step 5. Download files to your computer using the FileZilla FTP client. In the window on the right, select all the files you want to download. In the window on the left, select the folder on your computer where you want to store the files. Right-click on the mouse on the folder you want to back up and select “Download.” A copy will be saved to your computer.
Note: FTP backs up your website’s files only. If you need to back up your database, consider using one of these methods – hosting backup or SSH/CMD command.
Pros and Cons of FTP Backup
Pros:
This method lets you download your website’s raw files and database.
Opting for FTP backup, you can backup your WordPress website even if you can’t access the dashboard.
Cons:
The method is more time-consuming than backing up your website with a plugin.
A human error is possible, accidentally saving an incomplete website copy.
This is not the best website backup method for non-techies.
MySQL Command/SSH WordPress Backup
MySQL Command and SSH (Secure Shell) are different technologies but can be used for the same things. In our case, we can use them for website backups.
MySQL Command is a command-line tool used to interact with MySQL databases. It allows users to execute various commands to manage databases, including backing up and restoring data.
SSH is a network protocol used to access and manage remote servers securely. It provides a client and server with an encrypted means of communication, allowing a client to execute commands on a server remotely.
Using MySQL Command and SSH, you can remotely access your web server’s command interface and execute MySQL commands for WordPress backups.
Step 1. Use SSH to connect to your server.
You’ll need to enter your server’s IP address, username, and password.
Step 2. Access MySQL.
Use the MySQL Command to access MySQL from the command line.
Step 3. Export WordPress database.
Create a WordPress database backup using the mysqldump command. The command looks like this:
Replace [username], [database_name] and [backup_file.sql] with your details.
Step 4. Download the backup file.
Use an FTP client to download the backup file to your local machine.
Note: This backup WordPress method makes a copy of your website’s database. If you need to back up files, you will need to do it separately using the host backup or FTP backup, which we’ve previously discussed in this guide.
Pros and Cons of SSH BackUp
Like other methods, MySQL Command/SSH WordPress backup has benefits and drawbacks you should know about.
Pros:
SSH provides a lightning-fast website backup process, offering a direct backup and migration on the web server.
Management tools function even if the website is offline.
SSH provides direct access to powerful command line tools like WP-CLI, letting you interact with WordPress even during backend issues.
Management tools use SSh to communicate directly with the website. There is no need to use companion WordPress plugins.
Cons:
Not all web hosts offer SSH.
SSH primarily caters to web developers.
SSH requires extra upfront work. Every website needs an SSH key to be added via SFTP or manually over SSH.
Restoring Website from Backup
Now that you have your WordPress website backup in place, let’s briefly review how to restore a WordPress backup using the previously discussed methods.
How to Restore WordPress Using cPanel
Navigate to your hosting provider’s cPanel dashboard (you can commonly access it via http://yourdomainname.com/cpanel).
Locate the Files section and the Backup Wizard option below it.
To initiate the restoration process, click Restore and choose whether you want to restore the entire website or parts of it (e.g., files, and database). Then, follow the prompts to proceed with the backup restoration process.
The steps differ slightly if your web host uses a custom interface rather than cPanel. In this case, adapt to the instructions accordingly.
How to Restore WordPress Files Using FTP
If we describe the WordPress file restoration process using FileZilla in a few steps, the instructions will be as follows:
Ensure you’ve got the FileZilla FTP client installed on your local machine.
Like creating a website backup, restoring WordPress with SSH is ideal for more advanced users.
Using the command line provides more control and flexibility, allowing you to restore the database and files separately. Here’s a brief overview of the process:
Connect via SSH to your server.
Navigate to your website’s root directory.
Use commands like scp or rsync to transfer backup files from your local machine to the server.
How to Restore a Website Using a Plugin
There are many WordPress plugins available for website restoration. We’ve decided to explain how to restore a website using the UpdraftPlus plugin.
Install and activate UpdraftPlus on your website.
Navigate Settings > UpdraftPlus Backups in your WordPress dashboard.
Scroll down to the Existing Backups section.
Find the backup you want to restore.
Click the Restore button.
Choose what exactly you’d like to restore (files, database, etc.).
These are quick instructions on how to restore a WordPress site from backup. For more detailed guidelines, please refer to our dedicated tutorial on how to restore WordPress from backup.
Conclusion
Regardless of their background and experience, every website owner should understand the process and methods for creating WordPress backups. The importance of handling backups is non-negotiable, making them an inevitable part of your website maintenance toolkit.
We realize the importance of professional website maintenance at IT Monks, particularly creating regular backups. We also understand how busy business owners are while running, optimizing, and promoting their projects. That’s why we have decided to share this guide with different methods on how to back up WordPress, which will be handy for non-techies and more advanced users alike.
Keep this guide bookmarked for the major website backup instructions. Whenever you need practical help and expert assistance, do not hesitate to contact us for professional website maintenance services.
FAQ
Does WordPress have a built-in backup?
WordPress doesn’t have built-in backups. However, you can back up your files and database using a plugin (like BackWPup) or consider a manual approach.
How do I back up my WordPress site without plugins?
If you prefer backing up your website manually, consider using an FTP client (like FileZilla) or MySQL Command and SSH.
Does the backup process using cPanel include media files such as images or audio in the backed-up files?
The cPanel backup includes media files (images and audio files). It doesn’t contain files from your /home directory that you do not own and cannot access.
How many backups should I keep?
It depends on your specific needs and storage capabilities. As a rule, we recommend following the 3-2-1 backup rule, meaning that you should have at least 2 backup copies.
 | updated:


 Gemini