How to Install WordPress?

Table of Contents
WordPress website development begins with installation, which deploys the content management system into a local or hosted environment. This process transitions the website from an inactive state without CMS, database connection, or file structure into a configured instance with administrative access, routing, and extensibility.
WordPress installation is the first step in WordPress website development, setting up the technical foundation for customization, content management, and scalability of a website. It defines how the website connects to required components, such as MySQL or MariaDB, and sets root directory permissions.
There are several installation methods, including local, manual, automated, and fully managed, each suited to different needs: local installations are for the development process, and manual, automated, and fully managed are for development and production deployment.
Local installations provide full control for developers and run offline on a local machine, but require a more complex setup and limited access to the website.
Manual installations offer flexibility and transparency but require technical expertise and time.
Automated installations reduce setup effort through scripts or tools but depend on standardized configurations.
Fully managed setups prioritize convenience and scalability but limit customization and deep server access.
By completing installation, the WordPress website becomes fully operational, ready for theme assignment, plugin use, and structured content publishing. This process enables all further development and positions the site within its deployment environment.
Types of WordPress Installation
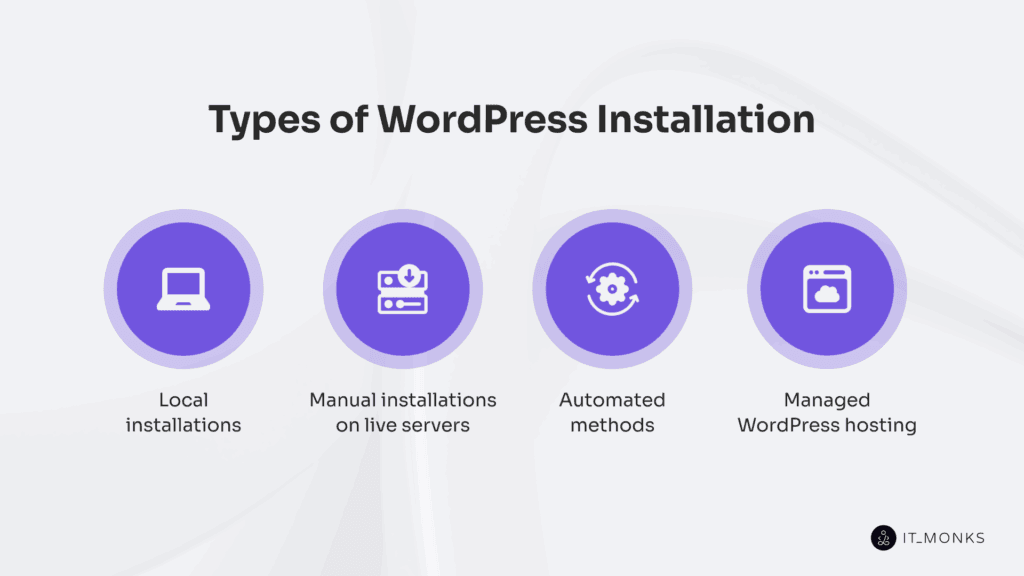
The WordPress installation process follows a structured path based on the environment, access level, and deployment method.
Local installations mark the development stage and include three approaches: manual setup with full control over the server, database, and configuration files; WordPress Studio for GUI-based deployment; and contained-based installation using containerized environments like Docker for isolated testing.
Manual installation on live servers applies to production environments. It includes FTP deployment, which requires uploading core files and setting up the database via a hosting control panel, and WP-CLI deployment, which uses command-line scripts to download, configure, and install WordPress.
Automated installation uses hosting dashboards to enable one-click deployment, simplifying setup by handling server configuration and file placement with minimal user control on the hosting servers.
Managed WordPress installation is a fully pre-configured environment provided by the hosting platform, integrating the stack and control systems to support stable, maintenance-free websites.
How to Make a Local Installation of WordPress?
A local WordPress installation runs on a developer’s computer, creating an offline environment for building, testing, and configuring sites without live server access. It enables full control, zero hosting cost, and private, reversible WordPress development.
Manual installation provides the highest level of configuration access and mimics live hosting with a local stack running Apache or Nginx, PHP, and MySQL or MariaDB.
WordPress Studio offers a desktop GUI installer that automates file and database setup, making it ideal for beginners, designers, and anyone who needs quick prototyping without the technical overhead.
Container-based installation supports containerized, isolated deployments defined through YAML configuration, suited for advanced users managing reproducible, version-controlled environments.
Each method serves a specific role and interface: manual uses the CLI for full control, Studio offers a GUI for simplicity, and Docker relies on scripting for scalable workflows.
Manual Local Installation
Manual local installation involves setting up WordPress on a local development environment by configuring your server stack, database, and file system directly.
Here is how to install WordPress manually:
- Install a local server stack (e.g., XAMPP, MAMP, or WAMP) that includes PHP, MySQL, and Apache.
- Create a database using the stack’s control panel (e.g., phpMyAdmin).
- Copy the WordPress core files into the web root directory (e.g., htdocs or www).
- Configure the wp-config.php file by entering database credentials and required settings.
- Run the WordPress installer by accessing localhost/site-folder in your browser.
- Verify the permalink structure in the WordPress dashboard to enable clean URLs.
This installation method provides full control over every part of the setup and closely mirrors a live server environment. It is ideal for developers, advanced users, or anyone needing a fully customizable local testing platform before deploying to production.
1. Install a Local Web Stack
To install WordPress locally, the system must first emulate a server environment using a local web stack that includes PHP (version 7.4 or higher), MySQL or MariaDB, and Apache or Nginx.
These components come bundled in tools like XAMPP (cross-platform), MAMP (macOS, Windows), WAMP (Windows), and Laragon (advanced Windows), each providing the execution layer WordPress requires.
Once the stack is selected:
- Download the latest version from the official website of the chosen package.
- Install the stack using default settings, unless there are specific port or directory requirements.
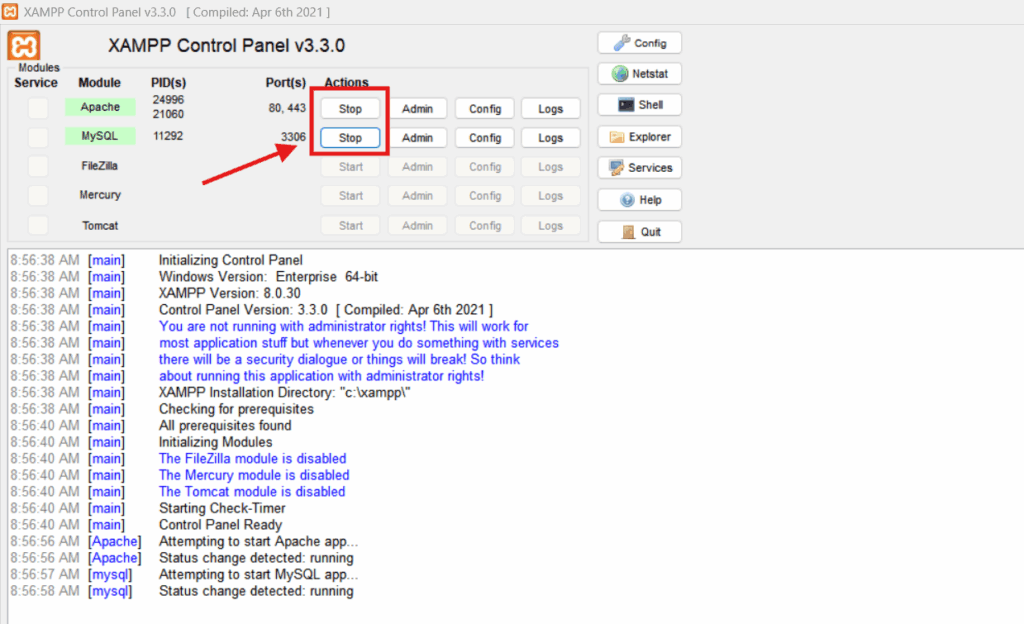
- Launch the control panel provided by the stack.
- Start Apache and MySQL services explicitly from the panel.
- Confirm that both Apache and MySQL services are active by visiting http://localhost in a browser.
Once the stack is running, move WordPress files into the web root to begin setup; this environment is required for executing scripts and processing database connections.
2. Create a Database
To create a database, start by opening your local stack’s control panel and ensuring the MySQL server is running:
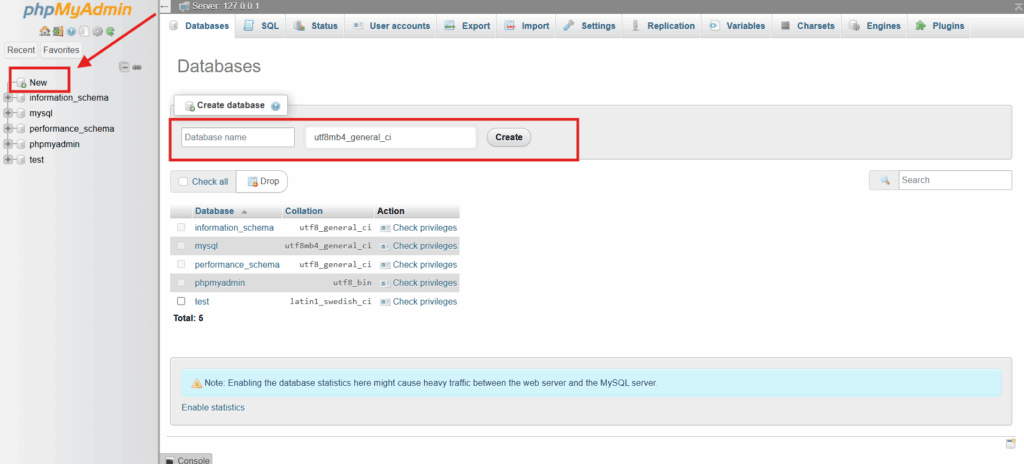
- Launch phpMyAdmin by visiting http://localhost/phpmyadmin/.
- Click the “New” tab in the top menu.
- Enter a name such as wordpress_local in the “Create database” field.
- Select utf8mb4_general_ci from the collation dropdown.
- Click “Create” to finalize the database creation.
3. Put WordPress Files in the Web Root
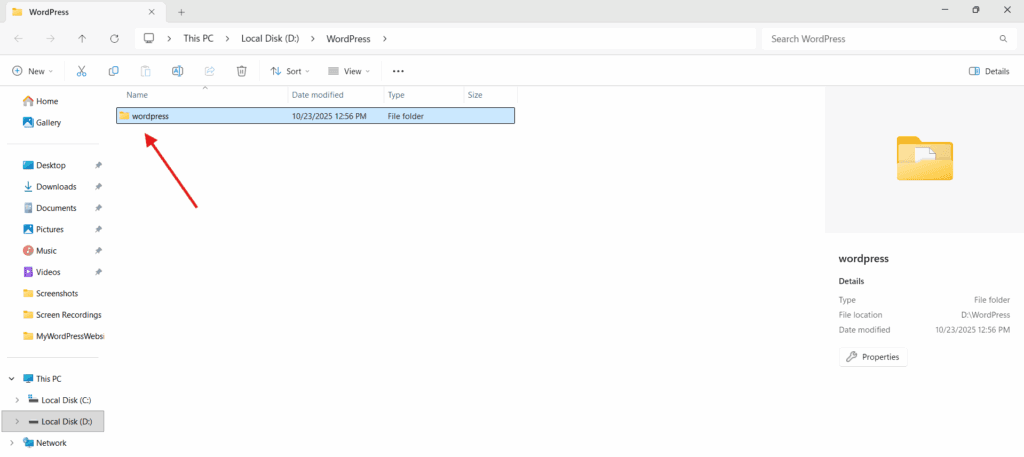
To put WordPress files in the web root, copy the extracted WordPress folder into the root directory of the local server, which is where Apache or Nginx serves files via localhost.
- Download the latest WordPress package from WordPress.org, then extract the ZIP file to reveal the uncompressed folder containing wp-admin, wp-content, and wp-includes.
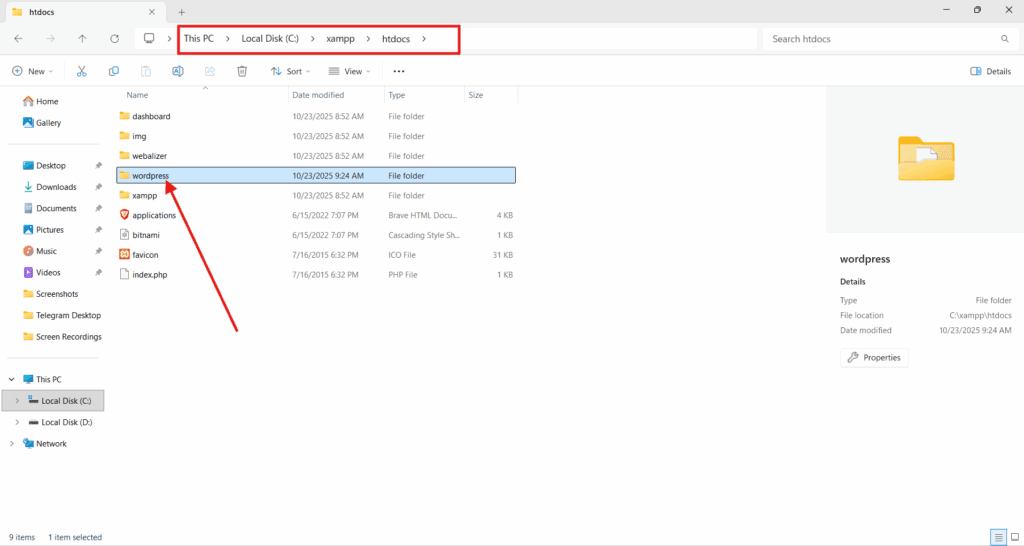
- Locate the root directory: htdocs for XAMPP, www for WAMP, or /Applications/MAMP/htdocs for MAMP.
- Move the entire folder into this directory, optionally rename it (e.g., mywordpresssite), and preserve its original structure.
- Visit http://localhost/mywordpresssite to confirm setup. If correctly placed, the installer screen will appear.
4. Configure wp-config.php
Configuring the wp-config.php file sets the database connection parameters that allow WordPress to communicate with your local MySQL database.
- Locate the wp-config-sample.php file in the WordPress root directory.
- Rename it to wp-config.php.
- Open the file in any text editor such as Notepad, Notepad++, Sublime, or VS Code.
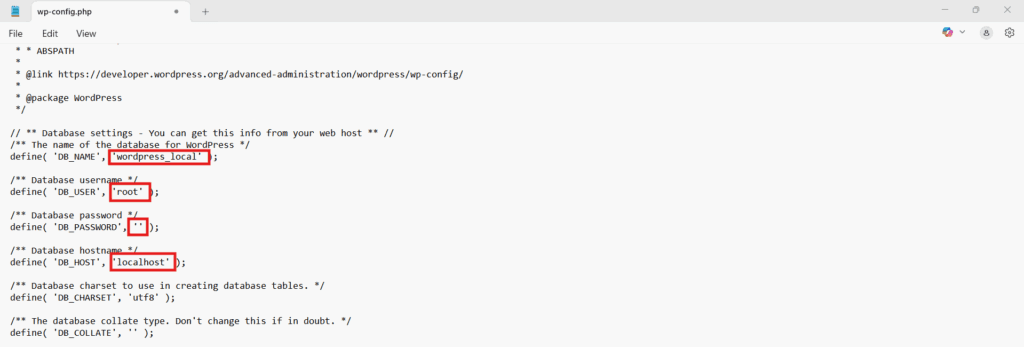
- Edit the following configuration constants with your local MySQL database credentials:
define('DB_NAME', 'wordpress_local');   // Database name created via phpMyAdmin
define('DB_USER', 'root');              // Default local username
define('DB_PASSWORD', '');              // Empty for default local stacks
define('DB_HOST', 'localhost'); // Host for local environments- Save the file to apply the configuration.
If wp-config.php isn’t preconfigured, WordPress will prompt you for database credentials during installation and automatically generate the file.
5. Run the Installer
Once wp-config.php is properly configured, you can run the WordPress installation wizard through your browser to complete setup and write the site data into the local database.
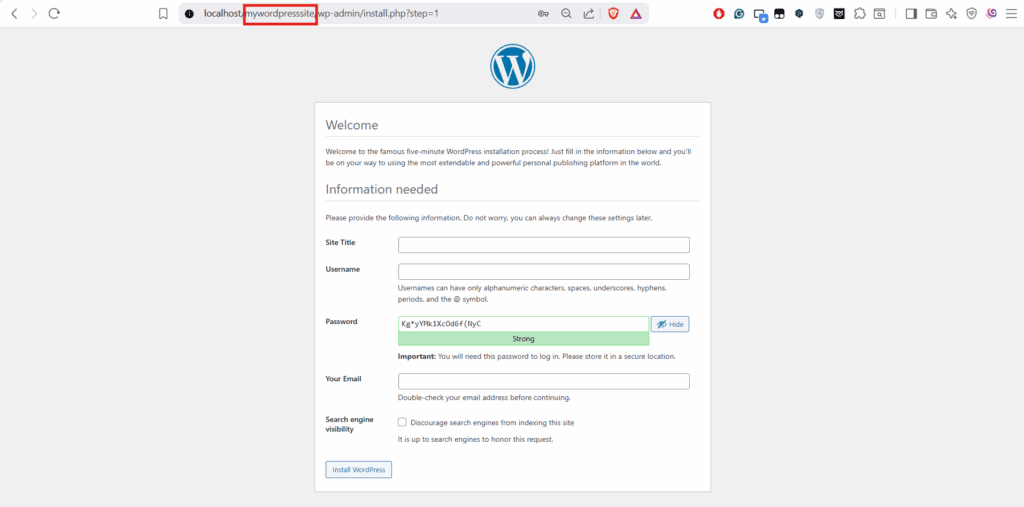
- Open a browser and go to http://localhost/your-folder-name, replacing your-folder-name with the name of the directory where you placed the WordPress files.
- Select your preferred language and continue to the setup form.
- Fill out the required fields, including site title, username (for admin login), password, and email address. Leave the Search Engine Visibility checkbox unchecked, as it has no impact in a local environment, but make sure to review it when moving the site to development or production environments.
- Submit the form by selecting the Install WordPress button. This action stores your inputs and creates the necessary database tables.
- Wait for the success confirmation. Once complete, WordPress displays a message indicating that the setup is finished and provides a login prompt.
6. Verify Permalinks
To verify the permalink structure and confirm that URL routing is functioning correctly in your local WordPress installation:
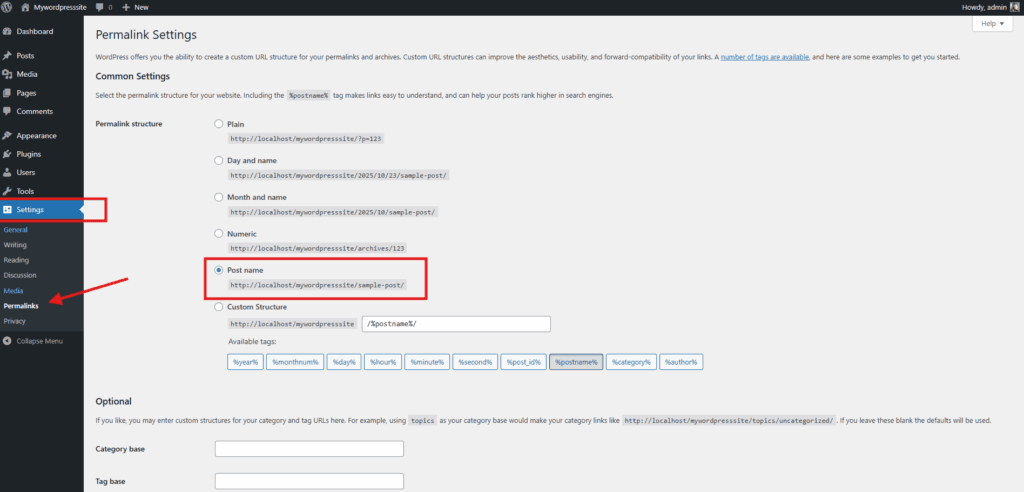
- Navigate to the Permalinks section in the WordPress dashboard’s Settings menu.
- Select the “Post name” permalink structure.
- Click Save Changes. This confirms that your server handles permalink rewrites correctly (e.g., via .htaccess on Apache).
- Open any published post or page and verify that the URL displays a clean permalink and does not return a 404 error.
If the page loads properly, permalink routing is functioning, and the local WordPress installation is confirmed to be complete.
Local Installation with WordPress Studio
WordPress Studio is a desktop application that enables the creation of local WordPress sites through a streamlined, GUI-based workflow, requiring no manual configuration of the WordPress stack.
To install WordPress with WordPress Studio, do the following:
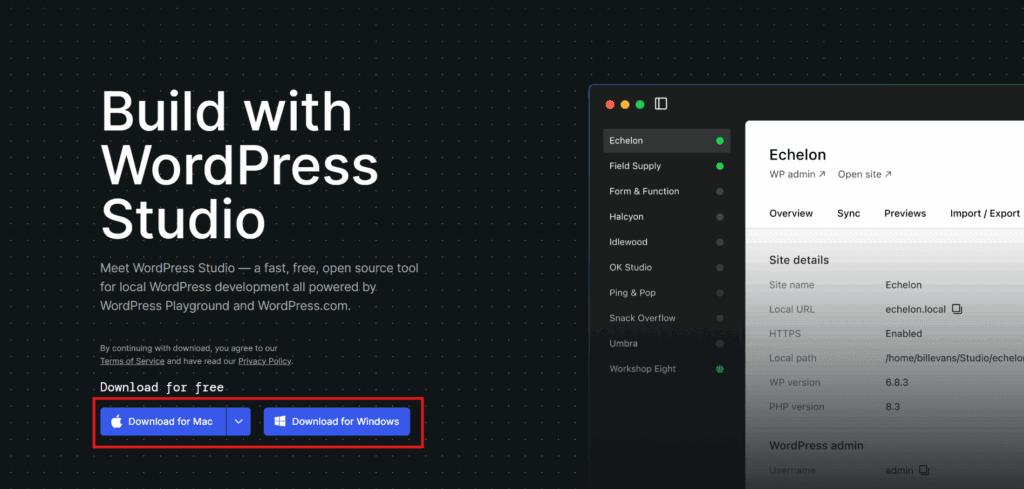
- Download and install WordPress Studio on your operating system.
- Create a new local project using the site setup interface by entering a project name and location.
- Launch the site to start the local server and initialize the project folder.
- Open the admin panel to access the WordPress dashboard and start managing your site.
WordPress Studio handles local environment abstraction automatically, including database setup and file configuration. This method is ideal for designers, beginners, or developers needing quick admin access without manual configuration steps.
1. Download and Install
To install WordPress Studio on your local machine, follow these exact steps:
- Download WordPress Studio from the official website.
- Select the version for your operating system.
- Download the installer file.
- Run the installer.
- Install WordPress Studio using default settings.
- Launch WordPress Studio.
2. Create a New Site
To create a new local WordPress site using the WordPress Studio interface, follow these steps:
- Open WordPress Studio.
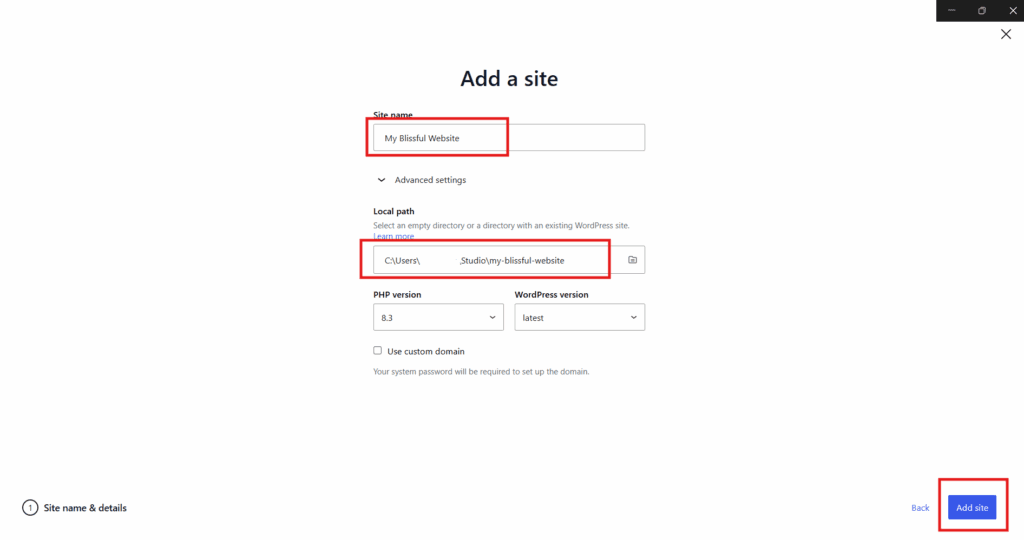
- Click Create New Site.
- Enter a name for your site.
- Select the project folder where the local site will be stored.
- Confirm the setup to create the new local WordPress site.
3. Launch the Site
To make your local WordPress site accessible in the browser, launch it using WordPress Studio by following these steps:
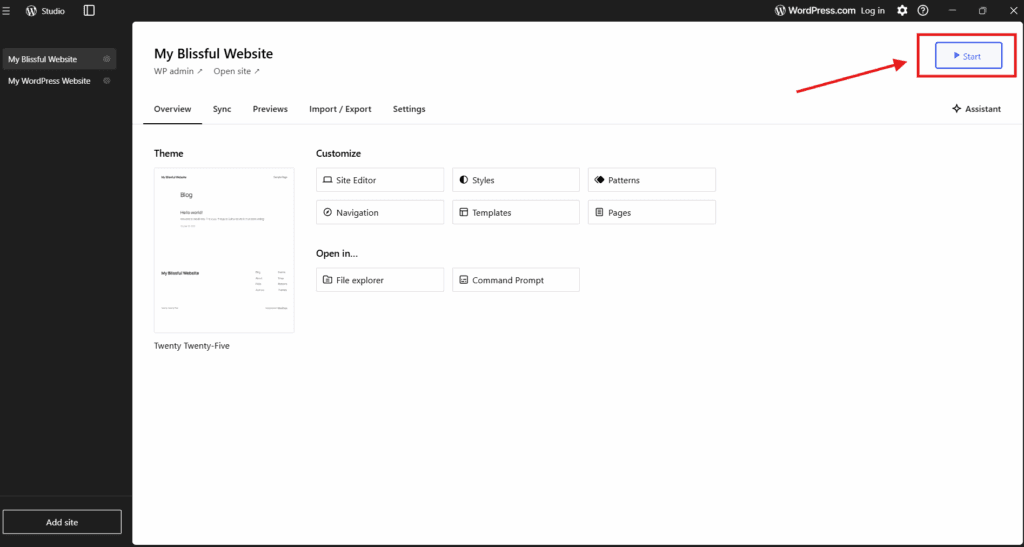
- Select your site from the WordPress Studio dashboard.
- Click “Launch” to start the local server.
- Wait for the local environment to initialize.
- Confirm the site opens automatically in your browser, or use the provided local URL to open it manually.
4. Open the Admin Panel
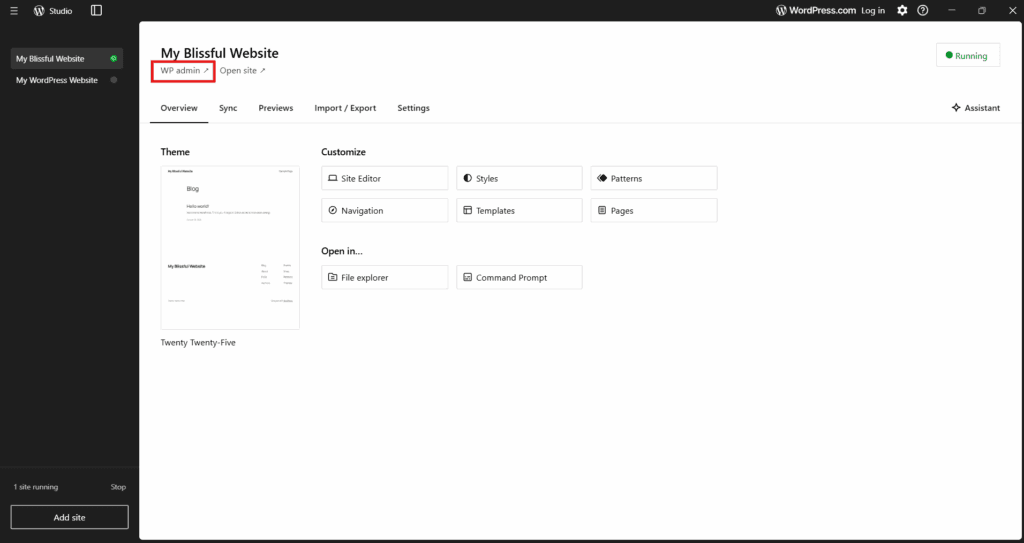
To access the admin panel of your local WordPress site, click “WP Admin” in WordPress Studio, and you’ll be redirected to the WordPress dashboard.
Local Installation Through Docker
Local installation using Docker helps set up a local WordPress website in an isolated, container-based environment. Before setting up WordPress with Docker on Windows, make sure Docker Desktop is installed and running on your system.
To configure a local WordPress setup using this method, do the following:
- Create a project folder to hold your local setup.
- Define a docker-compose.yml file to define the container services.
- Start the containers to initialize the environment.
- Open the site in a browser using the provided local URL.
- Complete the WordPress installation wizard.
- Log in to the admin panel to access your local site.
1. Create a Project Folder
To begin setting up WordPress in Docker, you need to create a dedicated project folder that will hold all configuration files and container data.
Here is what you need to do:
- Open your terminal or file explorer.
- Create a new folder on your local machine and name it after your WordPress project.
This folder will serve as the root location for your WordPress container environment, storing the docker-compose.yml file and all related configuration data.
2. Create a docker-compose.yml File
To define the services required for your WordPress project, follow these steps to create the docker-compose.yml file:
- Open your project folder.
- Create a new file named docker-compose.yml. You can do this using your file explorer or by running a command like touch docker-compose.yml in terminal (macOS/Linux) or New-Item docker-compose.yml in PowerShell (Windows).
- Copy the file to the folder and open it in a text editor.
- Insert the necessary YAML configuration that defines the WordPress service, the MySQL service, and volumes. (if needed)
- Ensure the file defines ports and volumes.
- Save the file to apply the configuration.
3. Start the Containers
To start your local WordPress environment using Docker, follow these steps:
- Open your terminal and navigate to the project directory where your docker-compose.yml file resides by using this command: cd path/to/your/project-folder. This will pull images if needed, build the containers, and run them in the background
- Run the command docker-compose up -d to start the containers.
This command will pull the required images if they aren’t already available locally, build the WordPress and MySQL containers, and launch them as background processes.
4. Open WordPress in Browser
To launch your local WordPress site, open your browser and go to http://localhost:8000. The WordPress installation screen should appear, confirming that the containers are running and the environment is active.
5. Complete the Installation Wizard
To complete the installation Wizard, fill out the setup form that appears on your screen. This step connects WordPress to the database and creates your admin account.
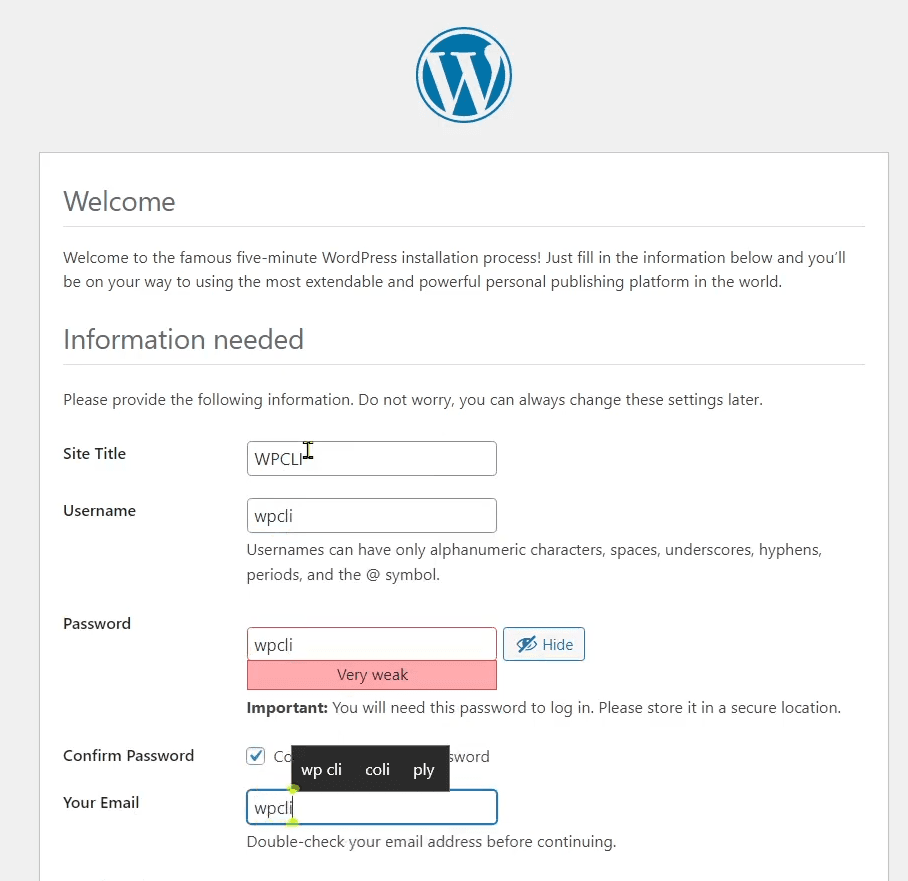
- Enter your Site Title. This is the name that will appear at the top of your pages and in browser tabs.
- Set your Username and Password. These will be your login credentials every time you access the WordPress dashboard.
- Add your Email Address. Use a valid email so WordPress can send admin notifications and password recovery options.
- Click the Install WordPress button. This submits the form and starts the installation process.
- Wait for confirmation. WordPress will process the information and install the necessary files. Once complete, you’ll see a success message and a link to log in. Your local site is now live.
6. Log In
After completing the installation wizard, follow these steps to access your local WordPress dashboard and confirm that the site is active:
- Open http://localhost:8000/wp-admin in your browser.
- Enter the admin username and password you created during the installation process.
- Click the Log In button.
- Confirm that the WordPress dashboard loads successfully. This verifies that your local WordPress site is now up and running.
How to Install WordPress Manually on a Server?
To install a WordPress website manually, core files must be uploaded to the server’s web root (e.g., public_html), the server environment must be configured, and a database connection must be established without the use of automated tools. This method provides complete control over deployment and is suited for shared or custom hosting environments.
Manual installation can be performed via FTP using a file transfer client and a hosting panel, or via the command-line interface with WP-CLI for a faster, scriptable setup. Both approaches require direct server access and hands-on configuration, making them suitable when precision and environment-level control are essential.
WordPress Installation Through FTP + cPanel
FTP installation is a manual method for setting up a WordPress website by uploading files to a web server using an FTP client and configuring the site in the hosting panel.
To install WordPress through FTP, follow these steps:
- Download and extract the WordPress files.
- Upload the files to the web server using an FTP client.
- Create a new database through the hosting control panel.
- Configure the wp-config.php file to connect WordPress to the database.
- Run the installation script in your browser to complete the setup.
FTP installation provides full access to core files and database settings and is commonly used in shared or cPanel-based hosting environments.
1. Download and Extract WordPress Files
To begin the manual FTP installation, first download and prepare the WordPress files on your local machine:
- Download the latest version of the WordPress package from the official WordPress.org website.
- Extract the contents of the .zip file to a local folder on your computer.
- Save and prepare these extracted files for uploading to your web server in the next step.
2. Upload Files to Web Server via FTP
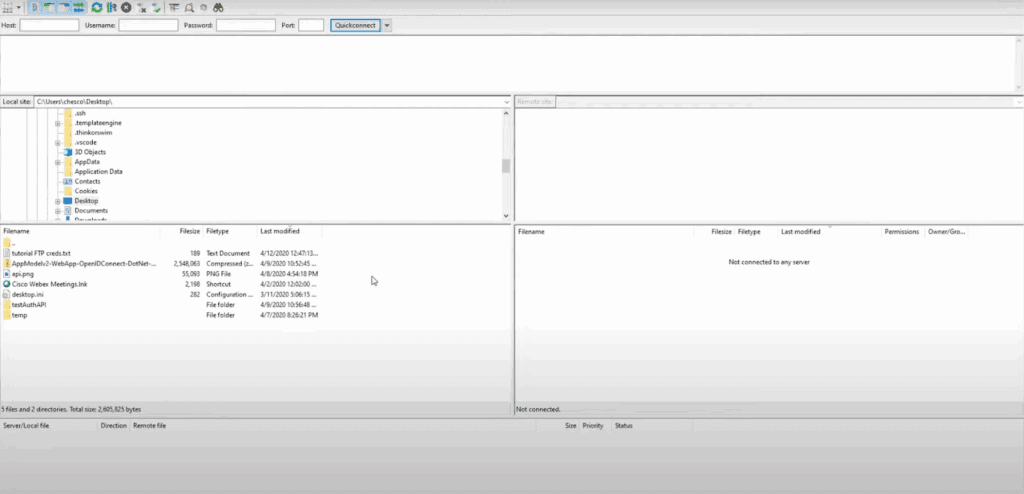
To upload WordPress to your web server via FTP, follow these steps in order:
- Open your FTP client and connect to your web server using your hosting credentials.
- Navigate to the target directory where WordPress will be installed, such as public_html or the root folder.
- Upload all files from the extracted WordPress folder into this directory.
3. Create a Database via Hosting Panel
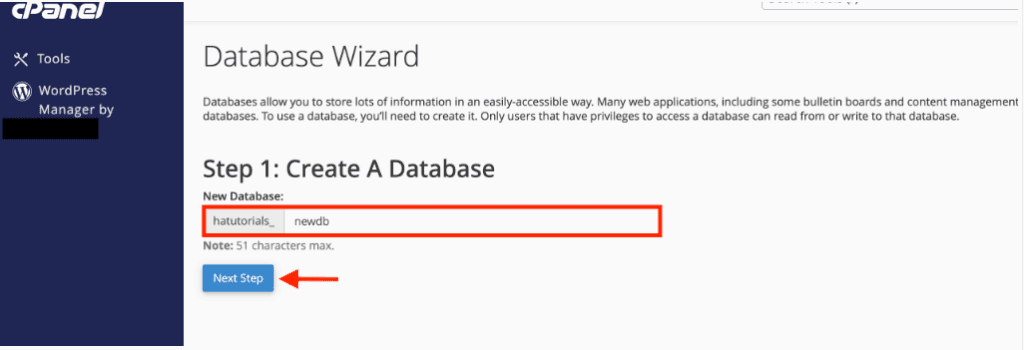
To prepare for WordPress installation, a new MySQL database must be created through the hosting provider’s control panel:
- Log in to the hosting panel (such as cPanel or Plesk).
- Navigate to the MySQL Databases section.
- Create a new database and assign a recognizable name.
- Scroll down and create a new MySQL user.
- Set a strong password for the database user.
- Assign the user to the database and grant full privileges.
- Save the database name, username, and password in a secure location for the configuration step.
4. Configure wp-config.php
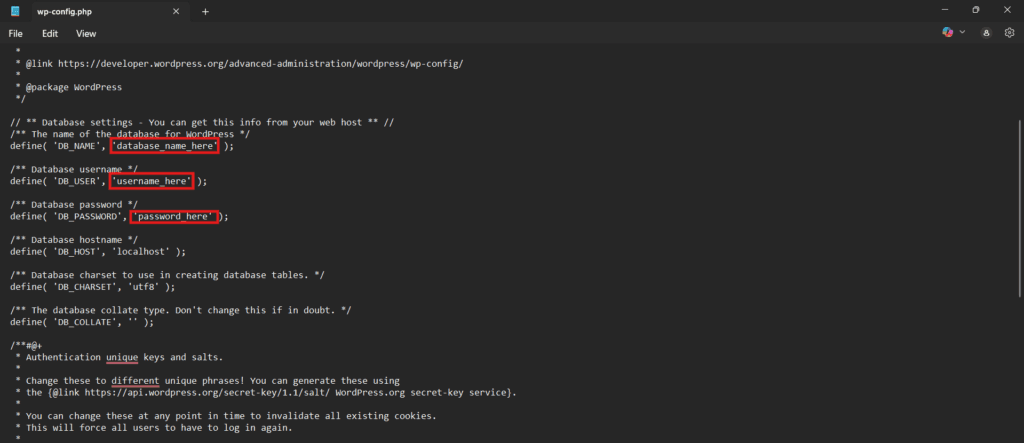
To connect WordPress to your database, configure the wp-config.php file by replacing the placeholder values with your actual database credentials. Follow these steps:
- Locate the file named wp-config-sample.php in your WordPress folder.
- Rename it to wp-config.php.
- Open the file in a text editor.
- Replace the values for DB_NAME, DB_USER, and DB_PASSWORD with your actual database credentials.
- Save the file.
If wp-config.php isn’t set up, WordPress will prompt for database details and create the file during installation.
5. Run the Installation Script

To complete the manual installation, do the following in your browser:
- Open your browser and go to the URL where you uploaded the WordPress files. The WordPress installation screen should appear.
- Enter your site title.
- Set a unique admin username and a strong password.
- Enter your email address.
- Click the “Install WordPress” button to complete the setup.
WordPress Installation Through Command Line
WP-CLI Installation uses the WordPress Command Line Interface to perform the full WordPress setup without relying on a browser or FTP client.
To install WordPress through the Command line, follow these steps:
- Install WP-CLI on your system.
- Download the WordPress core files via the CLI.
- Create the wp-config.php file using CLI commands.
- Create a database using the CLI or hosting control panel.
- Run the installation script through the command line to complete setup.
1. Install WP-CLI
To install WP-CLI on your local system or server, you need to:
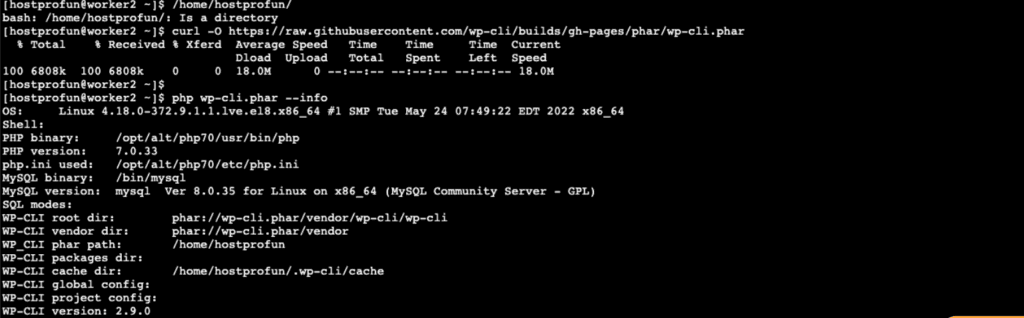
- Download the wp-cli.phar file from the official WP-CLI website.
- Move it to the /usr/local/bin/ directory and rename it to wp.
- Make it executable using chmod +x /usr/local/bin/wp.
- Verify the installation by running wp –info in the terminal.
2. Download WordPress Core via CLI
To download the WordPress core using WP-CLI, do the following:
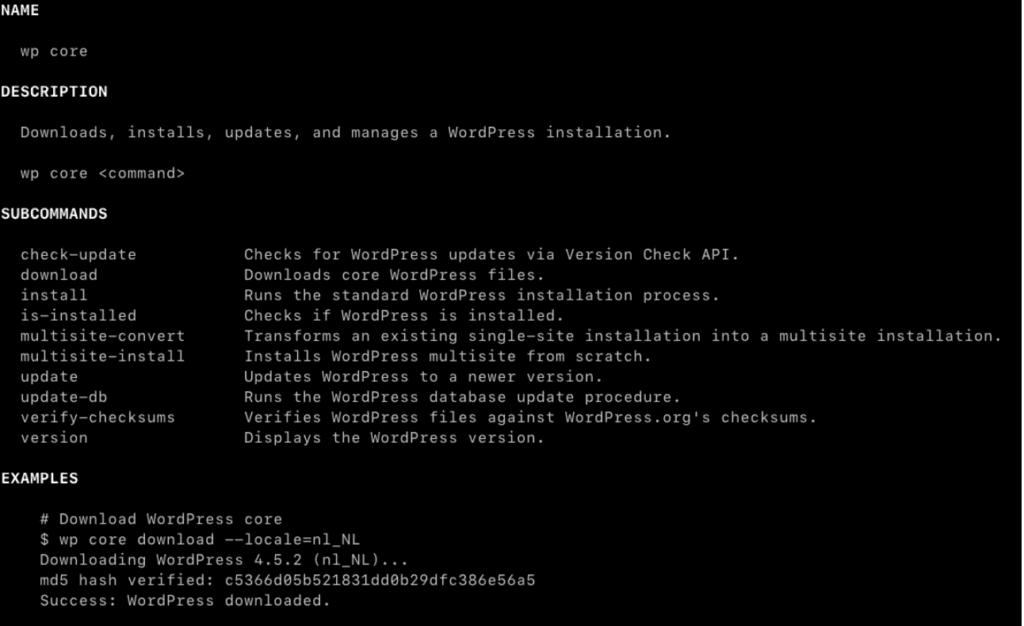
- Navigate to the installation folder. In your terminal, navigate to the folder where you want to install WordPress. This directory will hold the WordPress core files.
- Run the WP-CLI command. Once you’re in the correct location, run the following command using WP-CLI: wp core download
- Confirm download location. This command will download the WordPress core files and place them directly into the current directory. Ensure you are in the intended directory before executing the command.
3. Create wp-config.php via CLI
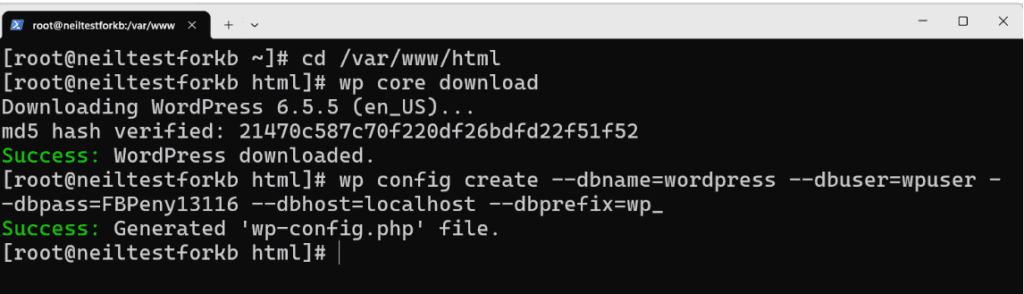
Create the WordPress configuration file via WP-CLI using the steps below:
- Use WP-CLI to generate the wp-config.php file by running the command with your database name, username, and password.
- Specify these values as parameters in the wp config create command.
- Confirm that the configuration file has been created in the WordPress root directory and is ready for use.
4. Create Database via CLI or Host
To set up a database for your WordPress installation, choose one of the following methods depending on your server access:
- Create a new database using WP-CLI if your server supports command-line access, or use your hosting panel to do it manually.
- Make sure the database name, username, and password match the values specified in the wp-config.php file.
- Once the database is set up, you’re ready to run the installation.
5. Finalize Installation
To complete the WordPress installation via WP-CLI, run the WP-CLI command with your site title, admin username, password, and email. Provide real values for each parameter to ensure proper execution:
wp core install --url="http://localhost" --title="Your Site Title" --admin_user="admin" --admin_password="securepassword" --admin_email="[email protected]"Once executed, WordPress completes the setup, creates the admin account, and applies the configuration.
After completion, the site is installed and ready to access using the credentials you entered.
How to Make a One-Click WordPress Installation?
To make a one-click WordPress installation, first ensure your hosting provider offers WordPress-specific hosting with a built-in installer tool. This feature is typically available in the control panel of supported providers:
1. Log in to your hosting control panel.
2. Navigate to the WordPress or Website Installer section.
3. Click the Install button next to WordPress.
4. Enter your site details, including the site title, admin username, password, and email address.
5. Select your domain and leave the directory field blank to install on the root domain.
6. Click Install or Finish and wait for the confirmation message.
The setup typically takes a few seconds, and once complete, your WordPress website will be ready to use.
How to Make a Managed WordPress Installation?
To make a managed WordPress installation:
- Sign up for a Managed WordPress hosting plan from your chosen provider.
- Log in to your hosting dashboard.
- Click the option to create or add a new WordPress site.
- Enter your domain name or select a temporary domain if one is offered.
- Set your site title, admin username, and password.
- Click Create Site or Launch to start the installation.
The WordPress website will be provisioned automatically and ready to access via the dashboard or a staging URL.
Common Installation Issues
Error Establishing a Database Connection
An error establishing a database connection happens due to incorrect credentials or an inactive database service.
To resolve this error, do the following:
- Open wp-config.php and verify that the database name, username, and password are correct.
- Ensure the database user has the necessary privileges to access the specified database.
- Confirm that the MySQL or MariaDB service is running, especially if using a local or self-hosted environment.
- Verify the DB_HOST value in wp-config.php. On managed or shared hosting, this may differ from localhost.
- Save the file and reload the browser to test the connection.
403 Forbidden or 500 Internal Server Error
403 Forbidden or 500 Internal Server Error typically occur due to permission issues, misconfigurations, or server-level limitations. In order to fix it, you need to:
- Check that folders in the WordPress root directory are set to 755 and that files are set to 644.
- Rename the .htaccess file temporarily, if present, then reload the site.
- Disable any custom rules in .htaccess that could conflict with the WordPress installation.
- Disable conflicting PHP configuration settings if customized.
- Switch to a stable, default PHP version via the hosting control panel, especially on shared servers.
wp-config.php Not Found
wp-config.php Not Found errors occur when WordPress can’t locate the wp-config.php file in the root directory. Here is how to resolve it:
- Confirm the file is named wp-config.php, not left as wp-config-sample.php.
- Verify that the file is uploaded to the WordPress root directory on the server.
- Confirm it was saved properly and not omitted during transfer, if created manually or via WP-CLI.
- Re-upload the file if it’s missing, incorrectly named, or corrupted.
Memory Limit Exhausted
Memory Limit Exhausted indicates that the PHP memory limit is too low for WordPress to function properly. To fix it, you need to:
- Open the wp-config.php file in your WordPress root directory.
- Add the line define(‘WP_MEMORY_LIMIT’, ‘256M’); before the comment that says stop editing.
- Save the file, then reload the site or the installation page.
- Increase the limit from your hosting control panel or contact support if the error persists.
In most cases, increasing the memory limit resolves the issue immediately.
Contact
Don't like forms?
Shoot us an email at [email protected]
