How to Integrate Shopify with WordPress to Run Your Online Business
Table of Contents
What will be your answer if we ask you about the two leading platforms for blogging and eCommerce? Without any doubt, the answer will be WordPress and Shopify. The world’s two most popular content management systems make it possible to run successful online businesses that would provide your customers with the needed usability and your company with an increased profit. And what about combining the best features of these two platforms on one site? Since 2016, it has become possible to integrate Shopify with WordPress. The hosted platform lets you add the Buy Now functionality to the HTML code of your WordPress website, thus letting you add the shopping cart options to your online business.
While integrating the functionality of these two platforms on one website, you get a chance to build a sleek and functional WordPress website that features the simplicity of Shopify to provide your customers with an exceptional online shopping experience.
WordPress Shopify Integration Advantages
- The reasons to integrate Shopify with WordPress seem to be obvious. With the help of Shopify, you can integrate your website with advanced eCommerce features. One of the major reasons why millions of businesses prefer Shopify is its ease of use. You can set up a multi-functional web store without any complicated coding skills needed. Shopify is a great choice for eCommerce beginners. When working with WP Shopify, you don’t need to hire a professional web developer to integrate Shopify with WordPress.
- By choosing Shopify, you do not need to invest extra time and money into your website’s security. The world’s leading eCommerce platform provides a Level 1 PCI compliant as standard for its users. It adds a 256-bit SSL certificate to all Shopify-based stores, which guarantees the highest level of security of your eCommerce business.
- Shopify supports the world’s leading payment methods, like Paypal, Bitcoin, Stripe, Visa, Mastercard, etc. It also calculates the shipping cost rates for your customers whenever they place an order on your site.
How to Integrate Shopify with WordPress Step-by-Step
Begin with the Shopify store setup
If you do not have a Shopify store yet, you will initiate the process of WordPress Shopify integration from the Shopify store setup. To do it, navigate to Shopify and leave your email to start Shopify free trial. To start a free 14-day trial, you will be asked to leave your email address, password, and enter your store name.

Shopify will ask you to answer several questions by picking answers from a drop-down list. It lets them better understand your goal and needs.
Once you complete filling out details about you and your store, click the ‘Enter my store’ button and you’ll be redirected to your Shopify store homepage.
Manage Shopify store payment methods
To let your customers complete orders on your site and accept payments whenever they buy something on your site, you need to set up payment methods on your Shopify store. To do it, navigate to your Shopify dashboard, open Settings menu, and click on Payments.
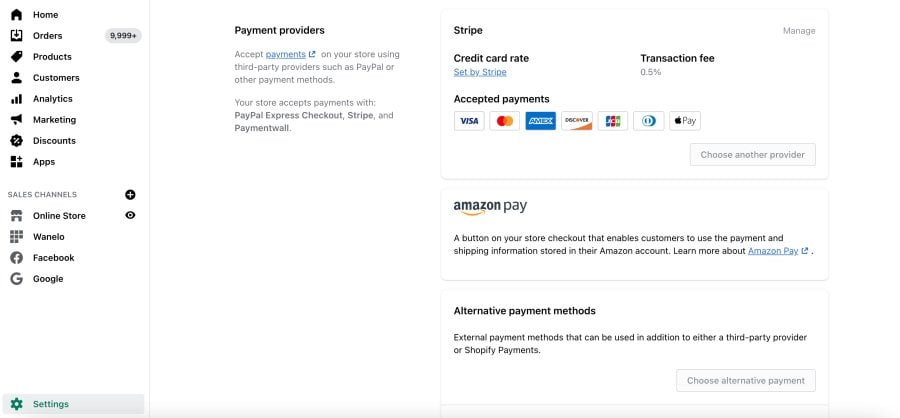
Shopify supports about 70 payment methods. It’s set as default settings that your Shopify store is ready to accept payments with PayPal. If you already have a PayPal account, simply enter the email address that you used to register in PayPal, and you are ready to start accepting payments right away.
Set up Shopify shipping and delivery
To manage shipping and delivery options in Shopify, navigate to Shopify dashboard, click on Settings > Shipping and delivery.
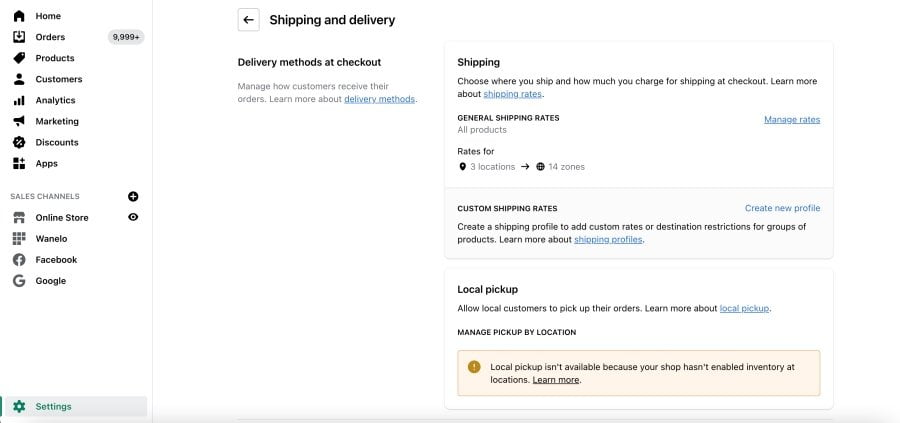
You will see the options to set up general and custom shipping rates on your store. By default, your shipping origin will be set to the address that you entered while setting up your Shopify store account. If you’d like to edit the shipping origin, specify new details by clicking the Change shipping origin button.
You will see the options to set up general and custom shipping rates on your store. By default, your shipping origin will be set to the address that you entered while setting up your Shopify store account. If you’d like to edit the shipping origin, specify new details by clicking the Change shipping origin button.
Next, you’ll need to activate your Shopify store. To do it, you will need to subscribe to a premium Shopify plan. The monthly price range starts from $29. WordPress site owners can integrate their sites with Shopify by choosing the Lite plan for $9. It will provide you with all the basic features of Shopify.
Add products to Shopify store
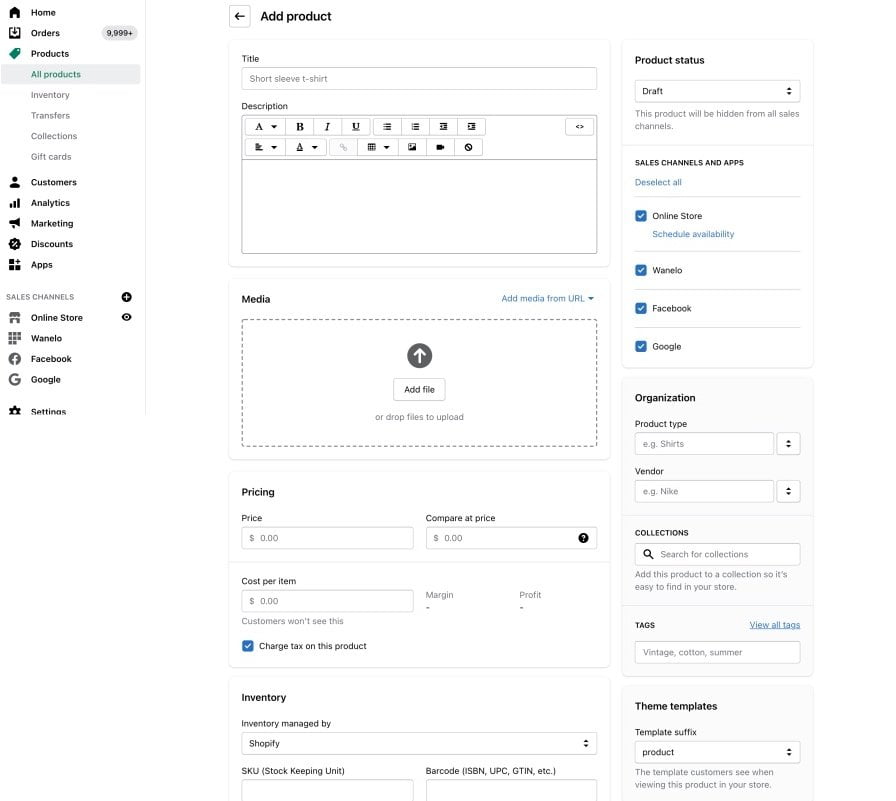
Using your Shopify dashboard, click on the Products tab and find the Add Product button. A new window will show up. You’ll be asked to specify all details about the item that will be added to your site. Enter the product name, product description, price, images, etc. Once done, click Save.
Manage Shopify Buy Button
Next, we’ll see how to integrate Shopify with WordPress. Shopify lets you embed any product or a collection of products that you add to your Shopify store to any WordPress project using a code generated within Shopify.
To do it, click on Settings > Sales channels > Add sales channel > find the Buy Button on the list, and click + to install.
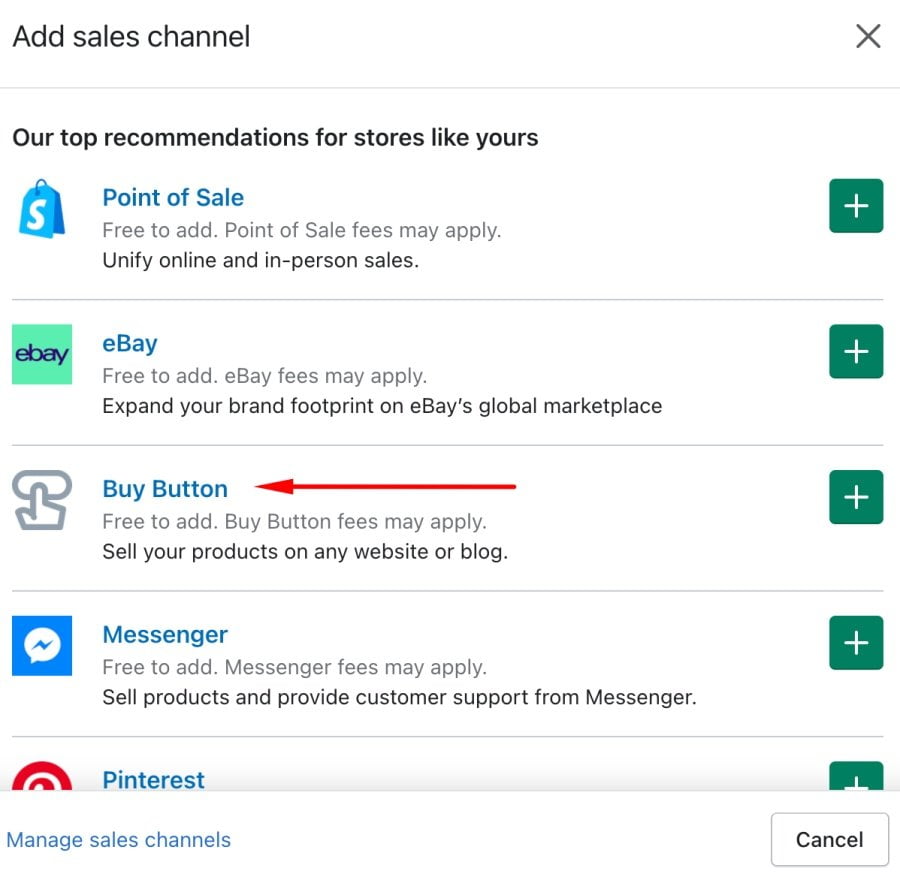
In a new window, pick a product from your Shopify store for which you’d like to create a buy button, and click Select. To configure the look of the Buy Button, choose a template, adjust the color and text that customers will see when they click on it. Click Next when you complete the customization. You will see the embed code that you can add to your WordPress site.
Embedding Shopify Buy Button to WordPress
Now, everything is ready to start selling your Shopify products through your WordPress site. To add Shopify Buy Button to WordPress, copy the embed code from Shopify and paste it on any page, post or sidebar of your WordPress site.
In Closing
That’s pretty much it. As you can see, you do not need to have any special design or coding skills to integrate Shopify with WordPress. By following these easy instructions, you can set up a new Shopify store, upload your products, and start promoting them on the pages of your WordPress site. Give your customers a chance to enjoy a seamless and safe online shopping experience on your WordPress site.
Contact
Don't like forms?
Shoot us an email at [email protected]

