How to Implement QR Codes for WooCommerce
Table of Contents
QR codes, or quick response codes, have been around for several decades but have recently gained popularity in eCommerce. QR codes are a type of barcode that smartphones can scan to access information quickly. In the context of Woocommerce, QR codes can streamline the checkout process and provide customers with a more convenient and secure payment experience.
With a growing number of people using smartphones for online shopping, business owners should consider adjusting their online stores to meet the needs and expectations of their target audience. By implementing QR codes for WooCommerce, you can get one step closer to optimizing your marketing strategy, considering the increased demand for handheld devices. There are plenty of services letting you generate QR codes for your business needs. However, Adobe’s QR code generator stands out as a quick and free solution for generating scannable QR codes for your business.
How can you implement QR codes for WordPress for efficient and secure payments? Let’s dive in!
Benefits of Using QR Codes for Woocommerce
QR codes are used in Woocommerce as a convenient and secure payment option for customers. Customers who want to purchase in a Woocommerce store can scan the QR code associated with the product using their smartphone camera. The QR code will contain the necessary information for the payment, such as the product name, price, and unique identifier for the transaction. This eliminates the need for customers to enter their payment information manually, reducing the risk of errors and speeding up the checkout process. By using QR codes in Woocommerce, businesses can provide a more efficient and secure payment experience for their customers, potentially leading to increased sales and customer satisfaction.
Other benefits of using WooCommerce QR codes include:
- Increased efficiency in payments. Using QR codes, customers can quickly and easily complete payments without typing in long card numbers or personal information.
- Convenience for customers: QR codes allow customers to make purchases quickly and easily without entering long card numbers or personal information.
- Enhanced security for transactions: QR codes eliminate the need for customers to share sensitive information, such as credit card numbers, with multiple parties.
WooCommerce QR Code Plugins

Installing a dedicated plugin is the easiest and quickest way to implement QR codes for WooCommerce. There are many free and paid extensions available in the community. Some of the most popular WooCommerce QR code plugins include:
- QR Code for WooCommerce – allows customers to scan a QR code to access product pages and checkout quickly;
- YITH WooCommerce QR Code Generator – lets you generate QR codes for products, categories, and pages;
- QR Codes & Barcode Generator Label Printing Plugin – allows users to generate and print QR Codes and barcodes on labels.
It is essential to consider your needs and budget before selecting a plugin for your WooCommerce store. Each plugin mentioned has features and pricing, so weighing your options and choosing the one that best fits your requirements and budget is essential. Additionally, it’s also advisable to check for compatibility with your existing online store and to read reviews and user feedback before making a decision.
How to Implement WooCommerce QR Codes with a Plugin
If you’re not comfortable editing code, it may be better to use a plugin instead. We’ll discuss adding QR codes to WooCommerce with the YITH WooCommerce QR Code Generator in the guidelines below.
The plugin allows you to create QR codes for products, categories, and pages in your WooCommerce store. With this plugin, you can easily generate QR codes and display them on product pages, category pages, or anywhere else on your website.
Here’s how you can use YITH WooCommerce QR Code Generator:
- Install the plugin. After purchasing the plugin, download it and install it on your WooCommerce store.
- Generate QR codes. Go to the plugin settings page, select the type of page or product you want to generate a QR code for, and then click the “Generate QR Code” button.
- Display QR codes. Using a shortcode, you can display the generated QR codes on your product pages, category pages, or anywhere else on your website.
- Customize QR codes. You can customize the appearance of your QR codes by choosing from different styles and colors.
With YITH WooCommerce QR Code Generator, you can make it easier for customers to access your products and pages by scanning QR codes. This can help improve the user experience and make it easier for customers to complete purchases in your store.
How to Add QR Code to the WooCommerce Product Page
To add a QR code to the WooCommerce product page, you can use the WooLentor QR Code Widget for Elementor. Here’s a step-by-step guide on how to do this:
- The first step is to install the WooLentor QR Code Widget on your website. This can be done through the WordPress plugin repository or by downloading it directly from the WooLentor website.
- Once you’ve installed the WooLentor QR Code Widget, you need to create a product page in WooCommerce. This can be done by going to your WordPress dashboard’s “Products” section and clicking “Add New.”
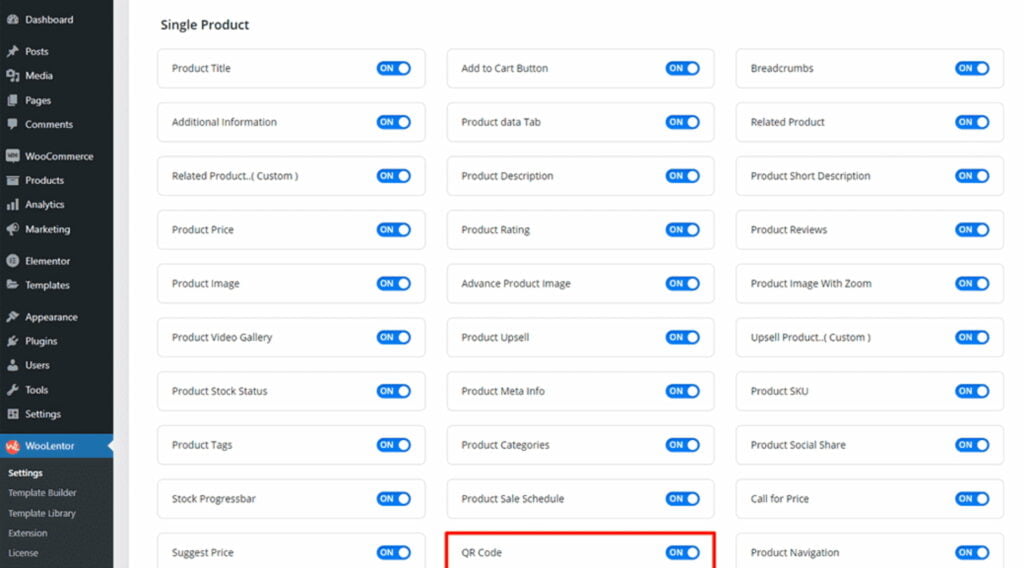
- Next, navigate to Dashboard > WooLentor > Settings > Elements. From the list of Elements, turn ON the QR Code widget.
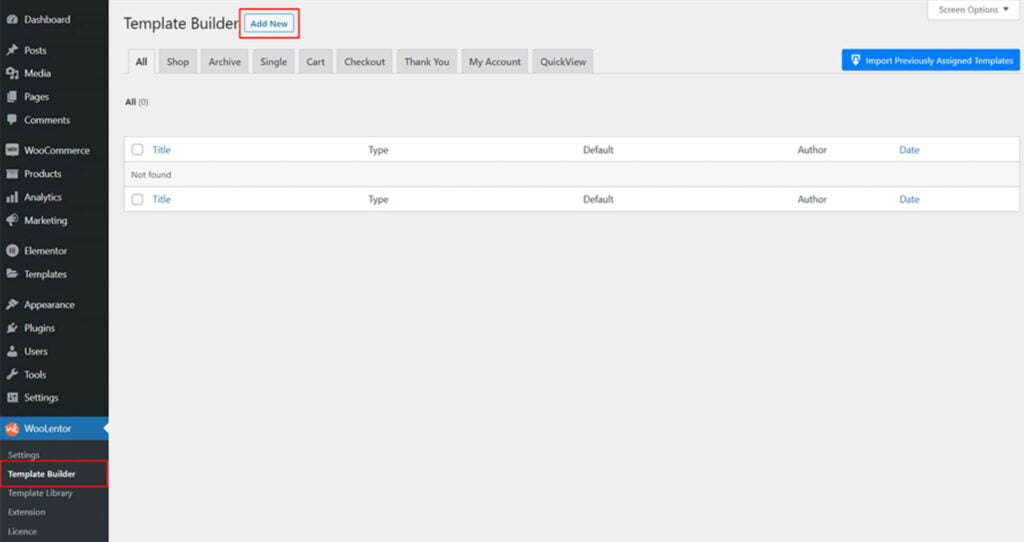
- Next, add the WooLentor QR Code Widget to your product page. Go to Dashboard > WooLentor > Template Builder. Click the “Add New” button on the top right beside the text “Template Builder” to create a Single Product Template.
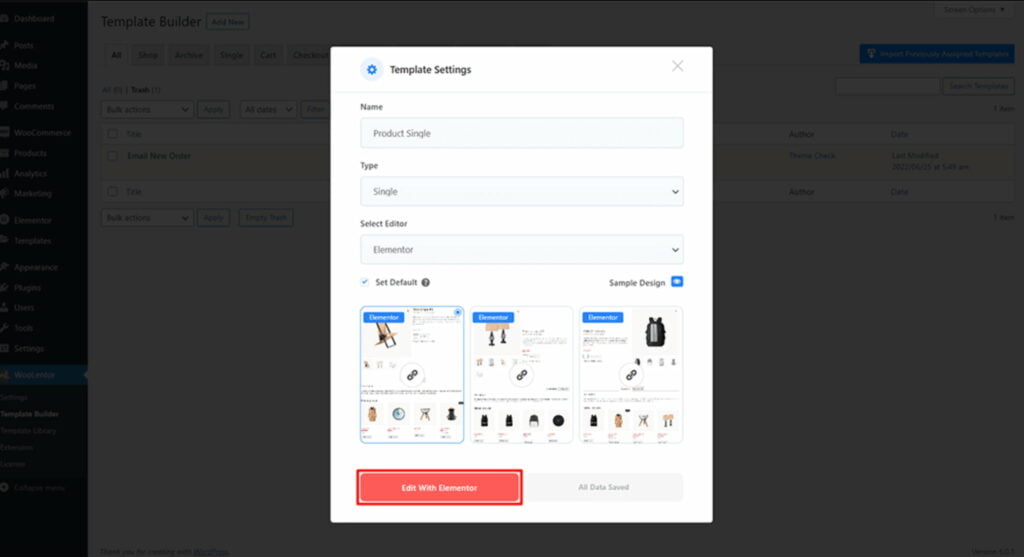
To set your template name in the template settings, follow these steps:
- Open the template settings popup box.
- Enter the name you would like to give your template.
- Select “Single” from the dropdown type list.
- Check the “Set Default” checkbox.
- Choose a default sample design by clicking the “Sample Design” button.
- Finally, click the “Save Settings” button to save all your changes.
To add the QR Code widget, click the “Edit with Elementor” button to edit the Single Product Template.
To add a QR Code widget, search “QR Code” and use the widget with the “WL Badge.” Drag and drop the widget onto the product page template.
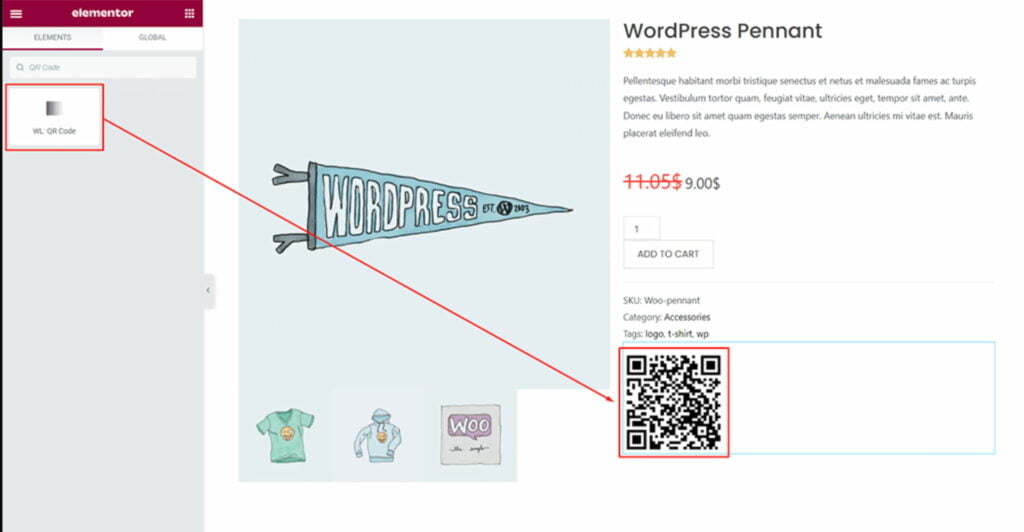
- Once you’ve added the widget to your product page, you need to configure it to specify the information encoded in the QR code. This may include the product URL, image, description, and more.
- After configuring the widget, you must save your changes and publish the product page.
By using the WooLentor QR Code Widget, you can make it easy for customers to access product information and purchase products directly from their mobile devices. Follow the instructions above or watch the video on how to add QR codes to WooCommerce product pages.
How to Add QR Codes to WooCommerce Without Plugins
If you have a basic understanding of HTML and CSS, have access to your WordPress theme files, and using QR code for WooCommerce plugins is not what you are looking for, then you may consider adding QR codes to your website manually or without a plugin.
To add QR codes to WooCommerce without using a plugin, you can follow these steps:
- Generate QR codes: You can use a free QR code generator tool to create QR codes for your products, categories, or pages.
- Upload QR codes to your site: You can upload them to your website by hosting them on your server or using a service such as Imgur or Dropbox.
- Add QR codes to product pages: You’ll need to edit your theme’s template files to add QR codes to your product pages. Locate the template file for your product pages, and add the following code where you want the QR code to appear:
<img src="your-qr-code-url.png" alt="QR code">- Save and upload the template file: Save your changes to the template file and upload it to your server. You should now see QR codes on your product pages.
What Next?
After adding QR codes to their WooCommerce store, an online store owner should follow these steps to ensure a successful implementation:
- Promote the QR codes. Encourage customers to use the QR code payment option by including information on product pages, email campaigns, and social media.
- Train staff. Ensure all staff members know how the QR code payment system works and can assist customers with questions.
- Monitor usage. Track how often customers use the QR code payment option and make changes as needed to improve the experience.
- Offer incentives. Consider offering discounts or special promotions for customers who use the QR code payment option to encourage adoption.
- Check for compatibility. Ensure the QR code payment system is compatible with customers’ devices, including smartphones and tablets.
- Update security measures: Regularly review and update security measures, such as encryption protocols, to protect customer information and prevent fraud.
- Provide customer support: Ensure customers can access support if they encounter any QR code payment system issues.
This is how you can implement a QR code in your WooCommerce store. When you decide to work with a plugin, choosing a reliable QR code generator is important to ensure that the codes are easily scannable and accessible. Consider using the tips and recommendations from this blog post. If you find out guidelines useful, bookmark this page for future reference.
Contact
Don't like forms?
Shoot us an email at [email protected]

