How to Create a WordPress Custom Post Type?

Table of Contents
A WordPress website defines its content model within the WordPress CMS, where each content type is structured and managed as a database entity. A custom post type is a developer-defined extension that expands this model beyond standard posts and pages to support specific data formats such as portfolios, products, or testimonials.
It extends the WordPress content type hierarchy by registering a new post type linked to taxonomies, post metadata, and rewrite rules that control its archive and single views.
In WordPress website development, a custom post type is created through a post type registration process that integrates with plugins or theme customization in code. This registration defines how the CMS manages the entity in the dashboard interface, renders it through template files, and connects it to the broader content structure.
Depending on the development approach, registration can be implemented via a plugin or directly in the theme’s code, both methods supporting structured, modular content management within the WordPress system.
What is a Custom Post Type in WordPress?
A custom post type in a WordPress website is a registered post object in the WordPress CMS that extends the default post and page structures. It is defined by a post_type parameter in the wp_posts database table, which the CMS uses to store and manage all post objects, including custom ones.
Created with the register_post_type() function, a custom post type defines its own labels, visibility, rewrite rules, and supported features. WordPress handles it through the same systems used for standard post types, such as WP_Query, taxonomy relationships, and metadata, ensuring unified storage, querying, and rendering.
Each custom post type is identified by its post_type value and connected to the template hierarchy through files such as single-{post_type}.php and archive-{post_type}.php. These templates determine display behavior, while rewrite rules define URL structures.
Developers register and manage custom post types within plugins or themes, integrating them directly into the CMS logic. They provide structured, scalable content models that maintain database consistency and logical separation within the WordPress framework.
How Do Custom Post Types Differ from Posts, Pages, and Taxonomies?
In the WordPress CMS, custom post types (CPTs), posts, and pages are post objects stored in the wp_posts table and identified by the post_type parameter, while taxonomies function separately as classification systems. They share the same query structure (WP_Query), metadata storage (post meta), and template logic, but differ in behavior, hierarchy, and purpose.
A post is the default chronological content type linked to built-in taxonomies like categories and tags. A CPT extends this model through register_post_type(), defining its own labels, visibility, rewrite rules, and taxonomies.
It registers separate admin UI menus, uses single-{post_type}.php and archive-{post_type}.php templates, and supports custom permalinks and archive pages, allowing developers to model entities such as products or events with independent routing and metadata.
A page is a hierarchical post type (post_type = ‘page’) for static, non-chronological content. It supports parent–child relationships, omits an archive page, and uses direct permalinks.
A CPT can enable a similar hierarchy (hierarchical => true), but usually remains non-hierarchical while publicly queryable.
Taxonomies, created with register_taxonomy(), classify post objects through terms and organize rather than store content. Taxonomies define classification attributes applied to post objects, describing their relationships without storing the content itself.
How to Create a Custom Post Type Using the CPT UI Plugin?
To create a custom post type (CPT) on a WordPress website, use the CPT UI plugin, which provides a post type registration interface directly from the admin dashboard.
The CPT UI plugin is a WordPress extension that lets developers register and manage custom post types (CPTs) through the admin dashboard without writing PHP code.
Installed within a WordPress website, it integrates as a top-level menu labeled “CPT UI,” enabling UI-based post type registration instead of defining the post_type string manually in code.
Here is how to create a custom post type using the CPT UI plugin:
1. Install the CPT UI Plugin
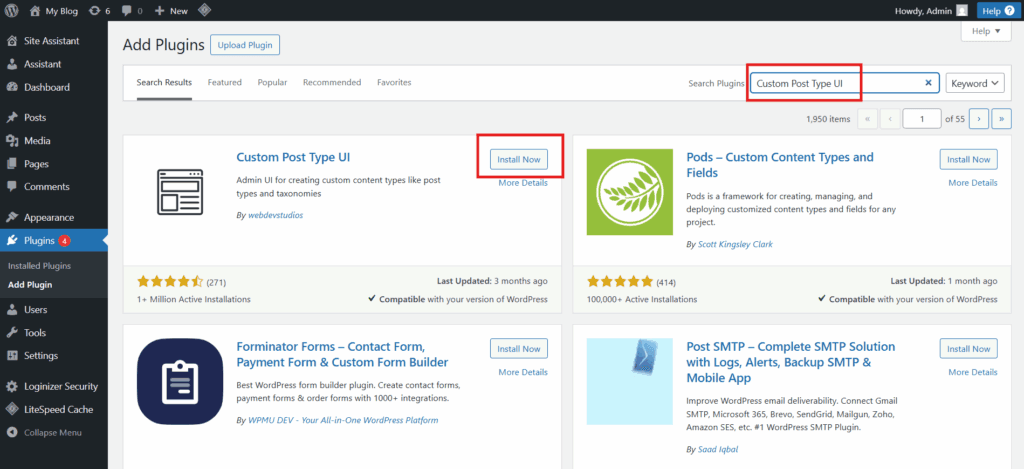
- In the WordPress admin dashboard, open Plugins > Add New.
- Search for “Custom Post Type UI.”
- Click Install Now, then Activate to enable the plugin within the WordPress website.
2. Access the plugin interface

- After activation, a new top-level menu labeled “CPT UI” appears in the admin sidebar.
- Go to CPT UI > Add/Edit Post Types to open the plugin interface used for post type registration.
3. Configure the custom post type

- Post type slug: Enter a unique identifier for the CPT. This defines the post_type value stored in the wp_posts table.
- Post type labels: Specify singular and plural names for display in the WordPress admin menu and editor screens.
- Visibility options: Set “Public,” “Show in menu,” and “Show in REST API (show_in_rest)” to control dashboard visibility and REST access.
- Supported features: Choose which features the CPT supports, such as Title, Editor, Excerpt, Thumbnail, or Custom Fields, from the supports list.
- Structure options: Define hierarchical (true/false) behavior to determine if the CPT functions like Pages (hierarchical) or Posts (flat).
- Additional parameters: Adjust menu position, rewrite slug for URL structure, and dashboard visibility as needed.
4. Register the post type
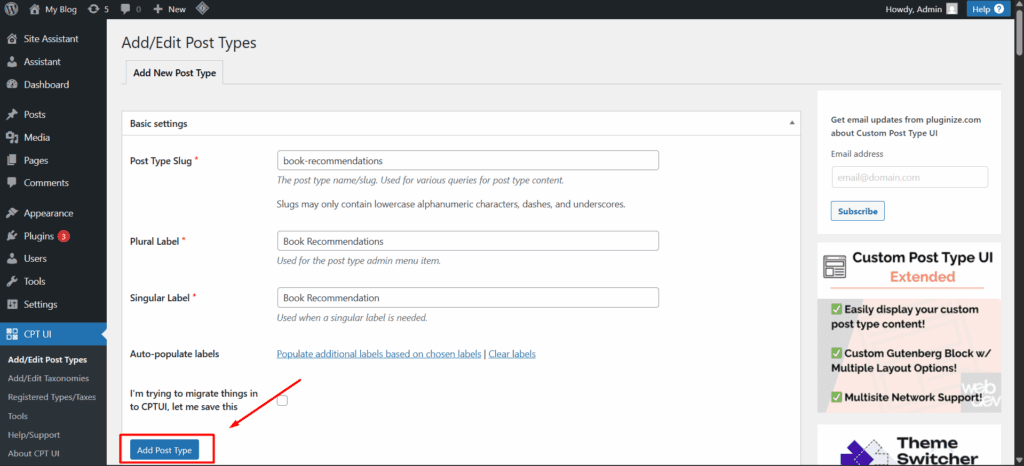
- Click Add Post Type to save and register the configuration.
- The CPT UI plugin stores the settings and registers the CPT during the WordPress init process, integrating it with the system’s post type registration routine.
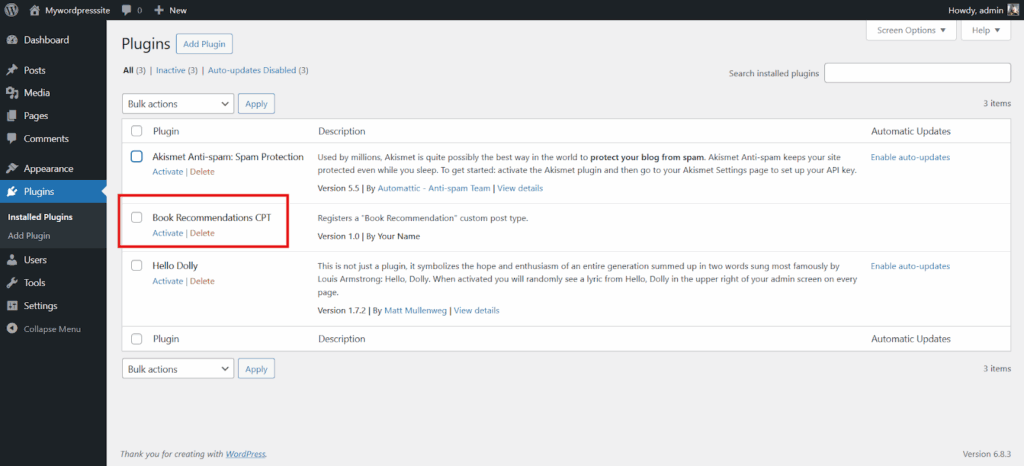
5. Verify registration
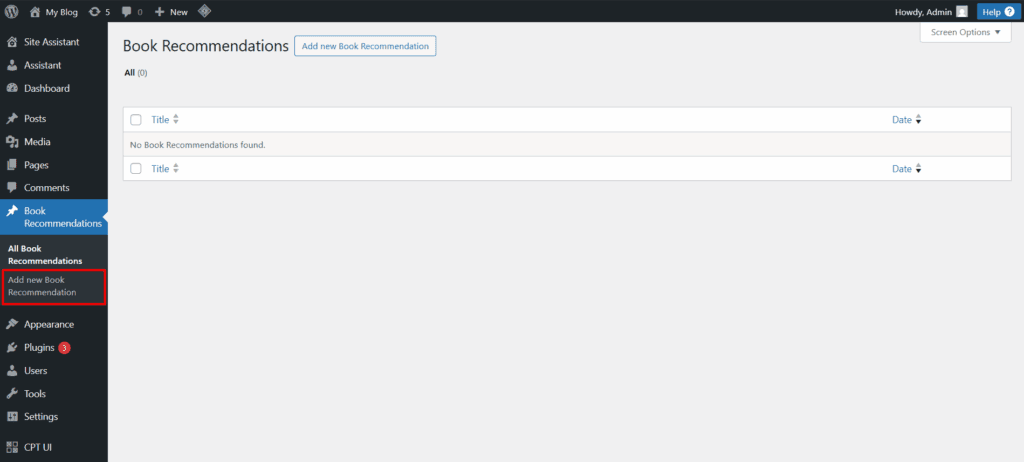
- The new custom post type appears as a separate section in the admin menu, showing its plural label as the section title.
- Use Add New under that section to create a sample entry and confirm that all configured supports, fields, and metadata function as expected.
The plugin-generated CPT becomes part of the site’s content structure, fully integrated with WordPress’s query system, REST endpoints, and CMS architecture.
How to Create a Custom Post Type with a Custom WordPress Plugin?
To create a custom post type in a WordPress website using the CPT UI plugin, the plugin should be installed from the plugin repository and activated within the admin dashboard, establishing the environment in which the post type will be registered.
The CPT first receives its post_type slug, then its post type labels, followed by its visibility attributes, structural settings, and supported features. After these values are stored, the plugin registers the CPT through WordPress’s internal register_post_type() function and places the new post type inside the admin dashboard menu for immediate use.
This method keeps the CPT modular, portable, and active even when the theme changes. The plugin encapsulates the registration logic, allowing clean version control and independent maintenance.
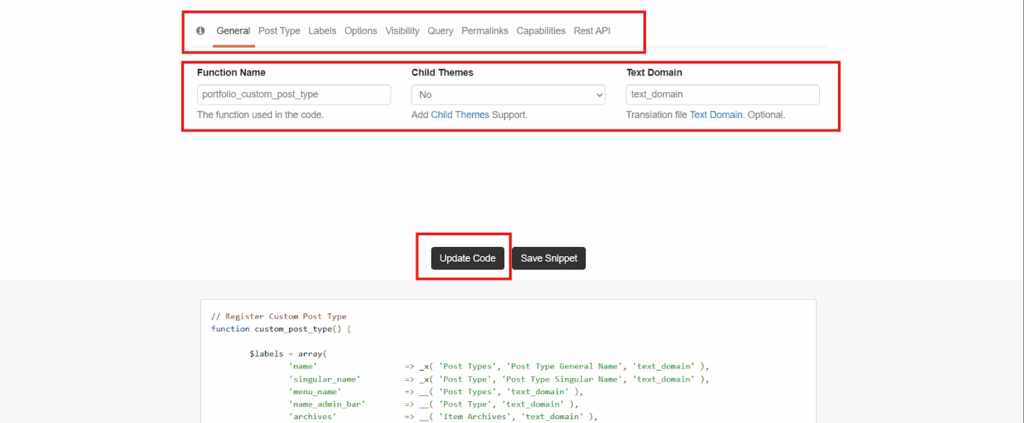
For a streamlined setup, GenerateWP, a code-generation tool, can be used to produce the PHP code required for CPT registration.
Within GenerateWP, parameters such as the post type slug, labels, supports, rewrite rules, and REST API visibility are defined.
These settings determine how WordPress stores and displays the CPT as a structured post object.
Here is how to create a custom post type with a custom WordPress plugin:
1. Create a folder, for example,/wp-content/plugins/portfolio-cpt/.
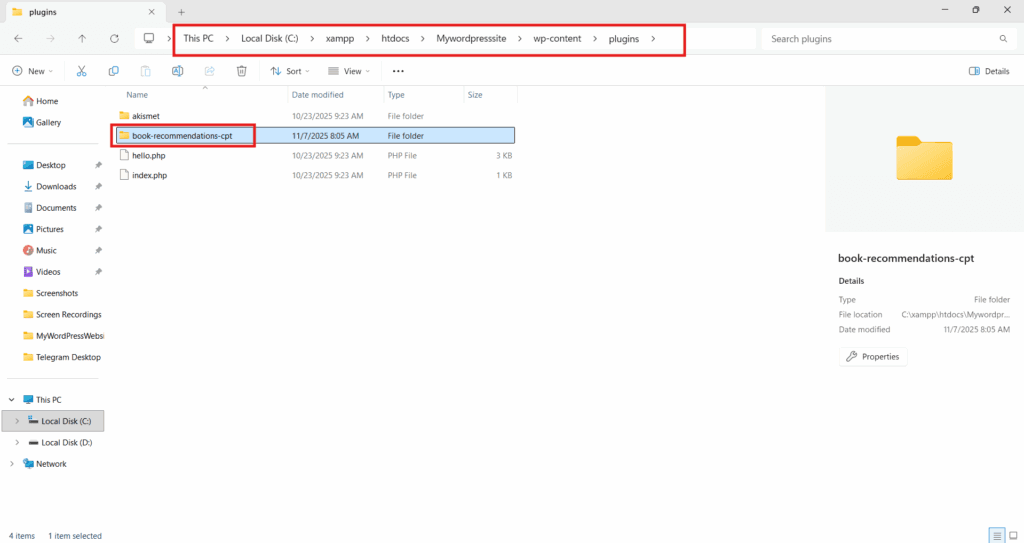
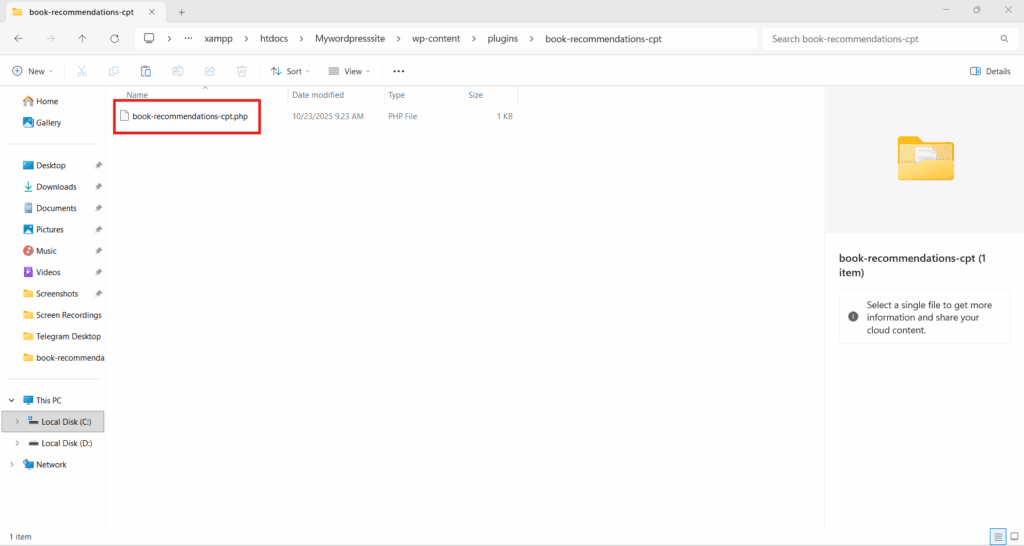
2. Create a PHP file inside the folder, e.g., portfolio-cpt.php.
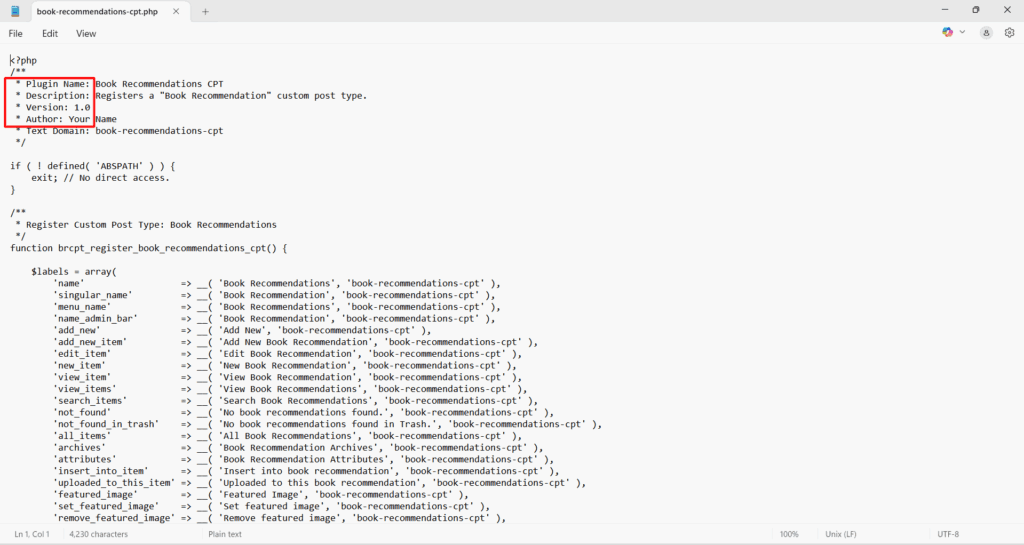
3. Add a valid plugin header that defines metadata (Plugin Name, Description, Version, Author) at the top of the PHP file. This header identifies the file as a plugin, enables WordPress to recognize and load it, and provides the metadata required for activation in the admin dashboard.
4. Generate the custom post type registration code using the GenerateWP code generator. To generate code, fill in the fields with the relevant data and click “Update Code.”
5. Paste the generated registration code under the header and save the file.
// Register Custom Post Type
function portfolio_custom_post_type() {

    $labels = array(
        'name'                  => _x( 'Portfolios', 'Post Type General Name', 'text_domain' ),
        'singular_name'         => _x( 'Portfolio', 'Post Type Singular Name', 'text_domain' ),
        'menu_name'             => __( 'Portfolios', 'text_domain' ),
        'name_admin_bar'        => __( 'Portfolio', 'text_domain' ),
        'archives'              => __( 'Portfolio Archives', 'text_domain' ),
        'attributes'            => __( 'Portfolio Attributes', 'text_domain' ),
        'all_items'             => __( 'All Portfolios', 'text_domain' ),
        'add_new_item'          => __( 'Add New Portfolio', 'text_domain' ),
        'add_new'               => __( 'Add New', 'text_domain' ),
        'new_item'              => __( 'New Portfolio', 'text_domain' ),
        'edit_item'             => __( 'Edit Portfolio', 'text_domain' ),
        'update_item'           => __( 'Update Portfolio', 'text_domain' ),
        'view_item'             => __( 'View Portfolio', 'text_domain' ),
        'view_items'            => __( 'View Portfolios', 'text_domain' ),
        'search_items'          => __( 'Search Portfolio', 'text_domain' ),
        'not_found'             => __( 'Not found', 'text_domain' ),
        'not_found_in_trash'    => __( 'Not found in Trash', 'text_domain' ),
        'featured_image'        => __( 'Featured Image', 'text_domain' ),
        'set_featured_image'    => __( 'Set featured image', 'text_domain' ),
        'remove_featured_image' => __( 'Remove featured image', 'text_domain' ),
        'use_featured_image'    => __( 'Use as featured image', 'text_domain' ),
        'insert_into_item'      => __( 'Insert into portfolio', 'text_domain' ),
        'uploaded_to_this_item' => __( 'Uploaded to this portfolio', 'text_domain' ),
        'items_list'            => __( 'Portfolios list', 'text_domain' ),
        'items_list_navigation' => __( 'Portfolios list navigation', 'text_domain' ),
        'filter_items_list'     => __( 'Filter portfolios list', 'text_domain' ),
    );

    $args = array(
        'label'                 => __( 'Portfolio', 'text_domain' ),
        'description'           => __( 'A custom post type for portfolios', 'text_domain' ),
        'labels'                => $labels,
        'supports'              => array( 'title', 'editor', 'thumbnail', 'excerpt' ),
        'taxonomies'            => array( 'category', 'post_tag' ),
        'public'                => true,
        'show_in_menu'          => true,
        'menu_position'         => 5,
        'menu_icon'             => 'dashicons-portfolio',
        'show_in_admin_bar'     => true,
        'show_in_nav_menus'     => true,
        'can_export'            => true,
        'has_archive'           => true,
        'hierarchical'          => false,
        'exclude_from_search'   => false,
        'publicly_queryable'    => true,
        'show_in_rest'          => true,
        'rewrite'               => array( 'slug' => 'portfolio' ),
        'capability_type'       => 'post',
    );

    register_post_type( 'portfolio', $args );

}
add_action( 'init', 'portfolio_custom_post_type', 0 );
6. Activate the plugin from Plugins → Installed Plugins in the admin dashboard.
WordPress registers the CPT, and the admin interface displays a new “Portfolios” menu item. The CPT is now fully integrated into the CMS and accessible through templates, the database, and the REST API.
What Are the Different Types of Custom Post Types in WordPress?
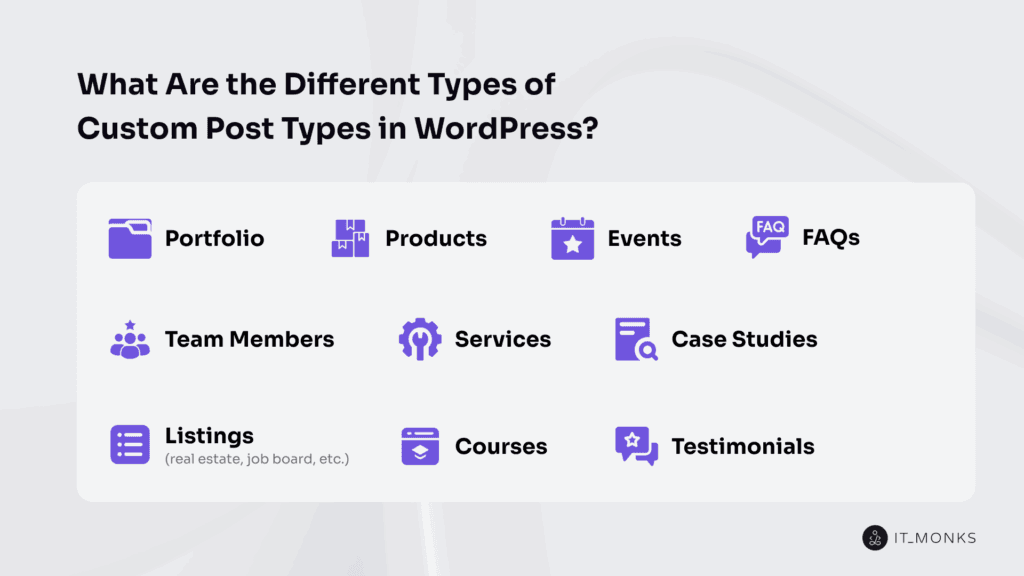
Different custom post types in a WordPress website reflect the need to model distinct forms of structured content that cannot be expressed through standard posts or pages.
Each custom post type functions as a developer-defined entity with its own content model, metadata schema, and template file integration. Because development projects require content that is time-based, transactional, relational, or directory-oriented, CPT variations emerge as purposeful models, where each one shapes how a specific post object is stored, queried, and presented in the site’s content structure.
Different custom post types are created through plugin-based registration using the register_post_type() function. Each custom post type is classified by its purpose, data attributes, and output behavior, not by built-in WordPress taxonomy.
A portfolio post type structures project entries with meta fields for client name, completion date, and gallery media. It uses an archive page and custom templates such as single-portfolio.php, often linked with a “project category” taxonomy.
A testimonial post type stores user-generated entries with client name, rating, and message fields. These are retrieved through dedicated content loops and displayed in sliders or shortcodes.
An events post type defines time-bound content with date fields for start and end times, venue location, and organizer details. Its archive layout is chronological, and developers use time-based queries to list upcoming events.
A products post type contains currency fields (USD/EUR), SKUs, and stock status. It integrates with e-commerce plugins and uses template files for catalog and single-product pages.
A team members post type groups biographical entries with meta fields for role, expertise, and profile image. It appears in the admin menu for easy staff management within the admin dashboard.
A services post type defines offerings with descriptions, pricing, and category taxonomies. It supports listing templates and reusable Gutenberg blocks for consistent presentation.
A case studies post type organizes project analyses, linking related Portfolio and Service types via relational meta fields to show goals and results.
A courses post type stores educational data with difficulty levels (Beginner, Intermediate, Advanced), instructor info, and duration.
An FAQs post type contains question–answer pairs for an accordion-style display.
A listings post type is used for real estate or job boards and structures entries with listing attributes such as price, location, and size, and applies rewrite rules for SEO-friendly URLs.
Each registered CPT has a post type slug that controls its query endpoint and corresponding template files (archive-{slug}.php, single-{slug}.php).
The WordPress CMS supports custom post type registration: the developer creates and defines each model, the admin dashboard displays them under unique admin labels, and the frontend renders them through their templates.
When Should You Use a Custom Post Type in WordPress Development?
A custom post type should be used in a WordPress website when content cannot be accurately structured, stored, or queried using the default post or page types. A CPT defines an independent content entity with its own metadata, taxonomies, and template files, allowing the developer to manage it through separate logic and database isolation.
Use a CPT when a content group:
- Requires its own admin menu, archive page, or single-template for rendering.
- Must be queried through the post_type parameter or exposed via a REST endpoint.
- Needs custom taxonomies, metadata fields, or rewrite rules for semantic URLs.
Each CPT registers a unique post_type slug and maintains its own CPT query loop, ensuring consistent storage and display within the WordPress CMS. Developers implement CPTs to separate structured content, such as “Events,” “Products,” or “Case Studies,” from standard posts, thereby maintaining a modular, scalable site architecture.
When a project demands custom capabilities, role-based access, or integration with external systems, CPTs isolate permissions, queries, and routing to preserve system clarity and scalability.
How to Display a Custom Post Type on a WordPress Website?
To display a custom post type on a WordPress site, you need to do the following:
1. Register the CPT so it can render on the frontend

- Register your CPT with these arguments: ‘public’ => true, ‘has_archive’ => true, and a ‘rewrite’ rule (e.g., ‘rewrite’ => array(‘slug’ => ‘portfolio’)).
- Use this registration to define the permalink and archive URL your templates will serve.
2. Name and place the template files that WordPress will load
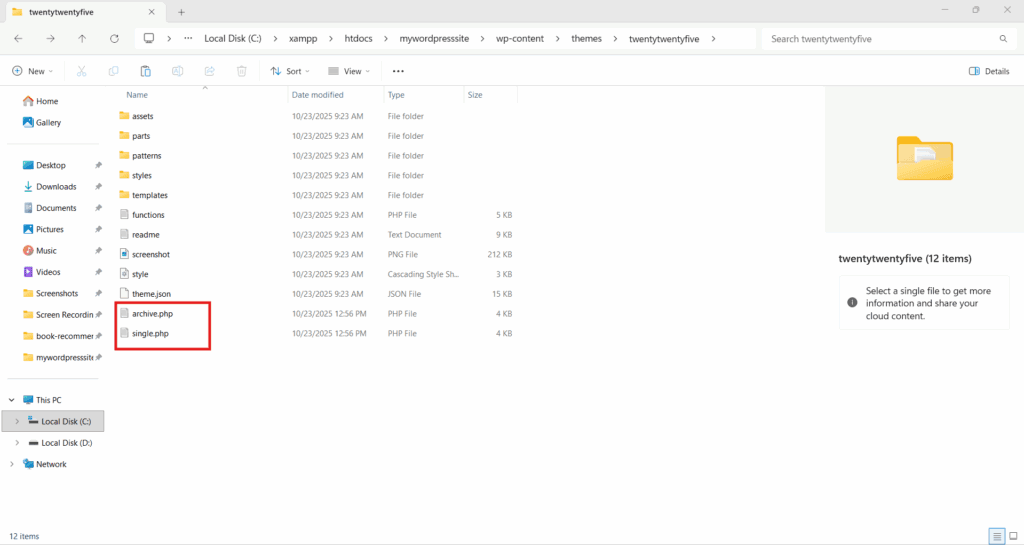
- Create archive-{post_type}.php for the archive view (e.g., archive-portfolio.php).
- Create single-{post_type}.php for single entries (e.g., single-portfolio.php).
- Place both files in the active theme (or child theme) directory.
- If these files are missing, expect WordPress to fall back to archive.php or single.php.
3. Implement the archive template to loop through CPT posts
- Create (or open) archive-{post_type}.php in your theme and paste the code below as-is.
Template hierarchy match: this archive file runs the main query for the CPT and loops through each post object for content rendering.
<?php get_header(); ?>

<main>
  <h1><?php post_type_archive_title(); ?></h1>

  <?php if (have_posts()) : ?>
    <div class="portfolio-items">
      <?php while (have_posts()) : the_post(); ?>
        <article>
          <h2><a href="<?php the_permalink(); ?>"><?php the_title(); ?></a></h2>
          <?php the_excerpt(); ?>
        </article>
      <?php endwhile; ?>
    </div>

    <?php the_posts_navigation(); ?>
  <?php else : ?>
    <p>No portfolio items found.</p>
  <?php endif; ?>
</main>

<?php get_footer(); ?>
4. Implement the single template to render one CPT entry and paste the code below as-is:
<?php get_header(); ?>

<main>
  <?php if (have_posts()) : while (have_posts()) : the_post(); ?>
    <article>
      <h1><?php the_title(); ?></h1>
      <div><?php the_content(); ?></div>
    </article>
  <?php endwhile; endif; ?>
</main>

<?php get_footer(); ?>
5. Retrieve CPT entries manually where needed (pages, widgets, sections)
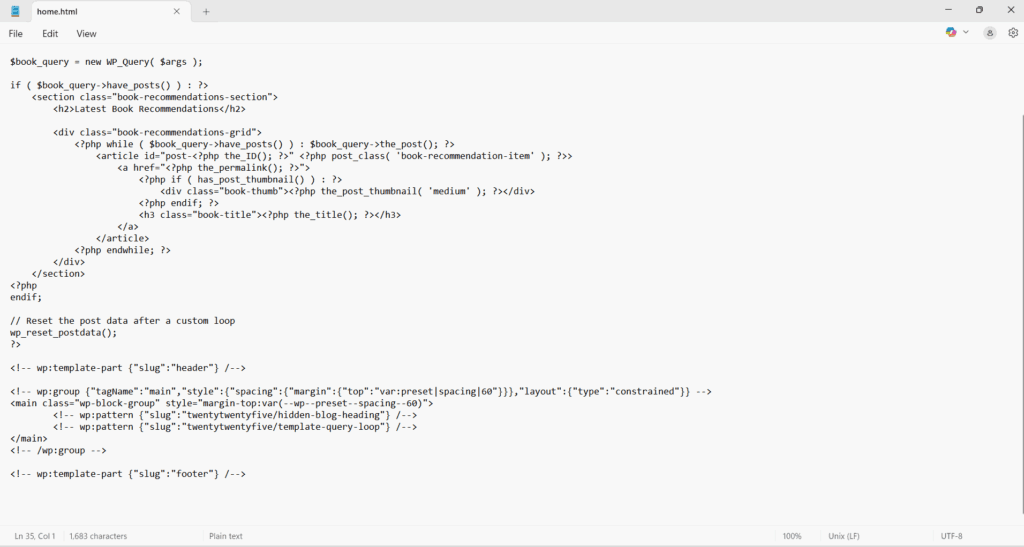
- In a custom page template or widget area, add a WP_Query that filters by the post_type you registered.
- Paste the code below as-is and call wp_reset_postdata() after the custom loop.
<?php
$args = array(
  'post_type'      => 'portfolio',
  'posts_per_page' => 10,
  'orderby'        => 'date',
  'order'          => 'DESC'
);
$query = new WP_Query($args);
?>

<?php if ($query->have_posts()) : ?>
  <div class="portfolio-list">
    <?php while ($query->have_posts()) : $query->the_post(); ?>
      <article>
        <h2><a href="<?php the_permalink(); ?>"><?php the_title(); ?></a></h2>
      </article>
    <?php endwhile; ?>
    <?php wp_reset_postdata(); ?>
  </div>
<?php else : ?>
  <p>No portfolio items found.</p>
<?php endif; ?>
6. Insert a dynamic link to the CPT archive
- Wherever you need a “view all” link, generate the URL programmatically with get_post_type_archive_link() and paste the snippet below as-is.
<a href="<?php echo get_post_type_archive_link('portfolio'); ?>">View All Portfolios</a>7. Verify the end-to-end display path

- Visit the CPT archive URL (e.g., /portfolio/) to confirm the archive template loads.
- Open a single CPT entry to confirm the single template loads.
- Confirm that manual WP_Query sections render CPT items where you placed them.
- If URLs don’t resolve, re-save permalinks (Settings → Permalinks) to flush rewrite rules.
Where Are Custom Post Types Stored in a WordPress Website?
In a WordPress website, every custom post type is stored in the core wp_posts table within the unified database schema. Each CPT occupies one row, and the post_type column defines its type (e.g., post_type = ‘event’ or post_type = ‘product’). This field differentiates CPTs from standard posts, pages, and attachments.
The post object for a CPT uses the same columns as other entries, such as ID, post_title, post_content, post_status, post_author, and post_date, ensuring structural consistency across all content objects. Additional data is stored in the wp_postmeta table, where each record links to its parent post through post_id and defines metadata with meta_key and meta_value pairs. Developers can retrieve this data using get_post_meta().
If a CPT includes taxonomies, WordPress associates each post ID with related term_id and term_taxonomy_id entries through wp_term_relationships, mapping them to definitions in wp_terms and wp_term_taxonomy. Optional plugin or configuration settings may be saved in wp_options, which stores serialized arrays or JSON objects that define CPT behavior within WordPress database.
During content retrieval, the WP_Query class runs a SQL query that filters the wp_posts table by the post_type value and joins metadata and taxonomy tables as needed.
This relational table model maintains normalized data, allowing CPTs to integrate with WordPress’s query, plugin, and template systems without requiring separate storage.
Contact
Don't like forms?
Shoot us an email at [email protected]