What is Contact Form 7 in WordPress?

Table of Contents

Many websites need a solution for individuals to connect with them, whether they are customers, prospective clients, or loyal readers. While one could consider purchasing a pre-designed theme that includes a personalized contact page or even attempting to develop a contact page from scratch, these alternatives often come with high expenses or intricate complexities. Recognizing the need for a more convenient solution, we present Contact Form 7. This guide discusses what is Contact Form 7 in WordPress and how to make a contact form on WordPress.
What is Contact Form 7?
Contact Form 7 proves to be an invaluable asset for website owners, as it offers a free and convenient solution for creating diverse contact forms within WordPress. The plugin is available for a free download and provides custom shortcodes for each form, simplifying and integrating them into any post, page, or widget area.
The exceptional functionality of Contact Form 7 has garnered significant admiration, evident in its wide compatibility with various themes. Contact Form 7 lets website owners create and incorporate customized contact forms effortlessly, enabling seamless communication with their audience. This plugin’s versatility and ease of use make it a preferred choice for anyone seeking an efficient and reliable means of contact within the WordPress ecosystem.
Why Choose Contact Form 7?
Now that you know what Contact Form 7 is, you might wonder why this plugin stands out among the numerous available options. After all, there are many excellent contact form plugins to choose from. So, what makes Contact Form 7 the right choice?
First and foremost, Contact Form 7 is entirely free. Unlike other “free” form plugins, you won’t encounter an abundance of upsells integrated into the main dashboard. This absence of premium versions and upsells provides a clean and hassle-free user experience. Additionally, Contact Form 7 offers extensive customization options. You can easily modify your forms using available parameters or apply a touch of CSS to achieve the desired look and functionality.
One significant advantage of Contact Form 7 is its exceptional compatibility. It seamlessly integrates with a wide range of both free and premium themes. This compatibility ensures that your contact forms will remain fully functional even if you decide to switch themes in the future. This flexibility allows you to make aesthetic changes to your website without worrying about disrupting the functionality of your contact forms.
Now that we have addressed why Contact Form 7 is preferred let’s explore how you can effectively utilize this plugin on your WordPress site.
How to Get Started with Contact Form 7
The installation process for Contact Form 7 is straightforward. Follow these steps to get started:
- Navigate to the “Plugins” section in your WordPress dashboard and click “Add New.”
- Use the search option to find the Contact Form 7 plugin.
- Install and activate the plugin.
Once activated, you will find a convenient “Contact” menu item in your WordPress dashboard. Clicking on it will take you to the main contact form management page.
Creating WordPress Forms with Contact Form 7
To create your first contact form, click on “Add New.” When the contact form opens, you will see various options available. Don’t worry, it’s easier than it looks.
At the top of the page, you’ll notice a box where you can change the name of your form. We suggest giving it a meaningful name that reflects its purpose or where it will be used.
Now, let’s move on to the available settings. We will guide you through each tab step by step.
Form Settings
Building your contact form is done in the Form tab of Contact Form 7. This tab allows you to construct your form using the plugin’s different tags. By default, the contact form includes fields for name, email, subject, message, and a send button.
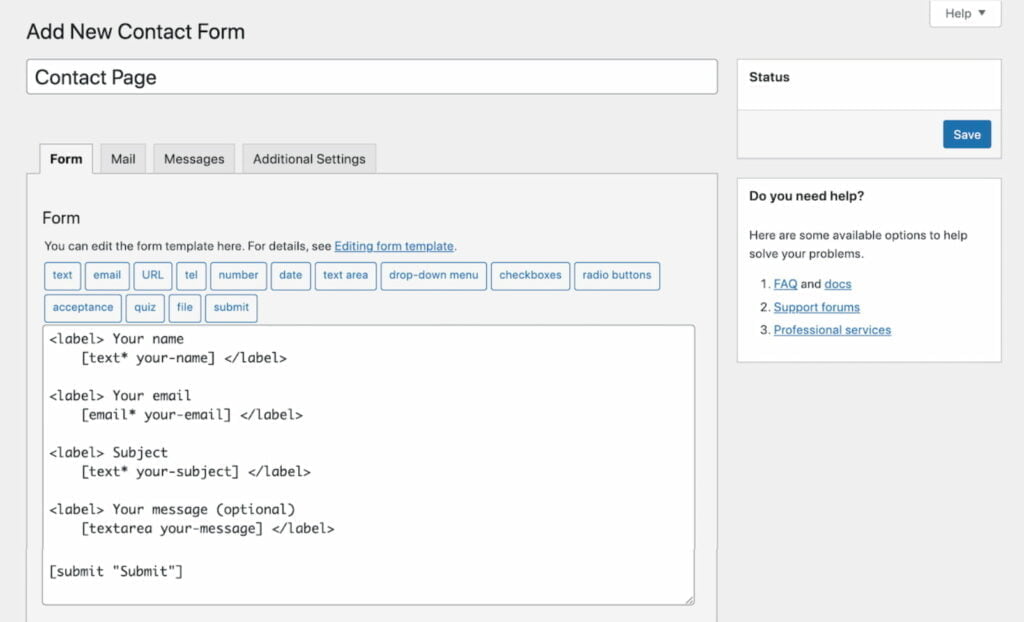
To remove a field, delete the corresponding code from the form.
To add a new field, click on any available tags to insert the corresponding code into your form section. A popup window will appear, allowing you to confirm and provide relevant information before inserting the tag.
Contact Form 7 offers a wide range of tags to generate different fields. You can create tags for text, email, URL, phone number, date, text area, drop-down menus, checkboxes, radio buttons, acceptance (e.g., terms and conditions), quizzes, file uploads, and submit buttons.
Mail Settings
The Mail tab in Contact Form 7 allows you to customize the email notifications you receive when users submit contact forms. By default, the plugin uses the email address of your site administrator. However, you can easily modify this to a support email or specify multiple addresses.
If you have added custom tags to your form, including the generated shortcode chunk in the Message body section. Failing to include this code will result in the omission of user-submitted answers for that field.
Furthermore, the Mail 2 option provides additional functionality. It lets you set up an autoresponder that sends a confirmation email to the user, acknowledging the receipt of their message. Additionally, it can be used to send different emails to different recipients. For example, you may want to receive emails containing the complete contact form information, while your support staff only needs to receive emails with specific fields. This feature offers flexibility in tailoring email notifications to suit your specific requirements.
Messages Settings
In the Messages tab of Contact Form 7, you have the option to modify the messages displayed to users for different completed or incomplete tasks. This customization allows you to create personalized messages for events such as successful contact form submissions, validation errors, incorrect formatting, and more. Tailoring these messages can enhance the user experience and provide clear instructions or feedback to users interacting with your contact form.
Additional Settings
The Additional Settings tab in Contact Form 7 provides further configuration options. Here, you can enable various built-in features, including exclusive subscription options, a demo mode where no emails are sent, acceptance validation for terms and conditions, message storing options, and more. You can refer to their documentation for a comprehensive list of Contact Form 7’s additional settings.
Once you have finished making your desired edits and adjustments, remember to save your changes to ensure they take effect.
How to Use Your Contact Form
To utilize your completed contact form, you can copy the form shortcode and insert it into various website areas, such as pages, posts, or widget areas. The shortcode can be found at the top of the contact form creation page, just below the form title, once you have saved it (it will be highlighted). The shortcode will typically resemble the following format:
[contact-form-7 id="330" title="Contact Page"]Using a page builder like WPBakery or Elementor, you can conveniently use the related Contact Form 7 builder module. This module allows you to select and insert your form directly onto a page without copying and pasting the shortcode manually.
By incorporating the contact form into your website, you provide visitors with a user-friendly and efficient means of contacting you.
How to Display a Contact Form on a Page
To display a form on your page using Contact Form 7, follow these steps:
- Open the Contact > Contact Forms menu on your WordPress admin screen. This is where you can manage multiple contact forms. After installing the Contact Form 7 plugin, you will see a default form named “Contact form 1” with a corresponding shortcode, like the one below:
[contact-form-7 id="1234" title="Contact form 1"]- Copy this shortcode. Next, go to the edit menu of the page where you want to display the contact form (Pages > All Pages). Creating a dedicated ” Contact ” page for the contact form is common practice.
- Paste the copied shortcode into the content of the page.
- For Contact Form 7 version 5.3 and later, there is support for the contact form selector block in the Block Editor. This block allows you to easily select a contact form from a list of forms you have created, eliminating the need to copy and paste shortcodes manually.
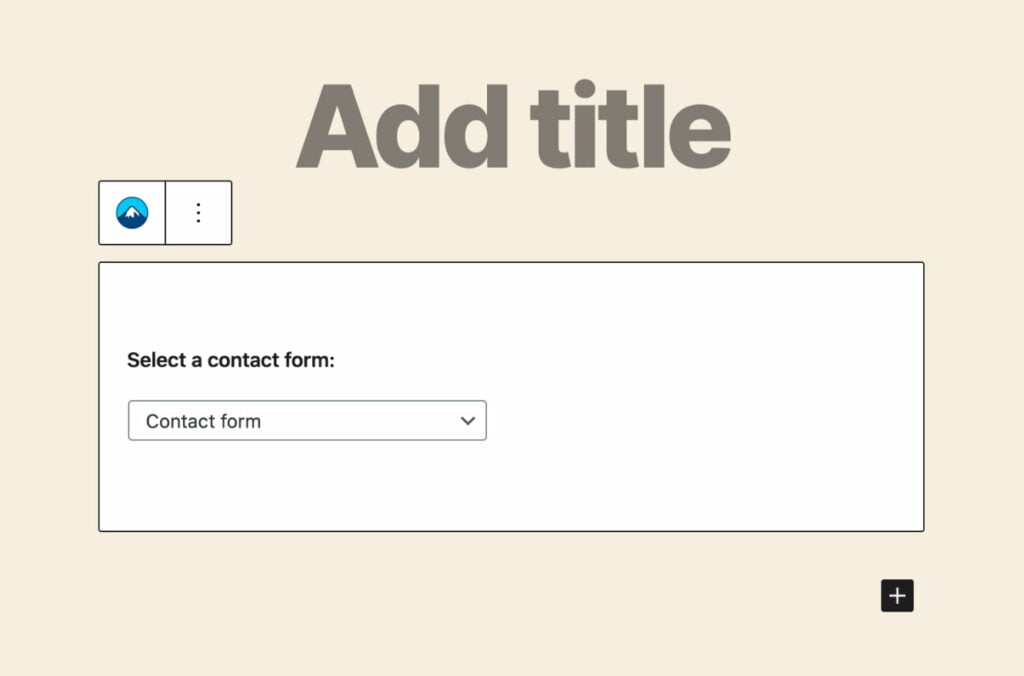
Contact form shortcodes remain available and can be highly useful when you want to add custom attributes or when you have multiple contact forms to display in different contexts.
With the completion of your contact form setup, users can easily locate the form and begin submitting messages to you.
Now, let’s explore how you can customize both the form and the content of the emails you receive.
Contact Form Customization
If you find the default form too simplistic and want to add additional fields, you can edit the form template on the admin screen.
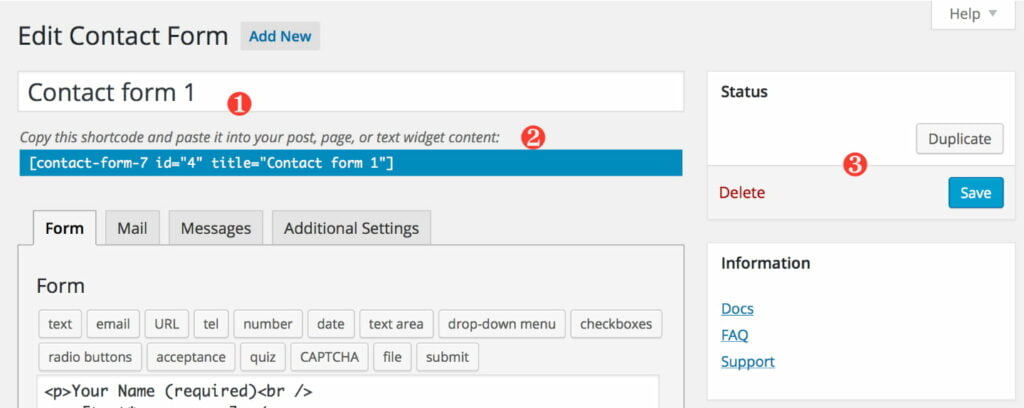
- The title of the Contact Form (❶) serves as a label for administrative purposes. You can choose any title, such as “Job Application Form.”
- Shortcode for the Contact Form (❷). Copy the provided shortcode and paste it into the content of your post, page, or text widget to insert the contact form at the desired location on your website.
- Options to Manage the Contact Form (❸). In this section, you can save the changes made to the contact form, duplicate the form if needed, or delete it if it is no longer required. These options provide flexibility in managing your contact forms.
To add fields to the form, you need to create tags for them and insert these tags into the form template within the Form tab panel. You may encounter unfamiliar codes in the form template, such as [text* your-name]. These codes are called “tags” in the context of Contact Form 7.
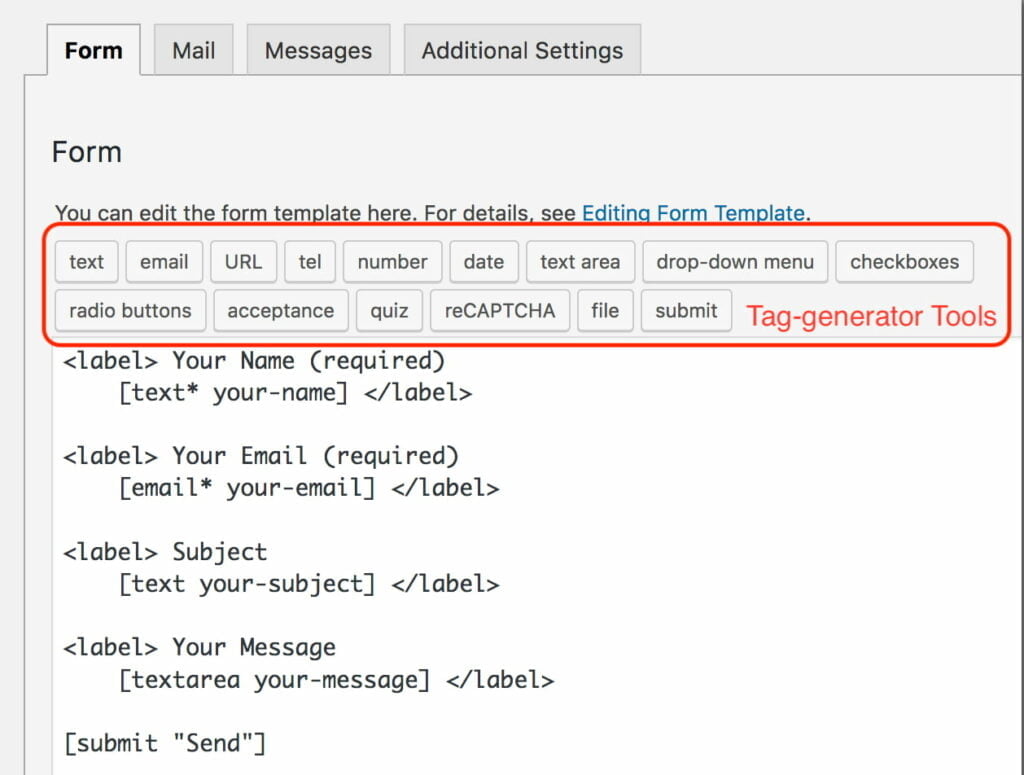
A tag has a slightly complex syntax, but no need to worry! You don’t have to learn it manually. Contact Form 7 provides tag-generator tools that allow you to generate as many tags as you need easily.
The second word in a tag represents its name. For example, in the tag [text* your-name], the name is ‘your-name.’ This name is important because it is later used in the mail template.
Utilizing these tag-generator tools and adding the desired fields to your form template allows you to customize your form to suit your specific requirements.
Email Tags
Sometimes, you may require additional information beyond the user submits through the contact form. This is where Contact Form 7’s special email tags prove valuable. These tags allow you to include additional details in your email notifications.
With the help of these email tags, you can add various elements such as email timestamps, submission IP addresses, the ID or title of the post that contains the contact form, and more. These tools are designed to assist you in organizing and managing your form submissions effectively.
Utilizing these email tags lets you gather comprehensive information beyond what the user directly provides, giving you a complete view of each form submission.
How to Use CAPTCHA with Contact Form 7
To initiate reCAPTCHA, you must first register your WordPress site. reCAPTCHA is a service Google provides, so you need a Google account. Sign in to your Google account and navigate to the reCAPTCHA Admin Console. You will be presented with a straightforward registration form resembling the one below:
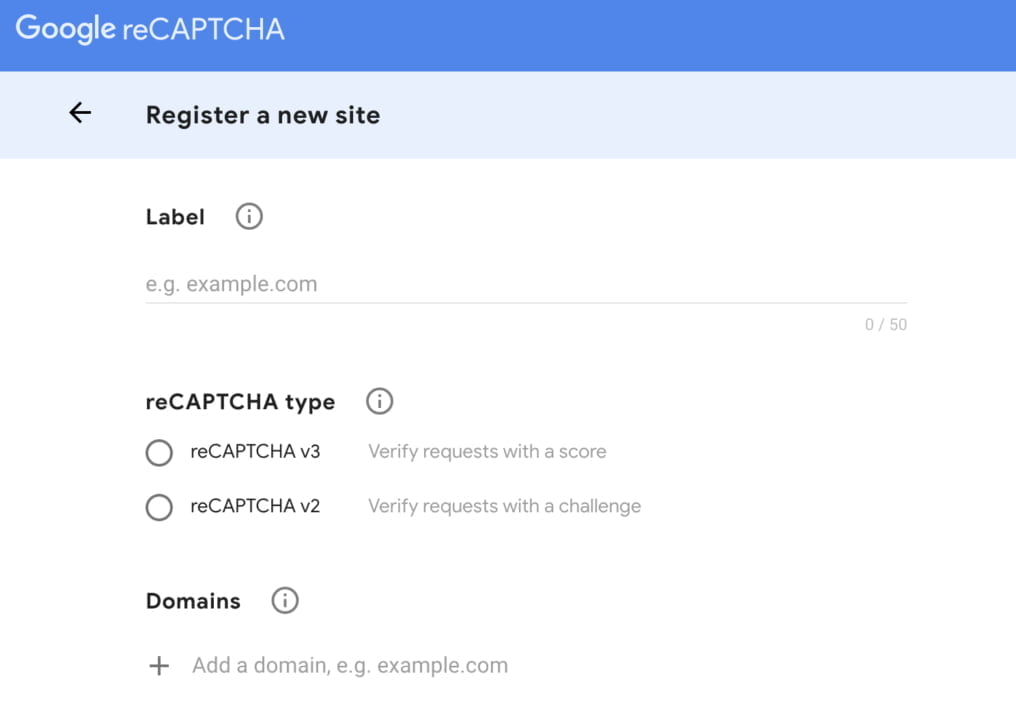
Select reCAPTCHA v3 from the available options and enter your website’s domain in the designated “Domains.”
Once you have registered your website, you will receive a site and secret keys.
Next, proceed to the WordPress admin screen and access the Contact > Integration menu page.
On this page, you will see a section labeled “reCAPTCHA.” Click on “Setup Integration” within this section. This will reveal input fields for the Site Key and Secret Key. Copy and paste the two keys you received in the previous step into their respective fields, then click “Save Changes.”
This is what Contact Form 7 is and how to get started with the creation and setup of contact forms on your website. Integrating your website with the respective functionality is a great way to establish better contact with your audience. Moreover, the forms created with Contact Form 7 can be easily adjusted to match the style and objectives of your web project. Check the benefits by yourself!


Contact
Don't like forms?
Shoot us an email at [email protected]
