How to Customize the WordPress Dashboard?

Table of Contents
The WordPress website operates through an administrative interface, its dashboard, which centralizes access to core site functionalities, content oversight, and backend configuration. As the operational backbone of site management, the dashboard comprises modifiable interface elements whose arrangement and visibility directly influence usability, clarity, and brand cohesion.
Customizing the WordPress dashboard allows the website to align interface behavior with organizational workflows and access needs. This interface adjustment accommodates a range of user roles, from content contributors to technical administrators, through tailored menu structures, refined navigation logic, and widget visibility.
Role-based customization enhances productivity and reduces interface noise by streamlining the visual structure and restricting irrelevant functions from specific roles.
Why Personalize the WordPress Dashboard?
Personalizing the WordPress admin dashboard improves task efficiency by aligning the admin interface with the specific workflows and responsibilities assigned to different user roles. A default dashboard layout often presents irrelevant sections and non-essential features, introducing visual noise and reducing clarity.
Through intentional configuration, dashboard personalization enhances backend usability by simplifying navigation and supporting interface layouts that reflect site-specific priorities and operational focus.
Customize the Admin Menu Items
The WordPress admin menu can be customized to match the operational structure and user-role priorities of a given website. This navigation interface supports adjustments to item visibility, hierarchical order, and access scope, enabling a tailored backend layout. Modifying the admin menu streamlines task flow and simplifies the interface for role-specific management demands.
Reorder Navigation Items
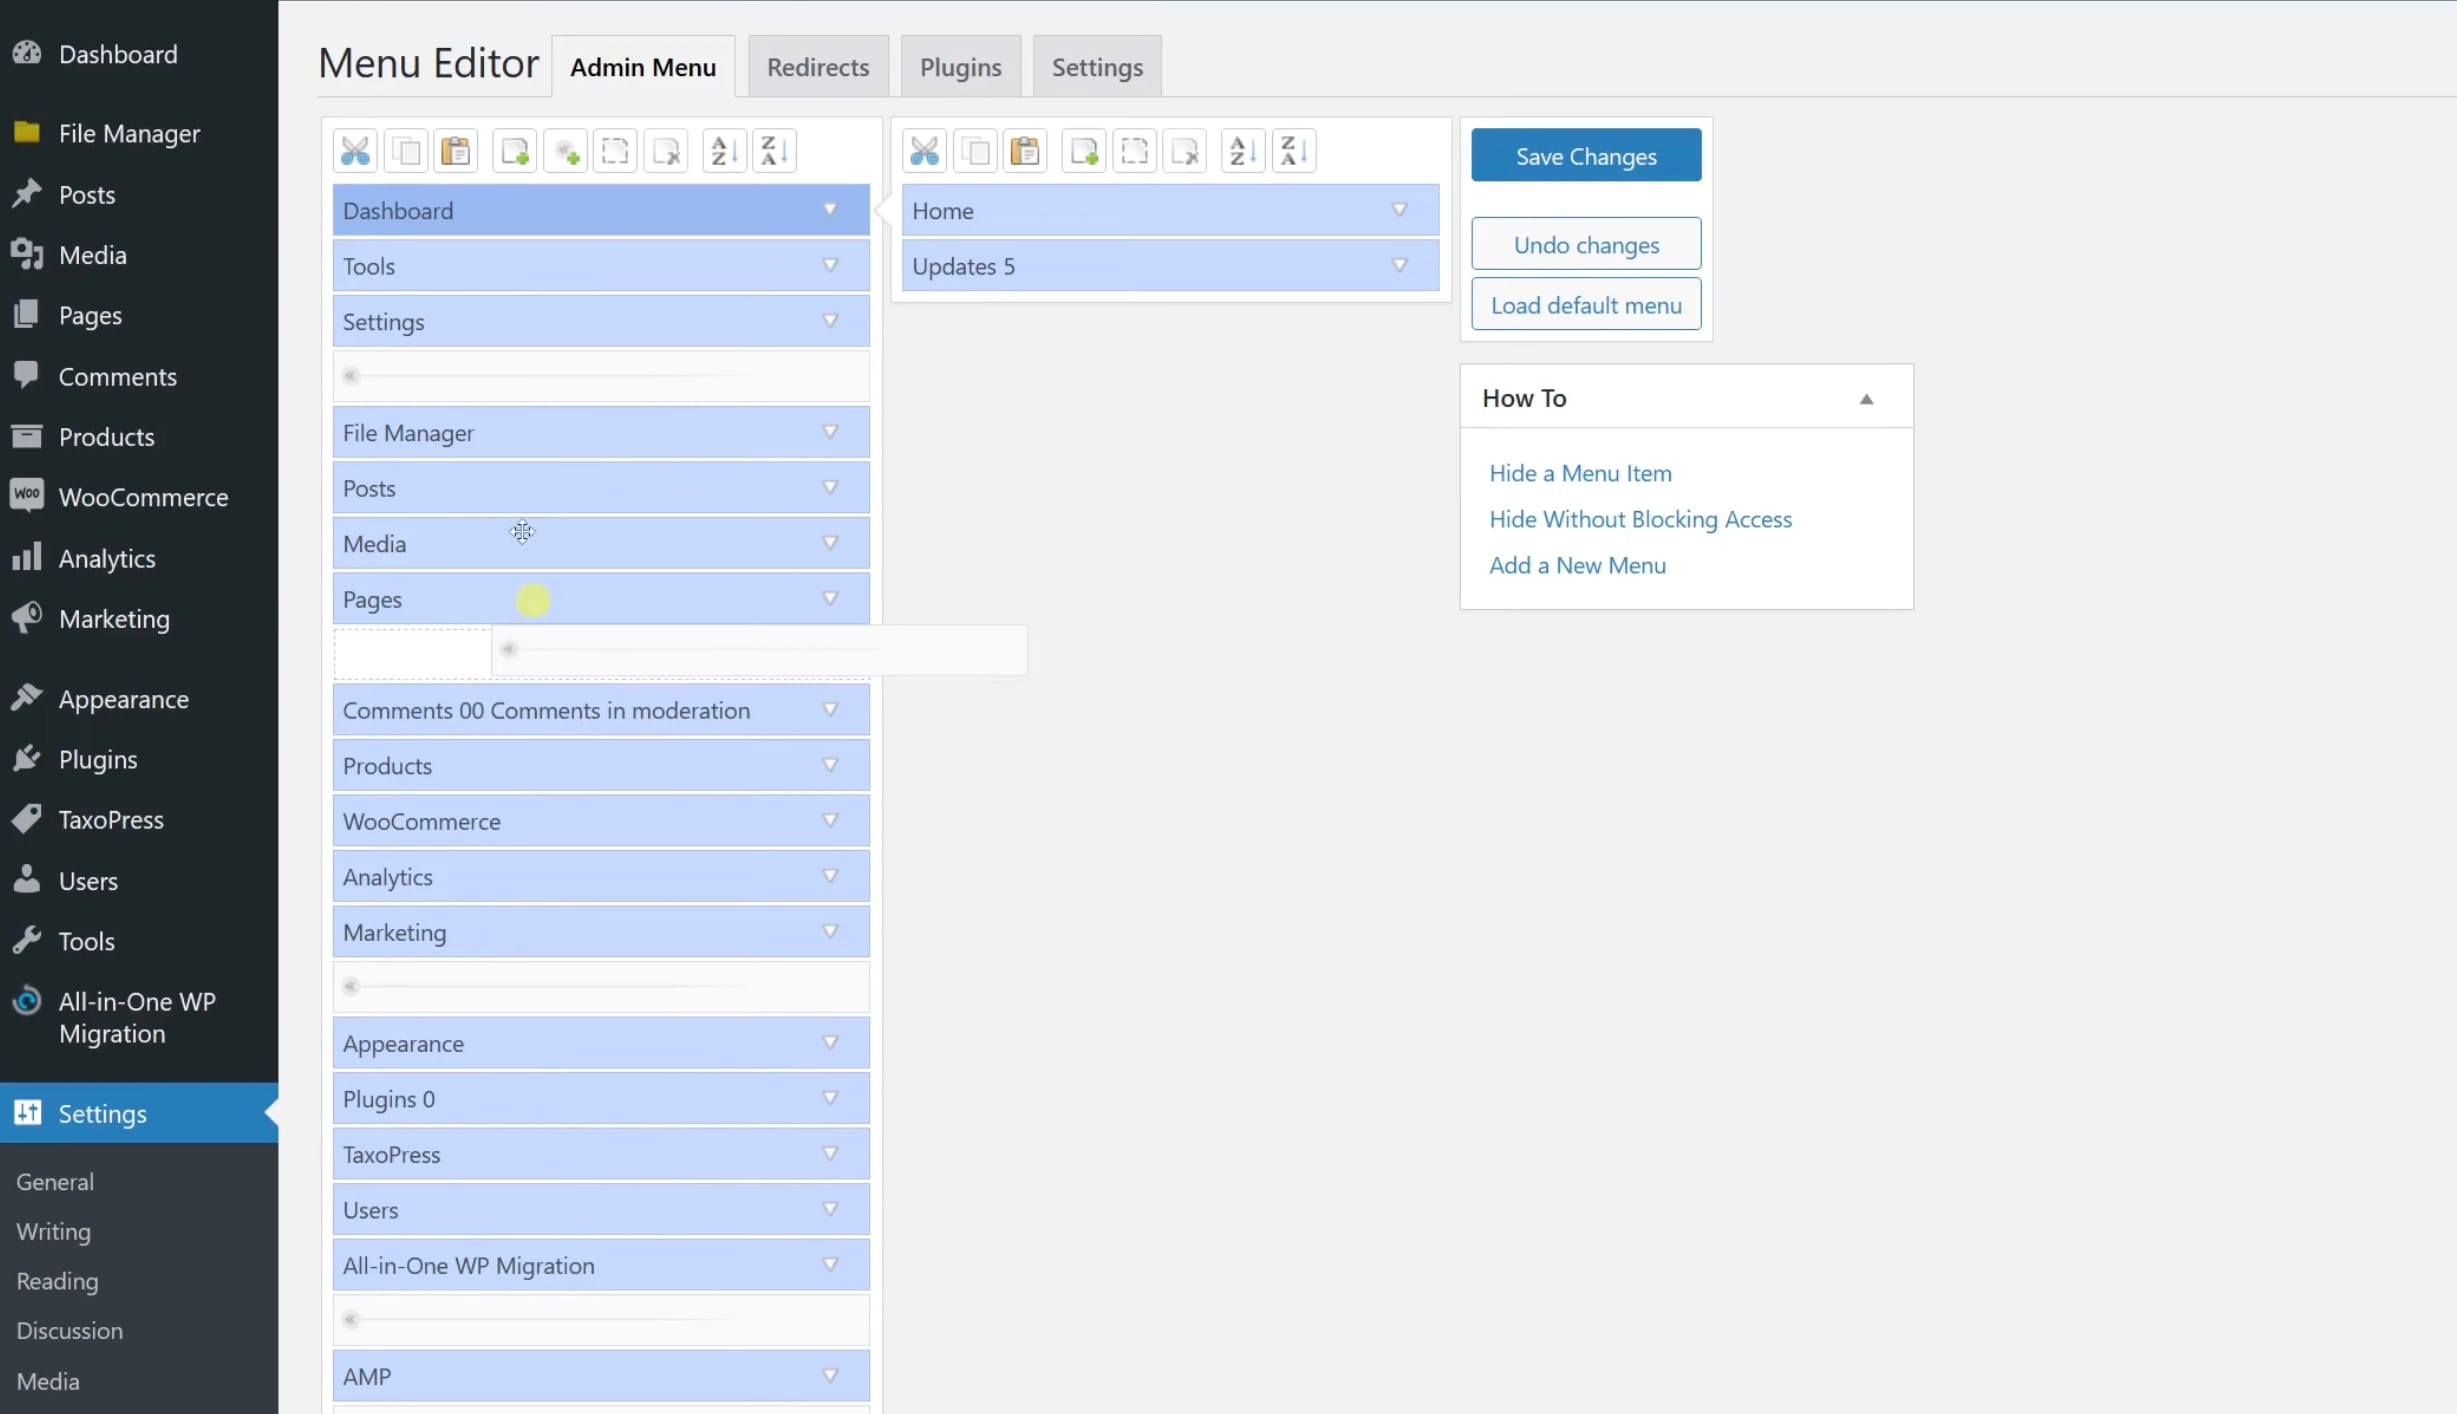
The default WordPress dashboard does not offer native menu reordering, which is why a plugin like Admin Menu Editor is required to adjust item sequence. After installing the plugin, navigate to its settings panel, where all admin menu items are listed. Use drag-and-drop to rearrange them into the preferred order. Once the layout is finalized, save the configuration to apply the new structure to the admin interface.
Hide Default Menu Sections
To streamline the interface, default menu sections can be hidden through the visibility controls within the admin menu panel.
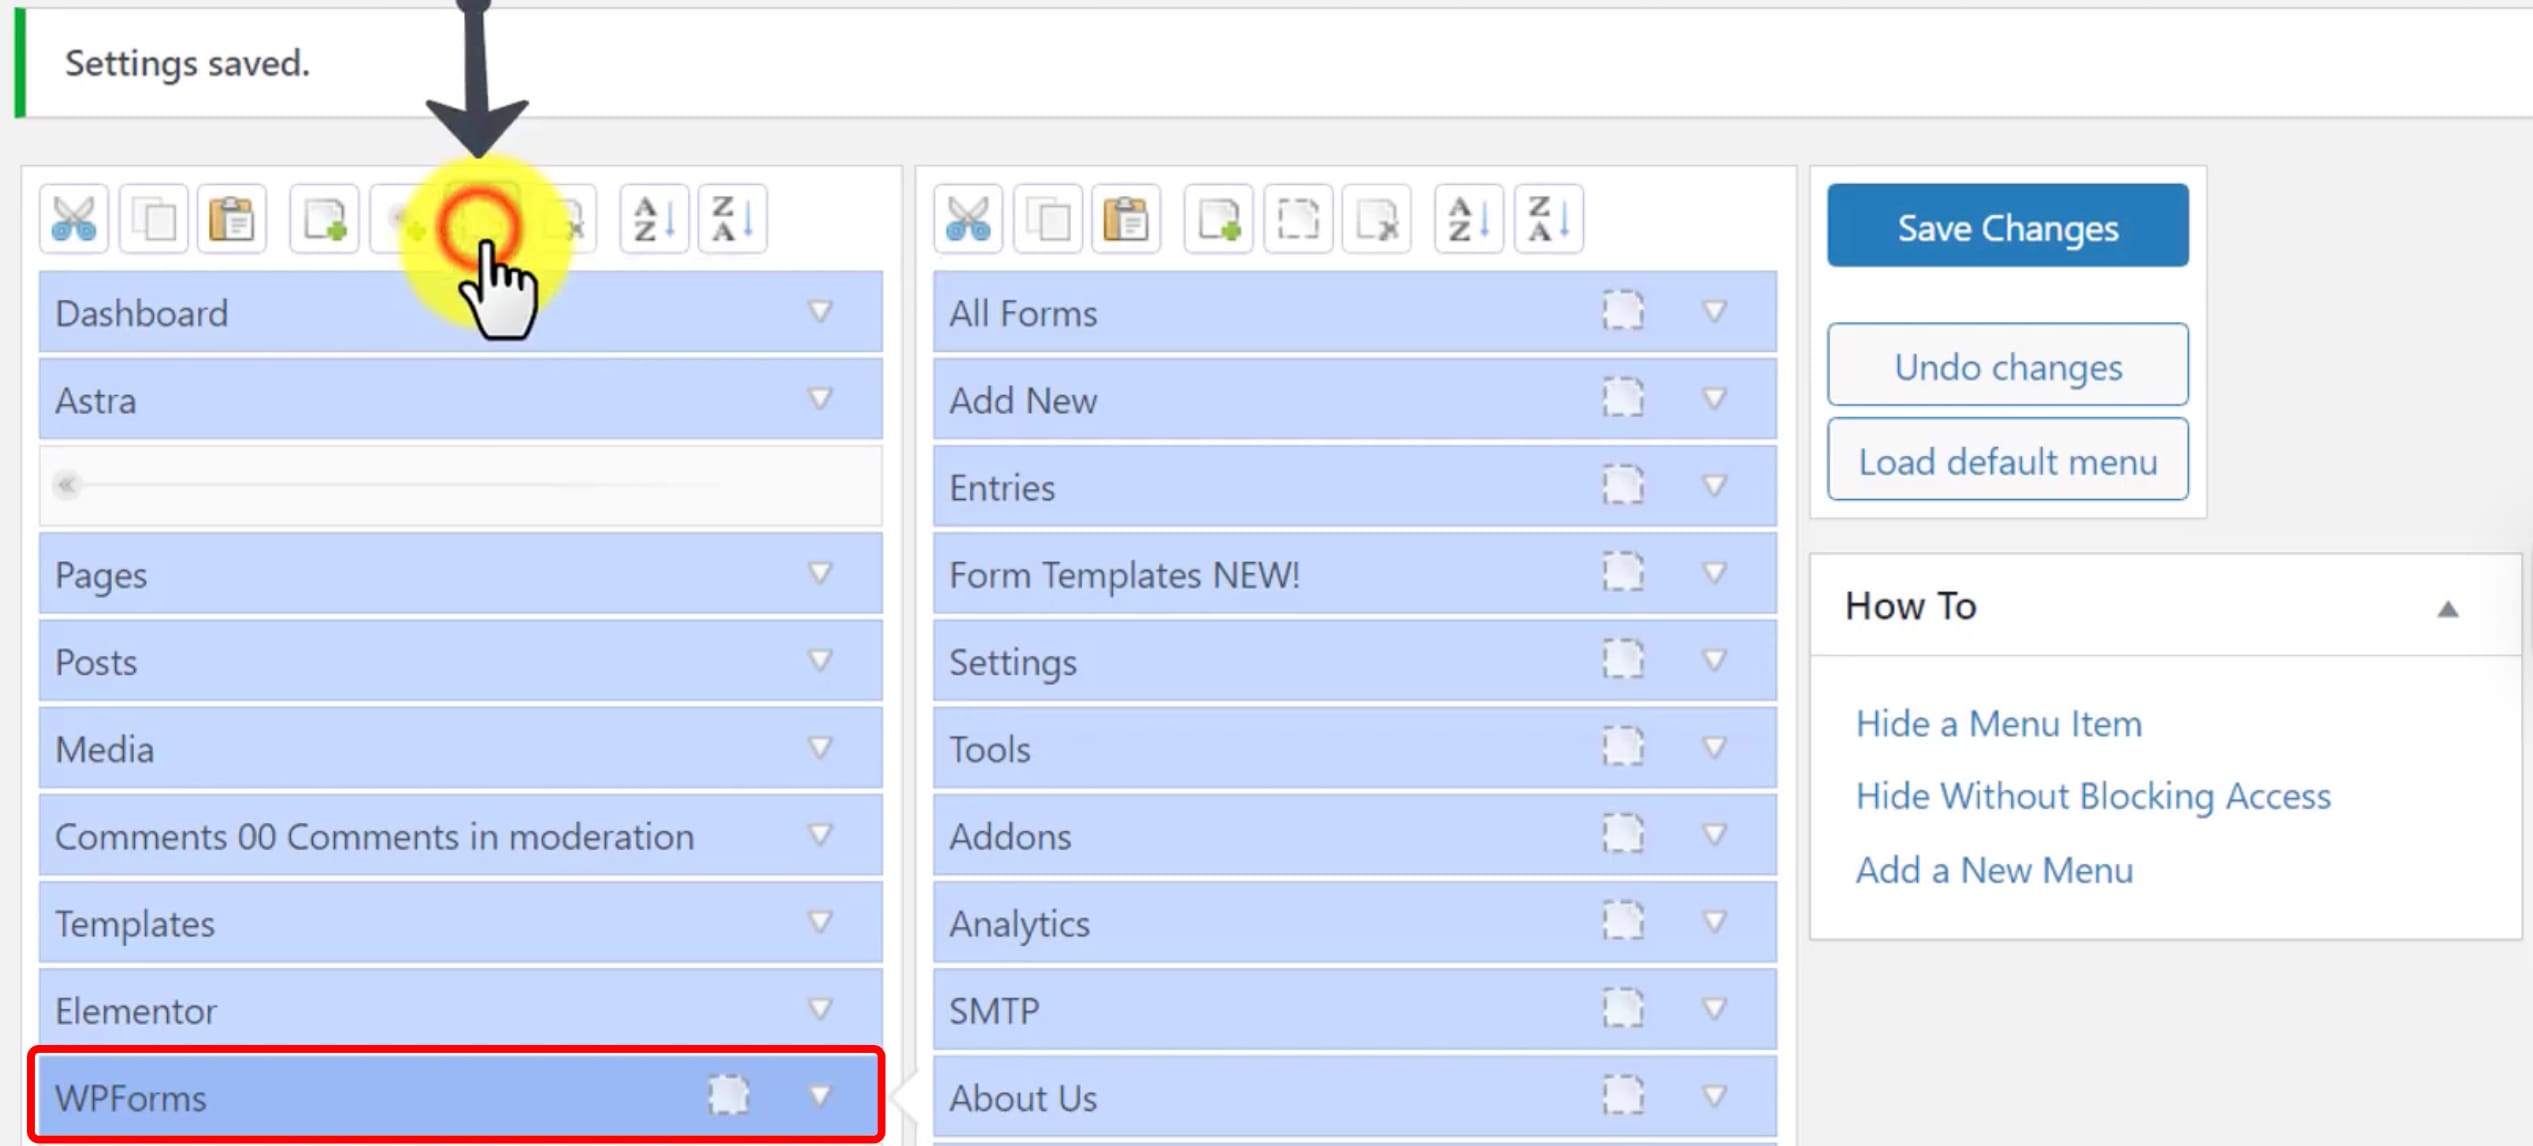
WordPress core does not offer a built-in setting to disable or hide admin menu items via the standard UI, so hiding default menu sections typically requires customization (e.g., via code) or a plugin. If you decide to use a plugin for this purpose, Admin Menu Editor will be a helpful option.
After installing the plugin, go to its control panel where all default menu items are displayed. Locate the sections you want to remove from view and uncheck their visibility boxes or toggle them off. Save the configuration to update the dashboard and hide the selected menu sections from the admin interface.
Modify Dashboard Widgets
Dashboard widgets are modular blocks displayed on the WordPress admin homepage that present site-related information such as activity logs, health checks, or content overviews. These display panels are part of the backend interface and can be modified to control what information is shown to site administrators and contributors. Adjusting the widget layout supports clearer workflows, reduces interface clutter, and aligns the dashboard with role-based visibility needs.
Remove Unused Widgets
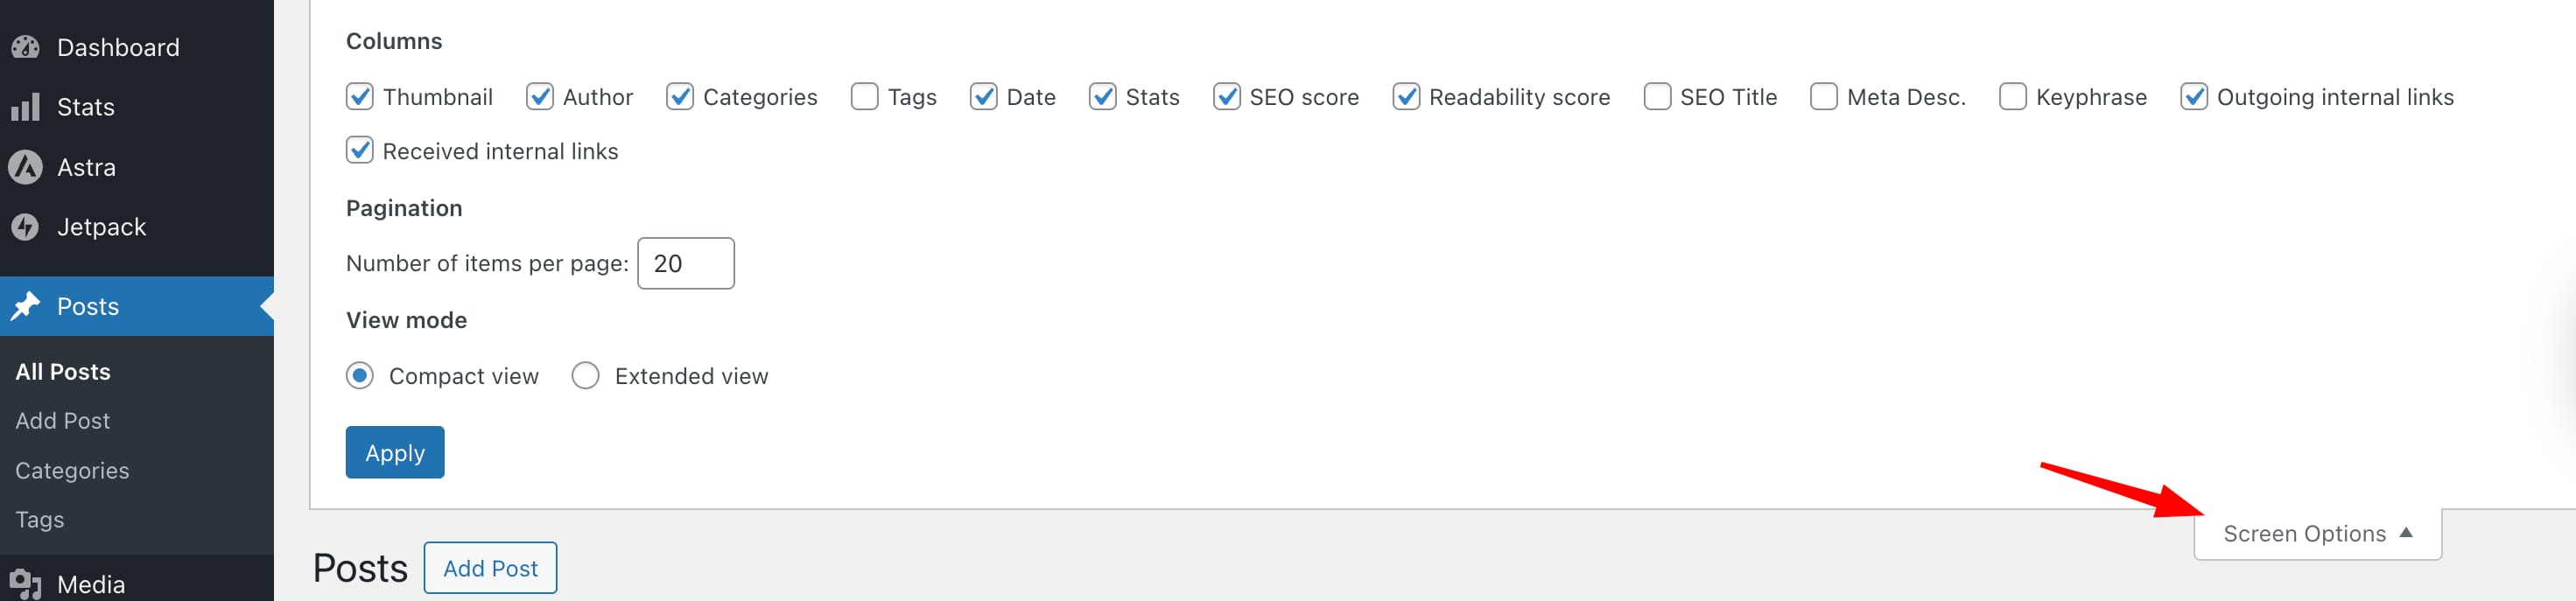
Open the Screen Options tab located at the top right of the WordPress dashboard. Uncheck the boxes next to any widgets you want to hide from the admin view. The layout updates instantly to reflect the selected display preferences.
Add Custom Widgets
To add a custom dashboard widget, either use a plugin interface or insert a widget registration function into your theme’s functions.php file. Define the widget by setting its title and the output it should display within the admin panel. Once registered, the widget will appear as a new content block on the dashboard homepage.
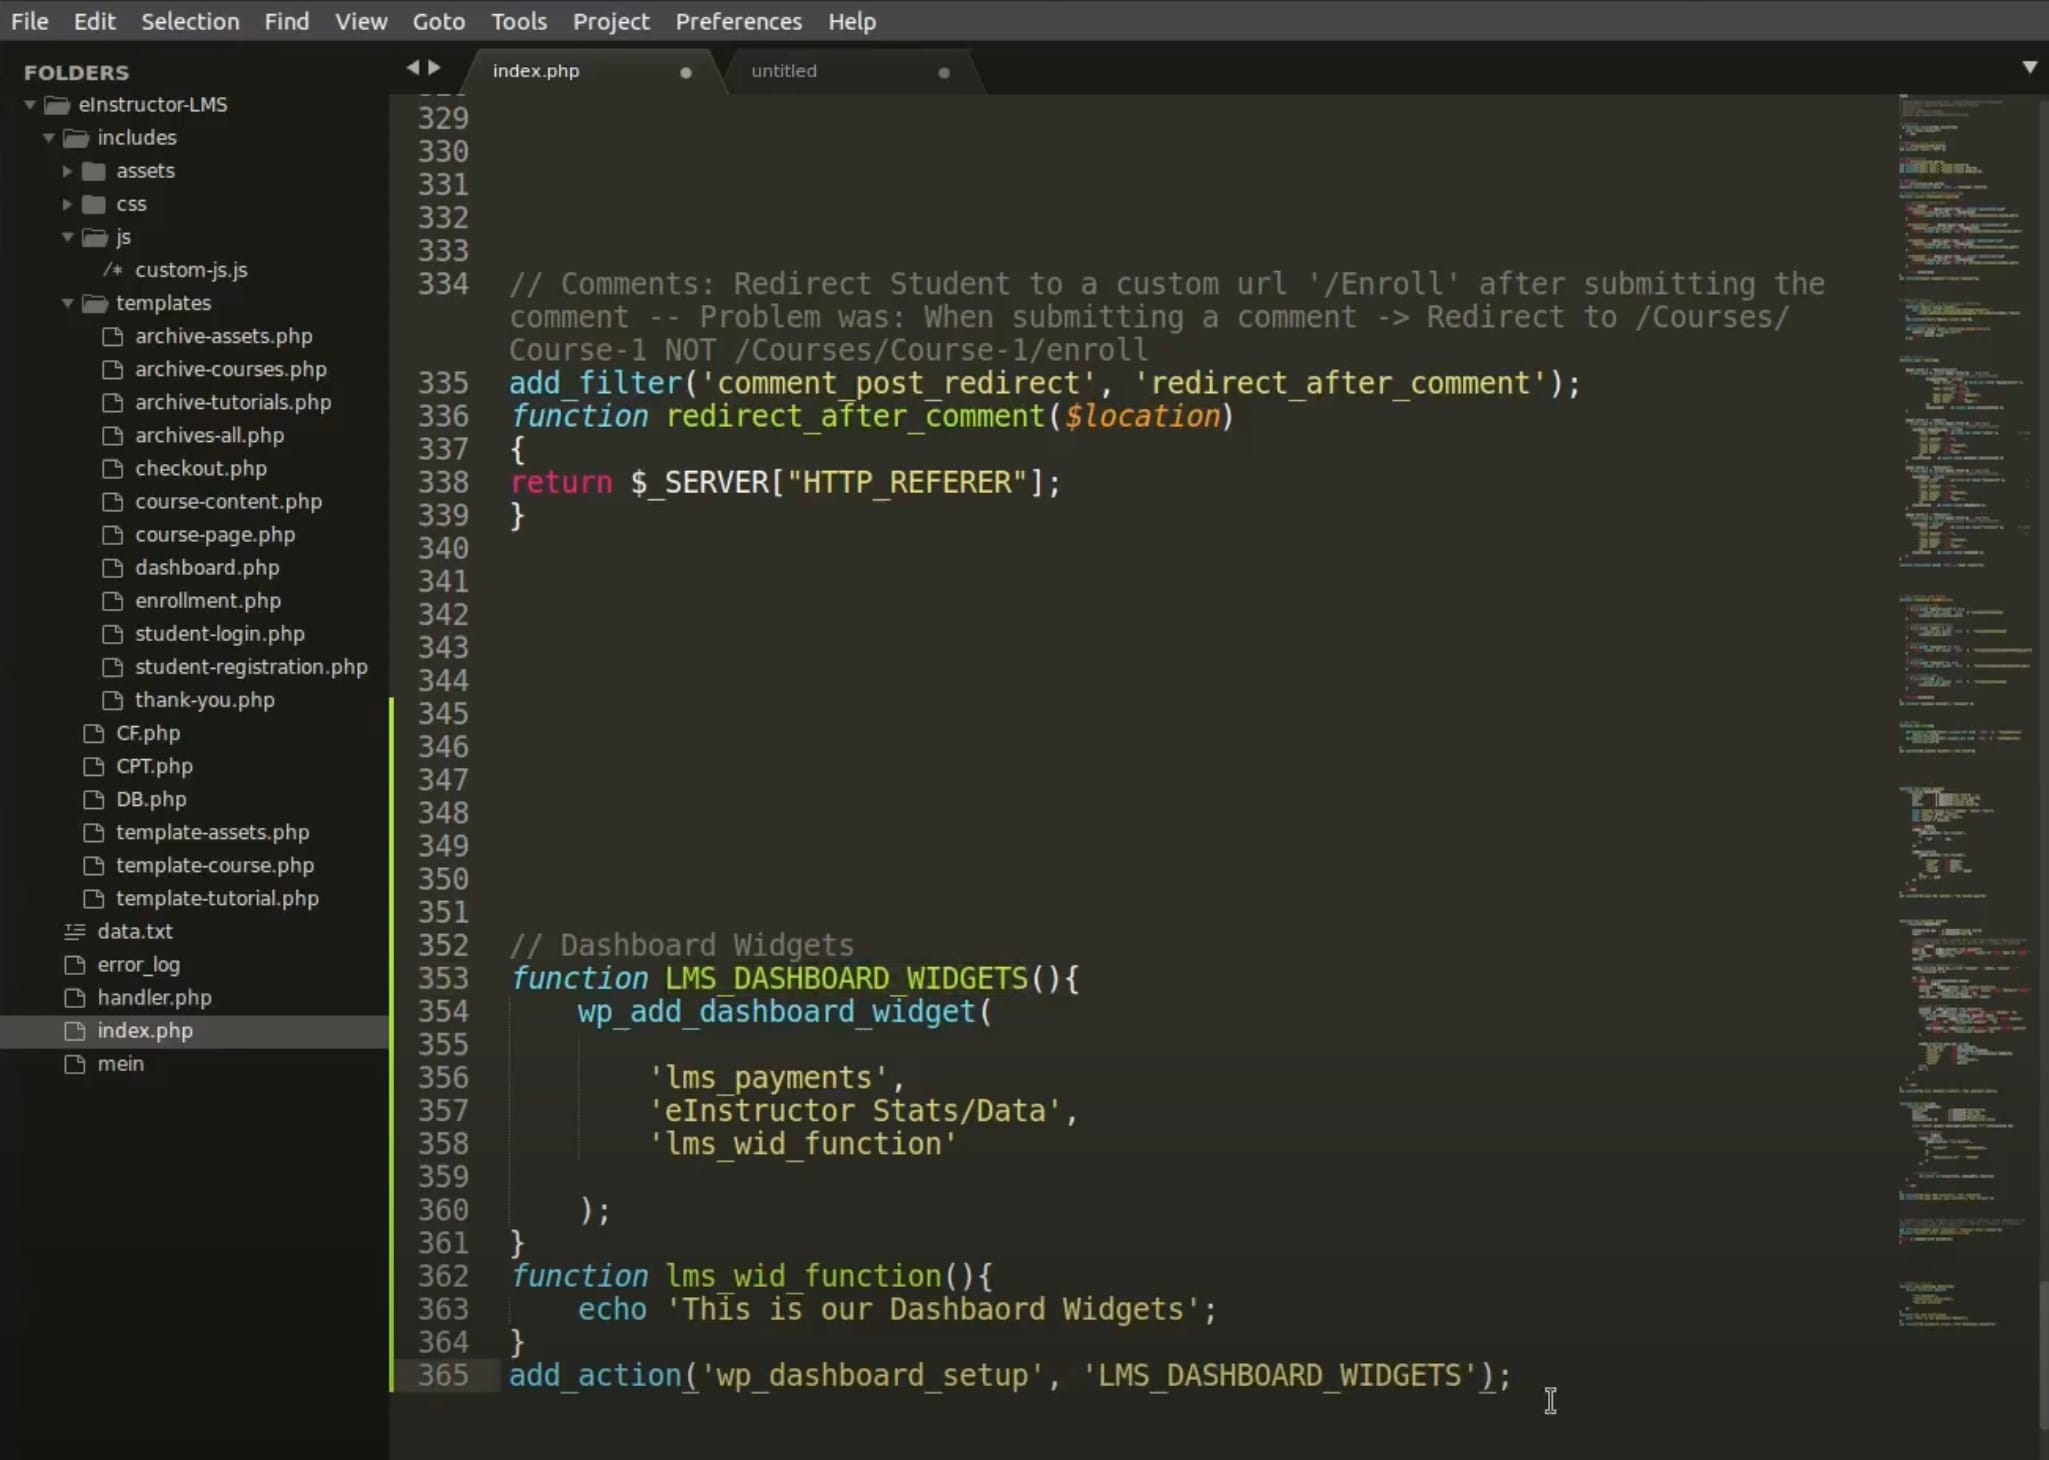
If you decide to opt for using a plugin, use Ultimate Dashboard (or a similar admin customization plugin). This provides a GUI for widget creation:
- Install and activate Ultimate Dashboard.
- Go to Ultimate Dashboard > Add New Widget.
- Specify a Widget Title and choose a Widget Type (Text, HTML, Icon, etc.).
- Input the widget content (e.g. HTML or plain text).
- Configure whether it should be visible to particular user roles.
- Save or publish, and the widget will show on the dashboard for the designated roles.
Change the Admin Color Scheme
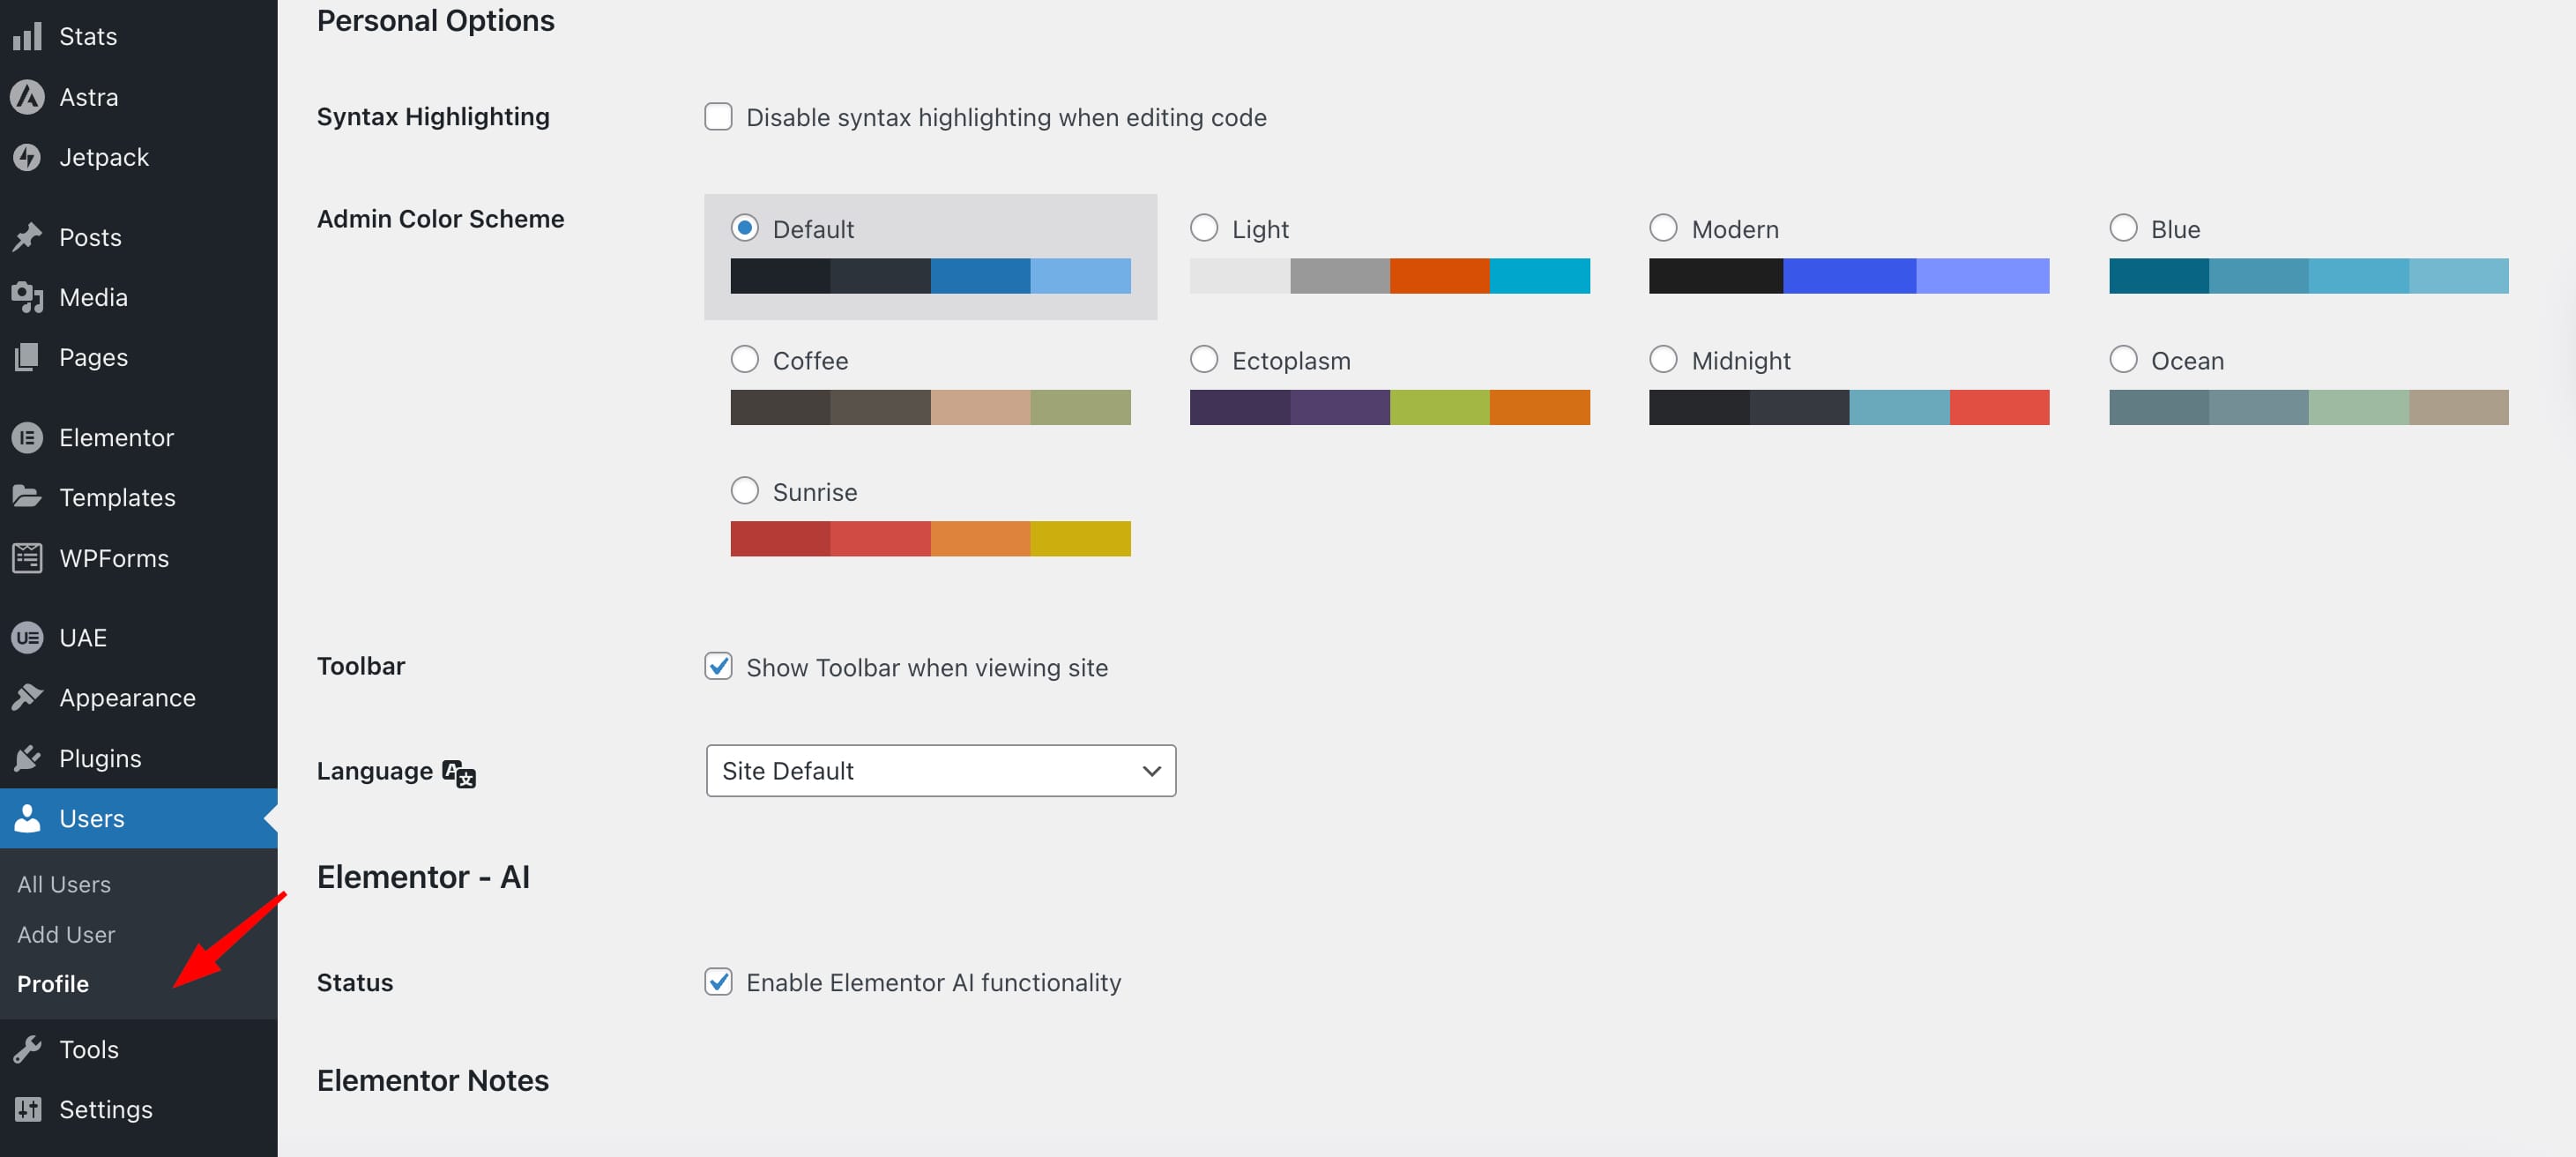
The admin color scheme defines the visual appearance of the WordPress dashboard interface for each user, affecting only the backend layout and not the public-facing website. WordPress provides several predefined color schemes that allow users to personalize their admin experience.
To apply a new color scheme, go to Users > Profile, scroll to the Admin Color Scheme section, select your preferred theme, and click Update Profile to save the change. The updated color scheme will take effect immediately in your admin interface.
Replace WordPress Branding
WordPress branding refers to the default visual and textual elements displayed across the admin interface, such as the login screen logo, admin bar icon, footer credits, and dashboard meta references. Replacing or removing these branding elements helps align the backend interface with the site’s own identity.
To perform this customization, one may opt for either a plugin or a custom snippet in functions.php. These methods override or suppress default branding outputs to display client‑specific logos and text.
If choosing the plugin route, a “white label” or branding plugin simplifies the process:
- Install and activate a branding plugin (for example, Remove WP Branding or a similar white‑label tool).
- Navigate to the plugin’s settings page (often under “Settings” or its own menu).
- Upload or select a custom logo to replace the WordPress login screen logo and admin bar icon.
- Edit or remove the default footer text (e.g., “Proudly powered by WordPress”) via the plugin’s footer branding option.
- Save the configuration and clear caches if necessary. The changes will immediately reflect in the admin interface for permitted user roles.
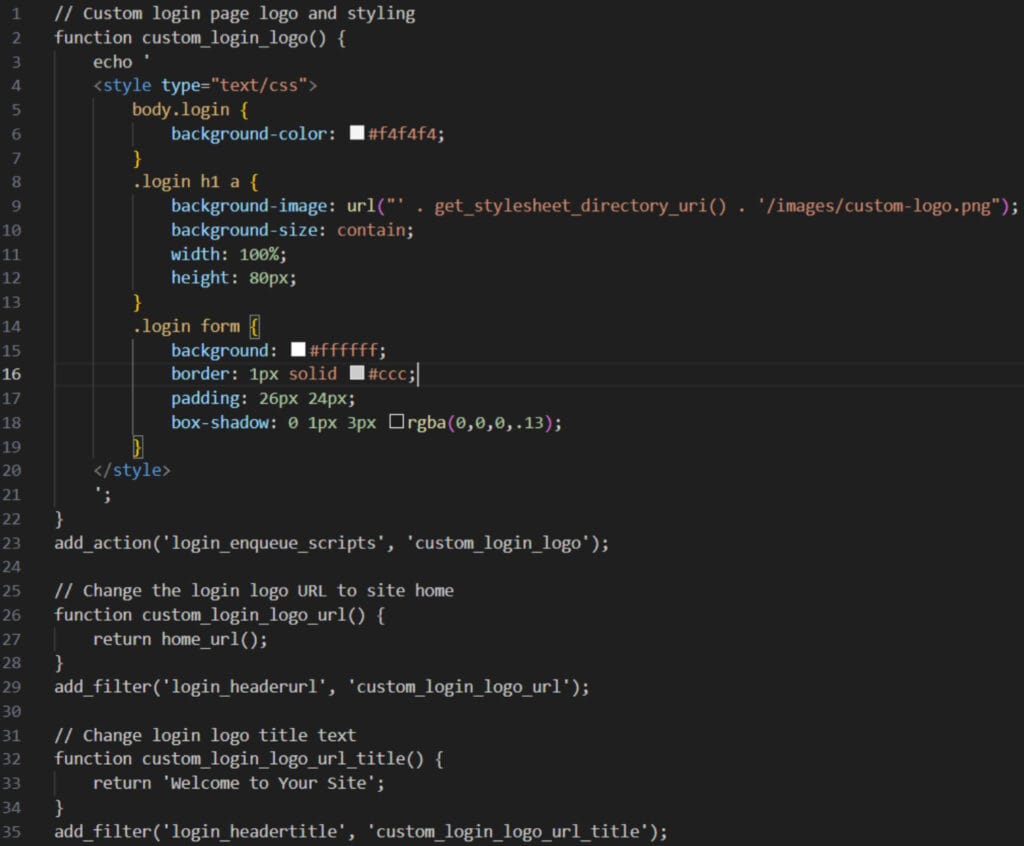
To override branding via code, insert the following (or similar) code snippets into your theme’s functions.php (or better, a custom plugin file) to replace login logo and footer text:
- The first snippet enqueues inline CSS on the login page to override the WordPress logo with your custom image.
- The second snippet replaces the default footer text in the admin screens with your own text.
- Upload your logo image to your theme (or child theme) folder (e.g. /images/custom-login-logo.png).
- Save changes; refresh the login page and admin dashboard to confirm the customized branding.
Role-Based Interface Control
Role‑based interface control means customizing which dashboard elements (menus, widgets, sections) are visible or hidden depending on a user’s role (e.g. Administrator, Editor, Author). By assigning visibility rules to roles, the admin interface can be simplified for less privileged users and sensitive sections can be restricted.
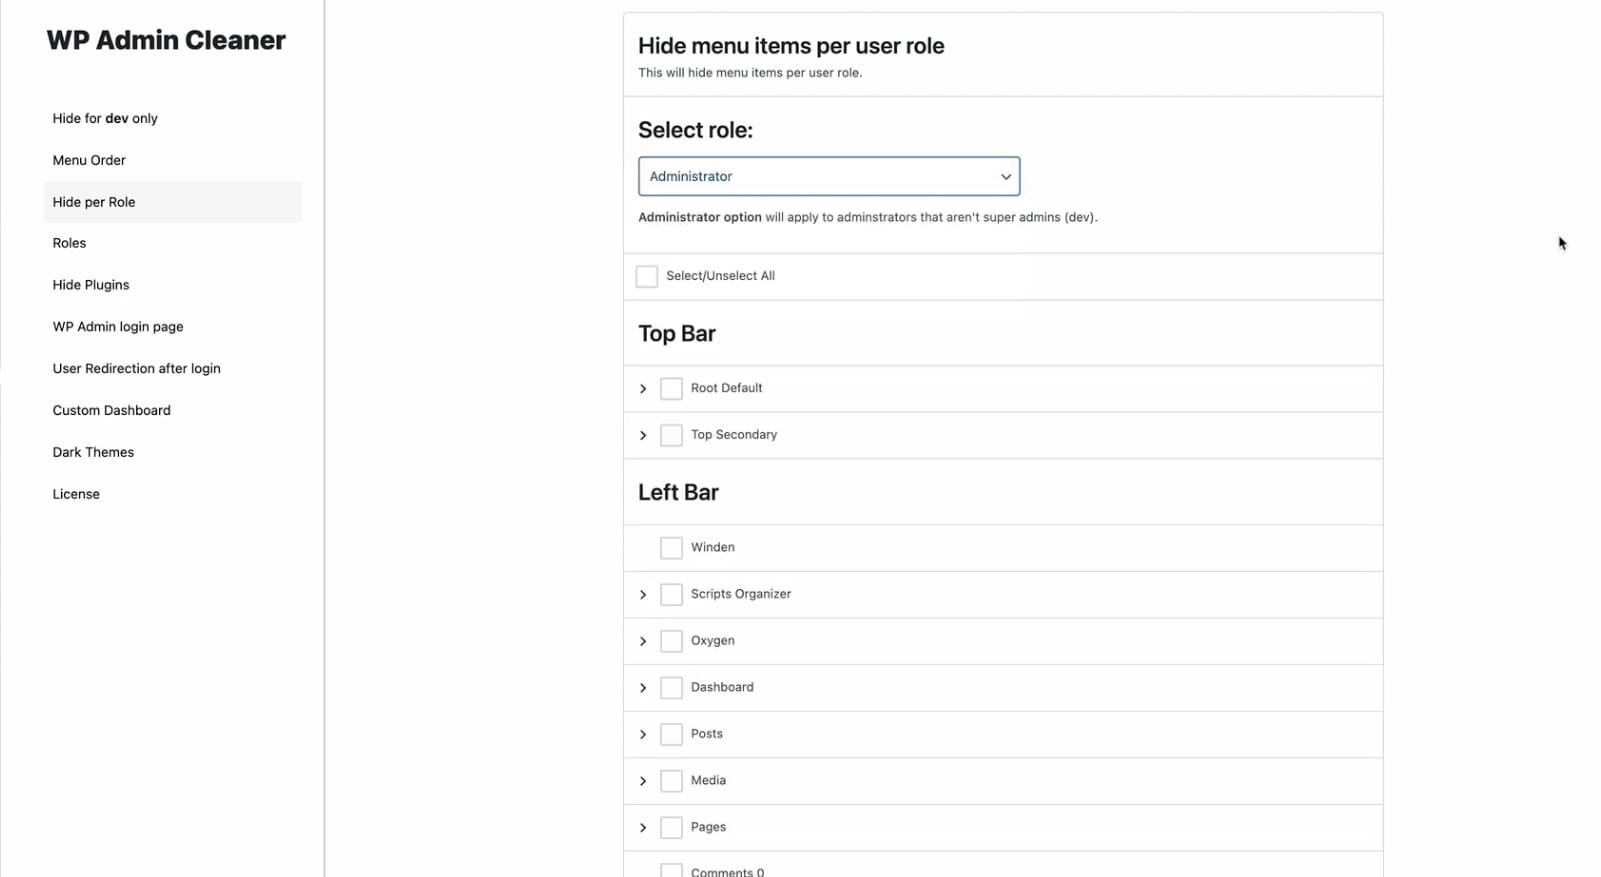
To enforce interface control via the WP Admin Cleaner plugin, which lets you hide or restrict dashboard elements (menus, submenus, widgets) per user role or current user.
Here’s how to use it:
- Install and activate the WP Admin Cleaner plugin.
- In the WordPress admin sidebar, go to WP Admin Cleaner > Settings (or the plugin’s menu area).
- Choose whether you want to Hide for Current User Only or Hide Per Role.
- If you choose “Per Role,” select the desired user role from the role dropdown.
- Expand the menu sections in the list (left bar, top bar, submenus) and check the boxes next to items you wish to hide for that role.
- Save the settings. The selected menu items will now be hidden in the admin interface for that role or user.
Create a Custom Login Page
A custom login page replaces the default WordPress login screen with a branded interface that aligns with the site’s visual identity and admin access flow. This page serves as the entry point to the backend and can be customized to display custom logos, background images, and styled form elements that reflect the site or client’s branding.
To configure a custom login page, use a plugin designed for login customization or insert custom functions into the theme’s functions.php file. These methods allow direct control over the login screen’s appearance, enabling personalized design for the admin access point without altering front-end theme elements.
Typical adjustments include replacing the default WordPress logo with a branded version, setting a custom background image or color, and restyling the login form fields to match the overall site theme.
Upload your custom logo to /images/ in your theme folder. Save and refresh your login page to see the updated design.
Manual Methods via Code
Manual methods via code refer to the practice of customizing the WordPress admin interface by directly modifying PHP through theme or plugin files. These changes are typically implemented in the functions.php file of the active theme or within a custom plugin. This approach allows developers to control core backend behavior (such as menu structure, widget visibility, branding, and login layout) without relying on external tools.
Use functions.php for Tweaks
The functions.php file is a core component of the active WordPress theme, used to insert PHP-based tweaks that alter admin interface behavior. Admin-level customizations (such as hiding widgets, modifying menu visibility, or adjusting login screen output) can be applied by adding action hooks and filters to this file. Once saved, these changes take immediate effect within the admin dashboard and persist until the theme is switched or the function is removed.
Plugin Solutions for Customization
Plugin-based customization offers a code-free method for modifying the WordPress admin interface using visual configuration tools. These solutions enable users to customize the layout, visibility, and branding of backend elements, including menus, dashboard widgets, login screens, and admin color schemes. With plugin-based tools, site managers can tailor the admin display for specific user roles or organizational needs, all directly from the WordPress dashboard without editing theme files or writing PHP.
Adminimize
Adminimize is a plugin designed to control the visibility of WordPress admin elements based on user roles. Inside the plugin’s settings panel, select a target role and uncheck the menu items, widgets, or meta boxes you want to hide. This enables a cleaner and more focused backend interface for each user group.
WP Admin UI Customize
WP Admin UI Customize provides a visual interface for modifying the layout and styling of the WordPress admin area. Open the plugin settings and navigate to the relevant section, such as Admin Menus, Login Screen, or Color Scheme, to apply the desired changes. This plugin supports layout configuration without code, enabling quick adjustments to the interface’s appearance and structure.
Contact
Don't like forms?
Shoot us an email at [email protected]
