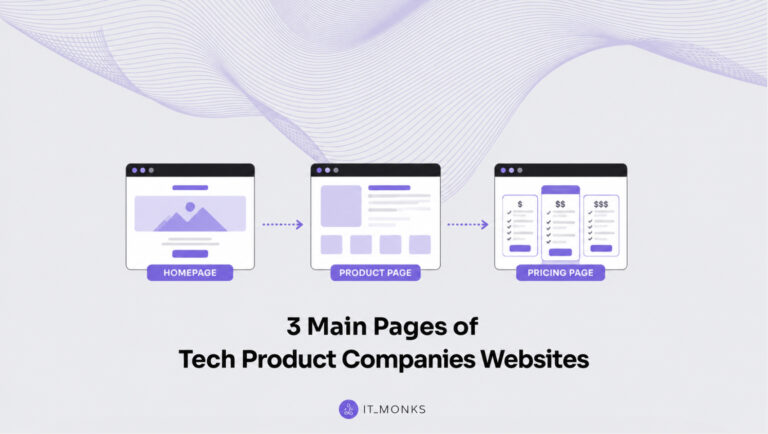
Explore our specialized services, tailored solutions, and industry expertise to elevate your digital presence. From custom WordPress development to seamless integrations, we build high-performing websites that deliver impact.
An existing WordPress site runs on a PHP version, and a PHP-version update or upgrade raises that site runtime to a supported version through a controlled maintenance procedure. This guide explains how to upgrade PHP on WordPress by moving through four phases: check the current version, back up the site, change the version in the host control panel, and verify the site after the change.
The process applies to site owners, administrators, and developers handling routine WordPress upkeep. It covers both common control locations: cPanel and a non-cPanel host dashboard. The same workflow also fits the broader update PHP WordPress task, whether the host labels the action as update, upgrade, change, or set.
The procedure does not start with the version change itself. A WordPress update PHP task begins by finding the current PHP version so the existing runtime is known before the host control panel setting is changed.
What PHP Version Is Your WordPress Site Running?
The current PHP version is the version of PHP the WordPress site runs on right now, before any change is made, the from-state of the whole upgrade. Finding which PHP version a WordPress site is running on is the first real step in any move to update PHP in WordPress, and it is a read, not a change. The number that comes back is a value in the form PHP X.Y, and it carries weight for one practical reason: the only way to confirm the update actually took later on is to know what the site started from. Skip this and the verification at the end has nothing to measure against.
Two places display this value, and both belong to the host rather than to WordPress itself. A managed host surfaces the active PHP version inside its own dashboard. A cPanel control panel shows the same value in a version field of its own. Either location answers the question. The choice between them comes down to which one a given site is administered through.
Check the PHP version on your host dashboard
A managed-host dashboard is the control surface a managed hosting provider gives each site in place of cPanel, and it surfaces the active PHP version as a labelled value somewhere in its settings. On most managed hosts the figure sits under a PHP or environment area, a panel that names the runtime and prints the current PHP X.Y beside it. The read action is a single one: open that panel and note the version label the dashboard displays. Nothing gets changed at this stage; the dashboard is being consulted, not edited, and the figure it shows is the site’s current PHP version. Sites run through a cPanel control panel reach the same value a different way.
Check the PHP version in the host control panel
A cPanel control panel reaches the same current PHP version through a version field of its own, read-only at this stage. cPanel groups its tools into sections, and the active PHP version appears as a labelled value within the software or PHP area, the same PHP X.Y figure, surfaced through a different control surface.
Reading it takes one look: locate the field, note the version it reports. Setting a new version also happens in cPanel, but through a separate manager handled later in the procedure. At this point, the panel is only being checked, not altered. With the current PHP version known for whichever location applies, the site is ready for the step that must come before any version change: a backup.
How to Back Up Your WordPress Site Before the Update
A site backup is a restorable copy of the WordPress site’s files and its database, captured while everything still works, so the exact state can be put back if needed. Backing up the WordPress site before the update is the precondition for the whole procedure, the gate that every later step depends on.
Order is the point. The backup is taken before the PHP version changes, never after, because its entire value lies in preserving the working from-state ahead of the switch. A copy made afterward records the new state, not the one worth returning to.
That backup is what makes the change reversible. With both the files and the database saved, a version change that turns up trouble is no longer a one-way move; the site can be reverted, and rolling back to the previous PHP version stays available as a safety net rather than a panic. The backup covers two components, and both are required: the site files and the database. One without the other restores only half a site.
The approach that fits both control paths is host-agnostic, a backup that does not lean on any one host’s staging feature. Plenty of hosts ship a staging or snapshot tool, and those work where they exist, but tying the precondition to a single provider’s feature leaves every site on a different host without a method.
A portable backup closes that gap. It runs the same way regardless of where the site is hosted, which is exactly what a procedure meant for both cPanel and non-cPanel sites needs. With a restorable copy in hand, the version itself can change, starting in cPanel.
Back up files and the database with a backup plugin
A backup plugin is the portable, host-agnostic way to capture both the WordPress site files and the database in one restorable set, installed and run from inside WordPress rather than from any host’s control surface.
Because the plugin runs from inside the WordPress install itself, it satisfies the backup precondition the same way on every host (cPanel, managed dashboard, or anything else), which is the reason it stays portable across hosts. A host’s own staging feature only helps the sites that host carries; a plugin-made backup helps any site running WordPress.
In practice the plugin saves a copy of the files and the database together, bundled so the pair can be restored as one. That single restorable set is the whole point: files and database, captured in step, ready to put the site back exactly as it stood. Once that copy is stored, the procedure moves on to changing the PHP version.
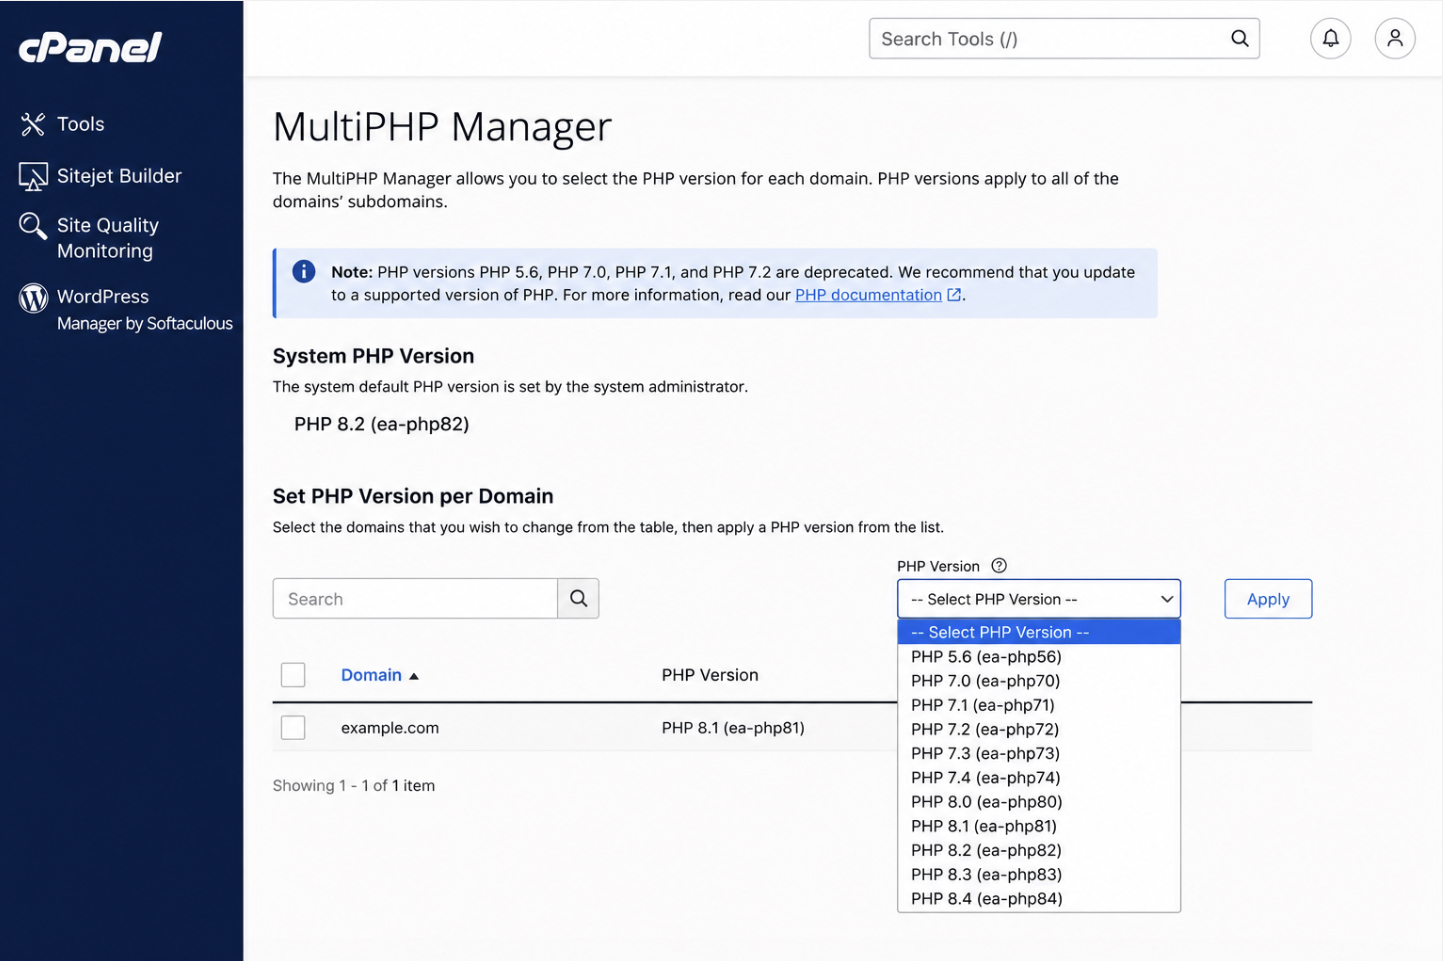
How to Update PHP in cPanel (MultiPHP Manager)
MultiPHP Manager is the cPanel location where a WordPress site’s PHP version is set, and on most cPanel hosts it is exactly where the upgrade actually happens. The site keeps running while its PHP version waits to be raised; the panel is the instrument, and the version is the attribute about to change.
Because a single cPanel account can hold several domains, the panel assigns each one its own PHP runtime, so a WordPress site does not inherit a server-wide setting, it carries a version of its own.
That per-site arrangement shapes how the change is made. Setting the new runtime in MultiPHP Manager takes two distinct actions: first the right site is selected from the list, then the version is set for it. Both actions happen entirely through the panel’s own controls, with no terminal and no command line involved, which is what keeps this path within reach of a site owner who has never managed a server by hand.
Select your site in MultiPHP Manager
Selecting the site is the first cPanel action, and it exists because MultiPHP Manager lists every domain on the account separately rather than applying one runtime across all of them. Selecting the wrong row would raise the PHP version of a different property, so the WordPress site being upgraded has to be identified before anything else is touched.
In the manager, each domain appears with its current PHP version beside it. Tick the checkbox, or highlight the row, for the domain that hosts the WordPress site, and the panel narrows its next control to that one site. The selection determines which property the version change will land on; once the site is marked, the version itself can be set.
Set the PHP version in MultiPHP Manager
Setting the PHP version is the completing cPanel action: with the WordPress site already selected, the new version is chosen from the per-site dropdown that MultiPHP Manager offers. The dropdown lists the runtimes the host makes available, each one rendered as PHP X.Y.
Choosing a currently supported entry (PHP 8.3, for instance, the version WordPress.org recommends) and applying it switches the selected site to that runtime. The dropdown decides which versions are on offer; applying the choice is the moment the change takes effect.
Once applied, the site no longer runs on its old version. The chosen PHP X.Y becomes the live runtime for that WordPress site, which is the whole purpose of the cPanel path: to move the existing site onto a higher PHP version through the panel, per site, without editing any code.
Not every WordPress site sits behind cPanel, though. Plenty of managed hosts skip MultiPHP Manager entirely and surface the same control somewhere else, so a site owner who never sees a cPanel screen sets the PHP version on the host’s own dashboard instead.
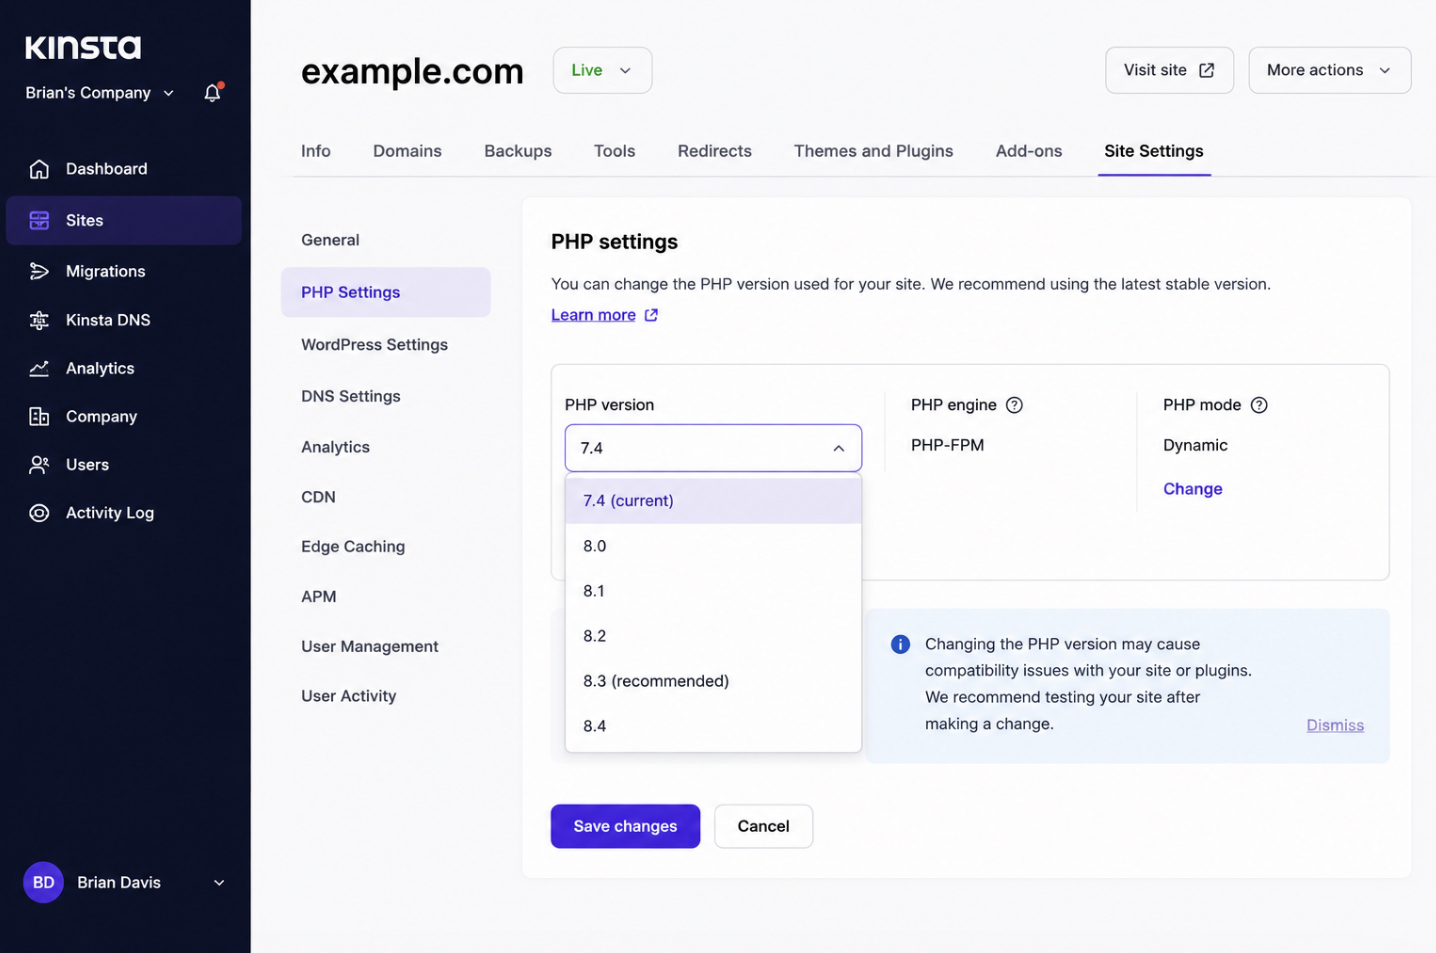
How to Update PHP Without cPanel on a Host Dashboard
Updating PHP without cPanel runs through the host dashboard: managed hosts expose the PHP-version control inside their own dashboard rather than in MultiPHP Manager, so the upgrade still happens through a panel, just a different one. The WordPress site stays the thing being raised, and its PHP version is still the attribute that changes; only the location of the control moves. This path serves every site owner whose host never ships cPanel at all, which on managed WordPress platforms is the common case rather than the exception.
The shape of the work mirrors the cPanel zone closely enough to feel familiar. The dashboard exposes a PHP-settings area, that area holds a version selector, and the new runtime is chosen and applied there. What differs is wording and placement (a managed host might label the control “PHP version,” “runtime,” or “site settings”), but the action underneath is the same: select a supported PHP X.Y and save it.
Change the PHP version on a managed host dashboard
Changing the PHP version on a managed host starts with the PHP-version selector in that host’s dashboard, which managed platforms place under a site’s settings or in a dedicated PHP-settings panel. The selector plays the part the cPanel dropdown plays (it lists the runtimes the host supports, each shown as PHP X.Y), so the upgrade reduces to choosing the target version and saving it.
Selecting a supported version and confirming the save applies the new runtime to the WordPress site, and from that point the site serves on the version just chosen.
The save is the execution moment for this path, the way applying the dropdown was for cPanel. Whichever route did the work (the cPanel panel or the managed-host dashboard), the WordPress site is now running a PHP version it was not running before, and a site that has just changed runtimes has to be checked before the upgrade can be called done.
How to Verify Your WordPress Site After the PHP Update
Verifying a WordPress site after the PHP update means confirming that the live site still functions on the new PHP version: loading it, exercising it, and watching it behave the way it did before.
This is the result check that closes the upgrade, and it is positive: the version has already changed in the panel, so the job now is to prove the site is upgrade-stable, not to chase a failure. Setting the version in the panel only swaps the runtime; loading the pages and exercising the features is what shows the site still runs on it.
Two checks carry the weight here. The first exercises the moving parts most likely to notice a runtime change, the active plugins and the theme, to read whether they still run cleanly on the new PHP version. The second is a safety net rather than a check: if something does misbehave, the version can be rolled back to where it was.
Together, they make the upgrade reversible right up to the moment it is confirmed, which is exactly why the result check belongs at the end of the procedure and not before it.
Test your plugins and theme on the new PHP version
Testing plugins and the theme means exercising every active plugin and the current theme on the new PHP version to read a single pass-or-fail signal: do they still run, or does one of them break against the changed runtime? PHP version changes are felt first by code that calls PHP directly, and on a WordPress site that code is the plugins and the theme, so they are the components worth loading and watching once the version moves.
Run through them deliberately. Open the WordPress admin and load the main pages, then trigger the things each plugin actually does (a form submission, a cache purge, a checkout step, whatever that plugin is there for), and watch the front end render under the theme. A clean pass across all of them reads as upgrade-stable: the site works on the new runtime, and the version change holds.
A plugin that errors, a layout that the theme suddenly renders wrong, or a feature that stops responding reads the other way, one component is incompatible with the version just applied, and that is the signal to reverse course. The reading is binary on purpose; either the components run on the new PHP version or one of them flags that they do not.
Roll back the PHP version
Rolling back the PHP version means reverting to the previous PHP version in the very same control where the new one was set, the cPanel MultiPHP Manager dropdown or the managed host’s dashboard selector.
A failed test does not have to mean a stranded site: reselecting the prior PHP X.Y and re-applying it restores the runtime the site was working on a moment ago, which makes a bad upgrade harmless and fully reversible. The reversal happens in the same panel as the original change, so nothing new has to be learned to undo it.
If a plugin or the theme keeps failing once the version is rolled back and the trouble points at PHP errors surfacing on the site, suppressing those errors at the runtime level is a separate task that sits outside this upgrade. With the version either confirmed on its new runtime or safely returned to the old one, the upgrade procedure itself is done.
Which PHP Version to Update To
The version to update to is the procedure’s destination: the supported PHP X.Y the site is being moved onto, a currently maintained line such as PHP 8.3 or newer, standing as the to-state the upgrade aims for. Knowing the target before touching the panel is a workflow prerequisite, since the whole procedure assumes a specific supported version is the goal; the selection in MultiPHP Manager or the host dashboard only makes sense once the destination is fixed.
Which version is the right one to update to is a decision in its own right, and it is settled in the article on the recommended PHP version for WordPress. The upgrade procedure takes the target as a given and moves the site to it; the reasoning behind selecting one supported version over another belongs with that decision.
Supported PHP version to update to
A supported PHP version is the safe destination the upgrade lands on: a PHP X.Y the platform still maintains and still issues security fixes for, with PHP 8.3 or newer standing as the kind of currently maintained version a WordPress site can be moved onto, in line with what WordPress.org recommends. The supported version is the to-state; an end-of-life version such as PHP 7.4, which stopped receiving security updates in November 2022, is exactly what a supported target exists to move the site away from.
On a live agency site, raising the runtime is rarely a single in-place flip. Those upgrades move from staging to live through a WordPress deployment workflow, so the change can be proven safe before it reaches visitors.
With that staging-to-live path in mind, the existing WordPress site now runs the higher PHP version, its plugins and theme have been confirmed on that runtime, and this single version change sits within the larger work of migrating a WordPress site across PHP releases. Which WordPress versions actually survive a given runtime is a separate lookup of its own, mapped in the WordPress PHP compatibility matrix.


 Gemini