Explore our specialized services, tailored solutions, and industry expertise to elevate your digital presence. From custom WordPress development to seamless integrations, we build high-performing websites that deliver impact.
To find and edit php.ini for WordPress, start with the file itself: php.ini is the server-level configuration file that sets up the PHP runtime a WordPress site executes on. Most WordPress problems that look like theme or plugin bugs (a media upload that stalls halfway, an importer that dies mid-run, a “memory exhausted” notice on the dashboard) trace back to a single directive sitting in that one file.
So the work splits into four moves, and they run in order. First, knowing where the file actually lives on the host. Then locating it through whatever access the host allows. Then confirming that the file in hand is the one WordPress is really reading, because servers often ship more than one. Only then does editing the directives become safe.
php.ini belongs to the wider PHP runtime that every WordPress installation depends on, and it is the place where that runtime’s limits are declared rather than guessed at. Once php.ini is found on the host, confirmed as the copy WordPress actually loads, and opened, its directives can be edited to give the site the memory, upload size, and execution time it needs.
What Is the php.ini File for WordPress?
The php.ini file for WordPress is the master configuration file that the PHP interpreter reads at startup to decide how much memory, how large an upload, and how long an execution a WordPress request is allowed to use. It is a plain-text file, not a WordPress feature. WordPress runs on PHP, and php.ini is where PHP itself is configured before WordPress code ever runs.
Whether written as two words (“php ini”) or searched for as “WordPress php.ini,” it is the same single file under either spelling. Naming it as a server-level file matters, because the same filename exists on almost every PHP host on earth; what makes one copy the php.ini WordPress reads is simply that it governs the PHP process serving the WordPress site.
Inside, the file holds directives: single lines, each pairing a setting name with a value. A handful of these directives do nearly all the work that WordPress administrators care about.
memory_limit caps how much memory one PHP process may consume, and a low cap is what produces the classic memory-exhausted screen.
upload_max_filesize and post_max_size together govern how large a file the Media Library will accept; the smaller of the two wins, which is why a theme demo import sometimes refuses a 40 MB package even when one limit looks high enough.
max_execution_time sets, in seconds, how long a single script may run before the server cuts it off, and it is the directive behind imports and backups that quit partway through.
None of these values get changed here. Naming them is enough to show what php.ini actually controls.
That control is the whole point of the file. php.ini configures the PHP runtime (the memory ceiling, the upload allowance, the execution window) that WordPress leans on every time a page is built or a file is saved. Change a value, and every plugin, theme, and core process running on that PHP instance inherits the new limit at once.
Two other files get confused with php.ini, and the difference is worth fixing early.
.user.ini is a smaller, per-directory configuration file that some hosts honor in place of php.ini when PHP runs as CGI or FastCGI. It overrides a subset of the same directives for one folder only.
wp-config.php is a WordPress file, not a PHP-runtime file; it sets WordPress constants such as database credentials and can nudge a couple of limits from inside the application, but it cannot raise a ceiling that php.ini has set lower.
php.ini sits beneath both of them as the true server-level source. With the file defined, the next thing to settle is where php.ini actually sits on a WordPress server so it can be found.
Where Is php.ini in WordPress?
php.ini is located at a fixed path on the WordPress server’s filesystem, most often in the account’s home or document-root area on shared hosting, or in a PHP version-specific configuration directory on a managed or self-run server.
Where is php.ini, then, has no single universal answer: the php.ini location is decided by the hosting setup, not by WordPress. WordPress never moves the file or creates a copy of its own; it simply runs on whatever PHP the host provides, and PHP reads its php.ini from wherever that host placed it.
The path depends almost entirely on the hosting type. On cPanel and similar shared environments, php.ini (or a php.ini-style override) typically sits in the hosting account’s root, alongside or just above the folder that holds the WordPress files.
On managed WordPress hosts, the active php.ini usually sits in a PHP version directory the platform controls, and direct file access to it may be limited or replaced by a settings panel. On a local WordPress development setup, php.ini sits inside the local PHP installation that ships with the stack, fully under the operator’s control.
Each of these places the same file in a different spot, which is exactly why a single path cannot be promised; the file is real and findable on all of them, but the route there changes with the host.
Two of these locations cover most WordPress sites and deserve their exact paths spelled out: the file as it appears under a cPanel hosting account, and the file as it relates to the WordPress install directory itself.
php.ini Location in cPanel Hosting
On cPanel and most shared hosting, php.ini is located in the account’s home root; the top-level directory that holds the hosting account, one level up from where the public site files begin. That is the first place to look, and on the majority of cPanel setups it is the only place php.ini sits. The file is a server-level configuration file, so it lives where the server keeps account-wide settings rather than down inside the site itself.
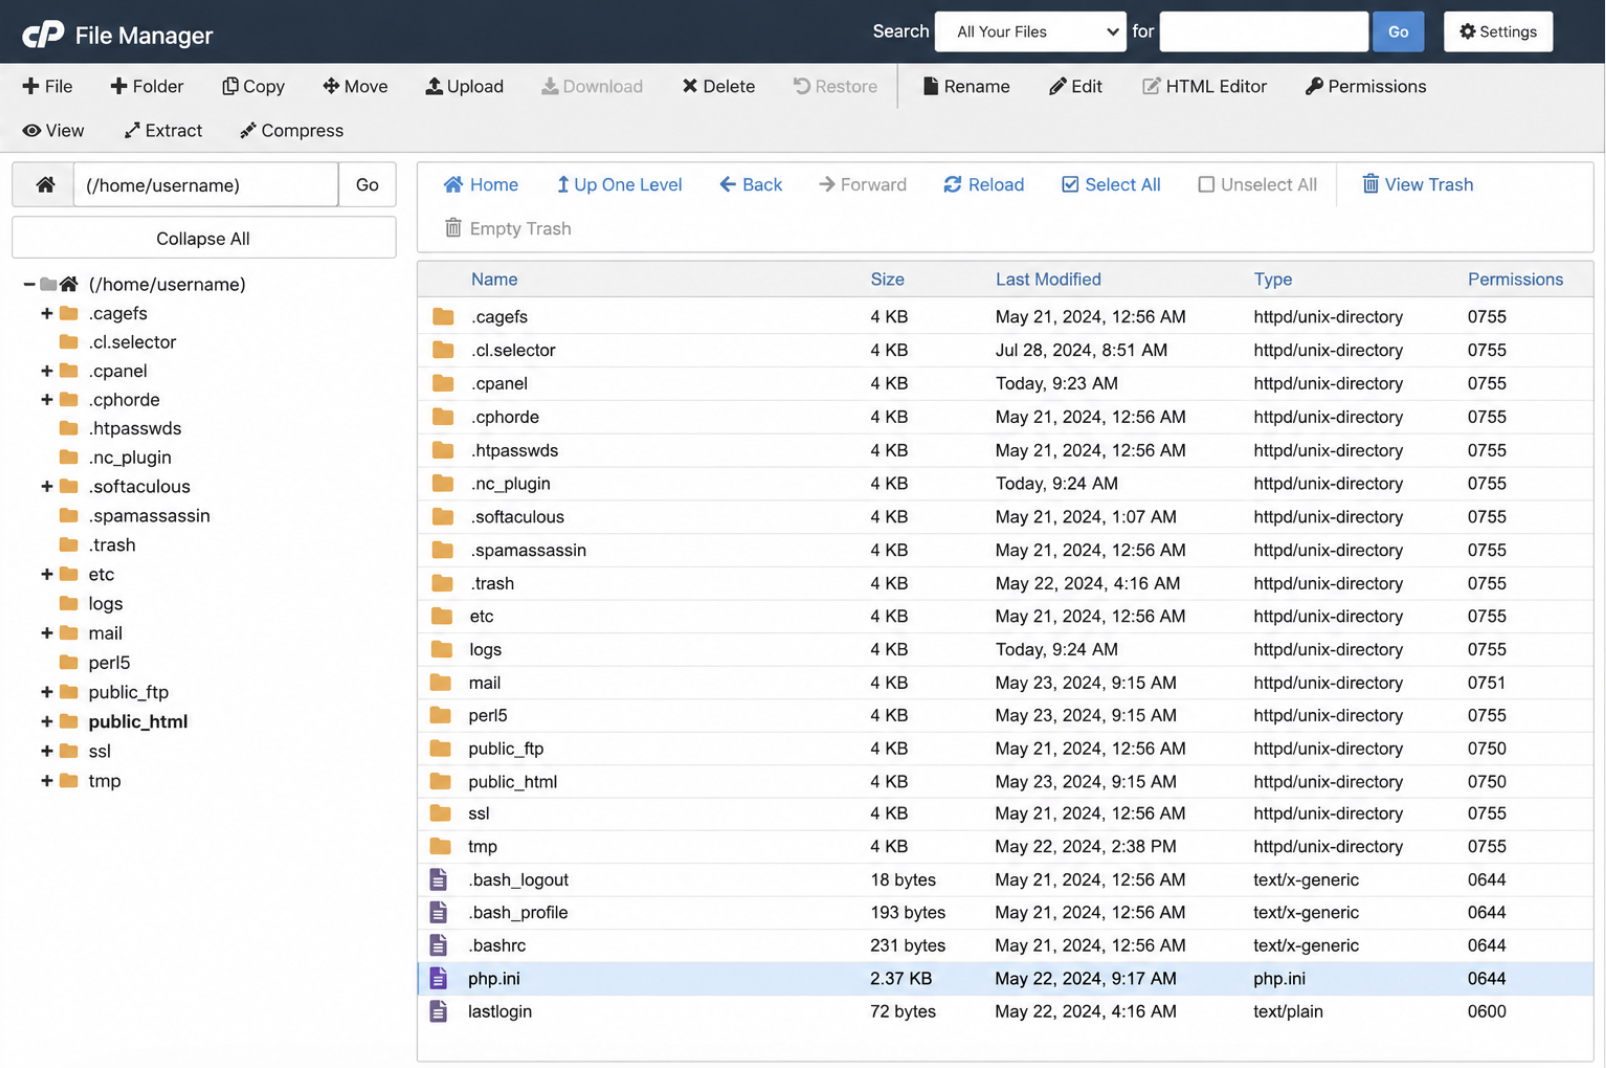
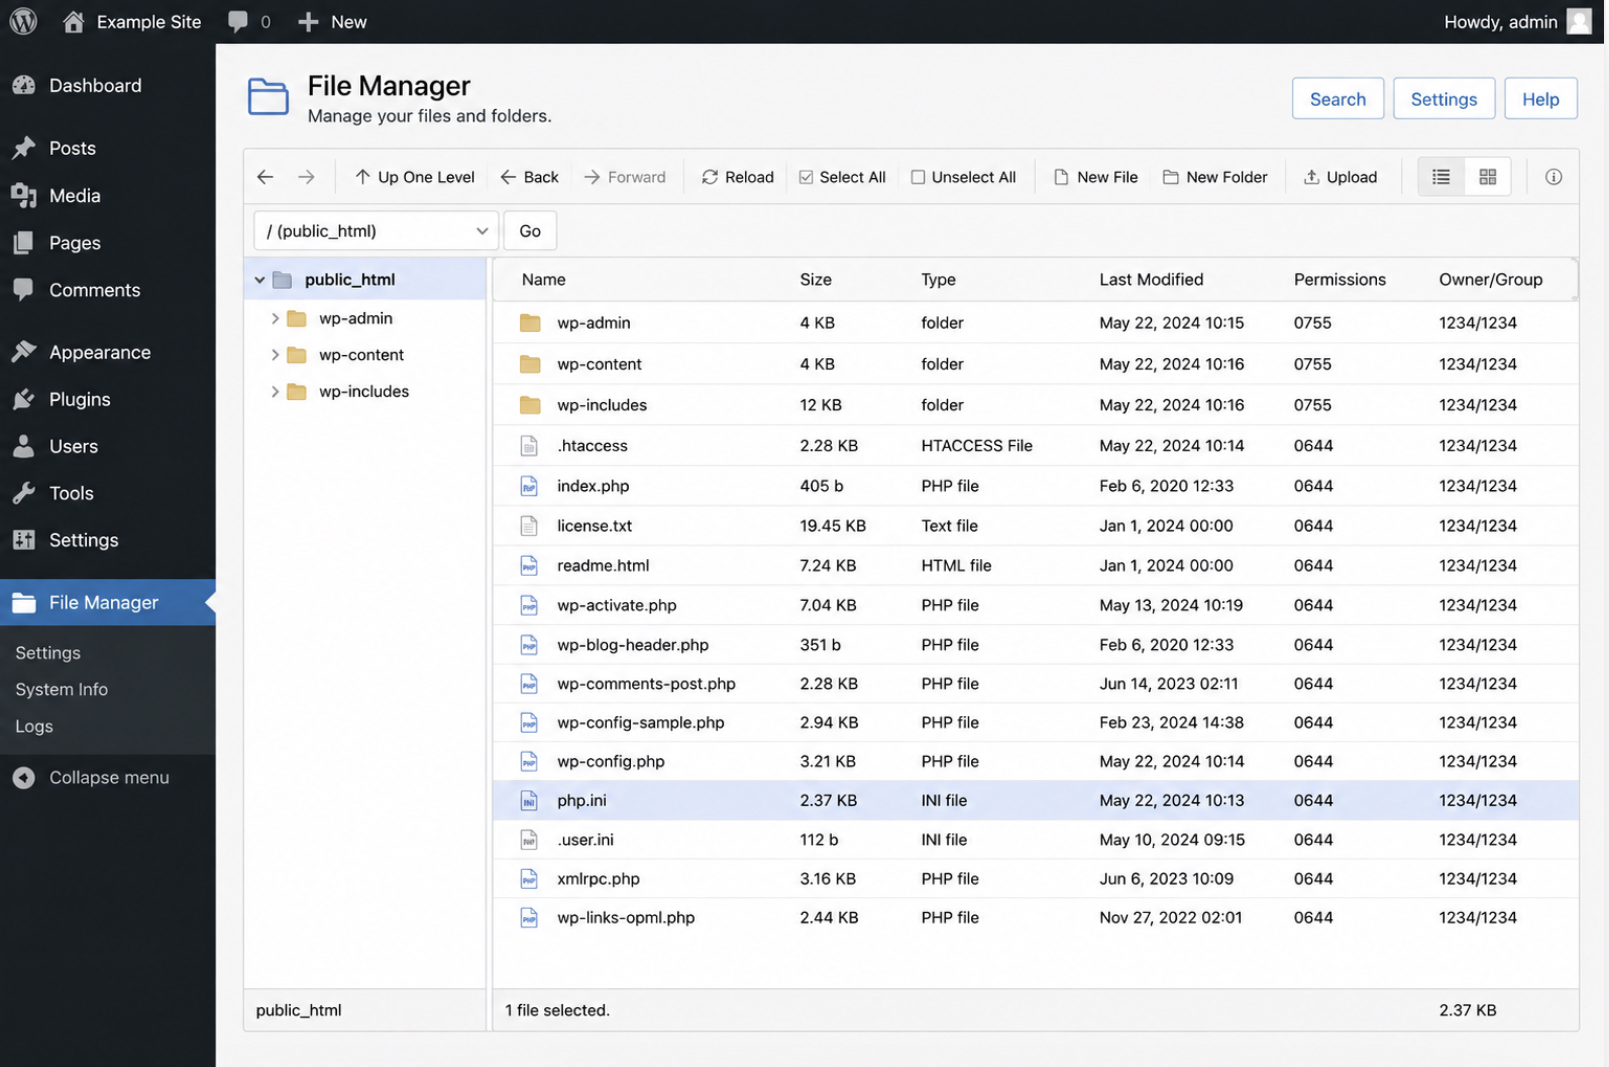
Open cPanel’s built-in File Manager and the path becomes visible without any guesswork. The File Manager opens at the account/home root by default, and php.ini ( when the host has placed one there) shows up in that opening directory listing alongside folders such as public_html.
This File Manager is part of cPanel itself, not a WordPress plugin; it reads the hosting account’s real filesystem, so what it lists is the actual location of the file on the server.
Knowing that php.ini sits in the cPanel host root settles the question for shared hosting. The location relative to the WordPress files themselves is a slightly different matter, since the install folder and the server root are not always the same directory.
php.ini Location in a WordPress Install
Relative to the WordPress install directory, php.ini is located above it more often than inside it, in the parent directory that contains the install folder rather than among the WordPress files. The reason is straightforward: php.ini is a server-level file, not a WordPress core file. It configures PHP for the whole hosting account, so it has no native place among the themes, plugins, and wp- files that make up the site.
When the web root and the WordPress install share the same folder, php.ini can appear right beside wp-config.php in that directory. When the install sits inside a subfolder, or when the host keeps PHP configuration at the account level, php.ini resides one or more levels above the install instead. Either way the file is not part of the WordPress codebase; it is the server’s PHP configuration, sitting near the site rather than within it.
That distinction is what makes the file occasionally hard to spot: a search confined to the WordPress folder can miss a php.ini that resides in the directory above. With the place now named (host root on cPanel, at or above the install directory in filesystem terms), the next step is to actually find the file through whichever access method the hosting allows.
How to Find php.ini
To find php.ini means to reach the file on the server when the location path is not already visible: when the install folder shows no php.ini, or when the host root is not yet open. Finding the file is a matter of opening the right access tool and locating php.ini in the directory where it sits. The place has been named; this is the action that gets to it.
Three routes reach the same single php.ini, and the choice between them depends only on what the hosting gives access to.
The first is FTP: connect an FTP client to the server and browse the directory tree to locate the file.
The second is cPanel’s built-in File Manager: the panel tool that opens the account filesystem directly in the browser.
The third is a file-manager plugin installed inside WordPress: a route for cases where neither FTP credentials nor a control panel are available.
Once the file is in hand through any of these routes, the locating work is done, and one question remains before any edit makes sense: confirming which php.ini WordPress actually loads at runtime, since a server can hold more than one and only the loaded one takes effect.
Find php.ini with FTP
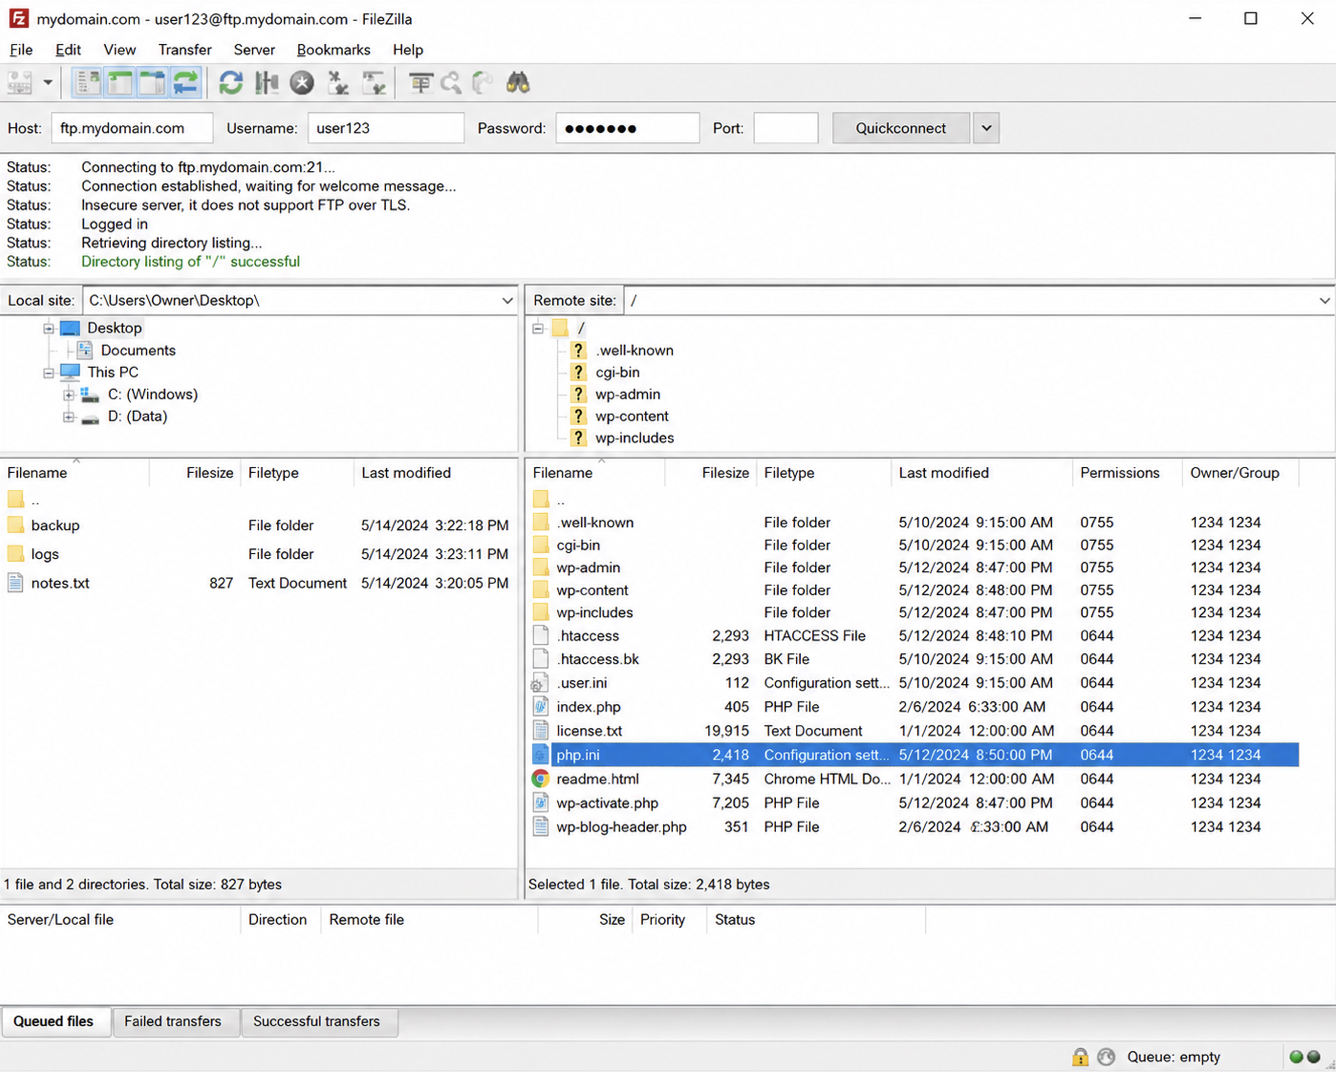
The FTP route reaches php.ini through a direct file-transfer connection to the WordPress host, and it is the route that works even when the hosting account exposes no control panel at all. An FTP client (FileZilla is the common one) connects to the server using the host, username, and password the hosting provider issues, and once that session is open the remote directory pane shows the same file tree the server itself sees. php.ini sits inside that tree at the path established for the hosting type, so the connection is the first step toward the file.
Connect the client first. After the status bar confirms a live session, navigate to the directory that holds php.ini: the account or home root on shared and cPanel-style hosting, or the folder the WordPress install reports as its document root. The remote pane will list the folders and files there, but php.ini does not always appear straight away. Many servers treat configuration files as hidden, and a hidden file stays out of the default listing.
Reveal the hidden files before assuming php.ini is missing. In FileZilla this is the Server menu’s “Force showing hidden files” option; other clients carry an equivalent toggle. With hidden files shown, the dotfiles and the server-level configuration files surface, and php.ini appears in the remote listing if the host keeps one at that level. Find it there, note the exact folder it lives in, and the file is located.
A host that ships cPanel gives a second, browser-based way to reach the same file without any desktop client.
Find php.ini with cPanel
The cPanel route reaches php.ini through the File Manager built into the hosting control panel, a tool the host provides inside cPanel itself, not a WordPress plugin and not a separate download. cPanel’s File Manager browses the account’s directories directly in the browser, so it locates php.ini without FTP credentials or any desktop software. This is the distinction worth keeping clear: the File Manager here is part of cPanel, whereas the plugin route covered next runs inside WordPress.
Open File Manager from the cPanel dashboard, usually under the Files group. It opens at the account home directory, and php.ini, when the host keeps one at the account level, is located at that host root rather than buried deeper in the site folders. Navigate to the root if the view starts elsewhere, the public_html folder and the home directory above it are the two places to check.
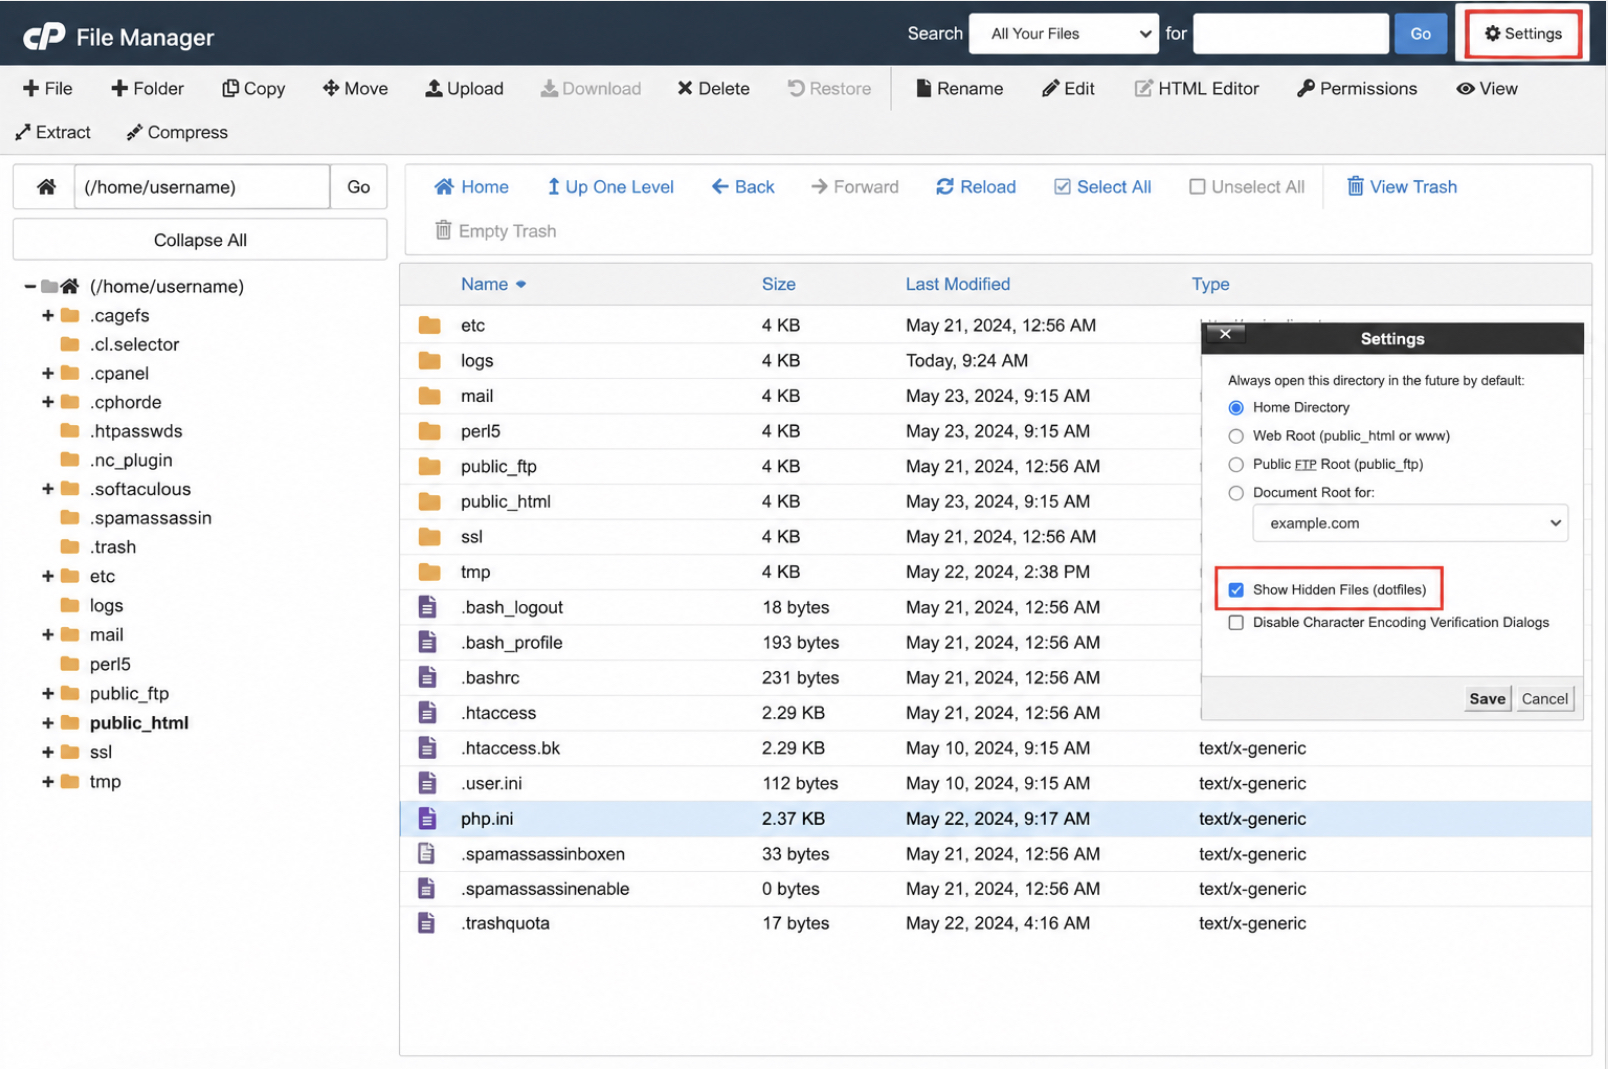
As with FTP, the file can stay hidden. cPanel hides dotfiles and configuration files by default, so the listing may look complete while php.ini is simply filtered out. Open the File Manager Settings (the toolbar button at the top right) and enable Show Hidden Files (dotfiles). The listing redraws with the hidden entries included, php.ini appears in the host-root directory, and the file is located.
On hosting that offers neither cPanel nor FTP access, a third route reaches php.ini from inside WordPress.
Find php.ini with a File Manager Plugin
A file-manager plugin reaches php.ini from inside the WordPress dashboard, a WordPress plugin installed into the site, distinct from cPanel’s built-in tool. The plugin renders the server’s file tree on a WordPress admin screen, which makes it the route that matters when the host gives no cPanel and grants no FTP access. Several free file-manager plugins exist in the plugin directory; any one that browses the server filesystem works for locating the file, so the choice is a matter of what is already trusted rather than a single named product.
This route applies under one condition: no control panel and no transfer credentials. When that is the situation, install a file-manager plugin from the WordPress dashboard and activate it the same way as any other plugin. Once active, it adds a file-browser screen to the admin menu.
Open that screen and browse to the site root, the directory holding wp-config.php and the wp-content folder is the anchor, and php.ini, if the host keeps one within reach of the site, sits at or near that level. The plugin lists the files plainly, hidden entries included on most of them, so php.ini shows in the listing and the file is located.
Whichever of the three routes surfaces the file, one question still stands before any change is made: a WordPress server can carry more than one php.ini, and only one of them is the file the runtime actually reads. Confirm which php.ini WordPress loads before treating the located file as the right one.
How to Confirm Which php.ini WordPress Loads
A WordPress server can load more than one php.ini, so the php.ini that WordPress actually loads has to be confirmed before any edit. Finding a file on disk is not the same as proving the runtime reads it. A typical stack carries a system-wide configuration, sometimes a second copy for the command-line interpreter, and on some hosts a per-account override, and only one of them governs the PHP process behind the site. Edit the wrong one and nothing changes.
The fastest way to confirm the active file is phpinfo(). Create a small file in the site root, give it any name, and put a single line inside it:
<?php phpinfo(); ?>
Load that file in a browser and read the row labelled Loaded Configuration File. That row reports the absolute path of the php.ini the web server is using for this site right now, the one whose directives reach WordPress. The path is the answer; ignore the dozens of other rows for the moment.
phpinfo() exposes the full environment publicly, so the temporary file should never stay on a live site. Delete it the moment the path has been read.
Where shell access exists, the same field can be checked without touching the document root at all. From the command line, run:
php -i | grep "Loaded Configuration File"
This prints the identical Loaded Configuration File value that phpinfo() shows in the browser, straight from the active interpreter. One caveat is worth keeping in mind: the command-line PHP binary occasionally reads a different php.ini than the web server does. When the two disagree, the path from the browser-rendered phpinfo() is the one that governs WordPress, because that is the process serving the pages.
The directives this file controls behave differently across PHP releases, and the floor values WordPress expects track the runtime it runs on, so confirming the file pairs naturally with confirming the PHP version, see the recommended PHP version for WordPress. With the active path in hand, the file is ready to open and edit.
How to Edit php.ini Directives for WordPress
Editing php.ini for WordPress means opening the confirmed php.ini and changing the directives that govern how PHP serves the site. The file is plain text: each line is a directive = value pair, and editing it is a matter of finding the right keys, setting WordPress-appropriate values, and saving. Open it through whichever route already located it; download and re-upload over FTP, the cPanel file editor, or a file-manager plugin from inside the dashboard.
Four directives carry almost all of the WordPress-relevant weight, and they belong together in one place:
memory_limit sets the ceiling on how much memory a single PHP process may consume. WordPress core runs comfortably below modest limits, but theme builders, image processors, and heavier plugins push against it, and a low ceiling surfaces as the white screen or the “allowed memory size exhausted” fatal error. The php.ini value is the true server ceiling. A constant in wp-config can only request a lower figure inside that ceiling (it cannot raise PHP past what php.ini permits),which is why the deeper option to increase WordPress memory limits in wp-config stays within the boundary this directive sets, not above it.
upload_max_filesize caps the size of any single file the Media Library will accept; a theme bundle or a 4K hero image rejected on upload usually means this number is too small. post_max_size caps the size of the entire request body, uploaded file plus accompanying form fields together. The dependency between them is strict: post_max_size must be greater than or equal to upload_max_filesize, because the request that carries a file is always at least as large as the file itself. Set post_max_size below upload_max_filesize and the upload silently fails no matter how generous the file cap looks.
max_execution_time limits how many seconds a script may run before PHP terminates it. Long imports, backups, and bulk operations are the usual scripts that need more than the default, and 300 seconds is a commonly-cited WordPress working floor for those jobs. Byte sizes take the M suffix for mebibytes, as in 256M and 64M; the time value is a plain integer count of seconds.
After the values are set, save the file back over the same route that opened it and reload the site. A fresh phpinfo() read confirms the new figures took effect. Not every environment allows a direct edit, though, and on the hosts that block it, the override moves to a different file.
.user.ini Fallback When php.ini Cannot Be Edited
On hosts that run PHP as CGI or FastCGI, per-directory configuration belongs in a .user.ini file rather than the central php.ini. The condition is specific: when the PHP interpreter is invoked as a CGI or FastCGI process (the common arrangement on shared and many managed plans), it reads an additional INI file from the directory tree it serves, and that file is named .user.ini by default. Placed in the WordPress root, it overrides the same directive keys per directory without write access to the server-wide php.ini.
memory_limit = 256M
upload_max_filesize = 64M
Only directives marked changeable at the per-directory level carry over, which covers the everyday WordPress set: memory, upload, and post sizes. One behavioural difference matters: .user.ini changes do not apply instantly. The interpreter caches the file, so a new value takes effect only after the cache interval elapses, a delay measured in minutes rather than seconds on a default configuration.
The fallback exists for one reason. php.ini itself cannot be edited directly on these hosts, so php.ini remains the file the override stands in for, and the directive names and value syntax are identical to it. What the central php.ini contains, line for line, is the next thing to settle.
php.ini Example for WordPress
A WordPress-appropriate php.ini example pairs a handful of directive lines with the values a WordPress site needs to run without tripping over memory, upload, or timeout limits.
Each directive line carries one WordPress-relevant setting: memory_limit reserves working memory in mebibytes via the M suffix, upload_max_filesize caps a single uploaded file, post_max_size sits at or above that upload ceiling so a request carrying the file is never rejected first, and max_execution_time allows a finite run in whole seconds. These directive lines serve as a copy-from reference rather than a fixed prescription; the safest values track the commonly-cited WordPress floors, not arbitrary highs. When the host ships no php.ini at all, this reference becomes the starting point for a file the operator has to create from scratch.
How to Create php.ini When the Host Ships None
Creating php.ini becomes the first move whenever the host ships none. The file has to exist before any directive inside it can be edited. Some hosting setups provide a php.ini the operator can open and change; others omit it from the account entirely, leaving nothing to locate in the earlier search. On those accounts the fix is to create the file, drop in the WordPress-relevant directives, and only then edit the values.
The routes that locate php.ini are the same ones that create it. Over FTP, connect to the account, navigate to the host root, and add a new empty file named exactly php.ini. In cPanel, the File Manager opens the same root and offers a New File action that does the job without a separate client. A WordPress file-manager plugin reaches the root from the dashboard when neither FTP nor cPanel is available. Whichever route the account supports, the steps run create the file, open it, set the four directives, and save, at which point the create path rejoins the ordinary edit path.
Whether php.ini exists at all, and whether it can be edited once it does, comes down to the hosting environment. Managed hosts often hide the file behind their own control panel and surface only a settings screen, so creating a raw php.ini may not behave the way it does on shared cPanel accounts. A local WordPress development environment removes that constraint, since it hands over full control of the stack and lets php.ini be created, loaded, and edited directly. With the file in place, the full path comes together: php.ini can be found on the WordPress host, the loaded copy confirmed, and its WordPress-relevant directives edited to match what the site needs.


 Gemini