Explore our specialized services, tailored solutions, and industry expertise to elevate your digital presence. From custom WordPress development to seamless integrations, we build high-performing websites that deliver impact.
Creating a landing page in WordPress starts with a clear goal: building a single-purpose page within an existing website and publishing it as a focused destination for visitors.
A site owner or developer can create a landing page in WordPress by following an ordered five-step process:
choose a layout method,
create the page,
add the main sections,
add the form and call to action,
and publish the finished page.
This workflow keeps the page focused on one objective while making a WordPress landing page easy to build, design, and launch. Whether the task involves how to make a landing page for lead generation or creating a landing page for a specific campaign, the result is a standalone page that sits alongside other page types such as a homepage or blog page and is ready for publication.
What Is a Landing Page in WordPress?
A landing page in WordPress is a single-goal WordPress page built around one call to action. The page exists to convert a visitor through a single action (sign up, register, download, request a quote), and every element on it serves that one outcome.
What makes a landing page in WordPress single-goal is the removed navigation: the page has no menu, no sidebar, and no footer links, so nothing competes with the call to action or carries a visitor away from it. The conversion goal count is exactly one. A WordPress landing page therefore consists of a focused stack of content and a single conversion point, and nothing else.
This page-type differs from the other pages a WordPress site already includes. A homepage introduces the whole site and routes visitors outward to many destinations through its menu and links. A blog page lists posts and invites continued browsing across articles. A landing page does the opposite of both: it removes the routes, holds the visitor on one page, and presents one action. The homepage and the blog page serve navigation and discovery; the landing page in WordPress serves a single conversion. That single-goal, navigation-removed page is the artifact the create sequence produces, and creating it starts with the layout method that arranges its content.
How to Design Your Landing Page Layout
Designing the landing page layout is the first decision in the build, settled before any content goes onto the page. The layout is the arrangement of the WordPress landing page, where the heading, the form, the button, and the supporting copy sit on a single screen aimed at one goal. Because the page carries one call to action and no surrounding menu, sidebar, or footer, its layout works differently from a standard content page: every element on it serves the single conversion the page exists to win.
WordPress offers two ways to lay out the page, and the layout method decides which surface the rest of the build runs on. The first is the block editor built into WordPress; the second is a page builder added on top of it. Each method is a distinct lay-out surface, and the difference between them comes down to how much of the design is prebuilt versus how much is shaped by hand.
A prebuilt template drops a finished arrangement of sections onto the page and leaves a few fields to edit. A more custom layout starts closer to a blank canvas and assembles each section from scratch. Neither method is better in the abstract. The right one depends on how close the prebuilt starting point sits to the page that needs to ship.
The layout decision sits inside the wider WordPress build, and seeing where it fits keeps the page connected to the site that contains it rather than treated as an isolated screen. A landing page is one page-type produced during a normal WordPress build, so the same skills that go into the broader site apply here; the WordPress development guide maps that wider development lifecycle, of which laying out a single landing page is one specialized step.
Within that lifecycle, the layout method carries one further trade-off worth weighing before the page goes onto a surface. A prebuilt arrangement starts the page closer to finished and asks for edits; a hand-built layout starts nearer a blank canvas and asks for assembly.
When the choice leans toward a heavily custom layout rather than a prebuilt arrangement, the reasoning behind building a layout from scratch instead of designing on top of a ready-made one is the subject of custom WordPress development vs themes. With the layout method understood, the next move is to lay the page out on one of these two surfaces and then create the page itself.
Block Editor
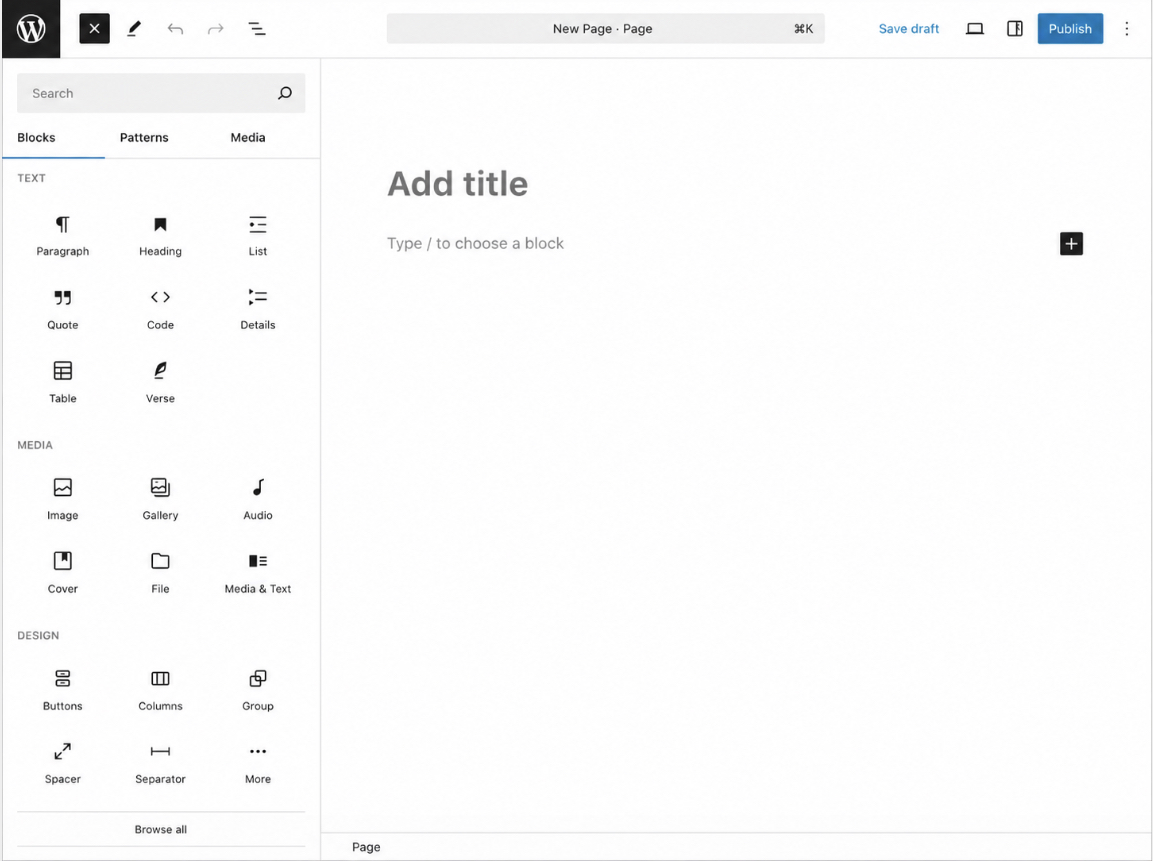
The block editor is the native lay-out surface built into WordPress, and it requires no extra tool to design the landing page. It is the editing canvas WordPress ships with, opened on the page itself from the Pages screen, where the page is composed from individual blocks rather than written as one continuous document. Because it is native, the landing page can be laid out the moment the page exists, there is nothing to install first.
Blocks and patterns assemble the landing-page sections directly on the canvas. A block is a single element (a cover image, a heading, a button, a form) added one at a time through the block inserter and stacked into the single-goal arrangement the page needs. A pattern is a prebuilt group of blocks, a ready-made section such as a hero or a call-to-action band, dropped in as a unit and then edited in place.
Building the page this way keeps every section under direct control on one canvas, so the heading, the supporting copy, and the button line up toward the single conversion without any surrounding navigation. When a faster, more prebuilt starting point is preferred over assembling blocks by hand, the alternative lay-out surface is a page builder.
Page Builder
A page builder is the alternative lay-out surface for the landing page, a drag-and-drop tool that lays out the page’s sections by dragging finished elements into place rather than stacking blocks on the native canvas. A WordPress landing page creator of this kind sits on top of the block editor and replaces the assembly step with a visual canvas where each section is positioned, resized, and styled by hand without touching the underlying structure.
A page builder suits the layout when speed matters and the page can start from prebuilt sections. The drag-and-drop surface ships with ready-made hero bands, form sections, and button rows that drop onto the page as complete units and need only their text and links edited, which makes a finished single-goal layout come together faster than assembling each block individually.
The trade-off noted for the layout method holds here: a builder leans toward the prebuilt end, the native canvas toward the custom end, and the page that needs to ship decides which end fits. With the lay-out surface settled, the native block editor or a page builder, the page can now be created.
How to Create Your Landing Page
With the layout method settled, the next step creates the landing page itself as a real page inside WordPress. Creating the landing page means adding a new page to the existing site, giving it a name, setting its web address, and applying a starting layout. This is the second step of the five-step build, and it produces the page that every later step adds to.
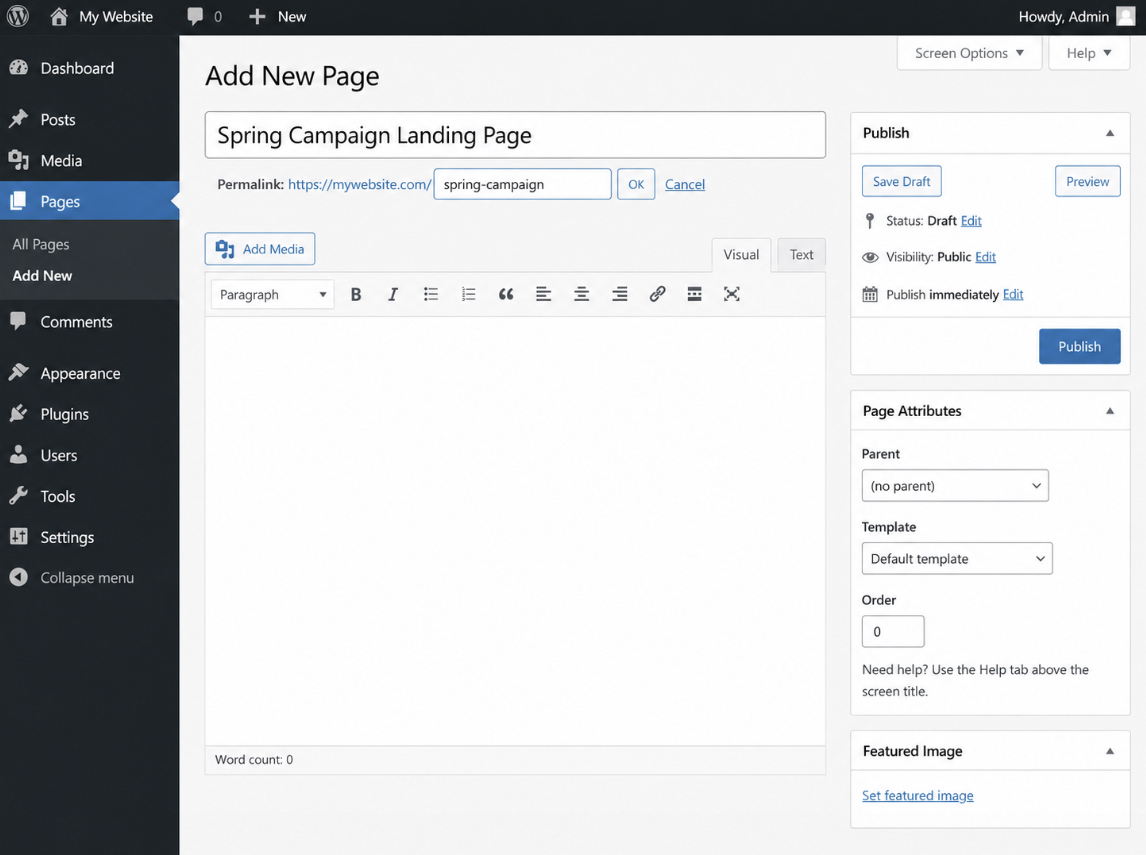
The landing page sits inside a working WordPress site, so a functioning install is the precondition for creating it, the page is added to a site that already runs, never built in isolation. Standing up that site, from the install through staging to first launch, is covered in how to install WordPress; once the site runs, the landing page is one of the pages added to it. Adding the page starts in the Pages area: a new page is created through Add New, given a title that names what the page is for, and assigned a URL slug (the readable tail of the web address, set in the permalink field) that keeps the address short and descriptive.
Once the new page exists with its title and slug, a template gives it a starting layout before any of its own content goes in. Creating a landing page is one page-type in the larger sequence that produces an entire site, and seeing it that way keeps the page anchored to its parent project; the full sequence appears in how to build a WordPress website, within which a single landing page is one specialized page among many. Applying that template is the final part of creating the page, after which the page is ready to be filled with the hero, the heading, the button, and the form that carry its single goal.
Landing Page Template
A landing page template gives the new page its starting layout, a prebuilt arrangement of sections the page begins from instead of a blank canvas. The template carries the structural shell of the landing page: a full-width canvas with the menu, sidebar, and footer stripped away, plus placeholder slots where the hero, heading, button, and form will go. Because the template includes that single-goal frame, the page inherits the navigation-free structure the page-type needs the moment the template is applied.
Two routes assign a template to the new landing page. The first selects a template from a builder’s library: a page builder ships a set of prebuilt landing-page templates, and choosing one drops its arrangement of sections onto the page ready to edit. The second creates and assigns a template in a block theme: a block theme supports custom page templates built in the Site Editor, so a landing-page template can be designed once (a blank, full-width layout without navigation), and then assigned to the new page through its template setting.
Either route ends the same way, with the template applied to the page so its starting layout is in place. With the template assigned, the page is ready to be filled with its own sections: the hero, the heading, the button, and the form, each added on top of the starting layout.
How to Add Your Landing Page Sections
Adding the landing page sections is the step that fills the created page with the content blocks a visitor reads from top to bottom. A section is a content block stacked on the landing page, a self-contained unit of layout and copy that occupies one horizontal band of the page. With the page created and its template applied, the next move adds these sections in the order a single-goal page needs them, each block earning its place by serving the one conversion the page exists to capture.
A single-goal landing page needs a small, disciplined set of blocks, stacked in the order a visitor encounters them:
Hero (cover) block: the first band at the top, carrying the headline and primary message.
Supporting content: a short band of proof or benefit copy that reinforces the single goal.
Button: the clickable element that states the one action to take.
Form: the field set that captures the conversion.
This stacking order is the design that keeps the page focused: the hero states the offer, the supporting content backs it, and the button and form carry the single action to its endpoint. Every block stacked onto the page points at the same outcome, which is why a landing page design adds only the blocks that advance the one goal and leaves out the navigation, sidebars, and competing offers a homepage carries. Each added section makes the single goal more obvious rather than dividing the visitor’s attention across several.
The hero block sits first and dominates the page, so it is the block to build before any other. It is the band a visitor sees on arrival, and it sets the message every block beneath it supports.
Hero Section
The hero section is the cover block at the top of the landing page, the first block a visitor sees, and the one that carries the page’s headline and primary message. As the dominant band on the page, the hero section states what the landing page offers before a visitor scrolls, which makes its copy the anchor for every block stacked beneath it. Designing the hero well sets the message for the whole landing page, because the message it states is the message the supporting content, the button, and the form all reinforce.
The hero holds two elements that do the work. Its headline names the single offer on a single line, large and high on the page so it reads first. Its supporting copy sits directly under the headline and states the single goal in a sentence or two, the reason a visitor would act. The hero contains nothing that competes with that message: one headline, one short line of support, and the space for the action that follows.
Adding a hero block from the block library or a builder section gives the page a ready cover band, and the headline and supporting copy are then written to match the one conversion the page captures.
The hero points the visitor toward the action it introduces, and the button is where that action is taken. The button is the element that turns the hero’s stated offer into a click, so it is the next block to add.
Button
The button is the clickable element on the landing page that carries the call to action, the single action the page asks a visitor to take. As the conversion-click element, the button states one action in its label and is sized and placed so it reads as the page’s primary action, with no second button competing for the click. A landing page has one goal, so the page carries one button, and that button’s label names the action in plain, direct words rather than a generic instruction.
Three properties make the single action obvious. The label states the action the page wants, matching the offer the hero stated above it. The styling (a solid fill, a contrasting color, and enough size) makes the button the most prominent element a visitor sees after the headline. The placement sets the button where the eye lands after reading the hero and supporting content, and repeats it once near the form if the page runs long. Designing the button this way keeps the single action unmistakable: one label, one style, one obvious place to click.
The button does not act alone. It submits to the form that captures the conversion. The button and the form together make the unit the whole page exists to deliver, which is the next step in the build.
How to Add Your Form and Call to Action
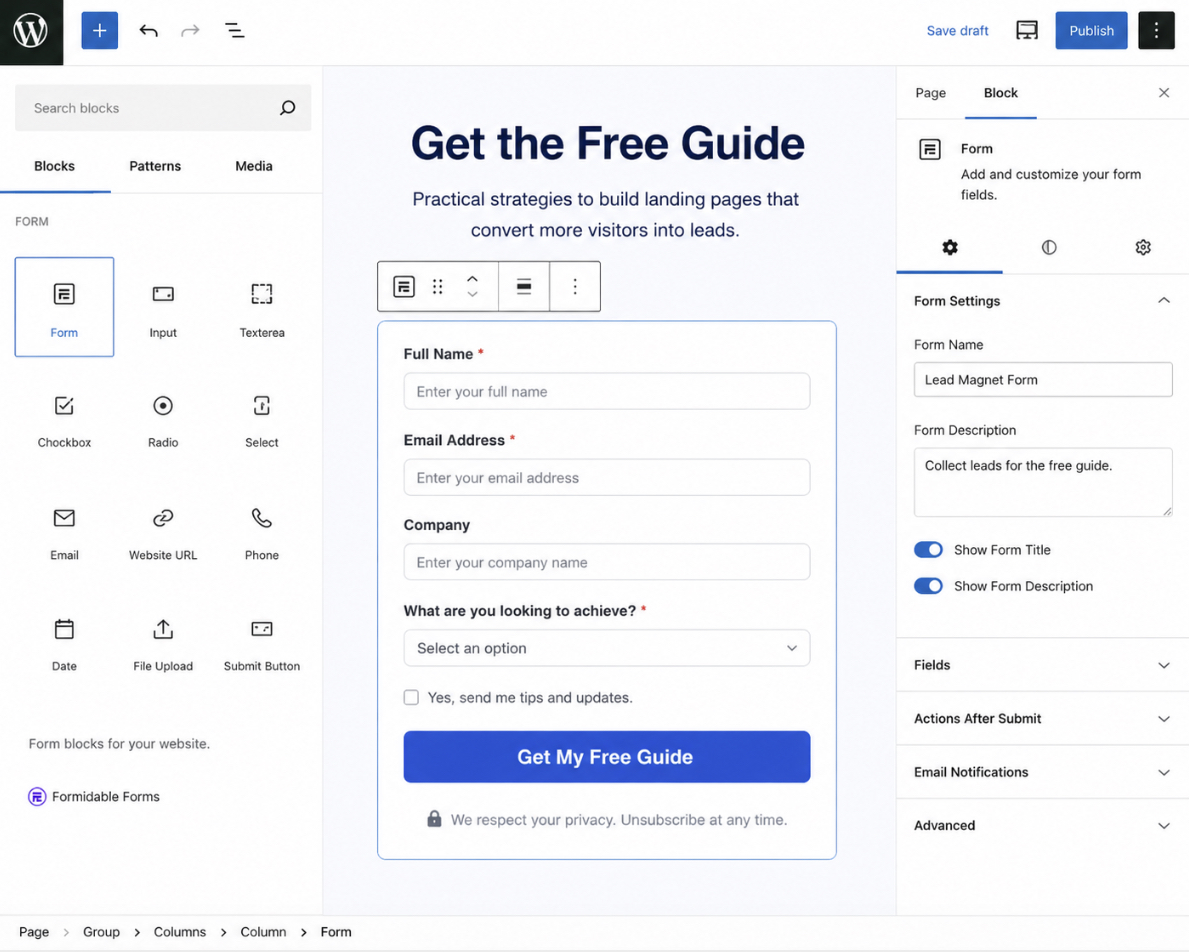
Adding the form and call to action builds the conversion unit, a form plus one call to action that, together, capture the single action the landing page exists to deliver. The form and the call to action are one unit, not two peers: the form collects the visitor’s submission, and the call to action is the single conversion that submission completes. This is the step that fulfils the page’s purpose, because a landing page is a single-goal page with one call to action, and the form is where that one goal is captured.
Adding the form starts with the field set. A form block from the editor or a form plugin places the fields on the page, a name and an email for a standard lead-capture form, kept short so nothing stands between the visitor and the single action. Each added field is one the conversion needs; extra fields work against the one goal by adding friction. The form ends in a submit control that carries the same call to action the button states, so the visitor reads one action from the hero down to the form.
Wiring the single call to action ties the button, the form, and the submit control to the same outcome. The button the page added above points at the form, the form’s submit completes the action, and no second call to action competes for the click. A well-built conversion unit raises the share of visitors who complete that one action, but the work here is the single-goal wiring itself, not a conversion-rate experiment. Keeping the form and call to action aligned on the one conversion is what makes the page a landing page rather than a general content page, the single-goal constraint holding from the definition through to this final content block.
With the conversion unit in place, the landing page now holds every block it needs: the hero, the supporting content, the button, and the form, all pointing at one goal. The page is assembled, and the remaining step sets it up to go live.
How to Set Up Your Landing Page to Publish
Setting up the landing page to publish is the final step that takes the assembled page live, after the layout, the sections, and the form with its single call to action are all in place. The landing page now holds every part it needs, so the set-up work turns that finished page into a published page that visitors can reach. Setting up and publishing run close together here: the set-up action configures how the page behaves, and publishing makes it visible at its own address.
Setting up the landing page starts with configuring the page settings: visibility, the URL at which the page is served, and the page attributes that control how WordPress treats it. These settings decide whether the page is public, what its permalink reads, and whether the theme wraps the single-goal page in navigation that competes for attention. Configuring the page settings keeps the landing page focused on its one conversion goal before it goes live.
Once the settings are configured, a short pre-publish check confirms the assembled page works the way a visitor will meet it. The check covers the parts that carry the page’s single goal:
The form submits and routes its entries to the right place.
The links and the call-to-action button point to the correct destinations.
The mobile preview renders the hero, the heading, and the form cleanly on a small screen.
The page speed loads fast enough that visitors do not leave before the form appears.
This pre-publish check stays brief because launch readiness for the wider WordPress site (backups, broader testing, and full go-live verification) belongs to the larger sequence that builds the whole WordPress website, of which creating one landing page is a single page-type specialization. The landing page only needs its own form, links, mobile rendering, and speed confirmed before it publishes.
Publishing the configured, checked landing page is the build endpoint. With the settings set and the pre-publish check clear, the landing page publishes to its address and starts serving its single goal to visitors. The published page is the result the whole build sequence was working toward: a single-goal page, live inside an existing WordPress site.
From the published landing page, the surrounding choices become relevant. A landing page can be built as a simpler, lower-complexity version when its single conversion is straightforward, an existing landing page can be changed after it is live, the builder used to create the page is one decision among several tools, and a splash page is a related WordPress page-type that serves a different purpose. Each of these decisions sits around the same landing page, shaping how it is built, edited, or distinguished from its siblings.
Landing Page Settings
The landing page settings control how the landing page behaves once it is live, chiefly its visibility and the permalink that forms its address. The settings hold the values WordPress uses to serve the page: whether the page is published publicly or kept private, the permalink that becomes the page’s URL, and the page attributes that position the page within the site. Configuring these settings is the set-up work that readies the single-goal page for publishing.
Visibility decides who can reach the landing page. A public visibility setting serves the page to any visitor, which is what a live, single-goal landing page needs; a private or password-protected setting holds the page back until it is ready. The permalink sets the page’s address, a clear, descriptive URL that matches the page’s purpose makes the landing page easier to share in a campaign. The page attributes, where the theme exposes them, set the template and ordering WordPress applies to the page.
Removing the navigation or menu, where the theme adds one, keeps the landing page single-goal. A standard WordPress page inherits the site header and menu from its default theme template, which give visitors many paths away from the page; a landing page works better when those competing paths are removed so the form and the one call to action stay the only routes forward. Setting the page to a blank or full-width template, or switching off the header and footer in the settings the theme provides, removes that navigation and holds the visitor on the single goal.
With visibility set, the permalink configured, and the navigation removed, the settings have readied the landing page, and the configured page is set up to publish.
How to Build a Simple Landing Page in WordPress
A simple landing page in WordPress is the minimum single-goal build, one page that carries only the essentials a visitor needs to take a single action. Where a fuller build stacks several supporting sections, the simple landing page keeps just three: a hero at the top, one button, and the form that captures the conversion. Everything that does not serve the one goal is left off, which is what makes the page simple.
Building the simple landing page compresses the five-step sequence to its essentials. The same ordered path still runs (a layout method, the new page, its sections, the form and call to action, then publishing), but the section count drops to the minimum set. The site owner or developer creates the page, adds the hero block with a headline and the single message, adds one button wired to the form, and publishes. No secondary sections, no competing actions, no extra blocks compete for attention. The result is a fast path to a working single-goal page, built from the same blocks as the full version with the optional ones removed.
How to Change a Landing Page in WordPress
Changing a landing page in WordPress means reopening a page that is already published and updating it in the editor, an edit to an existing page rather than a fresh build. The page keeps its URL and its single goal; the change revises what sits inside it. Opening the published landing page in the block editor or the page builder it was laid out with returns every section to an editable state, ready to update.
The common changes are straightforward edits to the blocks already on the page. A section can be swapped or revised: a new hero headline, different supporting copy, a reordered stack. The form can change when the fields it collects need to differ. The call to action can be revised so the single action the page drives reads more clearly, while the page stays single-goal: one button, one conversion. Each edit updates the live landing page in place, so the published version reflects the revision once the change is saved.
WordPress Page Builders for Your Landing Page
A WordPress landing page creator is the method used to lay out the page, and that decision comes down to two options set during the layout step: the native block editor built into WordPress, or a page builder added on top of it. Both lay out the same single-goal landing page; what remains is matching the method to the page at hand.
Each option suits a landing page in different conditions. The block editor lays out the page natively when a custom arrangement and no added plugin are the priority. A page builder lays out the page faster when prebuilt sections shorten the work. The decision between specific builders, which one ranks ahead of the others on features, templates, and ease, sits in a dedicated comparison of the best WordPress page builders, where the tools are weighed side by side. For laying out one landing page, either method assembles the same hero, button, and form into a single-goal page.
WordPress Splash Page
A WordPress splash page is a related page-type, a gate or intro page shown before site entry, displayed first when a visitor arrives and clearing the way to the rest of the site. It consists of a single screen with a brief message, an age check, a language choice, or an announcement, and a way through to the main content.
A splash page differs from a landing page in what it does at the point of entry. A splash page gates or precedes site entry; a landing page captures one conversion. The splash page sits in front of the site and passes the visitor onward, whereas the WordPress landing page holds the visitor on one page to complete a single action. With that distinction settled, the WordPress landing page stands complete: the layout method laid out, the page created, its sections added, the form and call to action in place, and the page published inside the WordPress site through the five-step build.
The surrounding decisions sit alongside that build (the simple-build variant, the edits to an existing page, the layout-method choice, and the splash-page sibling), each a choice that frames the same page. Its conversion goal held at exactly one from definition through publish, the WordPress landing page now runs inside its site.


 Gemini