Explore our specialized services, tailored solutions, and industry expertise to elevate your digital presence. From custom WordPress development to seamless integrations, we build high-performing websites that deliver impact.
Local by Flywheel is a managed local WordPress development tool, a desktop application that stands up a complete WordPress site on a single machine, no live server required. Most teams now know it simply as Local, or LocalWP; the name shortened once WP Engine folded Flywheel into its product line, but the application and its purpose stayed the same. Installing WordPress locally with it takes minutes, and the payoff is a private site a developer can break, rebuild, and hand to a client without ever touching production.
What makes Local a local WordPress development tool rather than a bare code editor is the server stack it bundles. Under a one-click interface, it provides a web server, PHP, and MySQL, the three pieces a WordPress install needs to run, so the environment never has to be wired together by hand. Spin up a site and Local supplies that stack; the WordPress software runs on top of it exactly as it would on a production machine.
One point deserves clearing up before anything is downloaded, because the shared brand name causes real confusion. The Local desktop app is a different product from Flywheel’s managed hosting. Flywheel, and its parent WP Engine, sells managed WordPress hosting that runs sites on the public internet; the Local application runs sites on the developer’s own computer, offline, for building and testing. The Local desktop application, the local WordPress software that runs on a workstation, is the product installed, not the hosting plan rented from a provider.
From here, the steps run in a fixed order: the machine requirements Local expects, then downloading and installing the application on macOS, Windows, or Linux, then the optional add-ons that extend it, then a first working local WordPress site, and finally the configuration that readies that site for real client work. The first of those steps is the smallest one: what a computer needs before Local will run at all.
What Are the Minimum Requirements to Run Local?
The minimum requirements to run Local are the machine footprint the application needs before installation: the free memory, disk space, and operating system version below which Local either refuses to launch or runs badly. Local’s installation documentation publishes these floors, and confirming them first is a cheap precaution: an install that fails halfway almost always traces back to a machine that was below the minimum requirements to begin with. Local is light as development tools go, but it is not weightless.
Two hardware figures set the baseline. Local needs a minimum amount of free RAM to hold the web server, PHP, and MySQL processes it runs, and a minimum amount of free disk space for the application plus each site’s files and database. Both are measured in gigabytes:
Free RAM: 4 GB. This is the memory available after the operating system takes its share, not total installed memory.
Free disk space: 1.5 GB, with headroom on top for every additional local site created later.
The operating system matters as much as the hardware, and each platform carries its own version floor:
macOS:macOS Monterey (12) or higher; older releases fall out of support and can only run legacy builds of the application.
Windows: Windows 10 or Windows 11, 64-bit only. The 32-bit builds are unsupported, and the deprecated Windows 7, 8, and 8.1 no longer qualify.
Debian-based Linux: a Debian-based distribution such as Ubuntu, installed through its package manager.
Meet these three preconditions (enough RAM, enough disk, a supported operating system), and installing Local runs cleanly, putting WordPress on localhost as intended. Fall short on any single one and it stalls. With the machine confirmed as capable, the next move is acquiring the application itself.
How to Install Local
Installing Local means three things done in order: acquiring the application, running its installer, and authorizing it. It is a short procedure (Local ships as a standard desktop installer, the same kind used for any other application), but each step matters, and skipping the authorization is the usual reason a fresh install behaves oddly. Done properly, installing WordPress locally this way ends with the application open and ready to serve a site from localhost.
The order is fixed by how the pieces depend on each other. First comes the download: the installer is pulled from Local’s releases page, where the current build and older versions both live. Next the installer runs, and because it is built per platform, the exact experience differs on macOS, Windows, and a Debian-based Linux system. Last, Local is authorized through the firewall so it can reach the outside services it needs. Each of the three moves exists for a reason, and skipping one to save a minute usually costs more time later. This is the fastest reliable route to install WordPress locally.
Where the installer comes from is the natural place to start.
The Local Releases Page
The Local releases page is the official download source for the installer, the single vendor page where every published build of the application is posted. It is the right starting point because it serves the file straight from Local’s own servers, not a mirror or a third-party bundle that might wrap the installer in something unwanted.
Two kinds of build sit there. The current release is the default download and the one nearly every install should use. Alongside it, the page keeps legacy versions available for the occasions a specific older build is needed, matching a client’s pinned environment, say, or reproducing a bug on the exact version where it first appeared. The developer downloads the right build from the Local releases page, then hands off to the installer.
With the correct installer downloaded, what happens next depends entirely on the operating system it lands on.
Installing Local on the Operating System
Installing Local on the operating system is the step where the downloaded installer actually runs, and it looks different on each platform because Local ships a native build for every one. The application underneath is identical; the wrapper around the install is what changes. Three operating systems are supported, and each has its own short procedure.
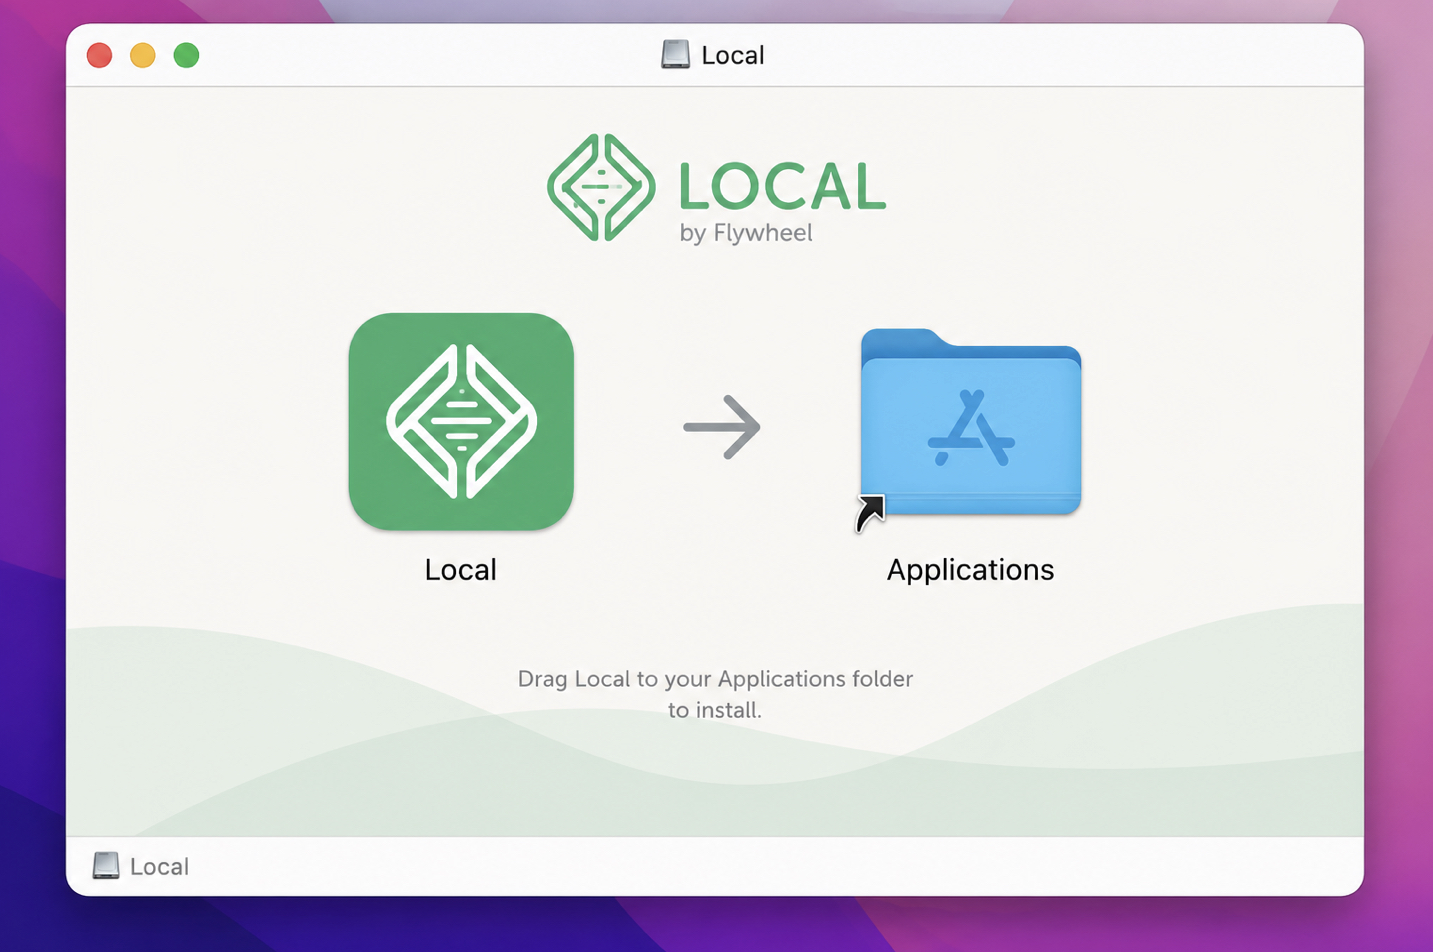
On macOS, the installer arrives as a disk image. Opening it presents the familiar drag-to-Applications window, and Local moves into the Applications folder like any Mac app. The first launch may prompt Gatekeeper to confirm the app, after which Local opens ready to work.
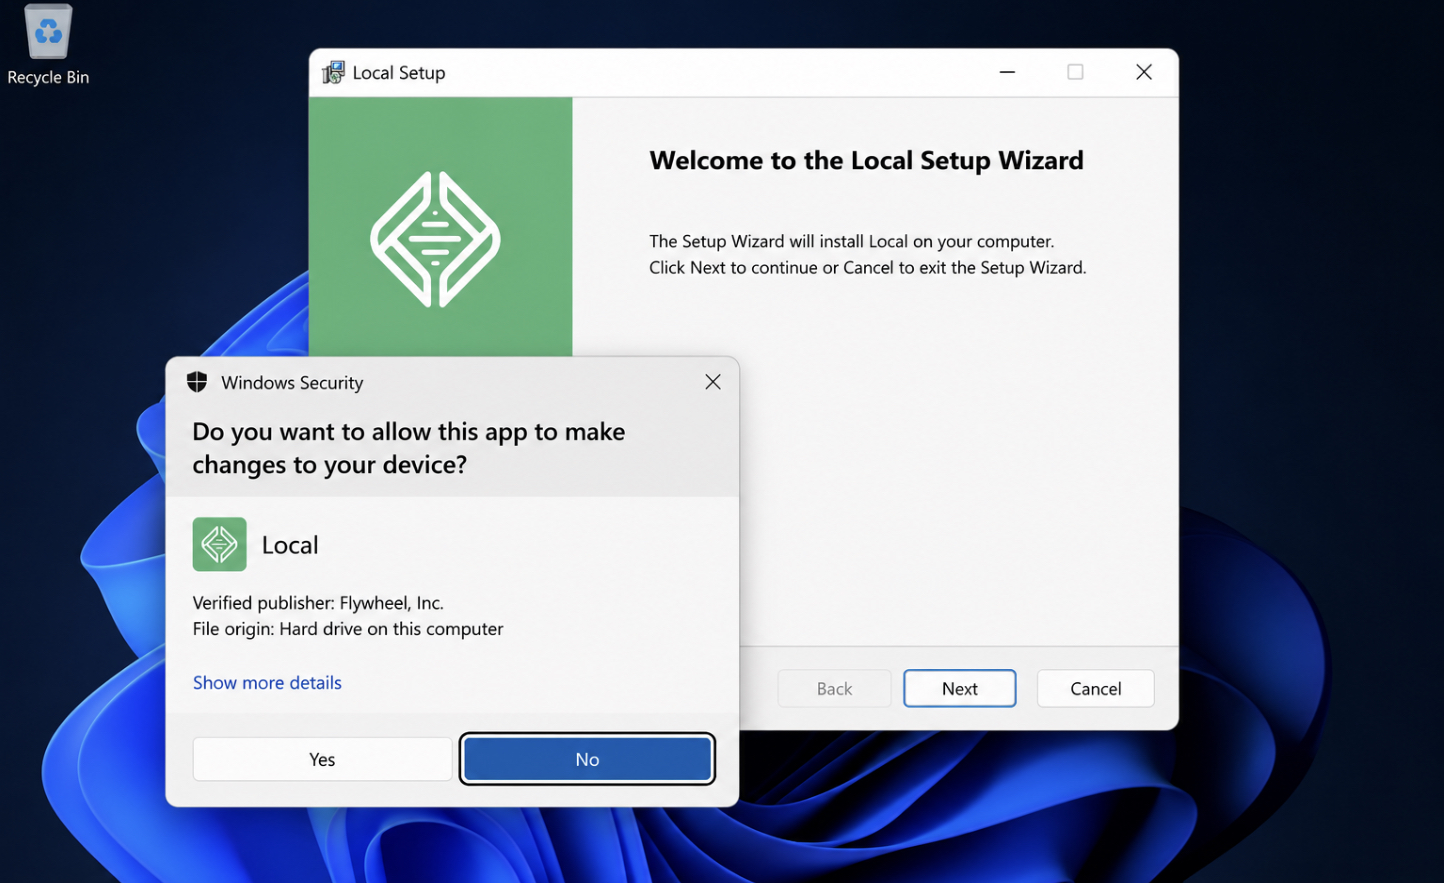
On Windows, the installer is a standard executable. Running it walks through a brief setup, and Windows Defender (or the system’s app-control settings) will usually ask to confirm that Local is allowed to run. Approving that prompt lets the install finish; declining it is the most common reason a Windows install appears to hang. Only the 64-bit build applies, matching Local’s 64-bit-only requirement.
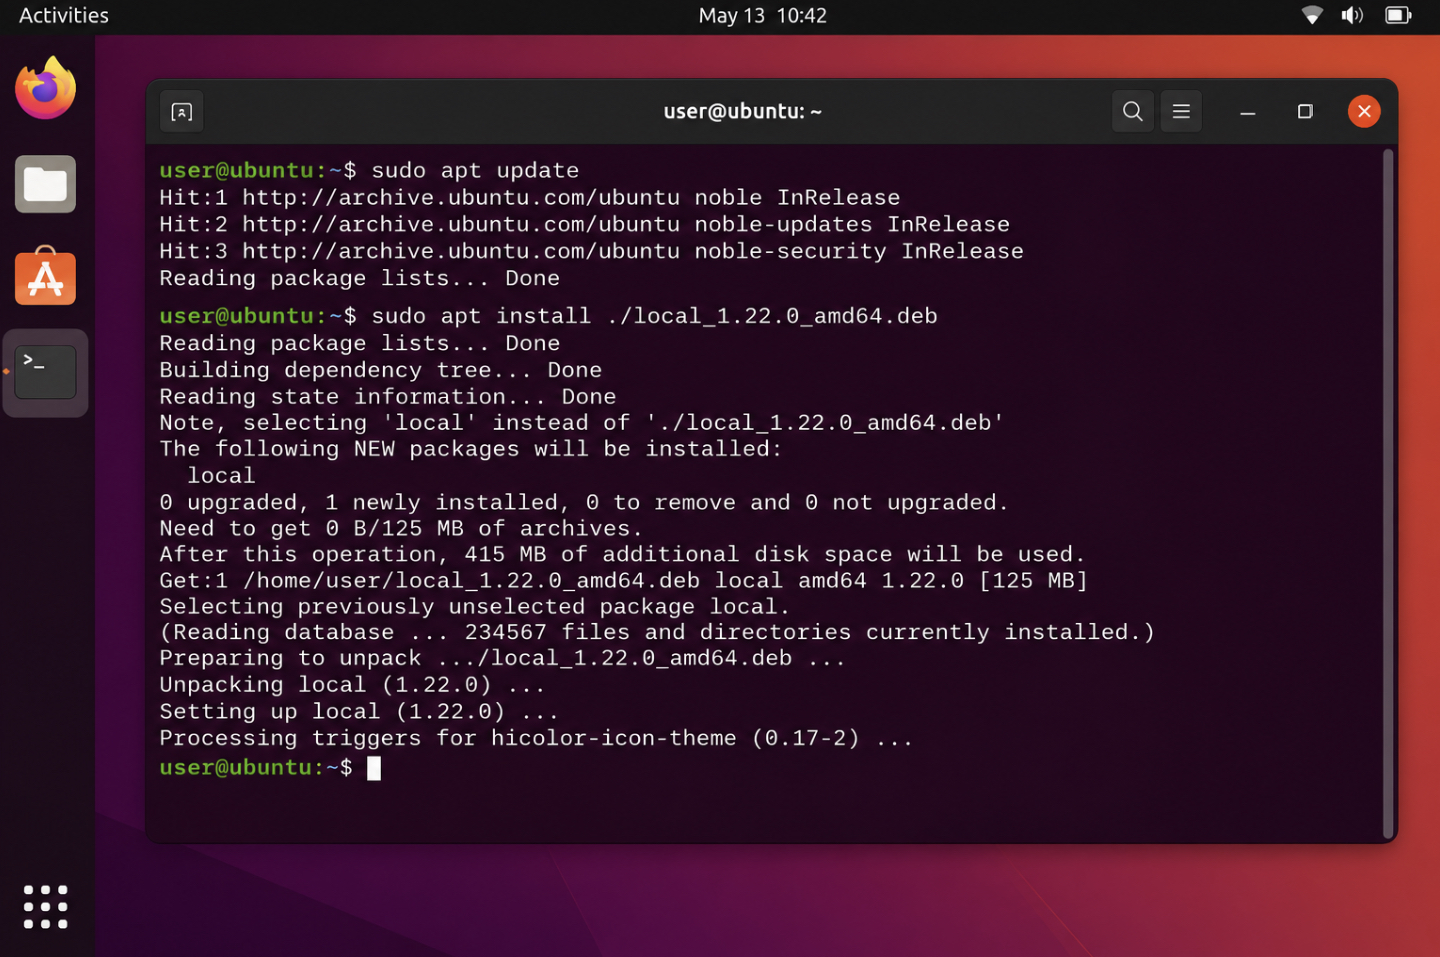
On a Debian-based Linux system such as Ubuntu, Local installs from the downloaded package. The package is added through the distribution’s package manager, either from the graphical software installer or from the command line, and the manager resolves its dependencies before placing the application. Once it completes, Local launches from the applications menu.
Whichever platform it runs on, the installed application still has one gate to clear before it can reach the services it relies on.
Firewall Authorization for Local
Firewall authorization for Local is the permission the application needs to reach a short list of internet addresses through the machine’s firewall. Local is a local tool, yet it still connects out for a few things (signing in, checking for updates, and pulling add-ons), and a strict firewall or corporate network can block those connections silently. Authorizing the addresses up front prevents the confusing half-broken state where the app installs fine and certain features never respond.
Local requires these URLs to be allowed through the firewall:
hub.localwp.com: Local’s hub, for account sign-in and add-on services.
api.wpengineapi.com: the WP Engine API endpoint Local authenticates against.
app.getflywheel.com: the connect service Local uses for its account and connect features.
cdn.localwp.com: the content delivery address Local pulls application assets and downloads from.
getflywheel.github.io: static resources Local references during use.
The addresses on getflywheel.com and wpengineapi.com are connection endpoints the application talks to, not a hosting service to sign up for, allowing them simply lets Local function. Once the URLs are cleared and the application is installed, the core tool is fully in place, and the next thing worth adding is the set of optional add-ons that attach to Local and extend what it can do.
How to Install Local Add-ons
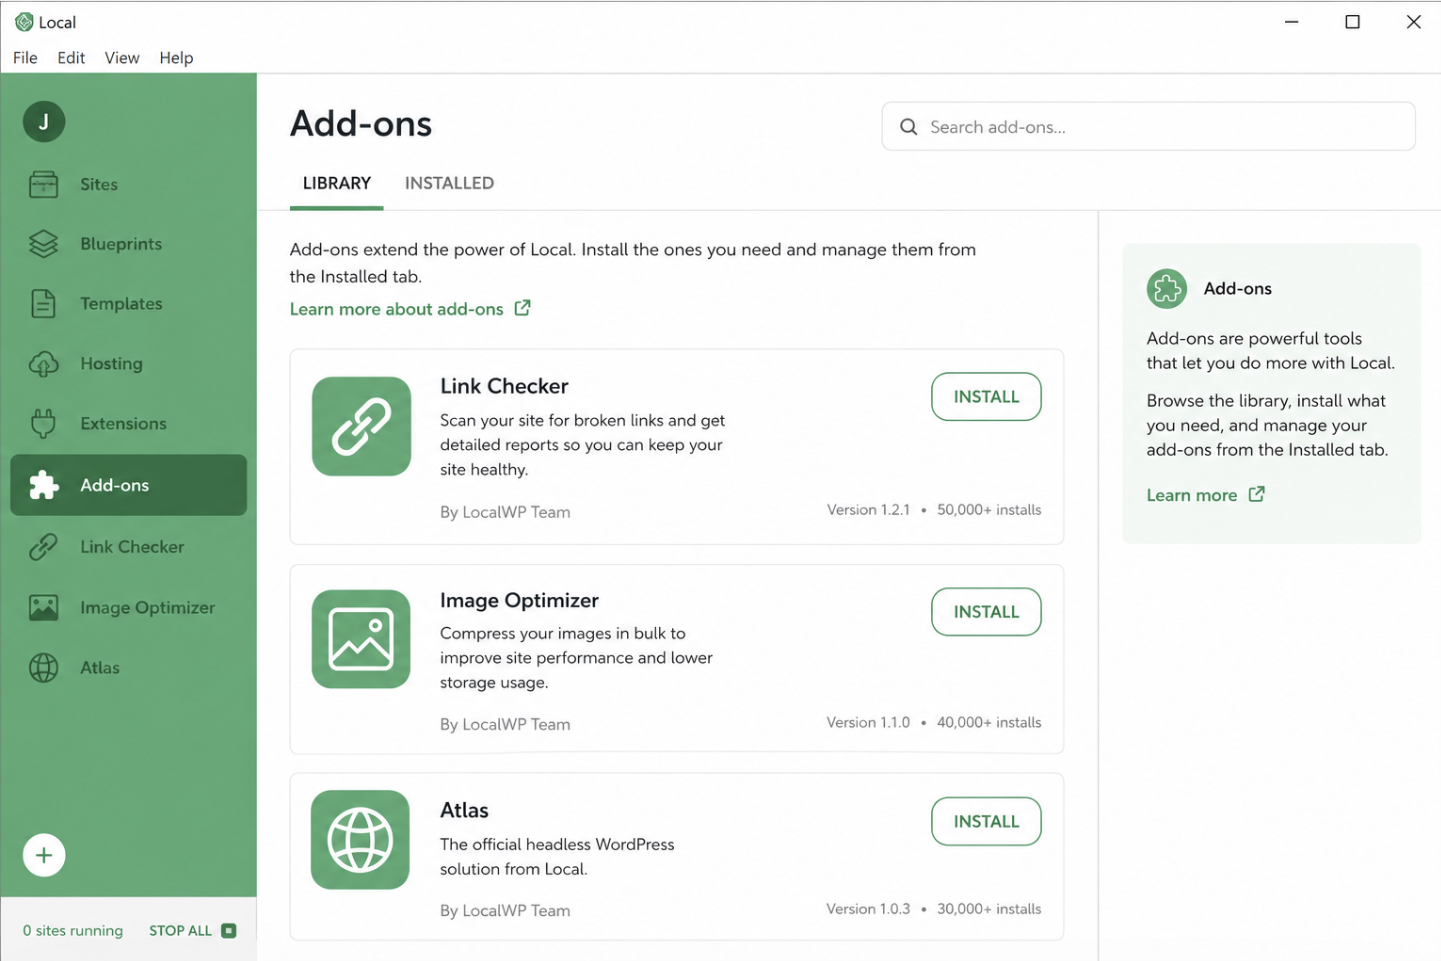
Local add-ons are optional tools that attach to the Local application itself and install from its add-ons menu, extending what the LocalWP local WordPress development tool can do without changing any single site. Because an add-on binds to the app rather than to a site, it goes on right after the core application is installed and before a first local site exists. The Add-ons entry in Local’s left sidebar opens the add-on library, where each available tool installs with one click and then appears as its own panel inside the app.
Not every add-on earns a place in an agency workflow, so the choice matters more than the count. The ones that repay the install on real client projects:
Link Checker scans the local site for broken internal and outbound links before anything reaches the client, and it is the add-on most agency builders keep switched on across every build.
Image Optimizer compresses the media library locally, which helps when a client hands over a heavy set of uploads.
Atlas supports headless WordPress builds for teams running a decoupled front end.
Link Checker does the heaviest work of the group. A developer runs it against the finished local build, reads the report of dead links, and clears them before a client ever opens the site. With the application installed and its add-ons in place, Local is ready to create a first working local WordPress site.
How to Run a First Local WordPress Site for Client Work
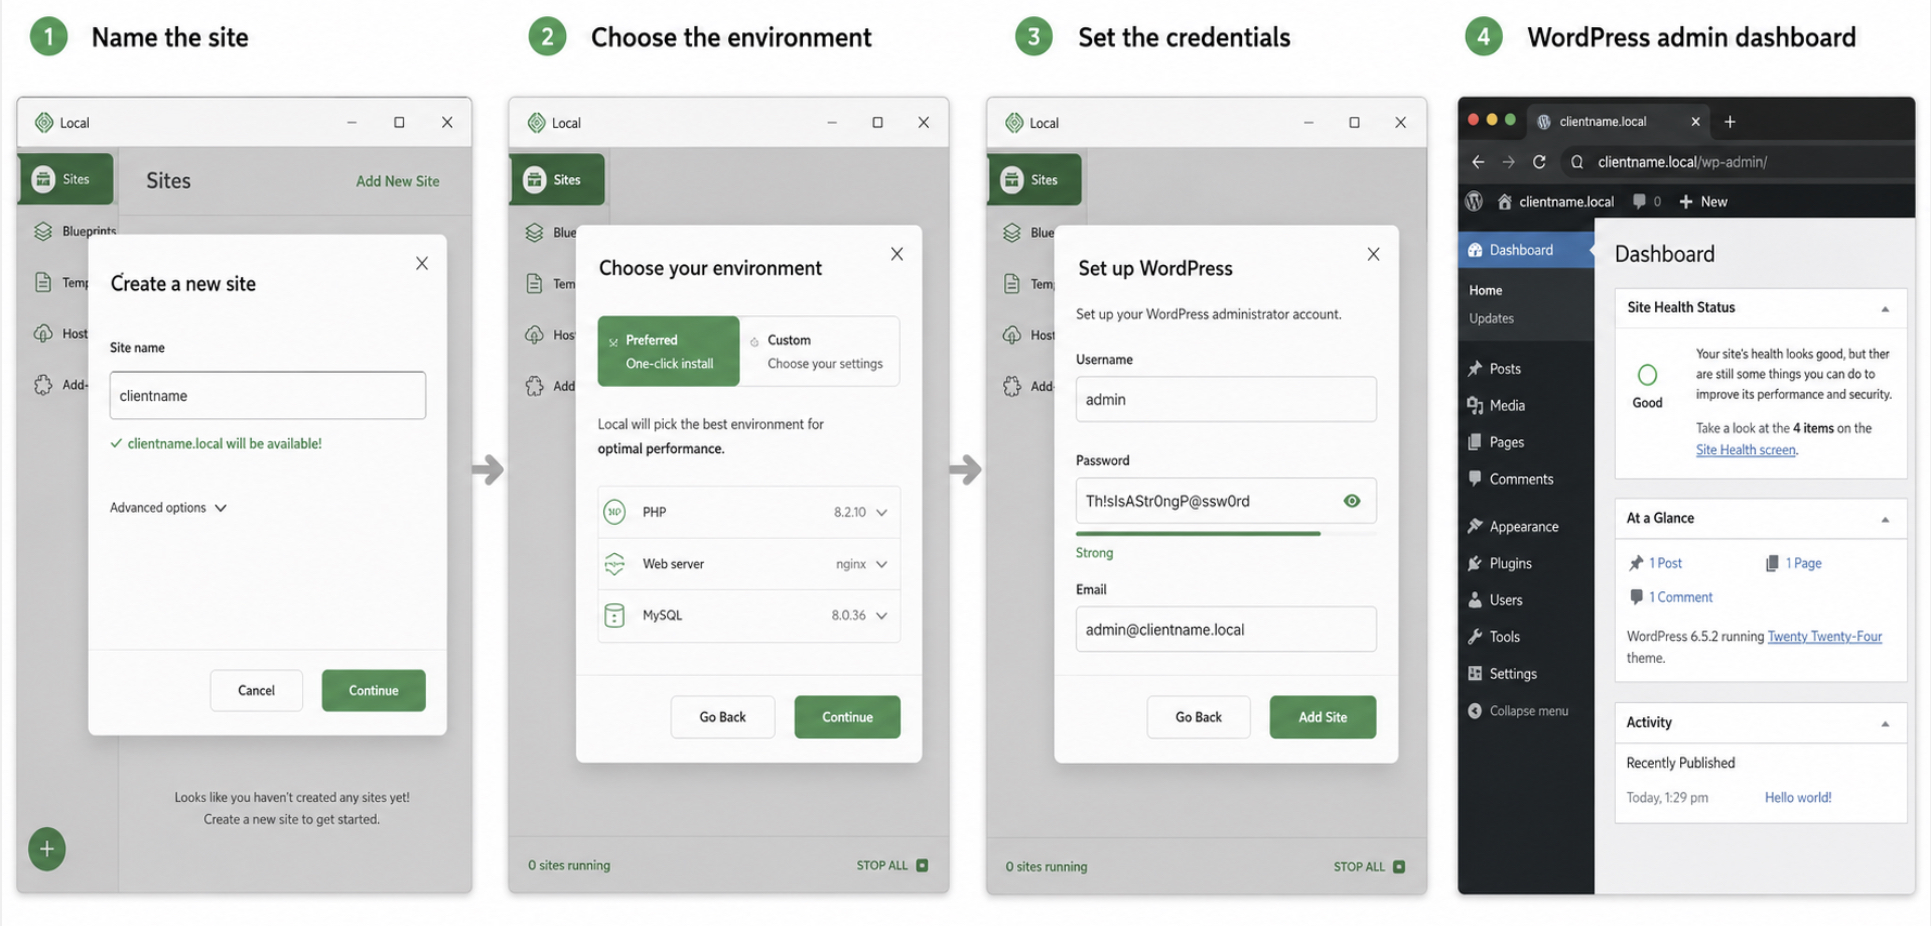
The first local site is a working WordPress install that the developer creates from Local and logs into directly, the point where installing WordPress locally stops being setup and becomes a real build. Creating that site follows a short ordered sequence inside the app, and treating it as the foundation of a client engagement rather than a throwaway install shapes a couple of the choices along the way:
Name the site. Local’s new-site dialog opens with a single field, and the site name becomes the local domain (clientname.local, for instance) that the build answers to.
Choose the environment. Local offers a preferred one-click environment and a custom one. The custom path exposes the PHP version, the web server, and the MySQL database version, so an agency build can match the exact stack a client runs in production.
Set the credentials. The dialog asks for the WordPress administrator username, password, and email — the login the developer later uses to reach the dashboard.
Reach the administration interface. Local provisions the environment and hands back the WordPress admin dashboard; from here, the site runs locally and behaves like the live one it will eventually mirror.
The environment choice deserves a second look, because it is a step within creating the site rather than a stage of its own: picking PHP, web server, and MySQL versions at this moment is what makes a local build client-accurate instead of generic. A theme can be dropped in afterward, though installing a theme is not the same as installing WordPress. The running site already exists once the dashboard loads. With a first local site standing and reachable, the work turns to configuring it for the real client work needs.
Local Configuration for Client Work
Client-ready configuration turns a freshly installed local site into one that behaves the way a real client engagement demands, tuning Local, the local WordPress development tool (also called LocalWP), past the point where the first site merely runs. A first working install only proves that WordPress loads. Configuration is everything that comes after: the adjustments that make a local site genuinely useful for agency work instead of a private test install nobody else ever sees.
Several capabilities matter here. Local lets a developer share an in-progress site with a client, serve that site over trusted HTTPS, check the mail the site tries to send, reach straight into its database, and save the whole arrangement to reuse on the next project. A small set of application preferences carries across every site a developer creates, so defaults set once do not have to be reset each time. Each of these builds on the same groundwork a developer lays down to set up a local WordPress development environment, with Local adding the client-facing tooling on top of it. The most immediate of the capabilities is the simplest to reach for: putting the in-progress site in front of the client who is paying for it.
Live Links for Client Sharing
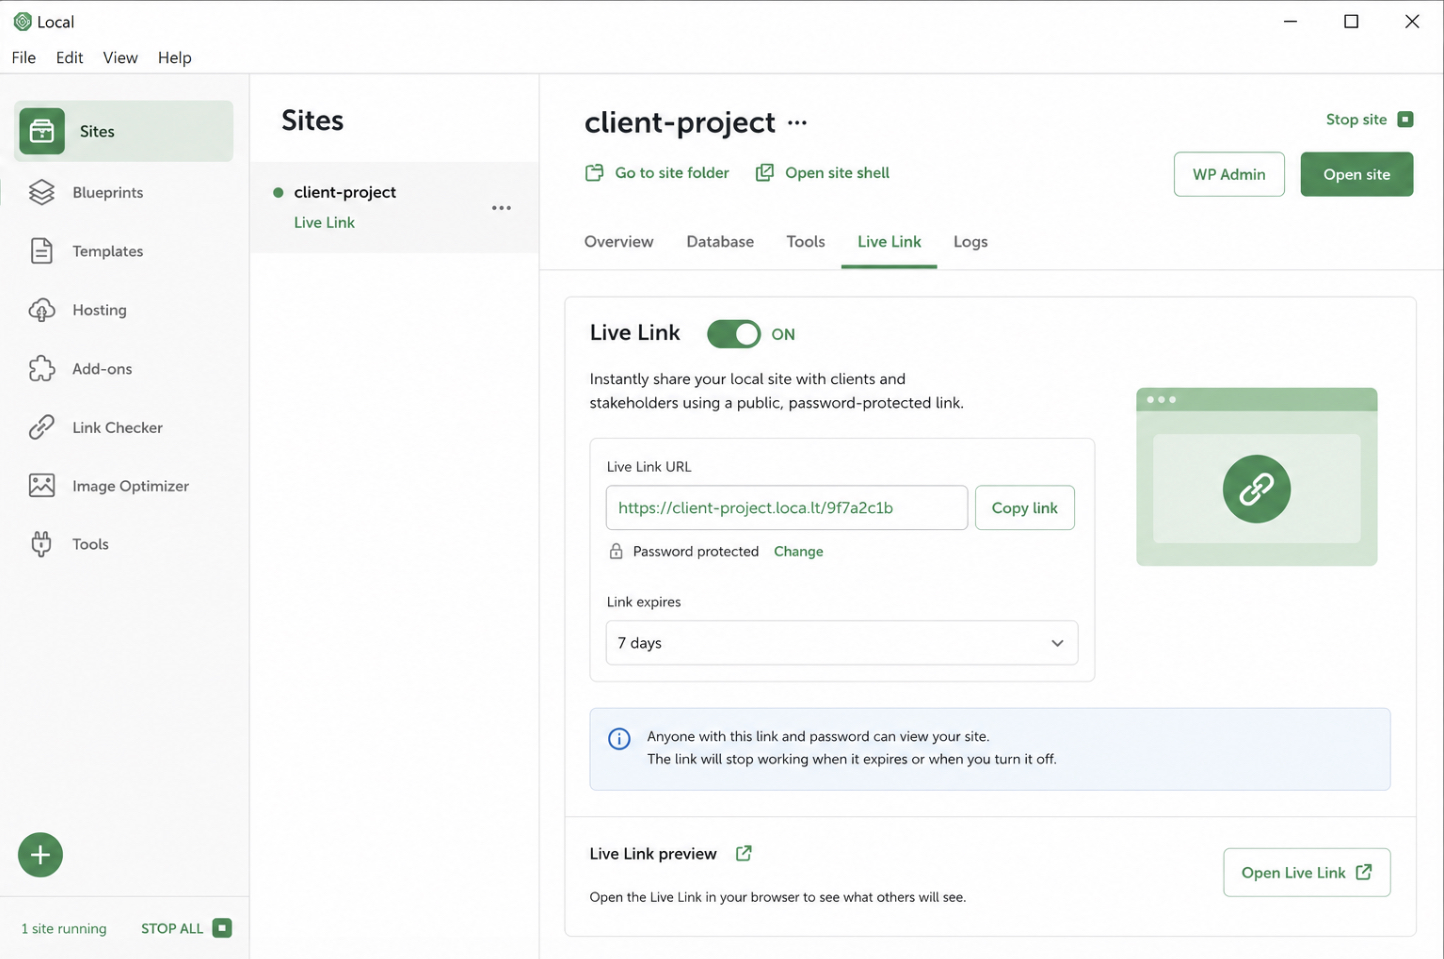
Live Links are shareable public URLs that Local generates on demand, exposing an otherwise-private local site so a client can open it in an ordinary browser. A local site normally answers only on the developer’s own machine. A Live Link opens a temporary, authenticated route to that same site, which is exactly what client sharing needs when the work is not ready to leave the developer’s control yet.
Generating one is a single action: the developer switches the Live Link on for a given site, and Local returns a public address to send over.
Because the address is a temporary review route rather than a published copy of the site, it closes again once the review is over, and the site drops back to being private. A client who opens that shared site over an insecure connection, though, can see it behave differently from the secure site they will eventually work with, which is where serving the local site over HTTPS starts to matter.
HTTPS for a Local Site
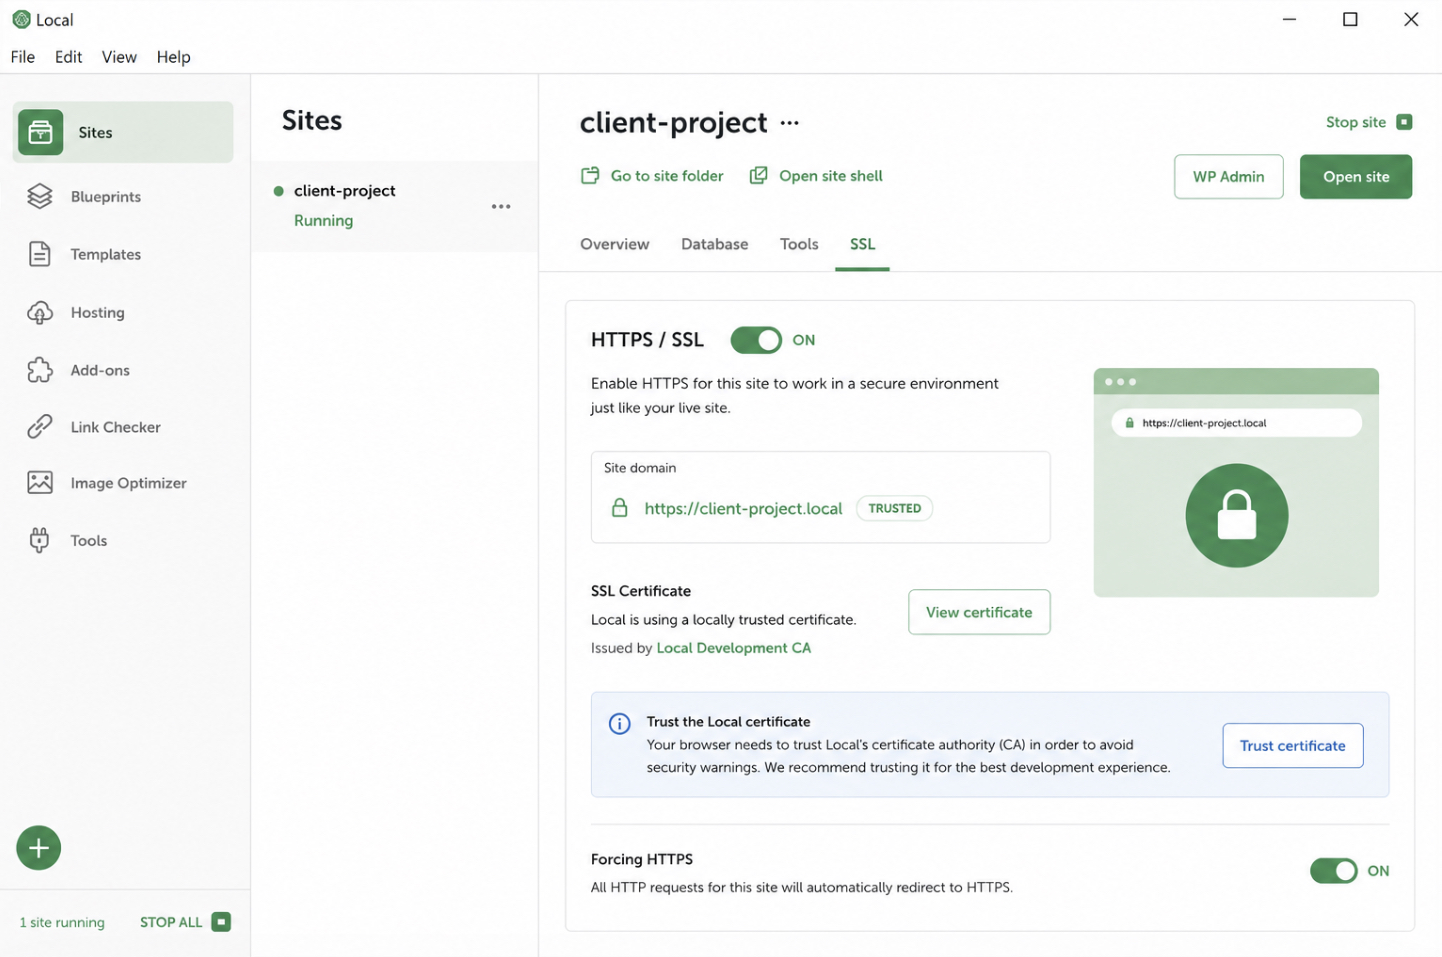
HTTPS on a local site means the site loads over a trusted, encrypted connection even though nothing ever leaves the developer’s machine. Local simulates a valid SSL certificate for the site and marks it trusted, so the browser stops flashing insecure-connection warnings and treats the local site the way it would treat a real secure one. Most production WordPress sites run over HTTPS; a local site stuck on plain HTTP can quietly hide bugs that only appear the moment the code meets a secure connection.
Switching a local site to HTTPS is a toggle: enable it in Local, trust the generated certificate, and the site reloads under https.
Mixed-content warnings, hard-coded http links, and cookies flagged secure then all behave the way they will on the client’s production site, so what gets tested locally stays accurate to what the client will actually run. Security is one kind of client-accurate behavior. The mail a WordPress site fires off is another, and Local handles that without letting a single message reach a real inbox.
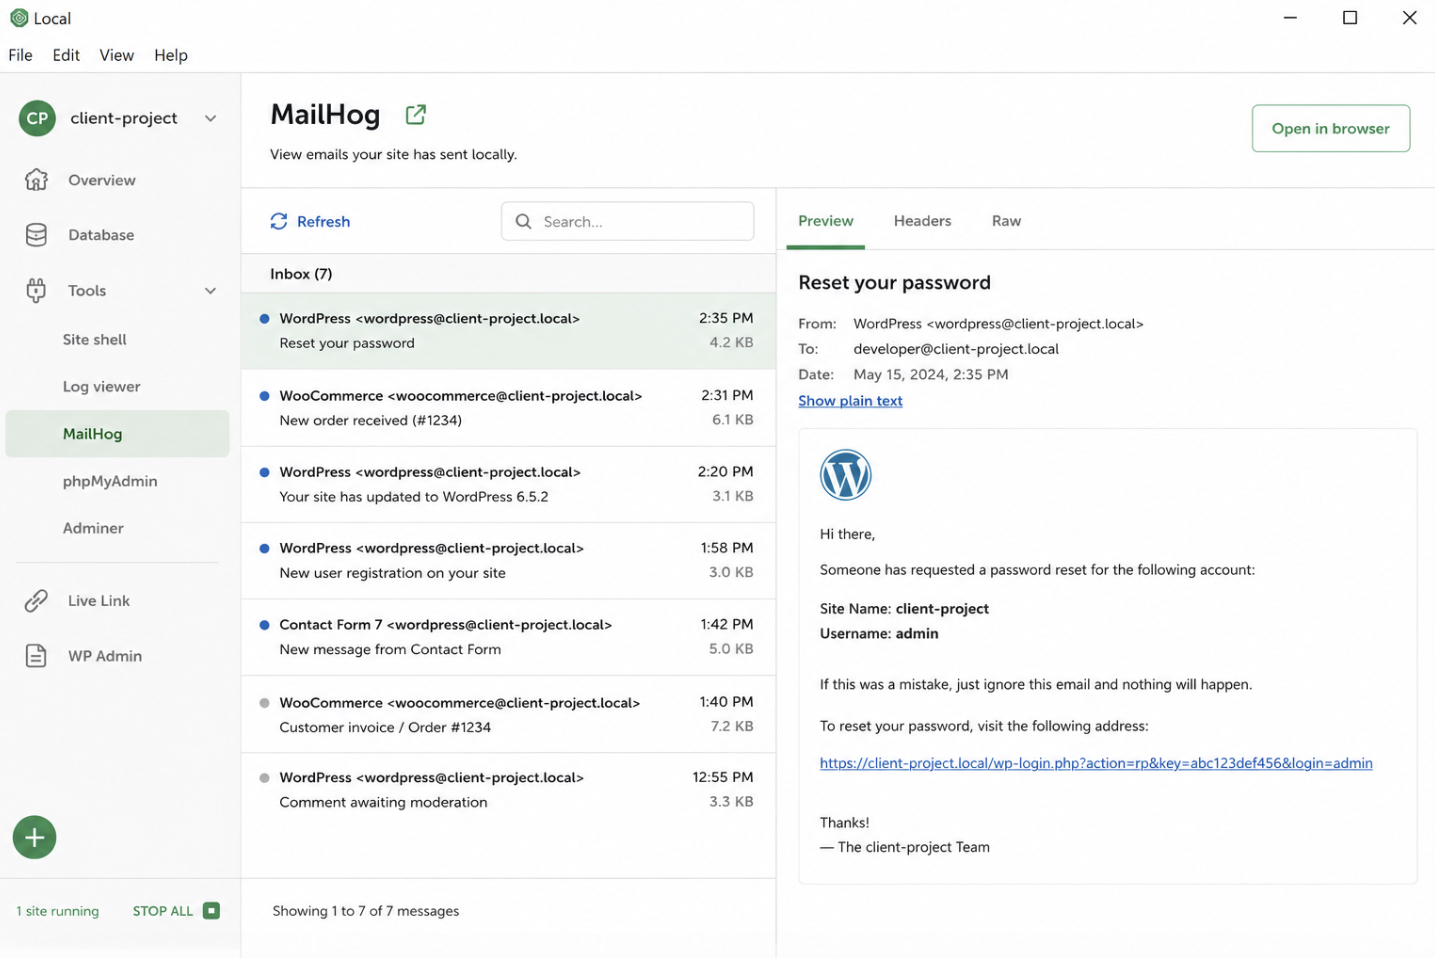
Local Email Testing
Local email testing captures the mail a local WordPress site sends and holds it locally instead of delivering it to a real recipient, letting the developer inspect every message during development. WordPress generates email constantly: password resets, order receipts, comment notifications. On a local install those messages have nowhere legitimate to go, so capturing them keeps development both safe and observable rather than accidentally emailing a live customer list.
Opening the captured inbox shows each email exactly as the site rendered it, headers and all, which is enough to verify a broken template or track down a notification that never fired.
That same built-in mail-and-database convenience is one reason teams weighing Local also look at DevKinsta, a managed alternative that ships comparable mail and database tooling out of the box. Mail is only one of the things a running local site produces, though. The database underneath it holds everything else, and Local opens that directly too.
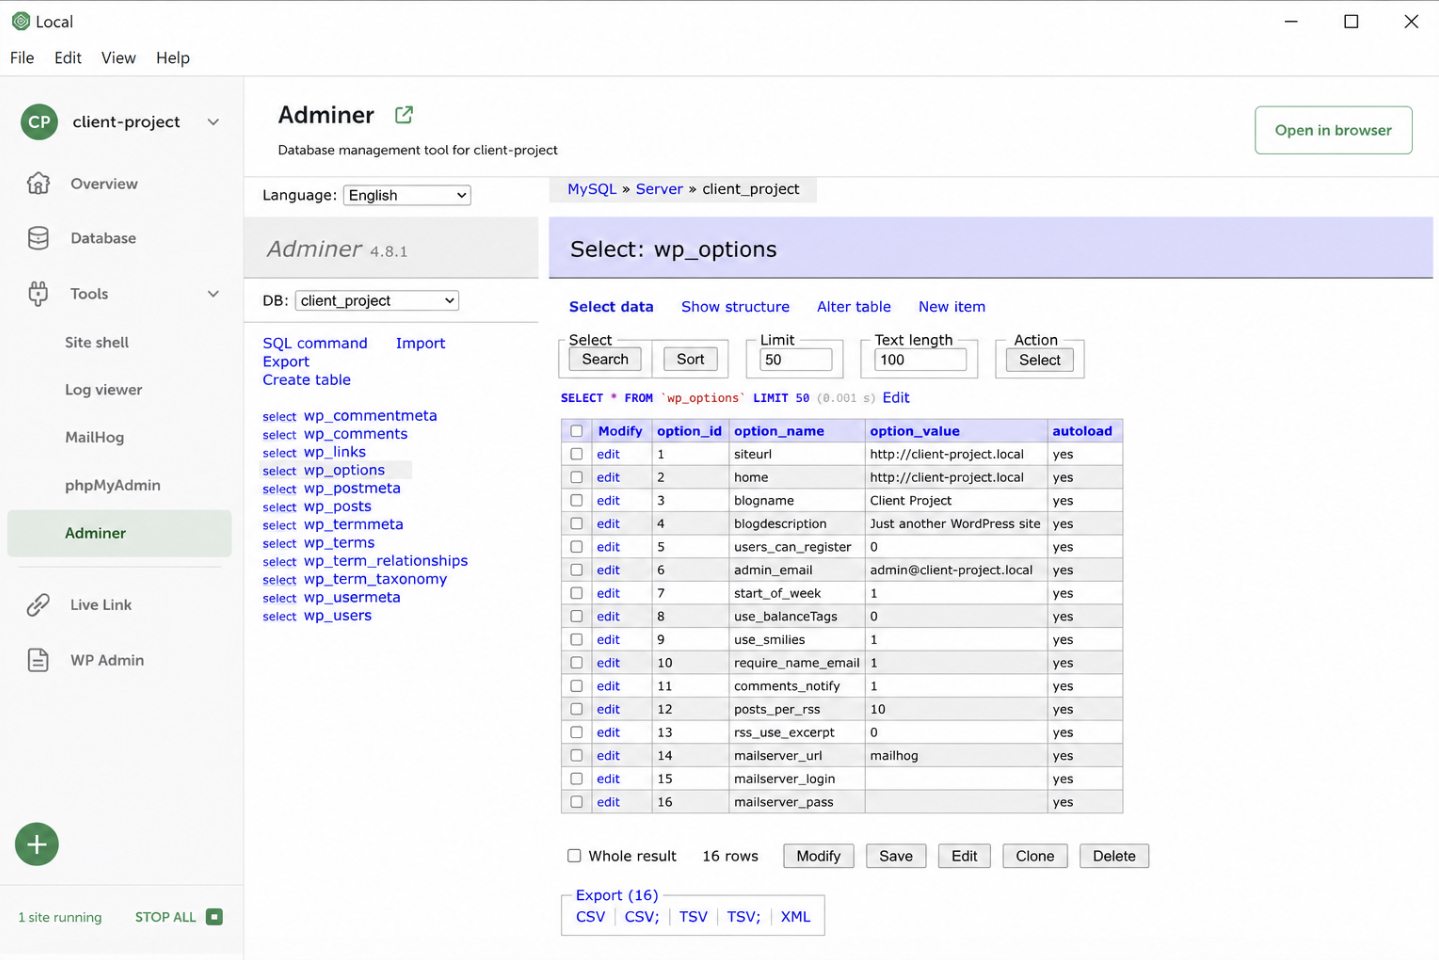
Site Database Access
Site database access is the ability to open the local site’s database straight from Local and read or change what it contains, with no separate client or connection string to configure first. Every WordPress site keeps its posts, options, and user records in a database, and reaching that database is how a developer fixes a stuck setting, checks a serialized value, or clears out test data that the admin screens simply will not let go of.
Local opens the site’s database in a built-in tool with one action, listing the tables the way any database browser would.
From there a developer inspects rows, edits an option, or drops a table of throwaway records, all against the local copy and never against a remote one. Once a site is configured, secured, and populated the way a project needs, rebuilding that same setup by hand for the next client throws away the effort, which is what makes a saved, reusable template worth keeping.
Reusable Site Templates with Blueprints
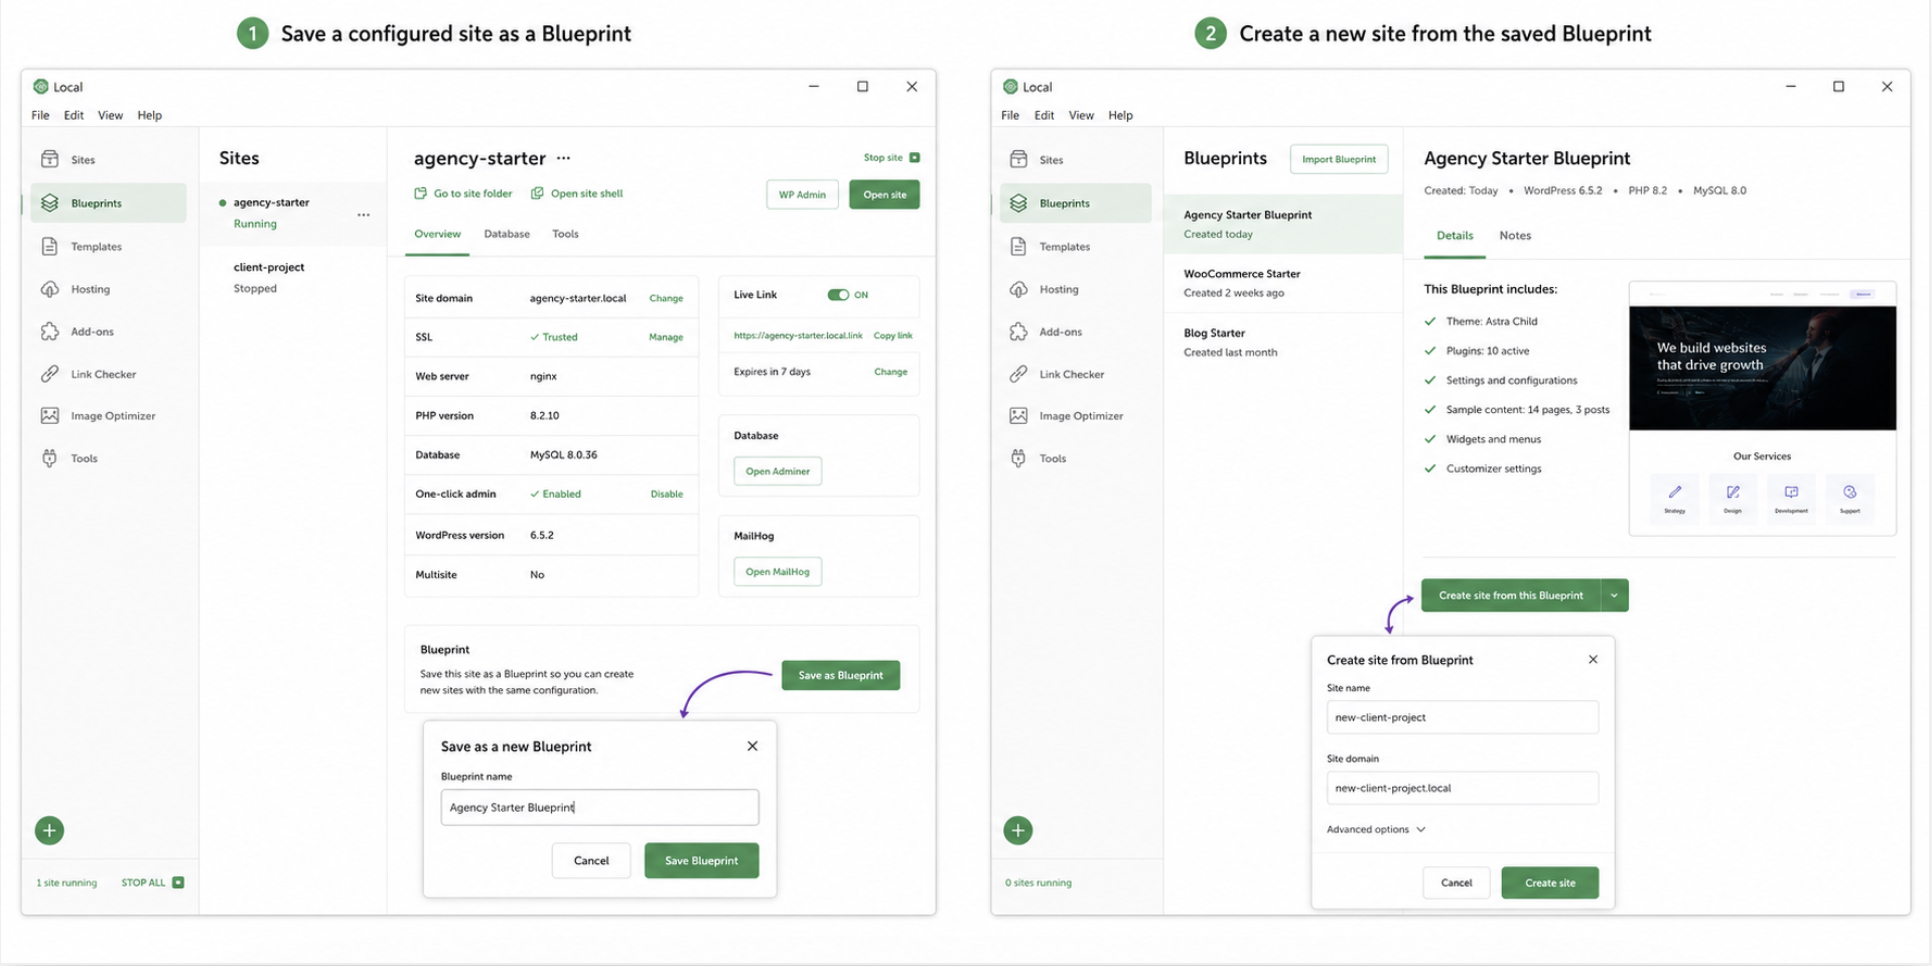
A Blueprint is a saved, reusable site template inside Local: a snapshot of a fully configured local site that spins up new sites from that same starting point. Agencies rarely build just one site. A Blueprint captures the plugins, theme, settings, and content of a finished local install, so the next project can start already configured instead of blank.
Saving one takes a configured site and stores it as a Blueprint; creating a new site from that Blueprint reproduces the whole arrangement in seconds.
For a studio that wants every client build to begin the same way, that repeatability is the real payoff: a client-ready baseline nobody has to assemble twice. Reusable Blueprints are one reason Local earns a place among the local WordPress development environments a studio might standardize on, even though the decision between them ultimately turns on the wider trade-offs each one makes.
Configured this far, a Local site does what real client work asks of it, not merely what a first install proves. It all holds together on one machine: install WordPress locally with Local, run a working site on it, then tune that site until it is ready to show a client. That is what separates a genuine local development setup from a throwaway demo.




 ChatGPT
  Claude
  Grok
Grok  Gemini