Explore our specialized services, tailored solutions, and industry expertise to elevate your digital presence. From custom WordPress development to seamless integrations, we build high-performing websites that deliver impact.
To install wordpress from cli, WordPress installation runs from the shell rather than through a browser-based interface, using WP-CLI as the command-line method for executing the install process. This approach is commonly chosen by developers, sysadmins, and agency engineers when repeatability, automation, and scripting consistency are priorities. Unlike a manual/GUI install or a host one-click install, the process remains entirely within the command-line workflow, with WP-CLI running the installation.
A typical WP-CLI install wordpress workflow follows a predictable sequence that can be reused across environments and deployment routines. In an install, WP-CLI WordPress command-line Linux curl environment, the process generally moves through requirements, the tool itself, download, configuration, database preparation, installation, and verification. This guide focuses on installing WordPress CLI from start to finish, keeping the scope centered on the command-line path rather than the browser/GUI path.
Before the installation process begins, the method requires a clear understanding of the environment, dependencies, and prerequisites that support a successful WordPress deployment. The next section provides that orientation and outlines the requirements needed before proceeding.
What is WP-CLI?
WP-CLI is the official WordPress command-line tool. It bundles a set of commands that carry out WordPress tasks from the shell, and for an installation that means it replaces the browser-based WordPress steps with typed commands. Where the standard setup asks an administrator to fill in a form on a web page, WP-CLI accepts the same details as command-line arguments and completes the installation with no browser open.
That substitution is the whole reason the WP-CLI install runs from the command line: the tool turns each install step into something a developer can type, save, and replay.
The tool goes well beyond installation, and its full command reference is in a dedicated guide. For the complete account of what it is and everything it does, the dedicated explainer covers what WP-CLI is. For the install at hand, one fact carries the rest: WP-CLI runs in the shell, so the server must provide a shell, a runtime, and a place to store data before a single command executes. Those prerequisites come first.
WP-CLI Server Requirements
WP-CLI server requirements are the prerequisite conditions the install needs in place before the first command runs. The WP-CLI install requires a working PHP runtime, a database engine such as MySQL or MariaDB, and command-line access to the machine. None of these are optional, and confirming them up front saves a stalled install later, when a missing piece would halt the sequence partway through.
The three prerequisites form a short checklist:
PHP: the language runtime that both WP-CLI and WordPress run on.
A database engine: MySQL or MariaDB, where WordPress stores every post, setting, and user.
Command-line access: a shell session, reached over SSH on a Linux server, so commands can be typed directly.
A developer who reaches for WP-CLI to install WordPress from the Linux command line, pulling the tool down with curl, needs exactly these three things confirmed first, and many command-line guides skip past them straight to the download. Each requirement deserves a closer look before the install proceeds: the runtime pieces, PHP, and the database engine settle what the install runs on, while command-line access settles how a developer reaches the server. With the checklist confirmed, the WP-CLI tool can go onto the server.
PHP and Database
PHP is the runtime that executes both WP-CLI and WordPress itself, so it’s the first requirement to confirm. WP-CLI is written in PHP and runs as a PHP application, so the server needs a PHP interpreter present and reachable from the shell. WordPress core sets the floor at PHP 7.2.24; anything older will not carry the install. Newer releases of PHP work as well, and most current servers ship a version well past that minimum, but 7.2.24 is the line below which the install cannot start.
The database engine is the second runtime piece. WordPress stores its content, settings, and user accounts in a relational database, and the WP-CLI installation requires that engine to be available so subsequent commands can create a database and connect to it. Two engines satisfy the requirement: MySQL and MariaDB, the open-source drop-in that speaks the same protocol. Either one works, and the install does not care which is present as long as the server can reach it.
The database itself is created later in the sequence with a single command, so nothing needs to be set up here beyond confirming the engine runs. That covers the two runtime prerequisites; the third is about how a developer reaches the server in the first place.
Command-Line Access on Linux
Command-line access on Linux is the shell session a developer works inside, and it is the access mode WP-CLI runs in. WP-CLI is a command-line tool, so it needs a terminal to receive its commands; on a Linux server that terminal almost always arrives over SSH, the secure protocol that opens a remote shell on the machine. Once that session is open, the developer types wp commands the same way any other shell command gets typed.
A developer on Linux works through the shell rather than the browser for a clear reason: the shell is where scriptable, repeatable work runs. The browser-based install screen handles one site at a time through a sequence of clicks, while the command line accepts a command, runs it, and reports the result in text that a script can capture and a developer can replay.
That is the whole appeal of installing from the command line, and it is why the terminal, not the graphical interface, is the working environment for everything that follows. With command-line access confirmed and the runtime requirements in place, the WP-CLI tool can be downloaded onto the server.
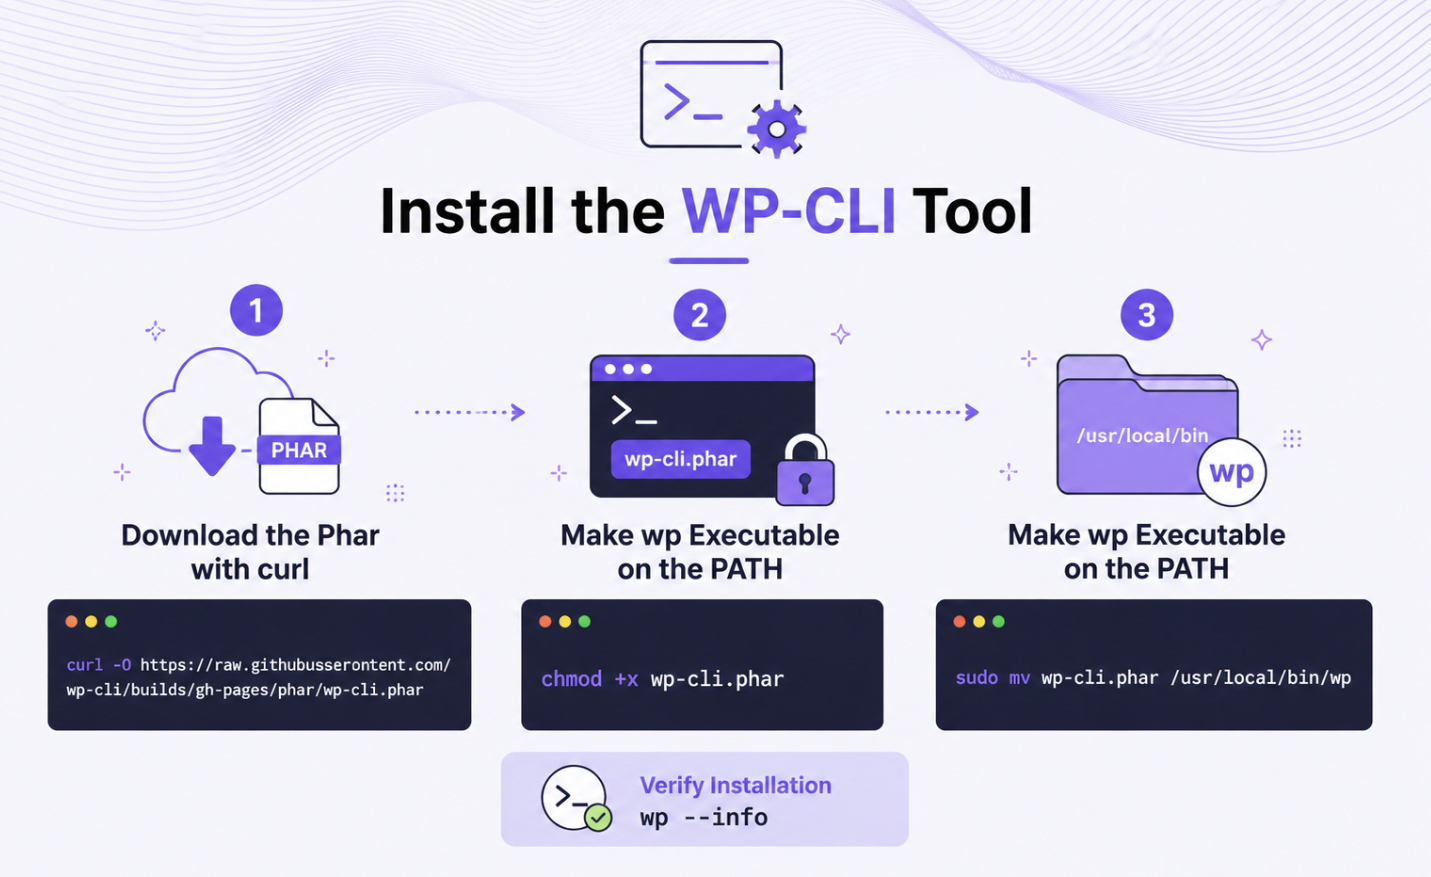
Install the WP-CLI Tool
Installing the WP-CLI tool means placing the command-line program on the server before it can install WordPress core. The tool has to exist and be runnable first, because every step after this is a wp command, and a wp command needs the wp program present to interpret it. To install WordPress from CLI, a developer installs the WP-CLI tool by downloading a single file, marking it executable, and putting it where the shell can find it.
The recommended artifact for this is the official phar, a self-contained archive that packs the entire tool into one file, and curl is the mechanism that fetches it. The phar arrives with a single download command:
That command pulls the binary down to the current directory. Package managers and per-operating-system installers exist, but the curl-and-phar path works the same way on any server, which keeps the WordPress install WP-CLI step identical from one machine to the next. A freshly downloaded phar is not yet runnable, though, and the shell does not yet know it as wp. Two short steps finish the job: making the file executable, then moving it onto the PATH and checking that the tool reports itself correctly. With the tool installed and confirmed, the WordPress core files can be downloaded.
Download the Phar with curl
The phar is the single-file WP-CLI binary, the one archive that holds the whole command-line tool, and curl is the command that fetches it. Bundling the program into one file is what makes this curl download so direct when installing WP-CLI on a Linux server: there is no package to unpack, no dependency tree to resolve, just one binary pulled from the official release URL. The release is hosted on the project’s own build server, so the download always points at the same canonical location.
curl runs the fetch in a single line, writing the downloaded file into the working directory under its original name:
The -O flag tells curl to save the file using the name it carries on the server, which leaves a wp-cli.phar sitting in the current directory. At this point the binary is on disk but inert. Making it executable is the next move.
Make wp Executable on the PATH
Making wp executable means setting the file’s executable bit so the shell will run the downloaded phar as a program rather than treat it as plain data. A freshly downloaded file carries no permission to execute, and chmod +x grants it. From there the binary moves onto the PATH as wp, so the command resolves from any directory, and wp --info confirms the tool is installed. The three actions run as one sequence:
chmod +x flips the executable bit on the phar. The sudo mv then relocates it to /usr/local/bin/wp, a directory already on the system PATH, and renames it to wp in the same step, which is why every later command is wp followed by its arguments rather than a path to a phar file. The final line, wp --info, prints the tool’s version, the PHP binary it found, and its configuration, and a clean block of output there confirms the tool is installed and reachable. With wp answering on the PATH, the next move is to download WordPress core with wp core download.
Download WordPress Core with the WP Core download
wp core download is the command that fetches the WordPress core files into the working directory. It reaches out to WordPress.org, pulls the latest release, and unpacks the full set of core files right where the command runs, so the directory that held nothing a moment ago now holds a complete, uninstalled copy of WordPress. The command runs on its own, with no flags required for a standard English-language install:
wp core download
For a site in another language, the optional --locale flag fetches the matching translation, so wp core download --locale=de_DE pulls the German build instead of the default. That flag is the only variation most installs ever need at this stage; everything else about the command stays the same.
The result is a core tree sitting in the working directory, and that tree is where the rest of the sequence takes place. The configuration file gets written inside it, and the install command later runs against it, which is exactly why the core has to be downloaded before either of those steps. wp config create reads and writes inside the core files, and wp core install operates on them, so neither can run against a directory that does not yet contain WordPress.
Downloading the core first is what gives the remaining commands somewhere to act. With the core files in place, the next step writes the configuration file that lets WordPress reach its database.
Create wp-config with wp config create
The wp-config file is the configuration file that lets WordPress reach its database, and wp config create writes it from the shell rather than from a text editor. The developer points the command at three connection values and it generates wp-config.php inside the core tree already on disk:
The three flags map directly to the database the install will use. --dbname names the database WordPress reads and writes content to, --dbuser names the database account, and --dbpass supplies that account’s password. The values shown here are placeholders the developer swaps for the real database name, user, and password before running the command. Because the core files were downloaded into the working directory in the prior step, wp config create writes inside that tree, where WordPress expects its configuration to sit.
Configuration precedes database creation for one concrete reason: wp-config names the database that the next command creates. wp db create reads --dbname straight from this file, so the connection details have to be recorded first. Running config before the database also preserves the sequence in the shell, without a detour into a code editor to hand-edit constants.
If wp-config.php already exists in the directory, the command stops rather than overwrite it, and the developer moves the stale file aside or passes a force flag before re-running. With the credentials written, the database named inside the file is the next thing to bring into existence.
Create the Database with wp db create
The database is the store WordPress keeps its content in, and it has to exist before the install runs, which wp db create handles entirely from the command line. The command reads the name and credentials out of the wp-config file written in the prior step, so one short command stands in for a manual session at the MySQL prompt:
wp db create
This is the step that sets the all-command-line sequence apart from the routes other guides take. Rather than opening a raw MySQL shell and typing CREATE DATABASE by hand, the developer lets WP-CLI issue the statement, using the connection details already recorded in wp-config. The raw-MySQL path reaches the same result; wp db create replaces it with a single command that remains within the same workflow as every other step. MySQL and MariaDB both serve as the underlying engine, and the command runs against either.
The dependency points one direction: the database carries the exact name set in --dbname earlier, because wp db create pulls that value from wp-config rather than asking for it again. That is the reason configuration came first. If the database account named in wp-config lacks the CREATE privilege, the command returns a permission error, and the account is granted that privilege before the create succeeds.
Once the database exists under the name WordPress will look for, the final command turns the downloaded files and the empty database into a running site.
Run the Install with the WP Core install
The wp core install command finalizes the install: it populates the database, writes the initial settings, and turns the downloaded core plus the empty database into a working WordPress site. The command produces a site that responds to its address and accepts an administrator login. It takes the site address, the site title, and the first administrator account in a single call:
Each value shown is a placeholder the developer replaces with the real site details. The parameters split into two concerns: the ones that define the site itself, and the ones that create the administrator who signs in afterward.
Site URL and Title
The --url and --title parameters set the site’s public address and its name. WordPress stores --url as the Site Address setting it builds every link from, so the value matches the domain the site is served at, including the https:// scheme. The --title value becomes the site name shown in the browser tab and the administration header. Both write into the database during the install, and wp core install records them as the site’s identity the moment it completes.
Admin User and Credentials
The --admin_user, --admin_password, and --admin_email parameters create the first administrator account. WordPress writes this account into the users table as part of the install, so the credentials are live the instant the command finishes. --admin_user sets the login name, --admin_password sets the password the account signs in with, and --admin_email records the address WordPress sends administrative notices to.
A strong password matters here because this account holds full control of the site. With the site identity and the administrator both written, a single verification command confirms the result.
Verify the WordPress Install
Verifying the install means confirming WordPress is installed and reporting the version now running, and wp core version answers both from the shell. The command reads the installed core and prints the version number:
wp core version
A successful run returns a plain version string:
6.5.3
That version number is the confirmation. When wp core version reports a number, the core is present and the install completed; wp --info gives the same assurance from the tool’s side, listing the WordPress path alongside the WP-CLI and PHP details. If the command returns no version at all, the core files or the database connection are incomplete, and the developer re-checks the download and config steps before the version reports. Once the version prints, the command-line install is complete from requirements through verification, run entirely from the shell.
That completion is the point to step back from the install itself: first, to how the command-line route is distinguished from the browser-driven manual install; then, to where WordPress can be obtained without the shell at all; and, finally, to how a command-line install fits a version-tracked project.
WP-CLI Install vs the Manual Install
The WP-CLI install is the command-line method of bringing WordPress into existence, and it differs from the browser-driven manual install in that the work actually happens. The command-line install is a sequence of WP commands typed into the shell. The manual install is a different form of the same task: files are moved to the server via file transfer, and then the browser install screen collects the database details and the administrator account manually.
Both routes finish at the same running WordPress site, so the distinction is one of method, not of outcome. The command-line route is scriptable and repeatable, which is why agency engineers and system administrators favor it when multiple sites need to go up. The manual route is the natural choice when shell access is missing, or when a single site is being stood up once and never again. For the browser-driven walkthrough from the first file transfer to the final install screen, the “install WordPress manually” procedure outlines every file transfer and install screen step.
Download WordPress Without the Command Line
Downloading WordPress without the command line means obtaining the core files from the browser download page rather than from wp core download. The download page hands over the very archive that wp core download fetches, packaged for a manual transfer onto the server. A developer who prefers the browser route or needs the files on a machine with no shell at all can download WordPress from the official source and unpack the archive into the target directory.
That archive arrives as a single compressed file, the same release WordPress.org publishes for every channel, and the unpacked tree is byte-for-byte identical to what the command line pulls down. The transfer mechanism is a question of convenience and shell availability, never a question of which WordPress ends up on the server. A browser download, a release mirror, and wp core download run over a remote connection all leave the same folders and the same version string in place.
A command-line install also fits cleanly into a version-controlled project, where the core sits inside a checkout instead of a hand-copied folder. A team that tracks its site this way folds the core into the same repository discipline that governs the rest of the codebase, following the conventions of the WordPress Git repository structure that version-controls a site. The core tree behaves the same whichever way it lands, ready for configuration and the install command.
Every route into a running install, the command-line method and the browser method alike, is mapped in the parent guide on how to install WordPress.


 Gemini