Explore our specialized services, tailored solutions, and industry expertise to elevate your digital presence. From custom WordPress development to seamless integrations, we build high-performing websites that deliver impact.
Migrating a Squarespace site to WordPress means moving every working part of an existing Squarespace 7.0, 7.1, or Squarespace Commerce site onto a self-hosted WordPress.org destination, then leaving Squarespace behind once the new site is verified.
Squarespace and WordPress serve different audiences. Businesses comparing Squarespace vs WordPress for ecommerce often migrate when they need greater scalability, plugin flexibility, or advanced customization capabilities.
This guide assumes the decision to move has already been made and covers the migration itself. The process unfolds from feasibility checks through a full site audit, mapping content into a migration matrix, handling the domain, exporting and importing data, aligning permalinks, rebuilding custom code, managing products, validating images, implementing redirects, and completing quality assurance before launch.
Squarespace-to-WordPress Transfer Feasibility
Squarespace-to-WordPress transfer feasibility describes whether a given Squarespace 7.0, 7.1, or Commerce site can be moved onto self-hosted WordPress at all, and on what conditions.
The reader’s query “can you transfer a Squarespace website to WordPress?” resolves to a yes-with-caveats answer:
pages, blog posts, basic text, and one blog feed export cleanly through Squarespace’s WordPress-formatted XML;
image references travel inside the XML as Squarespace CDN URLs (the binaries themselves need re-hosting once the Squarespace subscription lapses, which the dedicated image-import procedure handles);
and products, custom CSS, custom JavaScript, image galleries, forms, embedded audio and video, and password-protected pages do not survive the official path and require rebuilding.
Every Squarespace site can be moved, but the share of the work that can be automated depends on how much of the site lies outside the basic blocks the importer reads.
Three conditions decide whether the transfer is straightforward or substantial:
Content shape: a text-and-image blog with a handful of pages migrates without any per-section rebuild, while a Commerce site with custom CSS and gallery layouts requires a full hand rebuild for the parts the XML leaves behind.
Вestination readiness: a self-hosted WordPress install on a chosen host, with a domain plan and a starting theme already in place, is the prerequisite the official import path assumes.
Overlap timing: keep the Squarespace subscription active for one to two weeks after the cutover so the old site stays reachable while the new WordPress site absorbs traffic, redirects fire, and the team catches anything the cutover missed before you delete the old WordPress site.
Pre-Migration Squarespace Site Inventory
The pre-migration Squarespace site inventory is the catalog a site owner builds before any export action: every page, post, product, asset, and custom-code integration currently published on Squarespace, recorded in one place so nothing slips through the cutover.
Squarespace-to-WordPress walkthroughs from WordPress.com, 20i, or BigScoots open with this step, which is why most Squarespace-to-WordPress migration guides skip it and discover the gaps after the import has already finished.
Recording inventory first reverses that order: the Squarespace site becomes a known input, the asset matrix becomes the planning artifact, and the destination work that follows has a complete reference against which to verify itself.
A pre-migration Squarespace site inventory captures 11 asset categories:
pages (every standalone page in the Squarespace navigation, including hidden and unlinked pages)
blog posts (every post on every blog page, with categories, tags, and authors recorded)
Squarespace Commerce products (full catalog with prices, variants, SKUs, descriptions, and product images)
media assets: images, videos, and downloadable files served from the Squarespace content delivery network
image galleries (each gallery’s images, ordering, captions, and the page it appears on)
forms (each Squarespace form, the fields it carries, and where submissions are routed)
custom CSS injections from Design → Custom CSS
custom JavaScript injections from Settings → Advanced → Code Injection (header and footer)
embedded third-party apps and code blocks (audio players, video players, calendars, scheduling widgets)
member-only and password-protected pages, with member tiers and access rules noted
the existing URL structure, captured as a flat list of every published path on the site
Two further inputs round out the inventory.
Snapshot the live Squarespace site with a Wayback Machine capture or a wget mirror so the rendered output exists outside Squarespace once the subscription lapses.
Then list the SEO assets to preserve: top-traffic pages from analytics, ranking queries from Search Console, and the highest-value backlinks pointing to the existing Squarespace URLs (the URL redirect map uses this list as input).
A typical small-business Squarespace site holds 10 to 50 pages and 0 to 500 blog posts, which is manageable in a spreadsheet. A Commerce catalog with several hundred products warrants a CSV export from the start.
Once the inventory is complete, the asset matrix splits along a single boundary: Squarespace content that does not transfer through the official import path, and Squarespace content that does.
Squarespace Content That Does Not Transfer to WordPress
Squarespace content that does not transfer to WordPress is half of the inventory that the official Squarespace XML exporter cannot carry, which is why any answer to “how to transfer a Squarespace website to WordPress” begins with this list, because the work the exporter cannot do is the work that decides project scope.
The exporter understands a narrow set of basic page, post, and block types, and writes out only the records that have a clean WordPress equivalent. Everything else either lives inside Squarespace-only block types, lives in subsystems the exporter never visits (Commerce, member areas), or sits in code-injection slots that are by design separated from page content.
The non-transferring content fits into a procedural matrix, organized asset class by asset class:
Asset class on Squarespace
Why it does not transfer through the XML
Where the rebuild happens
Squarespace Commerce products
Commerce data lives in a separate catalog subsystem the XML schema cannot represent
Through a Squarespace Commerce CSV that WooCommerce imports natively
image galleries (gallery blocks beyond the basic block)
Gallery layouts and ordering are Squarespace-specific configurations that the importer flattens
Through a per-gallery rebuild on a native WordPress gallery surface
custom CSS injections (Design → Custom CSS)
Custom style code sits in a settings panel the exporter does not read
Through Appearance → Customize → Additional CSS or a child theme’s style.css
Code integrations sit outside page content and are excluded from the XML
Through the WPCode plugin’s Header and Footer slots
forms (Squarespace native form blocks)
Forms bind to Squarespace’s submission backend, which does not exist on WordPress
Rebuilt with Contact Form 7, Gravity Forms, or WPForms (common options, named not ranked)
audio and video files (Squarespace-hosted media)
The exporter writes references but not the binary media for non-image types
Manual re-upload into the WordPress media library
password-protected pages
Page-level access rules are Squarespace settings the XML cannot carry
Rebuilt with a WordPress membership or page-protection plugin
member content (Squarespace member areas)
Member areas live in a Commerce-adjacent subsystem outside the XML scope
Rebuilt with a WordPress membership plugin
Eight rows are the working count to plan against. The first four rows (products, image galleries, and the two custom-code injection paths) each warrant their own procedural treatment because they involve enough WordPress-side mechanics to require a walkthrough. The remaining four rows are matrix-level mentions, naming the WordPress plugin category that handles the rebuild without expanding into a procedural walkthrough. A content-only marketing site rarely owns more than the first three rows; a Squarespace Commerce site with member content can own all eight.
Squarespace Content That Transfers to WordPress
Squarespace content that transfers to WordPress is the complement to the non-transferring matrix: the five asset classes the official Squarespace XML exporter writes out cleanly, and the WordPress importer reads back without manual reshape.
The Squarespace-formatted XML uses the same record schema as WordPress’s own export. Hence, the import side recognizes every record it encounters and lands each one in the right WordPress object table. The clean half of the matrix is what makes the whole Squarespace-to-WordPress migration tractable via a single tool path rather than five separate ones.
Five asset classes travel cleanly through the official Squarespace XML export:
Asset class on Squarespace
What the export captures
What the import preserves
blog posts
full post body, publish dates, categories, tags, authors, comments
post records under Posts, with comment threads attached
pages (layout pages with text, image, and basic gallery blocks)
page body, hierarchy, draft/published state
page records under Pages, hierarchy preserved
categories and tags
taxonomy terms attached to posts
the same taxonomy terms, attached to the same posts
authors
author byline and email on each post
a WordPress user account per author, created or matched at import
basic text formatting
bold, italic, headings, lists, links inside the body
rendered the same way in the WordPress block or classic editor
Five rows is the limit of what the official path can do without manual help, which is why an export Squarespace blog to WordPress workflow is the cleanest sub-path inside the broader Squarespace-to-WordPress migration: a content-only blog with no Commerce, no custom code, and no native forms can import most of its body in one importer run, then leave only image re-hosting as the residual task.
A heavier Squarespace footprint still runs the same export step, then picks up the per-asset rebuilds of the non-transferring matrix already promised. One prerequisite comes before either flavor of import: the destination domain. The WordPress site needs to be reachable at the address visitors expect before the redirect map, and cutover steps can land, which is why the domain transfer comes before the export and import procedures rather than after them.
How to Transfer a Squarespace Domain to WordPress
Transferring a Squarespace domain to WordPress means moving the production address visitors already type (typically a custom domain purchased through Squarespace Domains or imported from a third-party registrar) to the new self-hosted WordPress installation via one of two procedures.
The “transfer Squarespace domain to WordPress” task splits along an ownership-and-resolution boundary that the two routes encode directly.
The first route keeps the domain registration where it is and only repoints the live address records that resolve the domain to a server: this is DNS pointing, faster to execute, and reversible by changing the records back.
The second route moves the registration itself off Squarespace and onto a registrar associated with the WordPress host or a standalone domain provider: this is a full registrar transfer, slower due to the inter-registrar approval window, and final once the transfer completes. Both routes end at the same outcome (the WordPress site answers when the domain is visited).
The choice between the two routes turns on three conditions:
Timing: a DNS repoint takes effect within propagation windows typical of 24 to 48 hours for most public DNS resolvers, while a registrar transfer needs the inter-registrar approval window to clear, which Squarespace documents as a 5 to 7 day overlap typical for domain transfers under ICANN policy.
Registrar relationship: a site owner who is also leaving Squarespace’s billing entirely will route the domain off Squarespace, while a site owner who is comfortable keeping the registrar contract at Squarespace can leave it there and only change where the records resolve.
WordPress-side domain rename procedure (the wp-config.php constants, the database search-replace, and the .htaccess updates that adjust WordPress’s own internal record of its address), which is documented in the dedicated walkthrough on how to change a WordPress domain name, the depth handoff for site owners who need the destination-side mechanics in detail.
DNS pointing handles the simpler route; full registrar transfer handles the route that ends Squarespace’s billing for the domain. DNS pointing comes first, registrar transfer second.
Squarespace Domain DNS Pointing to WordPress
Squarespace domain DNS pointing to WordPress means keeping the domain registration at Squarespace and only changing the address records (the A record and the CNAME record). Hence, the domain resolves to the new WordPress host instead of the Squarespace servers it currently resolves to. The domain stays registered at Squarespace; only the live answer to “where does this domain go” moves. The Squarespace billing relationship for the registration continues; the WordPress host begins answering for the domain as soon as DNS records propagate.
DNS pointing involves four record edits in the Squarespace domain panel:
locate the existing A record (the IPv4 record that resolves the apex domain) and replace its target IP with the WordPress host’s published apex IP value
locate the existing CNAME record on the www subdomain (or any other subdomain Squarespace publishes) and replace its target with the WordPress host’s published CNAME target
add or update the AAAA record (IPv6) if the WordPress host publishes one, using the host’s documented value
edit any Squarespace-specific verification or auxiliary records the new host does not need (TXT verification records can stay until cutover is verified, then be removed).
Each WordPress host publishes the exact A, CNAME, and AAAA values it expects in its own DNS record reference documentation, which is the source of truth for what to write in the records. A typical propagation window of 24 to 48 hours follows the edit; some visitors continue resolving the domain to Squarespace while others already resolve it to WordPress, which is why both endpoints need to serve consistent content during the overlap and why the redirect map and verification work happen on the WordPress side ahead of cutover, not after it. DNS pointing leaves an open question for site owners who also want to sever Squarespace billing for the domain itself: that requires a full registrar transfer.
Transferring the Squarespace Domain Registration to WordPress
Transferring the Squarespace domain registration to WordPress means moving the registration record itself from Squarespace to a registrar associated with the WordPress destination, typically the one that ships with the host’s domain product or a standalone registrar the site owner already uses. Squarespace billing for the domain ends at the registrar transfer; the WHOIS record updates to the new registrar; and the A and CNAME records that DNS pointing handles separately can be set at the new registrar from the moment the transfer lands.
The full registrar transfer follows a five-step procedural sequence:
clear the registrar lock on the domain inside the Squarespace domain panel (Squarespace publishes this control as the transfer-out toggle, with wording that varies by panel version)
retrieve the EPP code (also called the authorization code or auth code) Squarespace generates for the transfer; the new registrar requires this code as proof of authorization
initiate the transfer at the new registrar by entering the domain name and the EPP code on the registrar’s transfer-in page; the new registrar contacts Squarespace to confirm
approve the transfer-confirmation email Squarespace sends to the registrant address on file; without this approval, ICANN’s inter-registrar transfer policy holds the transfer pending
wait for the transfer to complete inside the inter-registrar approval window, typically 5 to 7 days under standard ICANN policy, sometimes shorter when both registrars expedite
The registrar transfer covers domain ownership and billing. It does not, by itself, change which server answers when the domain is visited; that is still a separate set of A and CNAME records at whichever registrar the domain ends up at. A site owner who pursues this route also follows the WordPress-side rename procedure documented in the WordPress domain change walkthrough when WordPress’s internal references to the address need updating: the wp-config.php site URL constants, the database table values, and the rewrite rules that depend on the address. Both routes (DNS pointing and a full registrar transfer) leave the WordPress installation reachable at its production address, ready to receive the content generated by the official Squarespace XML export.
How to Export a Squarespace Site to WordPress
Exporting a Squarespace site to WordPress involves running the official Squarespace exporter and downloading a WordPress-formatted XML file that the destination installation will read during the import. The export Squarespace to wordpress workflow is bound by the asset-transfer matrix: only the five cleanly-transferring asset classes pass through this exporter; everything in the non-transferring matrix is rebuilt through the procedure dedicated to its own asset class.
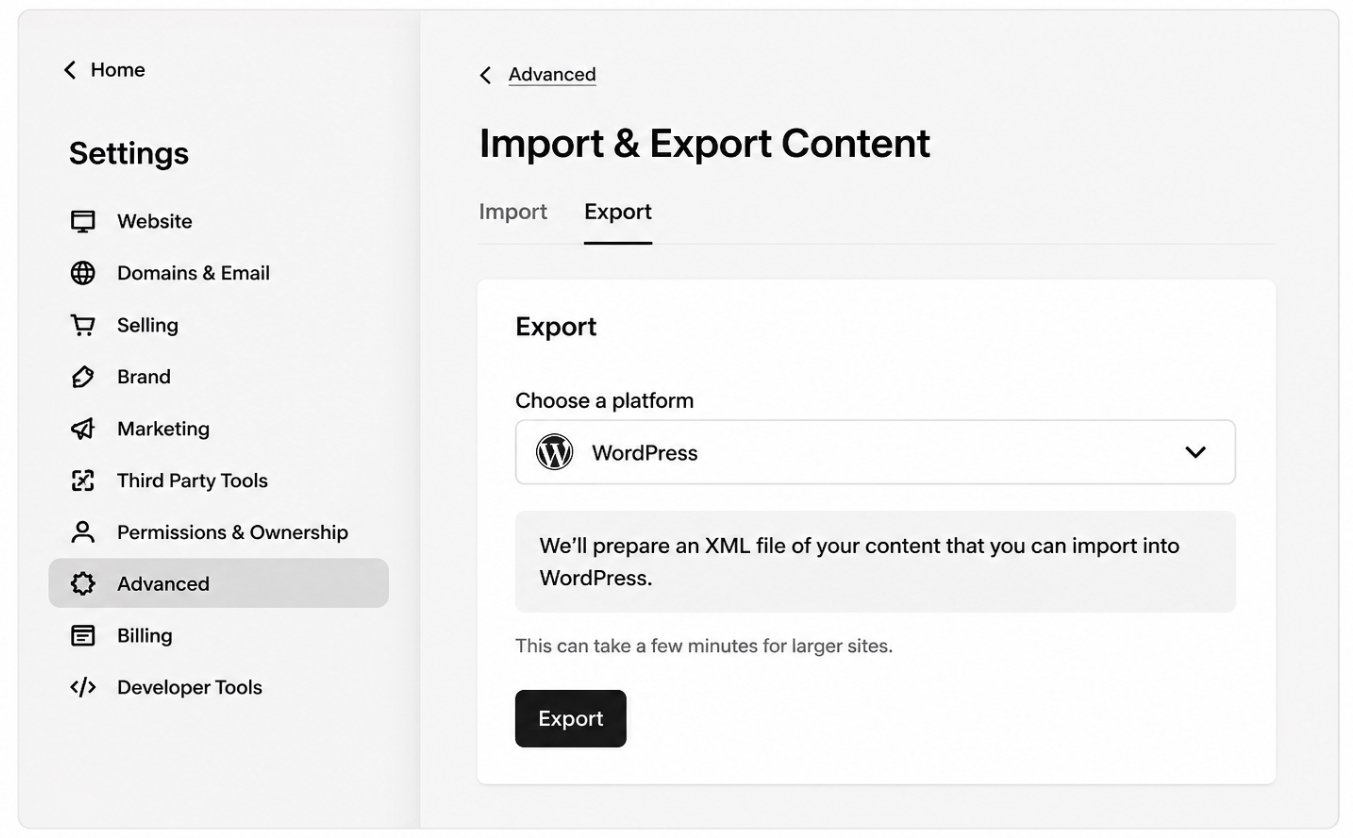
The Squarespace export procedure runs from the dashboard:
open the Squarespace dashboard, then go to Settings → Advanced → Import & Export Content
click Export to open the format selector
choose WordPress as the export format
wait for Squarespace to generate the XML file (typically under a minute on a content-only site, longer for sites with hundreds of posts)
download the XML file to local disk when Squarespace marks the export as ready
A source-version note applies. A Squarespace 7.0 site uses the same panel path, with one exporter run per blog page, producing one XML file per blog. A Squarespace 7.1 site uses the same panel path and exports the consolidated site model in a single run. Squarespace documents the exporter as a one-shot tool: a re-export captures whatever is in Squarespace at the moment it runs, so a content freeze before the export keeps the XML and the live site aligned.
How to Import a Squarespace XML File to WordPress
Importing a Squarespace XML file into WordPress involves running the WordPress Importer plugin against the XML the exporter generated, uploading the file through the WordPress dashboard, and letting the importer create destination records that mirror what Squarespace exported. The import is the destination-side complement to the export. The import Squarespace to wordpress procedure depends on the XML the exporter produced and on the WordPress installation being reachable at its production address.
The WordPress importer procedure runs from the dashboard:
open the WordPress dashboard, then go to Tools → Import
find the WordPress row in the importer list and click Install Now (the importer is a first-party WordPress.org plugin; the dashboard installs and activates it inline)
click Run Importer once installation finishes
upload the Squarespace XML file from local disk through the file-upload field
choose the author assignment for imported posts (assign each imported byline to an existing WordPress user, or create a new WordPress user account for that author)
toggle the “Download and import file attachments” option (WordPress will fetch external image URLs the XML references and place copies in the media library; on Squarespace XML the toggle succeeds for some images and fails for others, which is the gap the image-import procedure resolves)
run the import and review the import log when the importer reports completion
The importer captures the five cleanly-transferring asset classes the matrix already named. It does not capture the non-transferring half the inventory called out; rebuilds for those classes live in the asset-class procedures the matrix already routed each row to.
WordPress Permalinks After Migrating from Squarespace
WordPress Permalinks After Migrating from Squarespace is the permalink-structure decision that follows the import and precedes the redirect map: the URL pattern WordPress writes for posts and pages, configured at Settings → Permalinks, chosen to match the shapes the redirect map will translate Squarespace paths into.
The Squarespace to wordpress migration depends on this alignment because every redirect rule points an old Squarespace URL at a new WordPress URL; if the WordPress URLs are still on the default Plain pattern (/?p=123), the redirect targets are unstable, and the rules need a rewrite before launch.
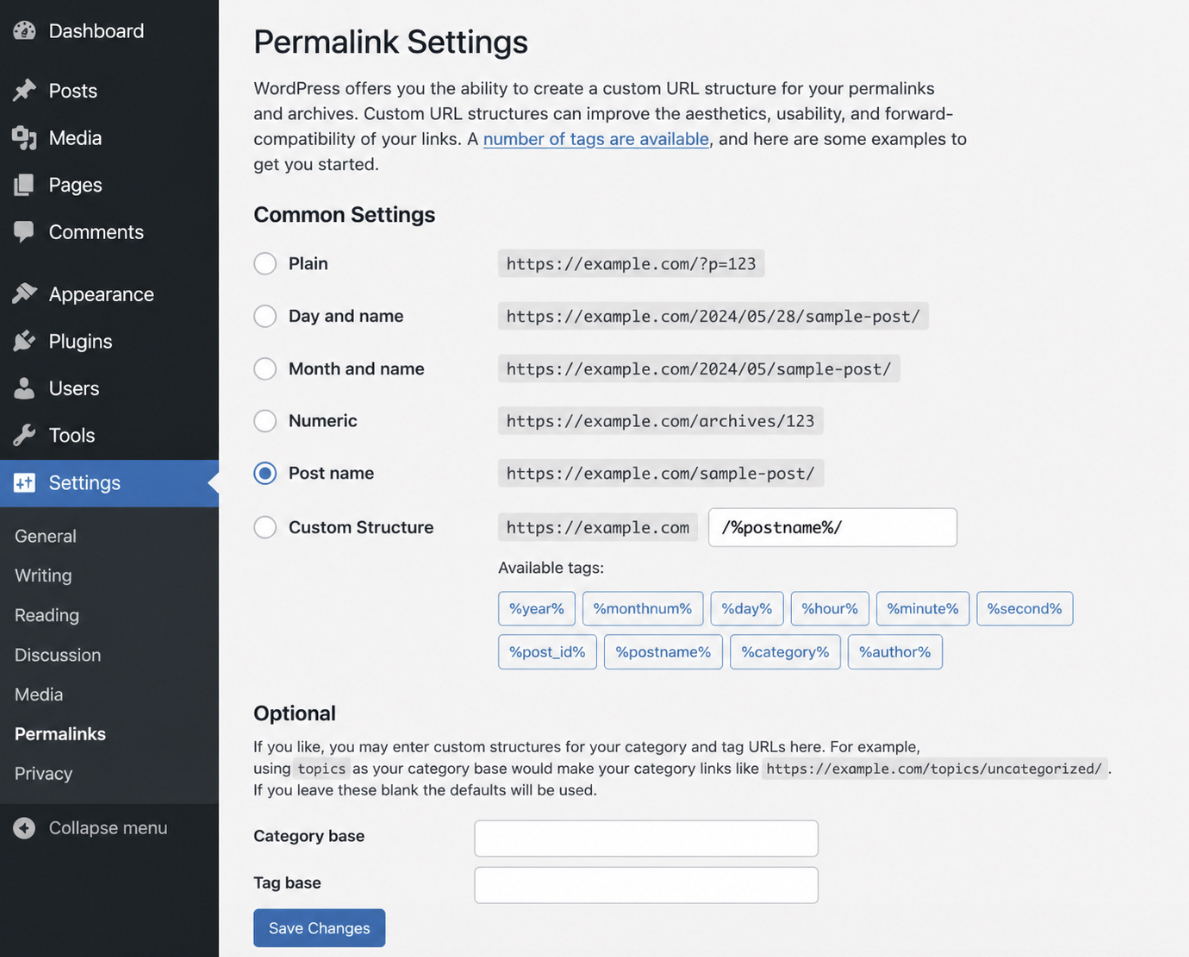
WordPress publishes five permalink structures at Settings → Permalinks; the choice for a site migrating from Squarespace is typically one of three:
Post Name (/sample-post/) is the closest match to Squarespace’s slug-based URLs and the common pick for blog-led sites; the redirect map can point each old URL at the same slug under WordPress
Day and Name (/2025/05/04/sample-post/) matches Squarespace blog URLs that already include date segments; the redirect map writes the date prefix into each rule
Custom Structure (/blog/%postname%/) covers Squarespace sites that published the blog under a /blog/ parent path the WordPress destination should preserve; the custom field accepts WordPress permalink tags
The procedure takes two clicks: open Settings → Permalinks, select the matching structure, save changes. WordPress rewrites the .htaccess rules in place (on Apache hosts; nginx hosts use server-block directives, so the equivalent rewrite lives in the host’s nginx configuration rather than in .htaccess); existing post and page records start answering on the new URL pattern immediately.
The permalink decision is the foundation on which the URL redirect mapping depends. Once permalinks are saved, the WordPress URL pattern is fixed, and the asset-class fix procedures that complete the non-transferring half of the matrix can run before the cutover writes the redirect rules.
How to Move Squarespace Custom Code to WordPress
Moving Squarespace custom code to WordPress means handing two non-transferring asset classes across the cutover by hand:
and custom JavaScript entered in Squarespace’s Settings → Advanced → Code Injection panel.
Neither sits inside page content, so the official Squarespace XML exporter does not read either panel, which is why any complete answer to “how to move from Squarespace to wordpress” treats custom code as a hand-carried asset class.
The Squarespace to wordpress migration covers each one through a separate destination procedure:
Squarespace custom CSS payloads land at the WordPress theme’s Additional CSS surface in the Customizer (or at the theme’s style.css file for permanent child-theme rules)
Squarespace JavaScript injections land at the WPCode plugin, which exposes Header and Footer slots that mirror Squarespace’s two Code Injection fields.
Both rule sets typically port without transformation, because each Squarespace panel holds standard CSS and JavaScript rather than platform-specific dialects.
Custom CSS Handoff
The custom CSS handoff is the procedural transfer of Squarespace’s Design → Custom CSS rules into one of two WordPress destinations: Appearance → Customize → Additional CSS for theme-scoped rules that should survive a theme change through the Customizer, or the theme’s style.css file for rules that belong permanently to a child theme. The CSS rules themselves do not change between platforms; only the panel they live in does.
The custom CSS copy procedure runs in five steps:
open the Squarespace dashboard, then go to Design → Custom CSS, and copy every rule the panel holds
open the WordPress dashboard, then go to Appearance → Customize → Additional CSS, and paste the copied rules into the editor
preview the WordPress site through the Customizer’s preview pane and verify the visual parity against the live Squarespace site
publish the Customizer change so the rules take effect on the front end
as an alternative path for rules that belong to a child theme, paste the copied rules at the end of the child theme’s style.css file through Appearance → Theme File Editor (a child theme is recommended so the rules do not vanish on the next parent-theme update)
A single Squarespace rule typically drops in unchanged: a font override that reads body { font-family: ‘Inter’, sans-serif; } on the Squarespace side reads exactly the same way in WordPress Additional CSS. Selectors do not always match across themes, since Squarespace and WordPress themes name their elements differently, so a rule that targets a Squarespace template class may need its selector renamed to the WordPress theme’s equivalent class before it applies.
Custom JavaScript Handoff
The custom JavaScript handoff is the procedural transfer of Squarespace’s Settings → Advanced → Code Injection entries (Header and Footer) into the WPCode plugin on WordPress, which exposes the same two slots. WPCode is a free WordPress.org plugin that hosts header and footer snippets without requiring theme file edits, which is the WordPress equivalent of Squarespace’s Code Injection panel at the platform level.
The custom JavaScript copy procedure runs in six steps:
open the Squarespace dashboard, then go to Settings → Advanced → Code Injection, and copy the Header field and the Footer field into a local file separately
open the WordPress dashboard, then go to Plugins → Add New, search for WPCode, and install and activate the plugin
open Code Snippets → Header & Footer in the WordPress dashboard
paste the Squarespace Header content into WPCode’s Header tab, and the Squarespace Footer content into WPCode’s Footer tab
save the WPCode configuration
load a public-facing WordPress page and verify the script tags render in the same document positions they previously held on the Squarespace site
A typical Squarespace footer injection ports as written: an analytics tag that reads <script async src=”https://www.googletagmanager.com/gtag/js?id=G-XXXX”></script> on Squarespace’s Footer field reads identically inside WPCode’s Footer tab. WPCode honors <script> tags in the snippet body, so the snippet needs no wrapping or rewriting to work. Snippets targeting a Squarespace block class may need a selector update to the WordPress equivalent so the script reaches the correct element.
The custom-code handoff closes the non-transferring code asset classes named in the matrix. Squarespace Commerce products complete the remaining major procedural classes, and they travel through their own CSV-based path into WooCommerce.
How to Migrate Squarespace Commerce Products to WordPress
Migrating Squarespace Commerce products to WordPress means moving the product catalog out of Squarespace’s Commerce subsystem and into WooCommerce on the WordPress destination, via the CSV export and CSV import paths that both platforms support natively. Commerce records live in a separate catalog subsystem that the official Squarespace XML schema does not represent, so the data does not pass through the XML exporter that already carries pages and posts.
The CSV path is the dedicated route the matrix flagged, and it runs in two halves: a CSV export on the Squarespace side, then a CSV import on the WordPress side. Squarespace produces a Commerce-Inventory CSV that lists every product with its core fields; WooCommerce has a built-in importer that reads CSVs and creates one product per row, with field mapping for any source columns that do not align by default.
Exporting the Squarespace Commerce Products CSV
The Squarespace Commerce products CSV export is the source-side step that produces a single comma-separated file containing every product currently in the Squarespace Commerce catalog, with one row per product variant. The exporter defines a fixed schema that includes product titles, descriptions, prices, SKUs, stock counts, variant attributes, hosted product image URLs, and category tags. Squarespace generates this CSV from the Commerce → Inventory panel rather than from the general Settings → Advanced → Import & Export Content panel that produces the XML, so the Commerce export is a separate action from the content export already completed.
The Squarespace Commerce CSV export procedure runs in four steps:
open the Squarespace dashboard, then go to Commerce → Inventory
click the Export button at the top of the Inventory panel
wait for Squarespace to assemble the CSV (typically under a minute on small catalogs, longer on catalogues with several hundred variants)
download the CSV file to local disk when Squarespace marks the export as ready
The CSV holds product data only; product images travel as URLs that point at Squarespace-hosted CDN locations rather than as embedded binaries. The WooCommerce importer fetches those URLs at import time, with the same plugin-tolerance caveat the broader Squarespace image arc carries: a hosted image whose CDN URL still resolves lands cleanly, while an image whose URL has already moved becomes the gap the image-import procedure resolves.
Importing the Products CSV into WooCommerce
The WooCommerce CSV import is the destination-side step that reads the Squarespace Commerce CSV and creates one WordPress product post per row, populating the Product fields WooCommerce exposes (regular price, sale price, stock status, SKU, weight, dimensions, attributes, gallery images). WooCommerce ships with a built-in CSV importer accessible from the WordPress dashboard, so no third-party plugin is required for the standard import path; the importer includes a column-mapping screen that maps each CSV column to a WooCommerce product field.
The WooCommerce CSV import procedure runs in seven steps:
activate WooCommerce on the WordPress destination through Plugins → Add New if it is not already active (WooCommerce installs the Products data structure WordPress needs for the import to land)
open the WordPress dashboard, then go to Products → All Products → Import at the top of the listing
choose the Squarespace Commerce CSV file from local disk and click Continue
review the column-mapping screen: WooCommerce auto-matches the column names that align by default (Title, Regular price, SKU, Stock), and exposes a manual dropdown for each column whose Squarespace name differs from the WooCommerce field name
map any unmatched columns to the correct WooCommerce field, or set them to “Do not import” if they hold data WooCommerce does not accept
click Run the importer and let WooCommerce process the file
review the import log when WooCommerce reports completion, and open Products → All Products to verify each product page renders with the correct price, variants, stock count, and gallery images
A single round-trip suffices for the typical small-business catalog. Larger catalogs that exceed the host’s PHP upload limit split cleanly into multiple CSVs of a few hundred rows each, imported one after the other with the same column mapping reused between runs. Once WooCommerce reports a clean import on the final batch, the Squarespace Commerce data has landed on WordPress, leaving the Squarespace-hosted image binaries (the asset class the XML import did not pull cleanly) as the remaining non-transferring class to resolve.
How to Import Squarespace Images
How to import Squarespace images means re-hosting the picture files referenced in already-imported WordPress posts onto the WordPress media library, since the official Squarespace XML export carries image references as Squarespace CDN URLs rather than embedded binaries, which is why any export Squarespace blog to wordpress workflow lands the post body cleanly but leaves the picture files themselves to a separate re-host step.
Once the Squarespace site is decommissioned, all Squarespace CDN URLs break, and the affected posts render with broken-image placeholders. The image re-host splits into three sub-paths: plugin-automated rewriting for the bulk case, manual download-and-re-upload for the small or atypical case, and gallery rebuild for the proprietary Squarespace gallery surface.
Auto Upload Images Plugin
The Auto Upload Images plugin is a free WordPress.org plugin that scans every imported post for image references whose URLs sit outside the WordPress site, downloads each external image into the WordPress media library, and rewrites the post HTML so the references point at the new WordPress URLs. The plugin recognises the Squarespace CDN domain as an external host and applies the rewrite uniformly.
The install and run procedure runs in four steps:
open Plugins → Add New, search for “Auto Upload Images”, click Install Now, and Activate
open Posts → All Posts, select every imported post, choose Edit from Bulk Actions, and click Apply (the plugin re-saves each post and triggers the URL scan)
wait for the bulk re-save to complete (duration scales with post and image count)
inspect a sample post’s image src attribute to verify the URL points at the WordPress media library rather than the Squarespace CDN
The plugin resolves the typical bulk case without further configuration. A small fraction of posts may still hold a residual Squarespace URL when the original CDN object has already moved; those fall through to the manual fallback.
Manual Download and Re-Upload
Manual download and re-upload is the fallback procedure for cases where the plugin path does not fit: a managed-WordPress host that blocks the plugin’s outbound HTTP fetches, an image set small enough that hand-handling is faster, or a post-set where the Squarespace CDN URLs no longer resolve. The procedure carries the image files across by hand.
The manual procedure runs in five steps:
enumerate every Squarespace image URL referenced by the affected posts, from browser developer tools or by sampling each post’s HTML
download each image file from the live Squarespace site, naming files so the source post is recoverable
open Media → Library → Add New on WordPress and upload the image batch
edit each affected post’s HTML to swap every Squarespace CDN URL for the corresponding WordPress media library URL
save each post and reload its front-end page to confirm every image renders from the WordPress origin
The manual path scales linearly with the affected image count, so it suits tail-end fixes after the plugin run rather than a primary recovery strategy.
Squarespace Image Gallery Rebuild
The Squarespace image gallery rebuild is a separate procedure from the per-image re-host because the Squarespace gallery block is a proprietary layout component with no direct WordPress equivalent in the XML payload. The constituent image files transfer cleanly via either the plugin or manual path, but the gallery’s grid layout, click-through behaviour, and lightbox composition do not survive the export. Each gallery is reconstructed in the WordPress destination using a native gallery surface.
The per-gallery rebuild procedure runs in five steps:
enumerate every Squarespace gallery from the pre-migration inventory, recording its source page, image set, and original layout
open the page or post that should host the rebuilt gallery, and add a Gallery block (Gutenberg’s native option), or use Elementor or Bricks gallery widgets if the WordPress site already runs one
add the constituent images to the new gallery from the WordPress media library
choose a layout matching the original Squarespace presentation: grid, masonry, or slideshow are the common shapes
publish the page and verify the gallery renders, captions display where set, and click-through behaviour matches the Squarespace site
A site with a handful of galleries finishes in a single session; larger sets spread across several sessions, and the pre-migration Squarespace site inventory serves as the source-of-truth checklist. With image references repointed and gallery layouts rebuilt, the WordPress side now exposes stable destination URLs for every imported asset class, which is the precondition the URL redirect map needs to pair each old Squarespace path with its WordPress equivalent.
Squarespace-to-WordPress URL Redirect Mapping
Squarespace-to-WordPress URL redirect mapping is the cutover procedure that translates every published Squarespace URL pattern into its corresponding WordPress URL pattern, then serves a 301 (permanent) redirect from each old URL to its new destination, so the WordPress site captures the ranking equity and inbound link value that the Squarespace URLs have already accumulated.
None of the Squarespace-to-WordPress walkthroughs from WordPress.com, 20i, or BigScoots provides a Squarespace-pattern → WordPress-pattern map, which is the cutover-step gap this procedure fills. The Redirection plugin (free, WordPress.org) is the canonical WordPress instrument that serves the map at request time.
The redirect map pairs a small set of Squarespace URL patterns with the WordPress URL patterns the destination exposes after the permalink decision:
Squarespace URL pattern
WordPress URL pattern
/blog/post-slug
/blog/post-slug/ (under /blog/%postname%/)
/page-slug
/page-slug/ (under Post Name permalink)
/shop/product-slug
/product/product-slug/ (WooCommerce default)
/galleries/gallery-slug
/gallery-slug/ or the rebuilt-gallery host page
The redirect mapping procedure runs in five steps:
build the URL-map artifact as a two-column spreadsheet, sourced from the URL inventory captured during the pre-migration audit
install the Redirection plugin via Plugins → Add New, then activate it
open Tools → Redirection, choose Import / Export, and import the URL-map CSV into Redirection’s source-target list
test a representative sample of redirects with a 301-checker (a Squarespace URL request should resolve to a 301 pointing at the WordPress URL, with the final response from the WordPress origin)
keep the Squarespace subscription active for a one-to-two-week overlap so redirects the inventory missed can still be captured against the live Squarespace surface
The redirect map is a non-optional cutover artifact. Without it, every external link to a Squarespace page or product silently breaks the moment Squarespace stops serving the site, and the ranking history accumulated under the Squarespace URLs does not transfer to the WordPress equivalents. The redirect-effective window is immediate, and the post-migration verification pass confirms each row resolves end-to-end before the cutover is declared complete.
The Squarespace-to-WordPress post-migration QA checklist is the closing verification pass any Squarespace to wordpress migration guide needs to ship before declaring the move complete: it confirms every imported asset class has landed correctly on the WordPress destination before the Squarespace subscription is allowed to lapse. The checklist runs once on cutover day, before DNS pointing finalizes, and again forty-eight hours later (a typical stabilization window) once DNS propagation has settled across regional resolvers — DNS propagation typically completes within twenty-four to forty-eight hours, though tail-end resolvers occasionally lag.
The checklist covers the per-asset-class verification points the asset-class migration matrix names:
every imported page renders correctly on the WordPress front end, matching the structural composition and blocks of the Squarespace source
every internal link resolves to its WordPress destination, and every external link still reaches the third-party site it referenced
every redirect row in the URL map returns a 301 status when requested (sample at least one URL per pattern row; for large inventories, sample ten percent or one hundred rows, whichever is smaller)
every form submits without error, and every WooCommerce product page renders with the correct price, variants, stock, and gallery images for Squarespace Commerce sites
every image loads from the WordPress media library (with alt text restored where Squarespace originals carried it), and every Squarespace gallery has a rebuilt WordPress equivalent
the WordPress sitemap is regenerated and submitted to Google Search Console, with the post-cutover ranking-check window allowed to settle over two-to-four weeks
page-load time on representative pages is acceptable on the new WordPress host, measured against the Squarespace-hosted baseline
This checklist closes the procedural arc of the WordPress migration, the broader parent reference covering migration into WordPress from any source CMS, by anchoring the Squarespace-specific verification against the cross-platform pattern the parent establishes. A general WordPress migration checklist supplements these Squarespace-specific points with items common to every migration shape, and the migration is complete once both lists come back clean.
 | updated:


 Gemini