Explore our specialized services, tailored solutions, and industry expertise to elevate your digital presence. From custom WordPress development to seamless integrations, we build high-performing websites that deliver impact.
The WordPressdatabase is the MySQL data store that stores a site’s content, settings, users, comments, and metadata. To access the WordPress database, practitioners usually use phpMyAdmin, a browser-based database tool provided through a hosting control panel or managed WordPress dashboard.
Access requires two things: the database credentials found in the site’s wp-config.php file and a host entry point where phpMyAdmin can be opened. From there, the process moves from identifying the correct database name to opening phpMyAdmin and finding the wp_ tables that hold the site’s WordPress data.
This guide covers the access journey end to end, starting with what the WordPress database is, then moving through credentials, phpMyAdmin access, and the core tables you need to recognize once you are inside.
What Is the WordPress Database?
The WordPress database is a MySQL relational database, identified across its tables by the wp_ prefix that WordPress stamps on each one at install time. It is a structured store, with rows and columns organized into named tables, not a folder of files, and that distinction is the reason the data for a WordPress site is reached through a database tool rather than through a file manager.
What the database holds sorts into a few clear groups:
Content: the posts and pages, kept mainly in wp_posts.
Settings: the site options WordPress reads on every request, stored in wp_options.
User accounts: login records and profiles, held in wp_users.
Metadata: the small key-value records that attach extra detail to posts, users, and other objects.
The MySQL engine underneath is the relational database WordPress was built to run on, and access to the data does not depend on which engine variant a host ships. WordPress chose the database name and connected to it during installation, and it authenticates against it the same way on every page load. Those installation-time credentials are exactly what phpMyAdmin asks for before it will open the same database.
Which Credentials Connect phpMyAdmin to the WordPress Database?
phpMyAdmin connects to the WordPress database with three credentials: the database name, the database user, and the database host. These are the same values WordPress itself uses on every request, so providing them is what points the tool at the correct database instead of leaving it to guess.
All three are stored in wp-config.php, the configuration file in the site’s root directory, written as the constants DB_NAME, DB_USER, and DB_HOST:
To locate them, the practitioner opens wp-config.php in the root of the WordPress files — the same folder that holds wp-admin and wp-content, and reads the three lines. DB_NAME names the database phpMyAdmin should select, DB_USER is the account it signs in as, and DB_HOST is the server address it connects through, set to localhost when the database runs on the same server, or to a separate host name when it runs on its own server.
Access only needs to read these three values; it does not write to them. The safe procedure for how to edit wp-config.php without breaking the site is its own task with its own precautions, covered in a separate guide. With the database name, user, and host in hand, phpMyAdmin can be opened, and where it opens depends on the host the site runs on.
Where to Access phpMyAdmin on the Host?
phpMyAdmin is the browser-based tool a host provides for reaching the WordPress database directly, and it almost always sits behind the hosting control panel rather than inside WordPress itself. A host exposes it in one of two places. The first is a general control panel such as cPanel; the second is a managed-WordPress dashboard built around a host’s own site tools. Which one applies comes down to the hosting plan, shared and reseller accounts lean on cPanel, while managed-WordPress platforms surface phpMyAdmin from their dashboard.
The path differs by host, but the destination does not. Whether the practitioner logs in through cPanel or navigates a managed-WordPress dashboard, each route opens the same phpMyAdmin screen, and once the WordPress database is selected from the list, that screen displays the same set of tables. Two different routes reach the same screen.
Because a shared control panel covers the widest range of accounts, the cPanel route is the practical place to start; the dashboard route follows for managed-WordPress hosting. The practitioner picks whichever matches the host in hand and works through it to reach the WordPress database.
Accessing phpMyAdmin Through cPanel
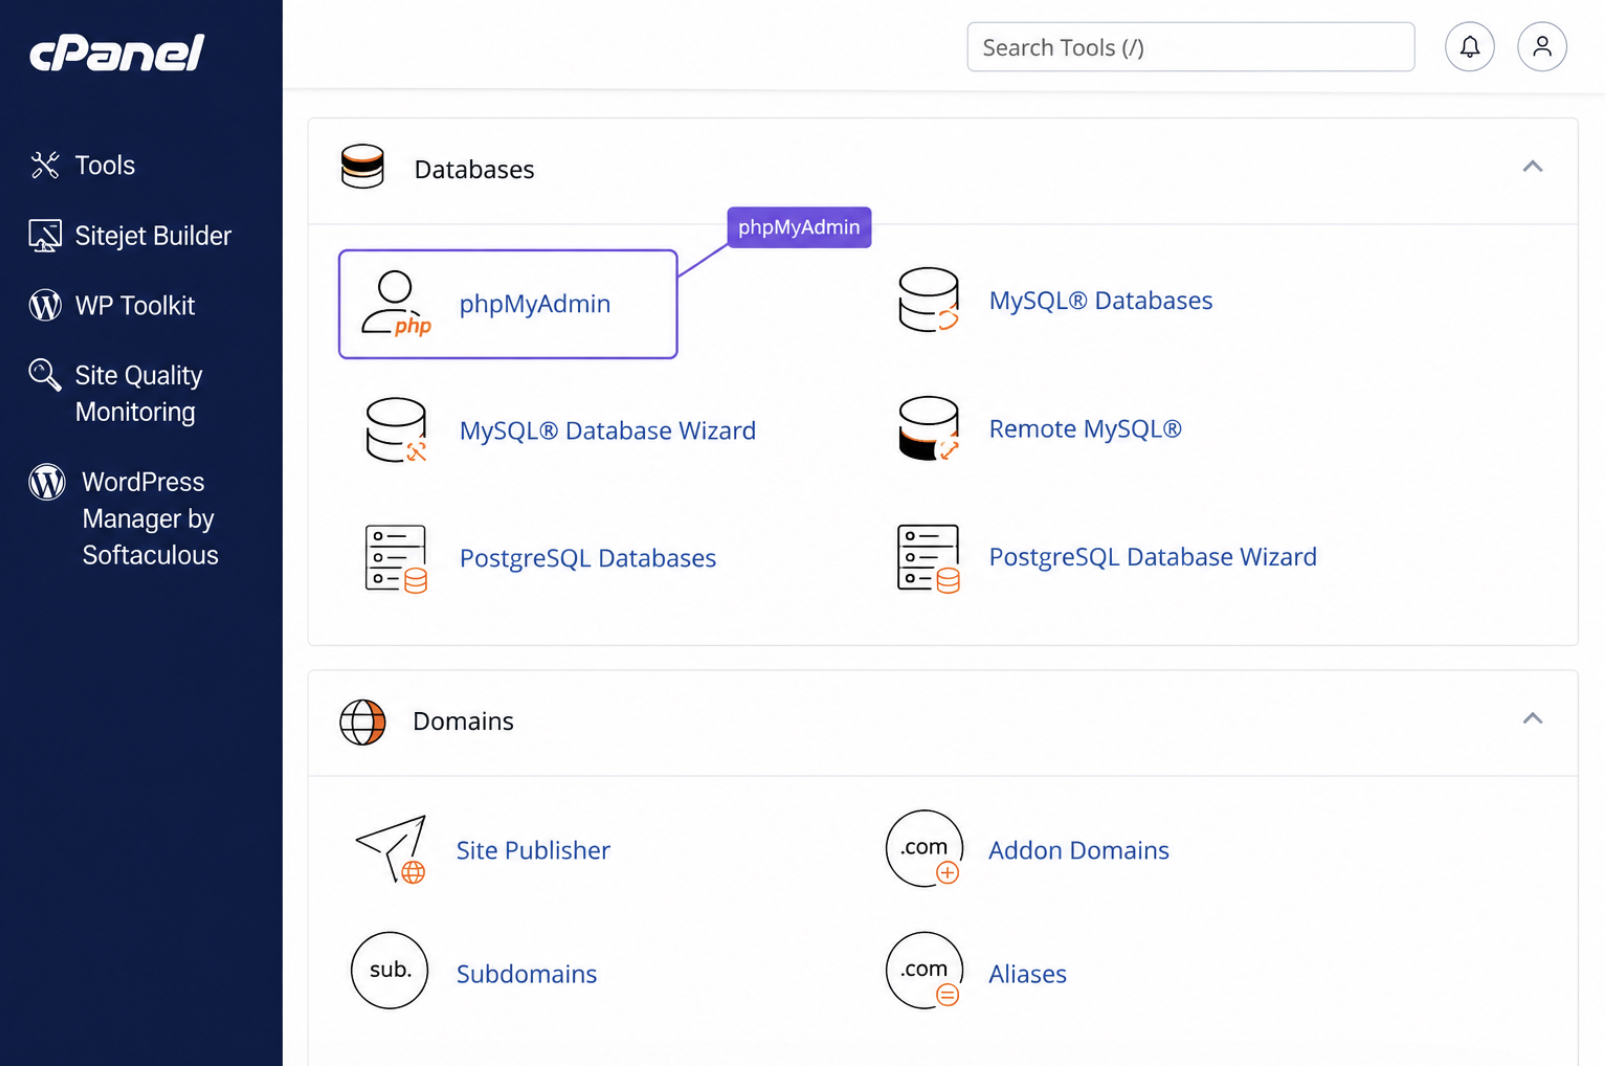
cPanel groups phpMyAdmin under its Databases area, beside the other tools for working with a site’s data. On a shared or reseller plan, this control panel is where the practitioner locates the phpMyAdmin launcher and, from there, reaches the WordPress database. The route is short and screen-anchored, so it takes only four moves:
Log in to cPanel with the hosting-account credentials the host issued.
Open the Databases group on the cPanel home screen.
Click the phpMyAdmin icon to open the tool in a fresh browser view.
Select the WordPress database from the left-hand list, matching it to the database name, the DB_NAME value already recorded for the site.
With the right database chosen, phpMyAdmin opens on the WordPress tables, ready for inspection. Managed-WordPress hosting reaches that same screen by a different route, through its own dashboard rather than a cPanel home page.
Accessing phpMyAdmin From the Host Dashboard
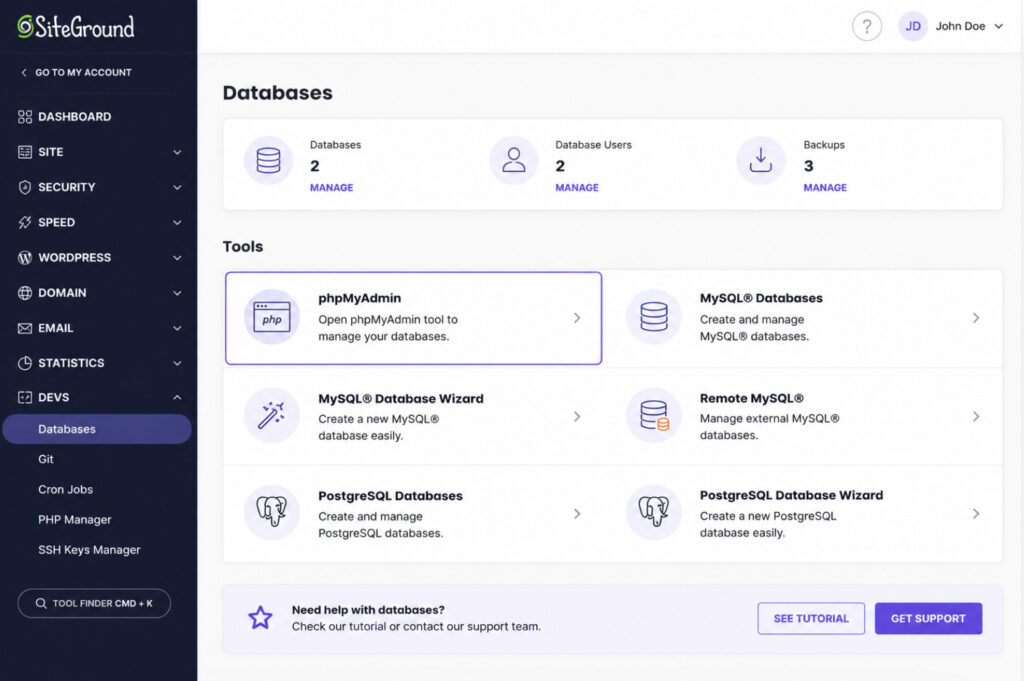
A managed-WordPress host keeps phpMyAdmin inside its own dashboard, tucked into a database or tools panel instead of a separate cPanel screen. The dashboard is the single place such a host gathers site management, so the route to phpMyAdmin runs through it rather than through a standalone control panel. The steps mirror the cPanel path closely:
Open the host dashboard and sign in with the account the host issued.
Navigate to the database or tools panel where the host keeps its data utilities.
Launch phpMyAdmin from that panel.
Select the WordPress database to reach its tables.
Once the WordPress database is selected, phpMyAdmin opens on its contents: the same destination the cPanel route reaches, arrived at by the dashboard instead. What loads at that point is a list of tables carrying the wp_ prefix, the core structures WordPress writes its content and settings into.
What Are the WordPress Core Tables Inside phpMyAdmin?
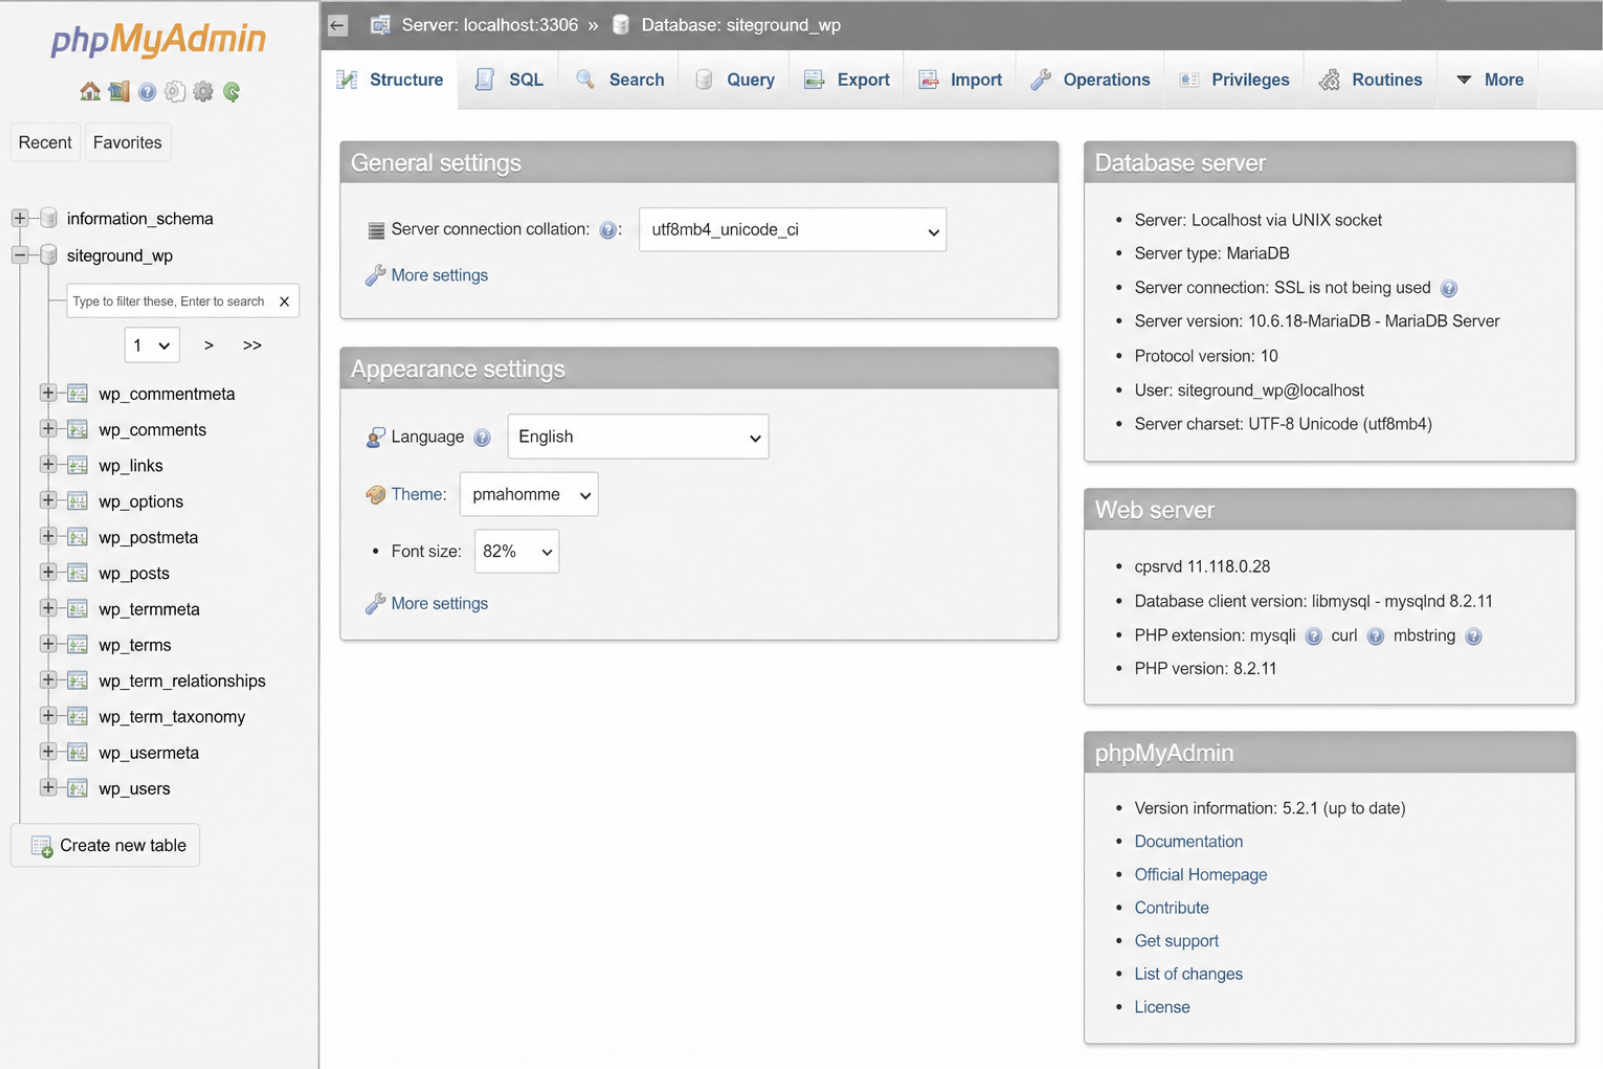
The WordPress core tables are the database tables that a standard WordPress installation builds inside its MySQL database, and they fill the left-hand column the moment phpMyAdmin opens the selected database. A single-site install creates roughly a dozen of them. Each shares the same short signature at the front of its name (the wp_ prefix), and that prefix is the quickest confirmation that the right database is open.
That prefix is WordPress’s default rather than a fixed rule, since a hardened install can set a different one, so the DB_NAME value recorded earlier stays the reliable confirmation that the database in front of the practitioner is the correct one. Scan the column, and entries such as wp_options and wp_posts sit there in alphabetical order, every name beginning with wp_.
A handful of these tables hold the data behind most database work, and knowing what each one stores turns a column of cryptic identifiers into something legible. The three that a practitioner reaches for most are these:
wp_options stores the site-wide settings, including the site title, the active theme, the home and site address, and the configuration values that plugins write back to.
wp_posts holds the content, where posts, pages, revisions, navigation-menu items, and media attachment records all live as individual rows.
wp_users keeps the user accounts, with login names, hashed passwords, email addresses, and registration dates for everyone permitted to sign in.
The rest of the core tables attach to that trio (wp_postmeta extends wp_posts, wp_usermeta extends wp_users), so those three tables are where most work in the WordPress database begins.
Seeing the wp_ tables is where access ends. Opening phpMyAdmin, selecting the WordPress database, and reading the wp_ tables is the whole of getting in; everything beyond it (exporting a table, importing a dump, mending a damaged one, or changing a value by hand) counts as a separate operation rather than part of access. Each of those tasks has its own walkthrough in the WordPress phpMyAdmin guide, which leads on from the moment the wp_ tables come into view.
When to Access the WordPress Database for a Repair?
Most occasions to access the WordPress database through phpMyAdmin turn out to be repair work. A site administrator rarely opens the database just to look around; the trigger is something broken, a settings value gone wrong, a plugin that left bad rows behind, or a table that no longer responds the way the site expects. Routine inspection does happen. It is the less common reason; a repair is the more frequent one.
The clearest case is a corrupted database. When a WordPress database becomes corrupted, the site stops loading or returns a database connection error, and reaching the data through phpMyAdmin is the first move before anything can be set right. Access comes first; the repair follows.
That repair is a separate task, and it sits outside the act of getting in. It runs through its own sequence of steps, one the access path only sets up, never carries out. Anyone ready for those steps can follow the guide on how to repair a corrupted WordPress database, which begins from the same starting point, phpMyAdmin open on the selected WordPress database.


 Gemini