Explore our specialized services, tailored solutions, and industry expertise to elevate your digital presence. From custom WordPress development to seamless integrations, we build high-performing websites that deliver impact.
A WordPressdatabase migration moves a MySQL or MariaDB database from one environment to another, between localhost and a production server, from one host to another, or across domain names. Whether the task is called a WordPress database migration or a WordPress data migration, the operation is the same: relocate the database that holds every post, page, user record, plugin setting, and theme option the site depends on.
The migration follows a consistent process: define the scope, prepare the source and target, select a transfer method, execute the move, verify the result, and cut over DNS to the new location.
Backup, optimization, and repair address a different lifecycle need. A WordPress database migration involves moving the database from point A to point B while preserving its data. Full-site migration, which bundles files, themes, and plugins along with the database, is a separate undertaking that also includes non-database assets.
What is a WordPress Database Migration?
A WordPress database migration is a relocation procedure that transfers the contents of a WordPress MySQL or MariaDB database from one environment, host, or domain to another while preserving every row of data. The procedure touches only the database layer, including tables, rows, serialized values, and the connections between them.
Five methods carry out the relocation:
phpMyAdmin export and import
WP-CLI wp db export and import
WP Migrate plugin push and pull
hosting-panel managed transfer
manual SQL dump and search-replace
WordPress database migration differs from three related but distinct operations:
Backup captures a point-in-time snapshot for disaster recovery.
Optimization refines tables and indexes to improve performance.
Repair fixes corrupted rows or crashed tables.
The term “WordPress data migration” appears in some documentation as a synonym. Both phrases describe the same relocation procedure and can be used interchangeably where the phrasing fits naturally.
One disambiguation demands attention. “Migration” in the WordPress ecosystem can also refer to Laravel-style schema migrations, version-controlled PHP classes that alter database structure through frameworks like Radicle and Acorn, executed via wp acorn migrate. That sense of the word describes the structural evolution of a database schema, not the relocation of data between environments. Kinsta maintains a reference covering that workflow.
From this point forward, every use of “migration” refers to the relocation of WordPress database between environments, not schema evolution.
A WordPress database migration requires groundwork before any data leaves the source server. Skipping preparation creates problems that surface only after import, including version mismatches, character corruption, and broken table references, when diagnosing them is slowest and most disruptive.
Four prerequisites anchor the checklist:
A verified source database backup. A restorable backup is the rollback path if the migration fails or data arrives corrupted at the target. The backup procedure is a separate operation covered in its own guide; confirming that a backup exists and restores cleanly is the gate that unlocks every subsequent step.
Confirm PHP and MySQL/MariaDB version parity. The source and target environments need compatible runtime versions. A database exported from MySQL 8.0 with PHP 8.2 may reference default collations or SQL modes absent in MySQL 5.7 with PHP 7.4. Check the PHP and MySQL versions on both sides before exporting.
Match character-set and collation settings. WordPress defaults to utf8mb4 with a collation such as utf8mb4_unicode_ci or utf8mb4_general_ci. If the target database uses utf8 or latin1 instead, multi-byte characters (emoji, certain diacritics, CJK glyphs) arrive as mojibake or question marks after import. Aligning the target’s default character set to utf8mb4 before migration prevents silent data corruption.
Align table prefixes. WordPress tables use a prefix defined in wp-config.php, commonly wp_. When the source uses wp_, but the target expects wptwo_, the imported tables end up in the database with names WordPress cannot find. Either reconfigure the target’s wp-config.php to match the source prefix or remap the prefix during import.
When to Migrate a WordPress Database?
A WordPress database migration is necessary in four recognizable scenarios, each defined by the relationship between the source and target environments. Knowing when to migrate a database, when to migrate db from one host or domain to another, starts with matching the situation to one of these patterns.
Moving from localhost to a live server is the most common trigger during development. A WordPress database built on a local machine (MAMP, XAMPP, Local by Flywheel, or Docker) needs to be deployed to a production host where visitors can access it. Every URL stored in the database still points to localhost or 127.0.0.1, which means the migration must handle URL rewriting before the site can function in the public domain.
Promoting a staging database to production follows a similar pattern. A staging environment lets content editors and developers validate changes against a copy of the live database. Once validated, the staged database replaces the production database. The source and target may share the same host but occupy different database instances, so credentials and connection strings change even if the server does not.
Re-platforming from one host to another triggers a migration when the entire WordPress installation moves to a new provider. The database crosses network boundaries, and differences in MySQL/MariaDB versions, PHP configurations, and server resource limits surface during this move more than any other.
A domain change (rebranding, TLD swap, adding or removing www) forces a migration even when the database stays on the same server. WordPress stores the domain in hundreds of places across wp_options, post content, and serialized metadata. Changing the domain without rewriting those stored URLs leaves the site with broken links, missing images, and redirect loops. The mechanics of serialized-data rewriting are covered in the manual SQL dump and search-and-replace methods.
WordPress Database Migration Method Selection
WordPress database migration method selection matches the transfer approach to four characteristics of the migration itself. No single method fits every scenario, and the criteria below identify which methods qualify for a given set of constraints.
Database size splits the field first. A database in the tens of megabytes transfers comfortably through phpMyAdmin or the WP Migrate plugin. Once the database reaches hundreds of megabytes or crosses into gigabyte territory, phpMyAdmin’s upload limit (typically 2 to 50 MB on shared hosting) becomes prohibitive. Streaming methods like WP-CLI wp db export and import or a manual SQL dump and search-replace handle large databases without hitting browser-based upload limits.
Access level determines which tools are available. Environments without SSH access restrict the choice to phpMyAdmin export and import, the WP Migrate plugin push and pull, or a hosting control panel’s managed tool. SSH access opens WP-CLI, manual SQL dump, and search-replace as additional options.
URL change introduces a serialized-data constraint. When the domain, protocol, or path changes between the source and target, every stored URL in the database needs to be rewritten, and WordPress stores many of those URLs in serialized PHP arrays, where naive text replacement can compromise data integrity. A manual SQL dump and a search-and-replace handle this natively. The WP Migrate plugin also handles serialized URL rewriting through its Find & Replace panel. phpMyAdmin and WP-CLI both require a separate search-replace pass after import.
Multisite posture narrows the field further. A WordPress Multisite network includes additional registry tables and site-ID dependencies that not every method can handle without manual intervention. WordPress Multisite network migrations entail additional registry table and site ID requirements that affect method selection.
How to Migrate a WordPress Database?
A WordPress database migration runs through five peer methods, each presenting the same export-transfer-import operation at a different level of access and transparency.
phpMyAdmin export and import provides a browser-based interface available on nearly every shared hosting account.
WP-CLI wp db export and import runs the same operation from an SSH terminal with scriptable precision.
The WP Migrate plugin’s push and pull handles the transfer within the WordPress admin dashboard, including serialized URL rewriting.
A hosting control panel’s built-in migration tool abstracts the entire process behind a single credential exchange.
A manual SQL dump and search-replace exposes every step (mysqldump, serialized-aware rewriting, and mysql import) with full visibility into what changes and why.
The five methods are ordered from the most accessible interface to the most transparent one, and each is covered in full individually.
Migrate a WordPress Database with phpMyAdmin
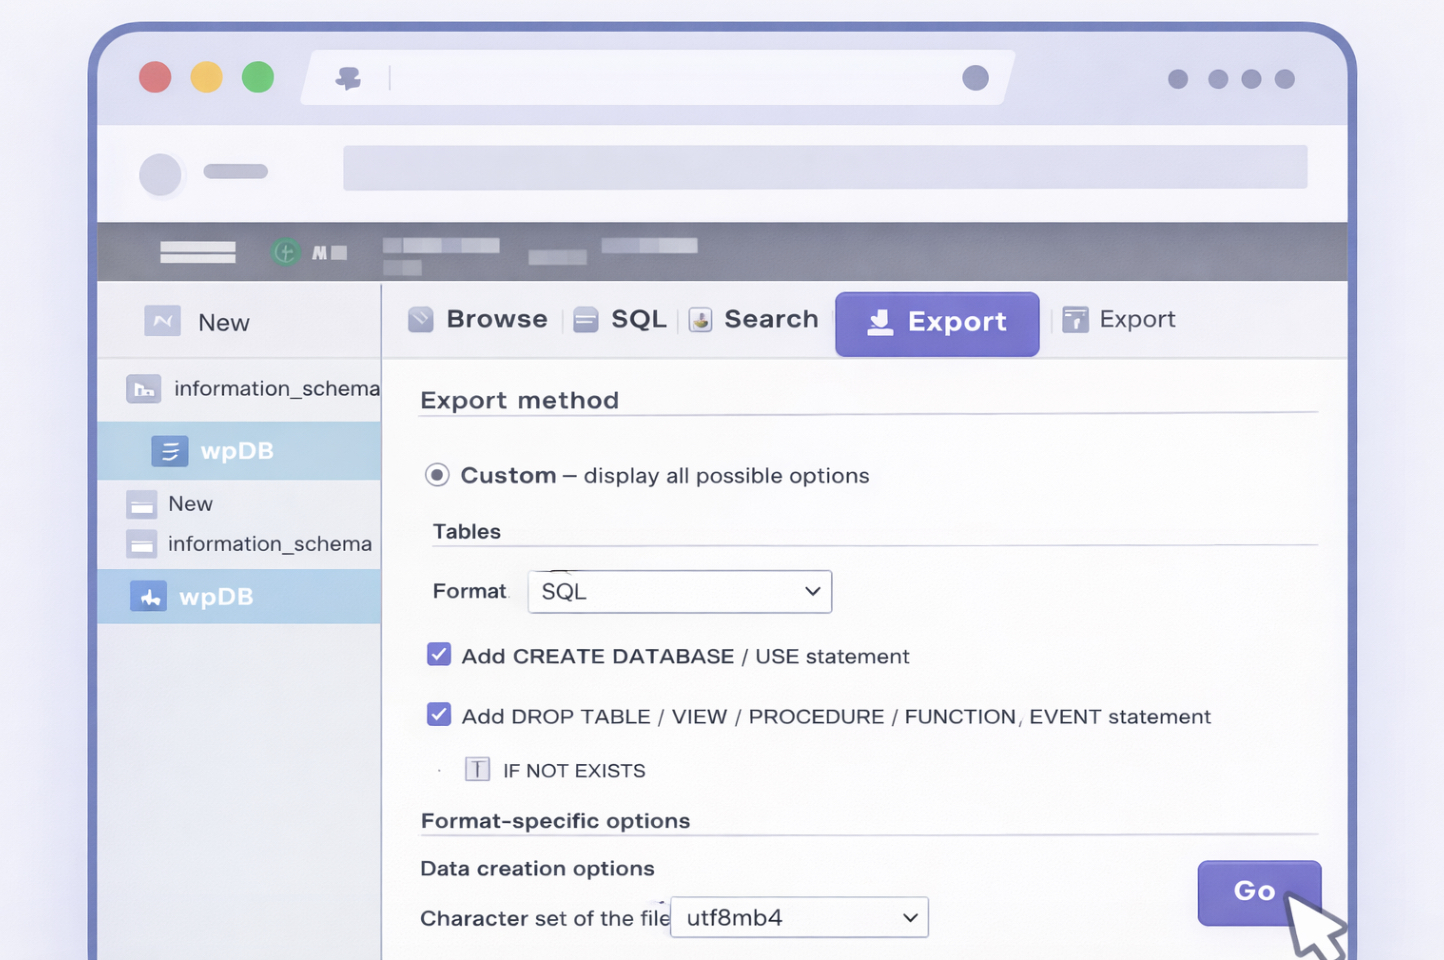
A WordPress database migration through phpMyAdmin export and import uses a browser interface that most shared hosting control panels expose by default. The procedure has three phases: export the source database, transfer the resulting SQL file, and import it into the target database.
Export. Open phpMyAdmin on the source host and select the WordPress database from the left sidebar. Choose the Export tab. Select “Custom” to access format options. Set the format to SQL, enable “Add DROP TABLE / VIEW / PROCEDURE / FUNCTION / EVENT / TRIGGER statement” (which produces DROP TABLE IF EXISTS directives that clear target tables before loading fresh data), and confirm the character set reads utf8mb4. Click Go. phpMyAdmin generates a .sql file and downloads it to the local machine.
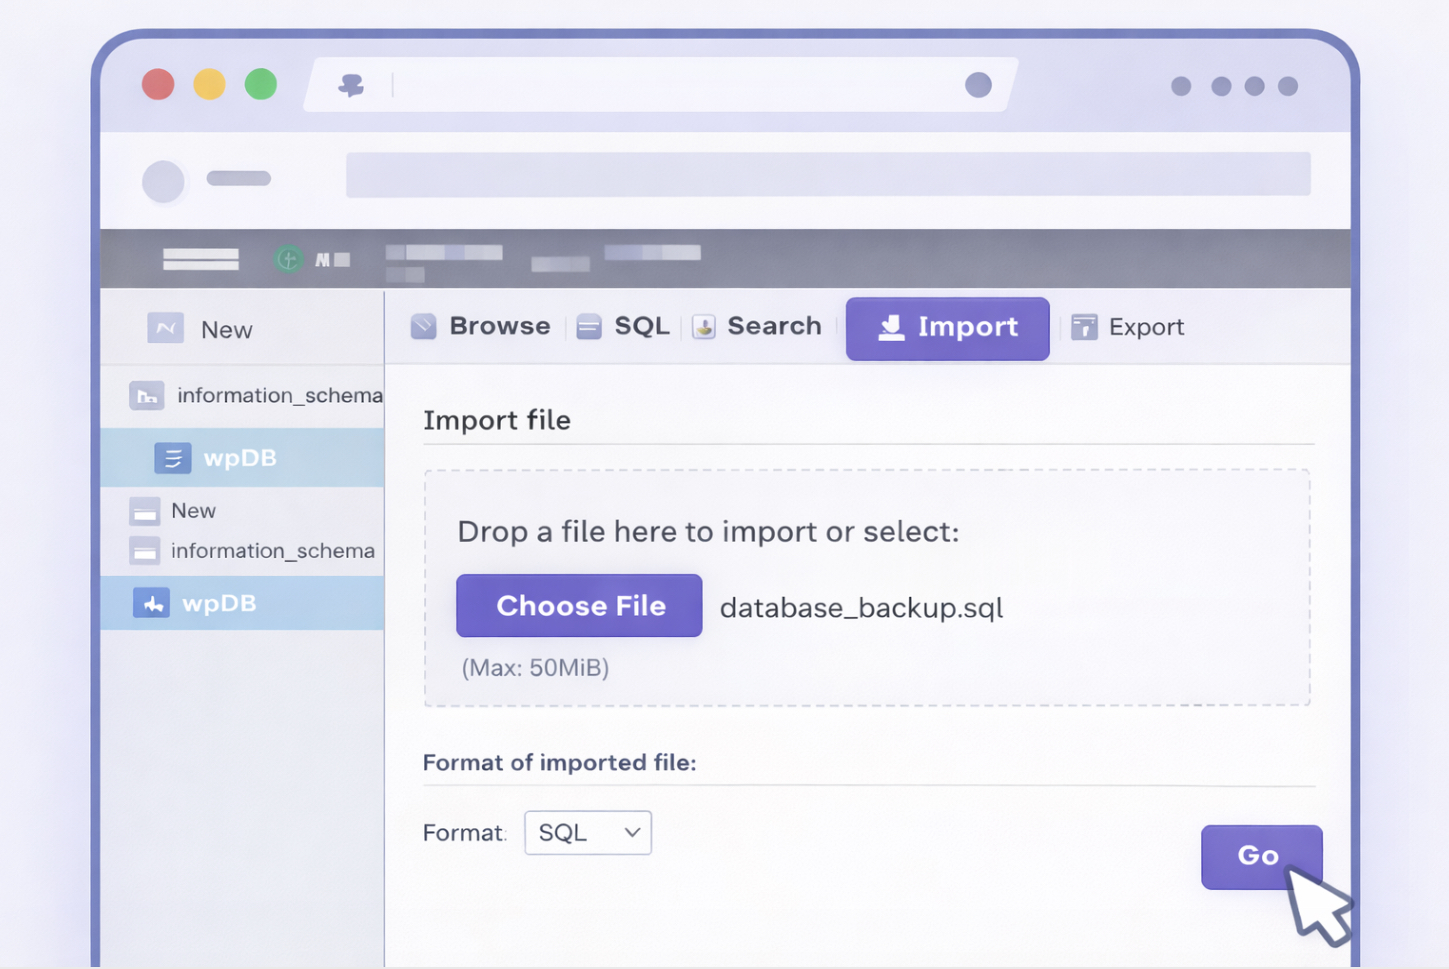
Transfer. The exported .sql file needs to reach the target server. For small files, uploading through the target host’s phpMyAdmin Import tab suffices. For files that exceed the upload ceiling, transferring via SFTP or SCP to the server’s filesystem and importing through the command line avoids the browser limit entirely.
Import. Open phpMyAdmin on the target host, select the destination database, and choose the Import tab. Click “Choose File” and select the .sql dump. The max_upload_size directive, set in the host’s PHP configuration, governs the maximum file size phpMyAdmin accepts via the browser. Shared hosts typically configure this between 2 MB and 50 MB. If the dump exceeds that ceiling, the import fails silently or throws a timeout error. Click Go to begin the import.
One caveat applies. phpMyAdmin alone cannot rewrite serialized data. If the migration involves a domain change, protocol switch, or path alteration, the imported database still contains old URLs embedded in serialized PHP arrays.
Attempting a plain text find-and-replace inside phpMyAdmin’s SQL query box breaks serialization prefixes. A serialized-aware search-and-replace pass, using wp search-and-replace or Interconnect’s Search-Replace-DB, must follow the import to correct those prefixes safely.
Migrate a WordPress Database via WP-CLI
A WordPress database migration through WP-CLI wp db export and import runs entirely from the command line over SSH. The procedure requires SSH access to both the source and target servers, with WP-CLI installed and the WordPress root directory accessible.
Three phases (export, transfer, import) execute in sequence:
# Phase 1: Export on source server
cd /var/www/html
wp db export db-backup-$(date +%Y%m%d-%H%M%S).sql

# Phase 2: Transfer to target server
# For a single file (one-shot transfer):
scp db-backup-20260416-143022.sql user@target-host:/var/www/html/

# For large databases or repeated syncs (resumable, delta-only):
rsync -avz db-backup-20260416-143022.sql user@target-host:/var/www/html/

# Phase 3: Import on target server
ssh user@target-host
cd /var/www/html
wp db import db-backup-20260416-143022.sql
wp db export generates a full SQL dump from the WordPress database defined in wp-config.php. The timestamped filename prevents accidental overwrites when multiple exports accumulate on the same server. Running the command from the WordPress root directory ensures WP-CLI reads the correct database credentials.
scp copies the dump in a single transfer, sufficient for most databases. rsync adds resumability and delta compression, which matters when a multi-gigabyte dump transfers over a slower connection or when repeated syncs need to send only what changed.
wp db import reads the SQL dump into the target database, dropping and recreating tables as directed in the file. After import, the database contains every row from the source, but all stored URLs still reference the source domain.
When the migration involves a URL change, wp search-replace rewrites stored values across every table. The manual SQL dump and search-replace method covers the full mechanics of serialized-aware rewriting, including the critical –dry-run preview and the –all-tables flag, because that procedure is the foundational reference for URL rewriting across all methods.
Migrate a WordPress Database with the WP Migrate Plugin
A WordPress database migration using the WP Migrate plugin’s push and pull operates within the WordPress admin dashboard on both the source and target installations. The plugin (sometimes referenced by its historical name WP Migrate DB, its hyphenated form wp-migrate, or its Pro-tier identifiers WP DB Migrate Pro, Migrate DB Pro, and DB Migrate Pro) handles bidirectional database transfers without requiring SSH access or direct database credentials.
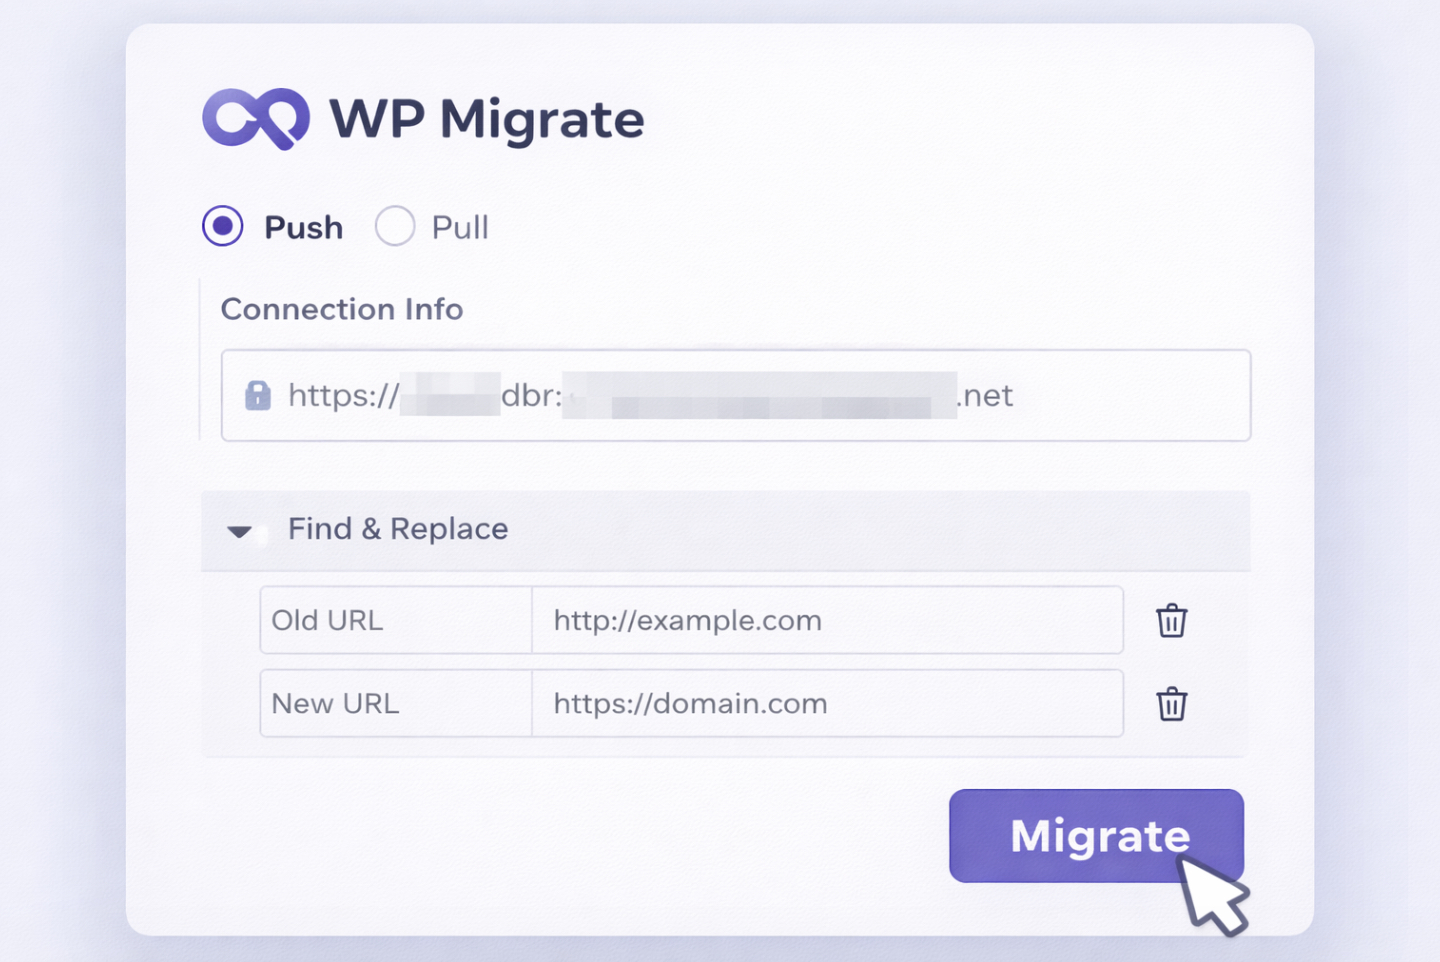
Install and activate the WP Migrate plugin on both the source and target WordPress installations. On the receiving side, generate a connection string from the plugin’s settings panel. On the sending side, paste that connection string into the corresponding field.
Two directions define the transfer.
Push sends the source database to the target: source initiates, target receives.
Pull brings the source database into the target: target initiates, source provides.
Select the direction that matches the server where administrative access is most convenient. Either direction produces the same result: the target database receives the source data.
The Find & Replace panel appears below the connection settings. WordPress database migration through this plugin handles serialized data natively: the panel accepts old-URL and new-URL pairs and rewrites serialized PHP arrays with corrected length prefixes during transfer.
Adding the source domain in the find field and the target domain in the replace field ensures every stored URL arrives rewritten at the destination. Multiple find-and-replace rows handle protocol changes, path changes, and directory differences in a single pass.
WPMigrate also offers a full-site migration option that bundles media, themes, and plugins alongside the database, a broader operation than database-layer relocation alone.
The WP DB Migrate operation completes when the plugin reports a success state on the initiating side. Verification follows in the post-migration checklist regardless of which method was used to perform the transfer.
Migrate a WordPress Database from a Hosting Control Panel
A WordPress database migration from a hosting control panel reduces the export-transfer-import sequence to a single managed step. Supply the source site’s URL, admin credentials, and, on some hosts, database connection details. The hosting panel’s migration tool pulls the source database, transfers it to the target environment, and reports success or failure.
cPanel Site Migration, Plesk WordPress Toolkit, MyKinsta, WP Engine portal, SiteGround Migrator, and DreamHost Automated Migration each provide a variant of this workflow. None merits elevation over the others; all abstract the same underlying operation behind a vendor-specific interface.
The trade-off is direct. Managed simplicity removes the need to handle SQL files, SSH connections, or plugin configuration. Reduced visibility means the migration’s internal steps (character-set handling, table-prefix mapping, serialized-data rewriting) happen behind the interface without confirmation.
Whether a given host’s tool rewrites serialized data during domain changes depends on the provider. If the source and target domains differ, confirm that serialized URLs arrived rewritten; if they did not, pair the panel import with a manual search-replace pass.
Migrate a WordPress Database with a Manual SQL Dump and Search-Replace
A WordPress database migration through a manual SQL dump and search-replace exposes every step of the transfer (the raw export, the serialized-aware URL rewriting, and the final import) with nothing abstracted away. The serialized-data mechanics explained here underpin every other transfer method: phpMyAdmin and WP-CLI both lack built-in serialized-aware rewriting, so any migration involving a URL change ultimately depends on the same principles.
mysqldump produces a complete SQL dump of the WordPress database. The –default-character-set=utf8mb4 flag ensures multi-byte characters export correctly rather than falling back to latin1 encoding. The timestamped filename distinguishes this dump from earlier exports. If SSH access is unavailable, the phpMyAdmin export tab produces an equivalent SQL file, the subsequent steps apply identically regardless of how the dump was generated.
Transfer the dump to the target server via scp, rsync, or SFTP.
The serialized-data warning. WordPress stores plugin settings, widget configurations, theme options, and portions of post metadata as serialized PHP arrays in tables like wp_options, wp_postmeta, and wp_usermeta. A serialized string encodes its length as a prefix: s:24:”http://old-domain.com/wp” declares that the string is exactly 24 characters long. Changing old-domain.com to new-domain.org alters the character count, but the prefix still reads s:24:. PHP’s unserialize() function reads the prefix, counts 24 characters, finds a mismatch, and fails. The value becomes empty. Settings disappear. Widget areas go blank. Plugin configurations reset.
Naive find-and-replace, whether through a text editor, sed, or a SQL REPLACE() query, cannot recalculate those prefixes. Every serialized string that contained the old URL breaks silently.
Phase 2: Serialized-aware search-replace.
Two tools recompute length prefixes during replacement: WP-CLI’s wp search-replace command and interconnect/it’s Search-Replace-DB (a standalone PHP script). Both parse serialized strings, perform the substitution, and rewrite the length prefix to match the new value.
# Preview changes without modifying the database (non-negotiable first step)
wp search-replace 'http://old-domain.com' 'https://new-domain.org' --all-tables --dry-run

# Execute the replacement after confirming the dry-run output
wp search-replace 'http://old-domain.com' 'https://new-domain.org' --all-tables
The –dry-run flag previews every table and reports how many replacements would occur without writing a single change. Running the replacement without a dry-run preview first risks rewriting values that should not change, especially in multisite environments or databases shared with non-WordPress applications. The –all-tables flag ensures that custom tables created by plugins and themes receive the same treatment as core WordPress tables.
Phase 3: Import.
# Import via mysql client
mysql --default-character-set=utf8mb4 -u db_user -p wordpress_db < wordpress-db-20260416-143022.sql

# Or import via WP-CLI
wp db import wordpress-db-20260416-143022.sql
Either method loads the dump into the target database. Run the search-and-replace after the import completes; the replacement applies to the live target database, not to the SQL file.
phpMyAdmin and WP-CLI both lack built-in serialized-aware rewriting, which is why any URL-change migration through those methods requires a separate search-replace pass. The WP Migrate plugin handles serialized rewriting natively through its Find & Replace panel, making a separate pass unnecessary when that plugin performs the transfer.
WordPress Database Verification after Migration
WordPress database verification after migration confirms that the transferred data arrived intact and the target installation functions correctly. Skipping verification leaves corrupted serialization, missing rows, and broken permalinks undetected until a visitor or client encounters them.
Five checks, performed in sequence, cover the critical failure points:
Row count parity. Query the source and target databases, table by table, and confirm that the row counts match. A discrepancy in wp_posts, wp_postmeta, or wp_options indicates a truncated import, a character set mismatch that caused rows to fail silently, or a partial dump. Exact parity for every table is the baseline expectation.
Option integrity. Open the wp_options table on the target and inspect siteurl, home, and active_plugins. The first two must contain the correct target domain and protocol. The active_plugins value is a serialized PHP array: if it unserializes cleanly (readable in phpMyAdmin or via wp option get active_plugins –format=json), the serialized-data rewriting succeeded for at least this critical row. If the value appears empty or malformed, the search-replace pass missed wp_options or broke its prefixes.
Login test. Log in to the WordPress admin dashboard on the target with an existing administrator account. A successful login confirms that the wp_users and wp_usermeta tables imported correctly, that password hashes survived the transfer, and that authentication nonces are generated against the target domain. A failed login, even with correct credentials, points to siteurl/home mismatches or missing user-meta rows.
Permalink flush. Navigate to Settings > Permalinks, then click Save Changes without altering the structure. WordPress regenerates its rewrite rules and writes them to .htaccess or the server’s rewrite configuration. Pages or posts that return 404 errors after migration almost always resolve after this flush because the rewrite rules still reference the source server’s directory structure until they are regenerated.
Media link spot-check. Open several posts that contain images and confirm the images render in the browser. Inspect one or two attachment URLs to verify they resolve to the target domain and path. Broken media links indicate that attachment metadata in wp_postmeta still contains old URLs, a sign that the search-replace pass did not cover all tables or that the replacement pattern omitted the uploads directory path.
If any of these checks fail, running a quick WordPress database repair can help resolve structural issues such as corrupted tables or index inconsistencies before they escalate.
An SSL certificate check and a brief confirmation that active plugins load their admin pages without fatal errors add further confidence beyond these five items.
WordPress Multisite Database Migration
A WordPress Multisite database migration is the process of transferring the database of a WordPress Multisite network, including its shared registry tables and per-subsite-prefixed tables, from one environment to another. Two database-layer facts distinguish it from a single-site migration.
First, wp_blogs and wp_site jointly define the network registry. wp_blogs stores one row per subsite: its domain, path, and activation status. wp_site stores the network’s identity: the primary domain and path that anchor every subsite. These two tables migrate as a paired unit. Importing one without the other leaves the network unable to resolve its own subsites, and WordPress falls back to a generic database error.
Second, cloning a subsite into a different network slot (assigning it a new blog_id) requires site ID remapping across every prefixed table that belongs to that subsite. WordPress names Multisite tables with the blog_id embedded in the prefix: wp_2_posts, wp_2_options, wp_2_postmeta. When the target network already occupies slot 2, the cloned subsite must land in a vacant slot, and every table prefix and every site_id/blog_id reference within those tables must reflect the new number. Uploads directory layout and the distinction between subdomain and subdirectory configurations affect how the network resolves requests, but both sit outside the database layer.
Once the registry tables and site-ID mappings are correct, the Multisite migration proceeds through the same cutover sequence as single-site migrations.
WordPress Database Migration Cut-Over for Live Sites
A WordPress database migration cutover for a live site coordinates the switch from source to target so that visitors experience the closest practical approximation to zero downtime, while keeping the rollback path open throughout.
Four phases structure the transition:
DNS TTL lowering. Twenty-four to forty-eight hours before the scheduled cut-over, lower the A or CNAME record’s time-to-live from its typical value (often 3,600 seconds or higher) to 60–300 seconds. Resolvers that have cached the old record will refresh within that shortened window once the DNS entry changes. Skipping this step means some visitors continue to reach the source server for hours after the domain points to the target, and any content they create during that window ends up in the wrong database.
Freeze window. Enable maintenance mode on the source site or impose a write-freeze that blocks new posts, comments, orders, and form submissions. The freeze must last only as long as the final sync requires: minutes for a small database, potentially longer for a database in the gigabytes. Every write that reaches the source after the freeze defeats the purpose of a clean cut-over.
Final delta sync. While the source remains frozen, export and import any records that arrived between the initial full migration and the freeze. WP-CLI wp db export and import handles this efficiently for the full database; environments with high write volume may isolate the delta to specific tables. The target database now mirrors the source exactly as of the freeze moment.
Rollback plan. The pre-migration backup created during the preparation checklist is the recovery asset. If the target site surfaces broken pages, serialization errors, or missing data after DNS propagation, restoring that backup to the source database and reverting the DNS record returns the site to its pre-migration state. The rollback window stays open as long as the backup remains valid and the source server remains provisioned.
The migration is complete when the target server serves production traffic, DNS has propagated past the lowered TTL window, and verification confirms data integrity on the target. The full relocation arc (define the operation, prepare the environment, recognize the trigger, select a method, execute the transfer, verify the result, and cut over DNS) reaches its endpoint with a live, verified target and an unused rollback plan.


 Gemini