Explore our specialized services, tailored solutions, and industry expertise to elevate your digital presence. From custom WordPress development to seamless integrations, we build high-performing websites that deliver impact.
A WordPresscontact form is the on-page inquiry form this guide builds, helping visitors send messages directly to a site owner through a contact page rather than exposing an email address. If you want to know how to create a contact form in WordPress, the process moves from selecting a build method to creating the form fields, configuring the notification email that receives submissions, placing the form on a contact page, and publishing it within an existing WordPress site.
Whether you are adding a new contact form in WordPress or improving one of several contact forms WordPress users rely on, the form ultimately lives on a dedicated contact page and becomes part of the wider site experience.
What Is a WordPress Contact Form?
A WordPress contact form is a WordPress-native inquiry form a visitor fills in to send a message to the site owner. The contact form consists of input fields, a submit action, and a notification email destination: the visitor types a name, an email address, and a message; the submit action collects those entries; and WordPress routes the submission to the notification email so the site owner can read it. The form contains the name, email, and message fields as its core parts, and it has the submit action that turns the typed entries into a sent inquiry.
The WordPress contact form differs from a hosted third-party embed in where it is hosted and how it routes submissions. A hosted embed runs on an external service and drops a snippet into the page, while the WordPress contact form is embedded in a WordPress page and routes submissions through WordPress itself.
Because the form sits in the page and runs on the platform, the site owner manages fields, notification email, and submissions inside the same WordPress admin that runs the rest of the site. Setting up a contact form is one step within a larger lifecycle covered in the WordPress development guide, which frames where a contact page fits across building, hiring, and launching a site.
The WordPress contact form completes the contact-page step of a WordPress build. A WordPress site needs a way for a visitor to reach the site owner without exposing a raw email address, and the contact form supplies that way: it collects a name, an email, and a message and then delivers them as an enquiry.
Adding the contact page is one of the closing steps when building a site, and the broader sequence for how to build a WordPress website places the contact page alongside the homepage and the about page as a core page every new site includes. The form is what makes that contact page functional rather than informational.
How to Create the Contact Form Fields
Creating the contact form fields moves from the form’s purpose to its construction: the build adds the input fields, the submit action, and the structure that a notification email will later use to deliver each enquiry. The full build carries the core three fields plus any optional ones, while a simple contact form keeps only the minimal name, email, and message set, both follow the same create flow.
Creating the form starts with one method decision. A WordPress contact form is built with a contact-form plugin, the block editor’s form block, or custom code, and the plugin or block-editor route covers most sites because it adds fields through the WordPress admin without writing markup. Choosing that route keeps the build inside the same admin that manages the rest of the WordPress site.
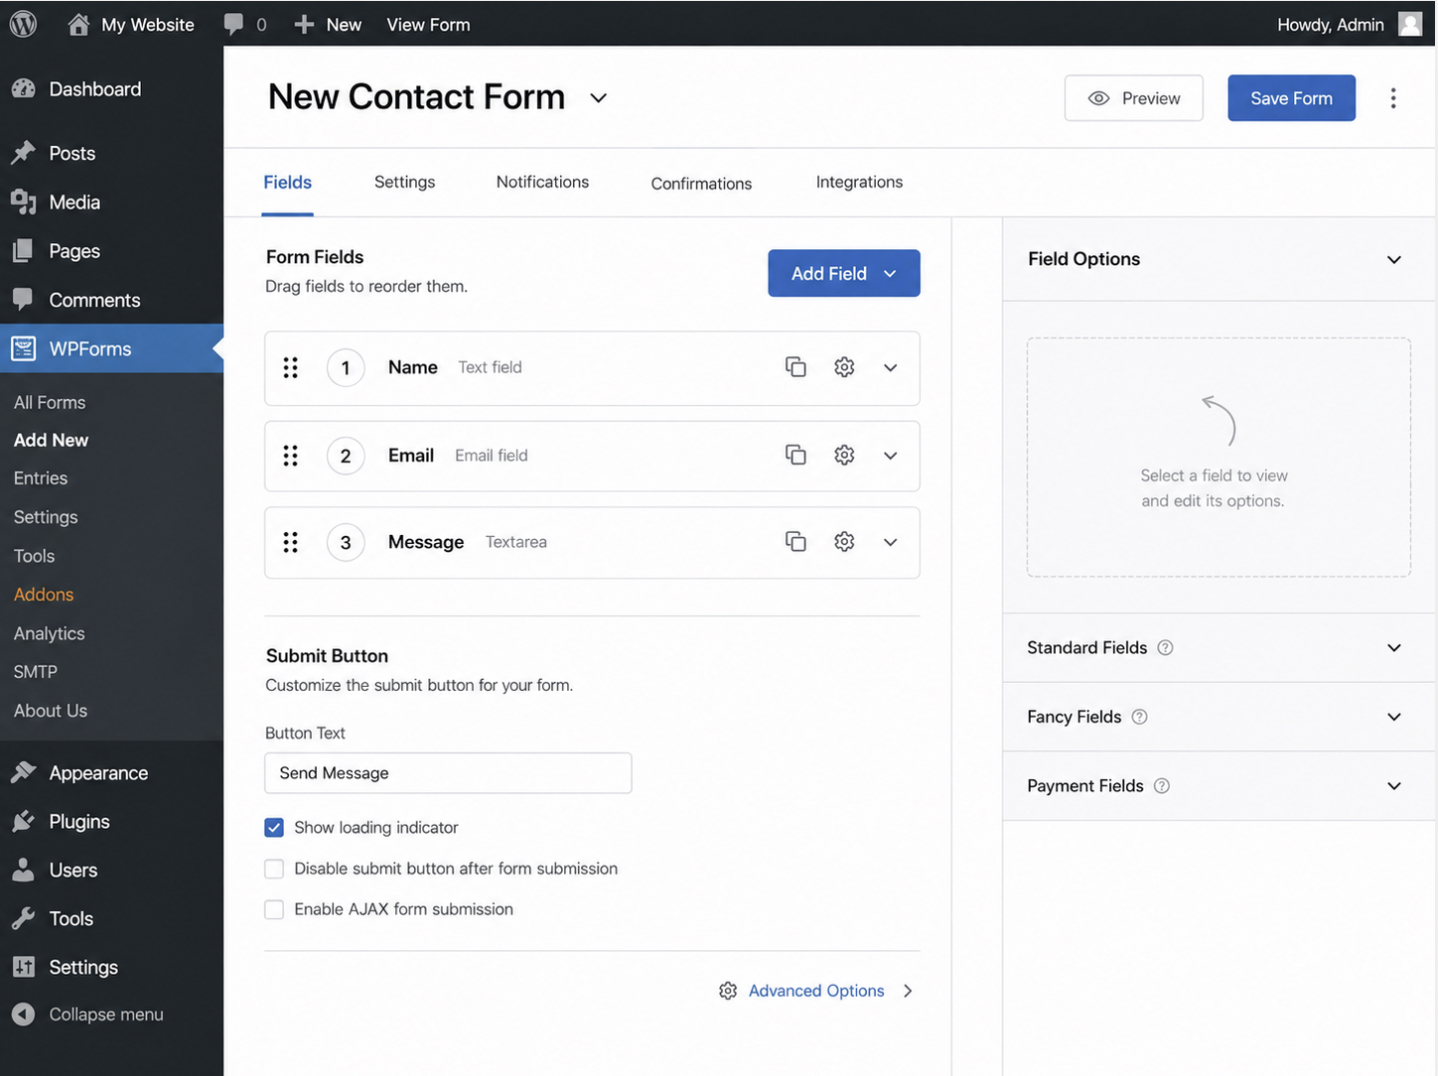
Build the contact form by adding its fields in the order a visitor reads them:
Install and activate a contact-form plugin from the WordPress admin, which supplies the form builder; the block editor’s form block is the no-install alternative.
Open the form builder in the WordPress admin and create a new form.
Add a name field so the visitor identifies the message.
Add an email field so the site owner can reply to the right address.
Add a message field so the visitor writes the enquiry itself.
Add a phone field or a file-upload field if the site needs them, keeping each optional.
Add the submit action and save the form.
The name, email, and message fields form the minimal set every contact form includes, and the phone and file-upload fields stay optional because most contact pages need only the core three. The form builder is the instrument that adds each field, and the built form now contains those fields and has a submit action.
The form now exists and accepts entries, but it does not yet route submissions to anyone. The submit action collects what the visitor types, yet a typed-and-sent message has no destination until the notification email is set, so the next build step configures where each submission goes. A leaner variant of this same build covers sites that need only the core three fields.
Simple Contact Form
A simple contact form is the minimal name, email, and message variant of the WordPress contact form just built. The simple contact form keeps to the core three fields and drops the optional phone and file-upload fields, so a visitor supplies only the parts an enquiry needs: who is writing, where to reply, and what the message says. The form has the same submit action and the same notification routing as the fuller form; it differs only in dropping the two optional fields.
A site owner builds the simple contact form for a contact page that needs nothing beyond the core enquiry. A small business page, a personal site, or a single-purpose landing page asks for a name, an email, and a message and nothing more, and the simple contact form suits that case because every extra field a visitor sees lowers the chance the visitor completes the form.
The simple contact form uses the same create flow as the fuller form, open the builder, add the three fields, add the submit action, with fewer parts to add. Built either way, the contact form still needs its notification email set before it delivers a single enquiry.
Contact Form Email Settings
Contact form email settings in WordPress are the configuration that determines where each submission from a contact form is sent once the form is built. A WordPress contact form collects a name, an email address, and a message, but the form only becomes useful when those entries reach a real inbox, and the email settings are the part of the form that routes a completed submission to that inbox. Building the form fields creates the form; configuring the email settings gives every submission a destination.
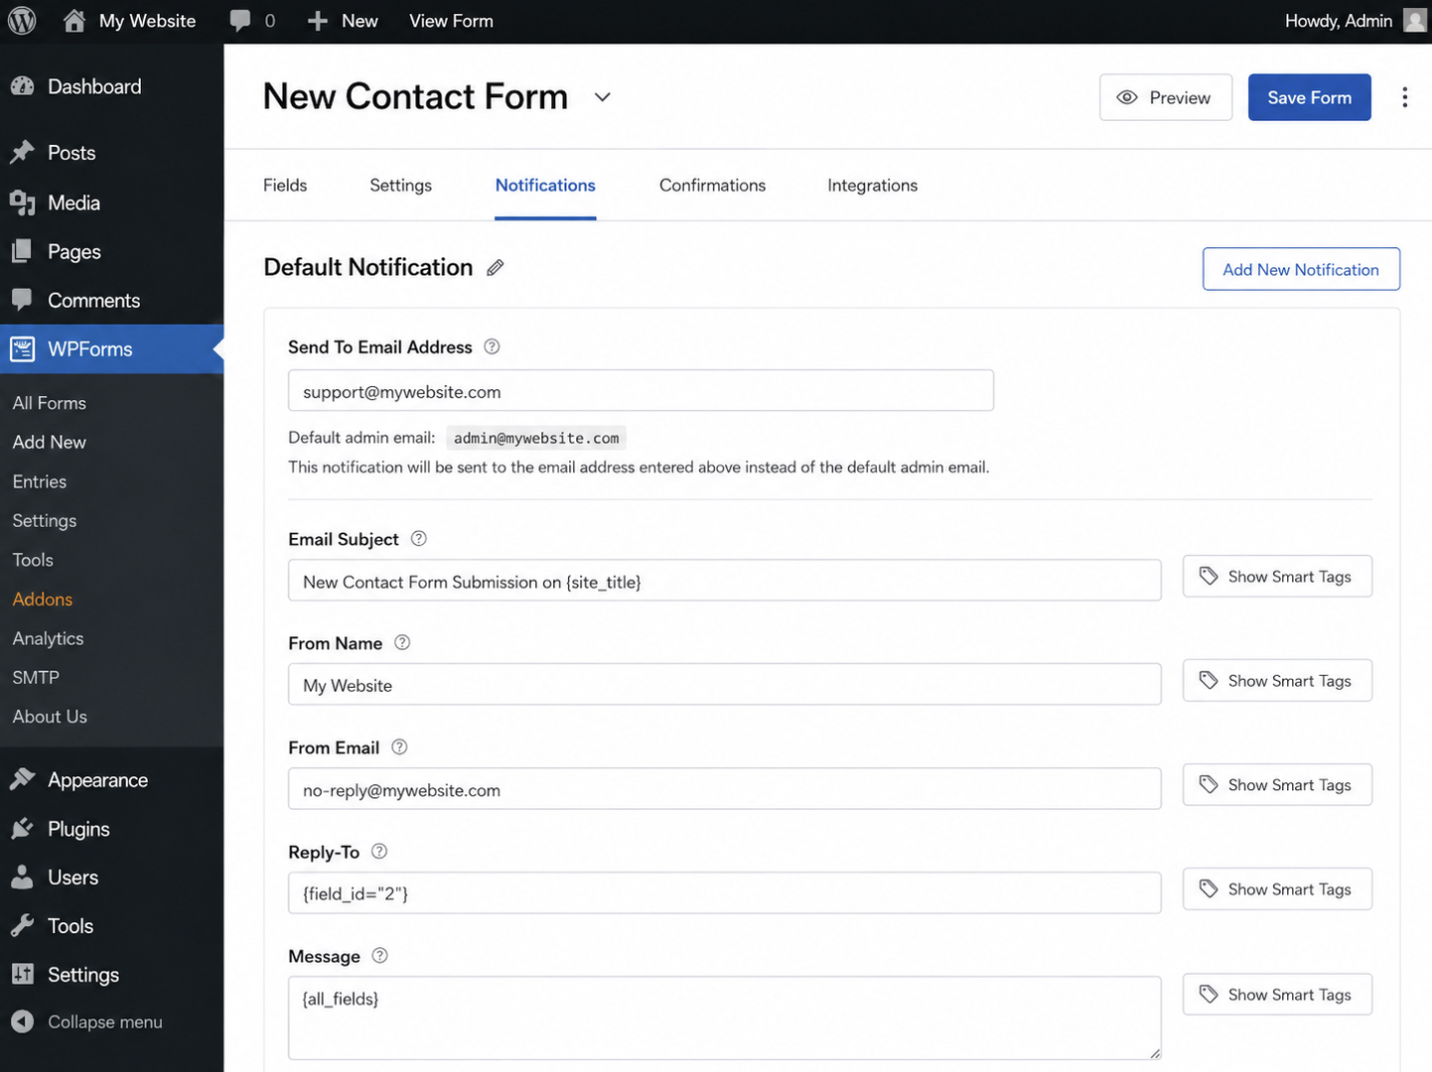
By default, a WordPress contact form delivers each submission to the site owner’s admin email, the address recorded for the WordPress installation. The recipient address is not fixed, though. Within the form’s email or notification settings, the recipient field accepts any address, so submissions can be routed to a sales inbox, a support inbox, or a shared team mailbox instead of the default admin email. The notification email is the message the form sends when a visitor submits the form; the recipient address is where that notification email arrives.
Setting the recipient takes a short, ordered sequence inside the form’s settings:
Open the form’s email or notification settings.
Locate the recipient address field (it shows the admin email by default).
Enter the address that should receive each submission.
Save the settings so the form routes new submissions to that address.
One delivery caveat is worth naming. When a configured form sends submissions but the notification email never arrives, the cause is WordPress email delivery rather than the form itself whenever the host does not relay the server’s default mail method reliably. WordPress sends mail through that default method, and a host that drops or filters it stops the notification before it reaches the inbox. That is the symptom and its cause; the deeper fix sits outside the form’s settings.
With the recipient address set and saved, the email settings turn a built form into a form that now receives and routes every enquiry to a real inbox. A form that captures fields and delivers its submissions is ready for the last build step, placing it where visitors can find it.
How to Add a Contact Form to a Contact Page
Adding a contact form to a contact page is the final build step, the point where the working form moves onto a published page so visitors can reach it and send a message. A WordPress contact form that captures fields and routes submissions to an inbox still needs a public place to appear; the contact page is the page on a WordPress site that hosts the form and presents it to visitors. Adding the form to a contact page completes the build sequence: the form is created, its email settings are configured, and now it appears live where it is meant to be used.
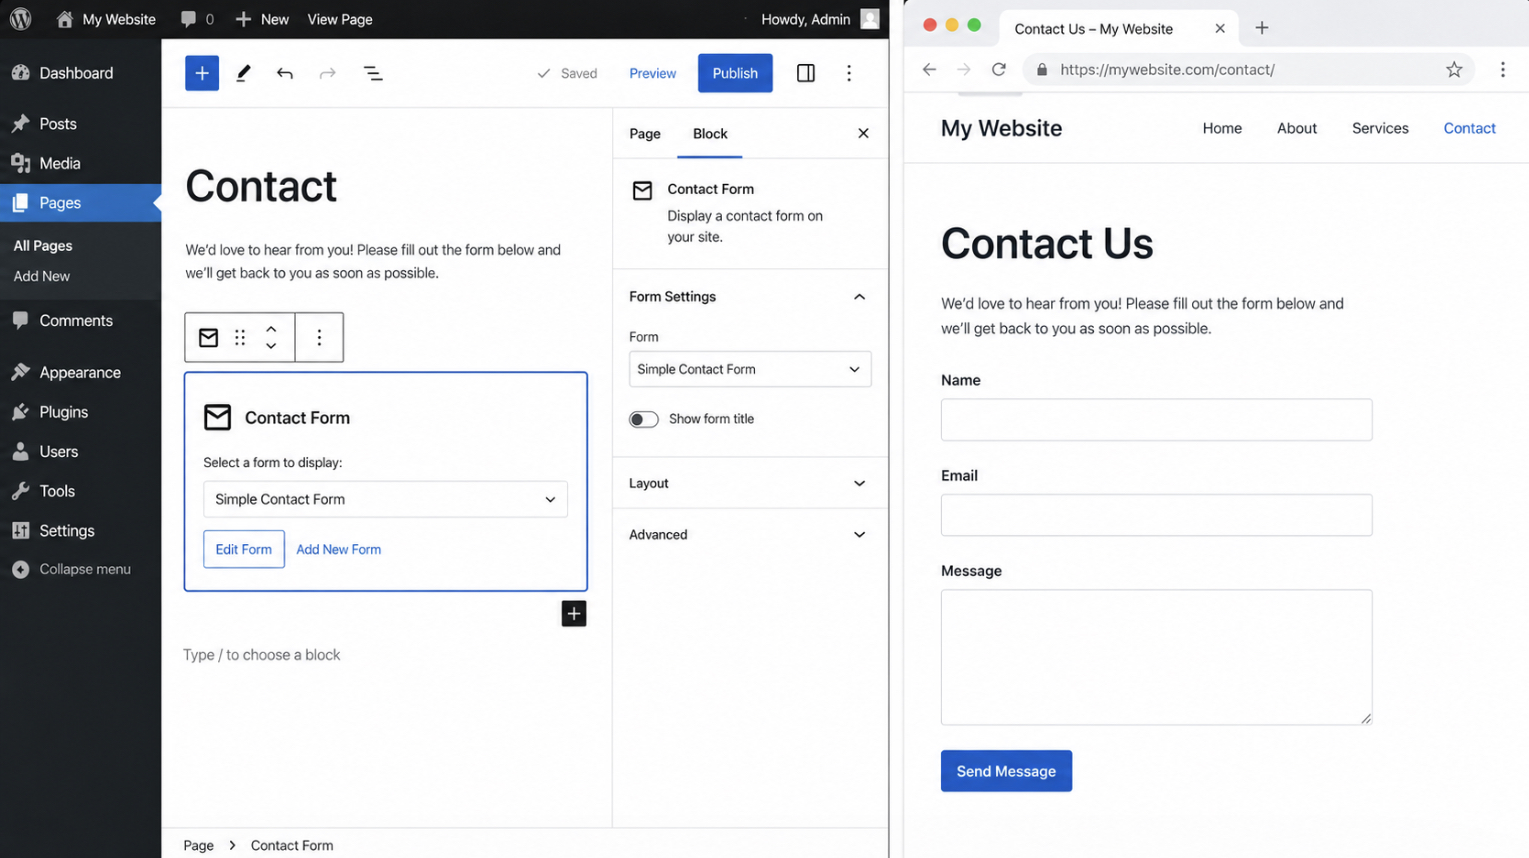
The form moves onto the page through a contact form widget: in the WordPress block editor, the site owner inserts the contact-form block on the contact page, or pastes the form’s shortcode into the page where the form should appear.
The block or shortcode is the placement mechanism. It embeds the form into the page’s content so the rendered form shows up exactly where it is positioned. The screenshot shows the block editor with the contact-form block inserted, alongside the published page where the live form appears to visitors.
Placing the form follows a short sequence:
Insert the contact-form block, or paste the form’s shortcode, on the contact page.
Position the form where it should sit on the page.
Publish the contact page so the live form appears to visitors.
A contact page assumes a working site to host it. A WordPress contact form is hosted inside a WordPress page, which means a WordPress install has to exist before the form has anywhere to go. The steps for “how to install WordPress” cover that prerequisite.
Once the install is in place, the contact page itself still needs a layout. The page can be laid out in the block editor that ships with WordPress or built with a dedicated layout tool that adds drag-and-drop columns, spacing controls, and pre-designed sections around the form. For a site owner deciding how to lay out the page that hosts the form, the comparison of the “best WordPress page builders“ covers that choice. A page builder governs only how the contact page is arranged on screen; it does not settle how the page itself is produced in the first place.
A deeper decision sits behind that layout choice: whether the contact page is hand-coded as a custom build or assembled from a ready-made theme that supplies the page template the form drops into. Each approach changes how much of the layout is editable later and how much depends on a developer. For a site owner weighing those two approaches, “custom WordPress development vs themes” sets out the trade-off behind the contact page and the form on it.
Publishing the contact page completes the build: the form is live and collecting submissions. The plugin-and-block route is the common path, but it is not the only one. A contact form can also be built with a free contact form plugin or assembled without any plugin at all, as an alternative route to the same live form on a contact page.
Free Contact Form Plugin
A free contact form plugin is a no-cost WordPress extension that builds the same name, email, and message form built earlier, without a paid tier. The plugin installs into a WordPress site, activates, and creates a working contact form from a starter template, so a site owner reaches a live form on the standard free version rather than a premium upgrade. The result is the same form: one that collects a name, an email address, and a message, then routes each submission to a notification address.
What a free plugin offers for this build is the core form itself. The free version includes the standard field set (name, email, and message), and the submission routing that delivers each entry to the admin inbox, which is exactly what the contact form needs to function.
A premium tier adds extras such as conditional logic, payment fields, or advanced spam filtering, but building this contact form does not require any of them. The free contact form plugin is enough to make a complete, submission-routing form on a contact page.
Choosing the free plugin folds back into the same ordered build: install and activate the plugin, then construct, configure, and place the form exactly as a paid plugin would. The decision between a free plugin and a paid one is a single choice at the start, not a different build path. A deeper evaluation of which contact-form plugin to install, comparing feature sets across vendors, sits outside this build and belongs to a dedicated plugin guide.
WordPress Contact Form Without a Plugin
A WordPress contact form without a plugin is a form built by adding form code directly to a page or theme template, rather than installing a contact-form plugin to generate it. This no-plugin route is the alternative method: instead of activating a plugin, a site owner writes the form markup into the page and connects it to a handler that processes each submission. The form it produces still collects a name, an email, and a message, the same outcome as the plugin route.
A site owner takes the no-plugin route for more control over the form markup and to avoid a plugin dependency on the WordPress site. The route requires writing the form code by hand and arranging for the WordPress page or theme to receive and process each submission, which is more setup than activating a ready-made plugin. For most contact pages, the plugin or block-editor route remains the faster default, and the no-plugin method stays a deliberate choice for a site owner who wants to manage the markup directly.
The specifics of that markup are the actual form code that produces a contact form without a plugin.
Contact Form Code
Contact form code is the form markup that produces a WordPress contact form without a plugin, the HTML that defines the fields a visitor fills in and the action that sends each submission. The code route uses this markup as its starting point: a single block that lays out the name, email, and message inputs together with a submit control, so the page renders a working form without a plugin generating it.
The markup contains the same name, email, and message fields used throughout this build, now expressed directly in HTML. The name input collects the visitor’s name, the email input collects the email address, the message textarea collects the enquiry, and the submit button sends the form to the address named in its action attribute:
This single block defines the form; the full implementation that receives the submission, stores it, and emails it sits beyond a no-plugin form’s basic markup. For a contact page that goes live quickly, the plugin or block-editor route remains the recommended default, with the contact form code reserved for the no-plugin method.
A WordPress contact form is the finished result of this build: a working form that collects a name, an email, and a message, sends each submission to a notification address, and sits on a published contact page. The contact form now exists, accepts entries, and delivers them.
The path that produces it is a settled sequence: choose a build method, build the form and its fields, set the notification email, add the form to the contact page, and publish. Whether the form comes from a free plugin, a paid plugin, the block editor, or contact form code, the ordered steps and the finished form stay the same.
The WordPress contact form is the contact page step in a complete WordPress build. With the form live on a published contact page, the site has the contact point a full build requires, and the wider work (domain, hosting, pages, and launch) is the broader job of building a WordPress website that the parent guide lays out in full.


 Gemini