Explore our specialized services, tailored solutions, and industry expertise to elevate your digital presence. From custom WordPress development to seamless integrations, we build high-performing websites that deliver impact.
A WordPress pre-launch QA checklist is the final verification pass an already-built site runs through before launch. It is the structured set of checks a site owner or developer works through on the staging site to confirm that nothing built during development behaves differently in front of real visitors. The checklist does not build the site, install WordPress, or set up the staging environment; those are settled before it begins. It tests what the finished build already contains and reports whether the result holds up under inspection.
The WordPress pre-launch QA checklist tests five categories of work:
search engine readiness
security
content accuracy
performance
functional behavior
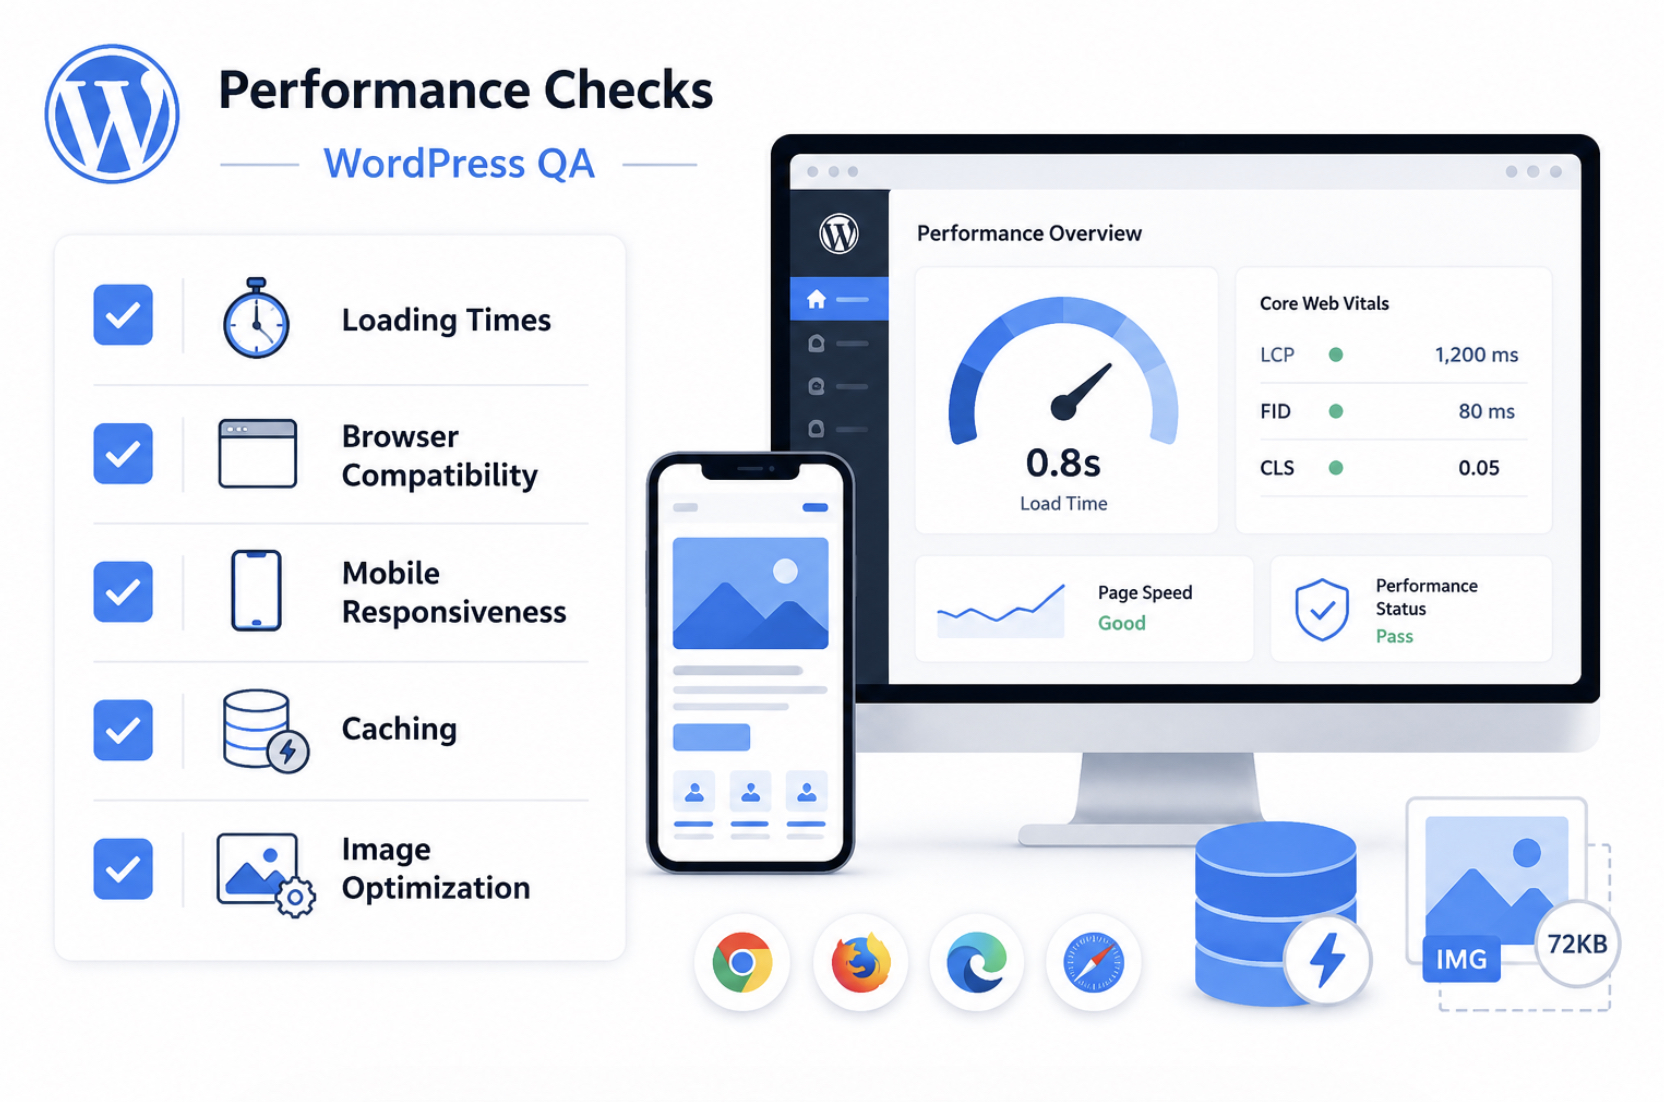
Search engine checks review the URL structure, sitemaps, and analytics tag. Security checks verify the certificate state and the protections that guard the built site against tampering. Content checks verify that pages read as intended and carry no placeholder text. Performance checks measure loading times, caching behavior, image weight, browser compatibility, and mobile responsiveness. Functional checks test that forms submit, links resolve, the navigation menu points where it should, and the error page returns correctly.
Each category feeds a single pass criterion: launch-readiness. The site reaches launch readiness only when every check in all five categories passes. A single failed check (a contact form that drops submissions, a missing certificate, a sitemap that points at staging URLs) holds the build short of readiness until the site owner or developer corrects it and re-tests. The checklist therefore behaves as a gate rather than a report. It either confirms the built site is ready or names the specific check that is not.
The site owner or developer runs this checklist against the staging copy, not the public address, so every test exercises the real build without exposing an unverified site to visitors. Working through the checks in order moves the site from a finished build to a verified build. Search engine readiness comes first, settling how the site is found and measured, and functional behavior closes the in-page checks last, because confirming what every interactive element does carries the build to the readiness verdict.
What Is a WordPress Pre-Launch QA Checklist?
A WordPress pre-launch QA checklist is a methodical verification pass run on an already-built site before launch. It belongs to WordPress QA (the discipline that confirms a site behaves as designed) and applies that discipline to the single point when a finished build is about to face real visitors. The checklist consists of an ordered set of checks, each a pass-or-fail test against the staging site, grouped so that related work is verified together rather than in scattered spot checks.
The pre-launch QA checklist covers five categories of verification: search engine, security, content, performance, and functional checks.
Search engine checks review the URL structure, sitemaps, and analytics tag so that the site is indexable and measurable from its first day live.
Security checks verify the certificate and the safeguards that protect the built site.
Content checks verify that every page carries the intended copy and no leftover draft text.
Performance checks measure how fast the site loads, how images are sized, how caching is configured, and how the build renders across browsers and screen widths.
Functional checks test the interactive parts of the build: forms, links, the error page, and the navigation menu.
Together these categories establish whether the build is sound across every surface a visitor or a search engine will reach
The state the checklist confirms is launch-readiness, the condition in which every check has passed and the built site is verified as ready. Launch-readiness is distinct from three neighboring states. It is not the build process, which produces the site the checklist later inspects. It is not post-launch maintenance, which keeps a live site healthy after it is already serving visitors.
And it is not the go-live cutover itself, the act of moving the verified site from staging to its public address, which the broader WordPress build sequence owns. The checklist stops at that boundary: it confirms readiness without performing the move.
Because launch-readiness is a pass state rather than a measurement, most checks resolve to a yes-or-no verdict: the certificate is valid or it is not, the contact form delivers or it does not, the sitemap lists real URLs or it does not. A small number of checks attach numbers, such as loading times in seconds or image weight in kilobytes, but even those convert into a pass-or-fail judgment against a threshold. The first category the checklist works through is search engine readiness, where the checks confirm that a search engine can find, crawl, and measure the built site the moment it becomes live.
SEO Checks
SEO checks are the category of the WordPress pre-launch QA checklist that confirms search-engine readiness before launch. Where the earlier categories test that the site works and reads correctly, this WordPress QA category tests one narrower thing: whether a search engine can find, crawl, and measure the site the moment it becomes live. The checklist treats search-engine readiness as a pass/fail state, not an optimization project; either the indexability and measurement signals are in place, or they are not.
Three items carry that state, and each one is checkable:
URL structure: the permalink format is final and search-engine-friendly.
Sitemaps: an XML sitemap exists and lists the live pages.
Analytics tag: the tracking tag is installed and firing.
These three matter at this point, and not later, because both indexability and measurability have to be correct before the site is live. A search engine crawls whatever URL format it finds first and remembers it; a sitemap that is missing at launch delays discovery of every page; an analytics tag that is not yet firing loses the first hours of real traffic data that can never be recovered. Each item is verified once here so that none of them has to be repaired under pressure afterward. The first of the three is the address every page is reached at, the URL structure.
URL Structure
The URL structure is the permalink format every page on the site resolves to, and before launch it should already be in its final, search-engine-friendly form. WordPress QA treats this as a single checkable value: the permalink structure either reads as clean, descriptive URLs (the kind a search engine and a person can both parse) or it still carries the default query-string format that no longer belongs on a live site. Verifying it means confirming the chosen format is locked in, not changing it.
Locking the URL structure now matters because changing it after the site is live breaks every existing link that already points at the old format. Inbound links, bookmarked pages, and crawled URLs all resolve to addresses that no longer exist, and recovering them means layering redirects on top of a problem that a single pre-launch check would have prevented. The format is set before launch and left alone.
Sitemaps
A sitemap, in this category, is the XML sitemap that lists the live pages a search engine should crawl, and the WordPress QA pass confirms it exists before launch. The check is presence, not configuration: the sitemap is generated by the SEO plugin already installed on the site, and it enumerates the pages that will be live, rather than a stale set left over from an earlier build. Testing it means opening the generated file and confirming the live pages are listed.
A present, current sitemap is what makes the site ready for search-engine submission the moment it goes live. With the file generated and accurate, submission to the search engine becomes a single step rather than a rushed last-minute fix, and crawlers reach every listed page instead of discovering them one stray link at a time. The sitemap is verified here so that discovery starts immediately and nothing waits to be found.
Analytics Tag
The analytics tag is the tracking code installed on the site to record page views, and before launch it should already be installed and firing on the staging or built site. WordPress QA verifies the tag fires (that it loads on the page and reports activity) rather than verifying that an analytics account exists somewhere upstream. A tag that is present in the markup but silent is the failure case this check catches.
Confirming the tag fires now means measurement starts the moment the site is live, not after someone notices the numbers are missing. The tag records page views from the first real visit, which gives the launch a clean baseline instead of a gap, and the first days of traffic (the ones that establish the baseline) are captured rather than lost. The tag is tested on staging precisely so that nothing has to be diagnosed against live traffic.
Security Checks
Security checks are the category of the WordPress pre-launch QA checklist that verifies the site is hardened against attack before launch. This WordPress QA category tests the site’s exposure: whether the connection is encrypted, whether the way in is locked down, and whether anything from development was left behind that an attacker could read. As with the other categories, each item resolves to a checkable state: the site is hardened, or a specific gap is still open.
Three items define that state:
A valid SSL/HTTPS certificate: the certificate is installed, valid, and not expired.
A hardened admin login: the login uses strong credentials and is not left on defaults.
No debug constants left from development: development flags that expose errors are removed.
The valid certificate leads because it governs every request: with a valid SSL/HTTPS certificate in place, the whole site is served over HTTPS, the connection is encrypted, and the browser stops flagging the site as not secure. A hardened admin login closes the most-targeted login entry point. Default usernames and weak passwords are the first thing automated attacks try, so credentials are reviewed and strengthened before the site is reachable.
The last item is the easiest to forget: debug constants enabled during development print errors and file paths straight to the page, so they are deleted before launch rather than left to leak the site’s internals. Hardening confirmed, the next category turns from how the site is protected to what it actually says, the content checks.
Content Checks
Content checks are the category of the WordPress pre-launch QA checklist that confirms the published content is final and correct before launch. This WordPress QA category examines the page content itself: the words on each page, the placeholder text that should no longer be there, and the media that should be the right media. The value it tests is straightforward: page content that is proofread, free of placeholders, and paired with correct images is a pass; anything still carrying draft remnants is not.
Examining the page content covers three things at once. The copy is proofread, so typos and broken sentences are caught while they are still cheap to fix. Placeholder and Lorem-ipsum text (the filler dropped in during page building) is removed, because nothing reads worse on a live site than a paragraph of dummy Latin under a real heading. And the media is confirmed correct, so the right image sits with the right caption rather than a stand-in from an earlier draft.
Finalized copy matters at this point because the alternative is a rushed post-launch fix to correct typos in public, where every visitor sees the error before the correction does. Catching it during the pre-launch QA pass keeps the fixes private and unhurried. With the words, the placeholders, and the media all verified, the checklist moves from what the site says to how fast and how reliably it delivers it.
Performance Checks
Performance checks confirm the built site loads acceptably across browsers and devices before launch, and they form the category of the WordPress pre-launch QA checklist that measures speed rather than correctness. Where the earlier categories verify that content reads right and that the site resists attack, these checks measure how fast and how reliably the rendered site reaches a visitor.
The pre-launch QA checklist treats performance as a measured state: load time recorded in seconds, Core Web Vitals recorded in milliseconds, image weight recorded in kilobytes, and responsive layout verified at viewport widths recorded in pixels. Naming the unit alongside each item keeps every reading comparable, so a passing site shows a defined number against a defined threshold rather than a vague impression of speed.
The performance check category comprises five items, each verified on the staging or built site as part of WordPress QA before launch:
Loading times: page load time in seconds, with Core Web Vitals in milliseconds.
Browser compatibility: correct rendering across the major browsers and versions.
Mobile responsiveness: layout that adapts across viewport breakpoints in pixels.
Caching: cached pages served without breaking dynamic content.
Image optimization: images compressed to an acceptable weight in kilobytes.
Each item owns a verification of its own, and the first of them sets the number every other performance reading connects back to: loading times.
Loading Times
The loading-time check measures page load time before launch, expressed in seconds, with the Core Web Vitals metrics tracked in milliseconds. Page load time is the interval between the request and a usably rendered page, and the WordPress pre-launch QA checklist records it as a number so the result reads as a pass or fail against a threshold rather than a guess.
Within that load time, two Core Web Vitals carry the most weight: largest contentful paint, which marks in milliseconds the moment the main content appears, and interaction to next paint, which gauges in milliseconds how quickly the page responds to input. Keeping the unit beside the metric (seconds for the whole load, milliseconds for each vital) makes the reading comparable across runs.
An acceptable load time is the threshold a built site clears before it is considered ready, and the loading-time check verifies the rendered page meets it. What pushes a page over that threshold traces to two causes: uncompressed assets that arrive heavier than they need to be, and absent caching that forces every element to rebuild on each request.
Both have a dedicated verification of their own further into this performance category, the caching check and the image-optimization check, so the loading-time reading establishes the number, and the remaining checks confirm the conditions that hold that number down. WordPress website QA testing treats load time as the primary performance figure the other items support.
Browser Compatibility
The browser-compatibility check verifies that the site renders correctly across the major browsers before launch, and it belongs to the performance category of the WordPress pre-launch QA checklist as a render-correctness verification rather than a redesign task.
A built site renders differently depending on the browser engine behind it, so the check tests the rendered layout in the current versions of the major browsers: Chrome, Safari, Firefox, and Edge across their recent releases, a count of roughly four browsers times two or three versions each. The compatibility check is scoped by that browser and version count: the more environments tested, the more confidently the site renders the same layout everywhere.
The failure state the compatibility check looks for is a layout break: text that overflows its container, a navigation bar that wraps, an image that renders out of position. WordPress QA treats a layout break in any tested browser as a fail, and the remedy is a render fix, not a redesign, because the layout already works in the browsers where it renders correctly.
Confirming a consistent render across the major browsers closes one half of the cross-environment question; the other half is whether the same layout adapts to the smaller screens visitors actually use, which the responsiveness check verifies next.
Mobile Responsiveness
The mobile-responsiveness check verifies that the layout adapts correctly across mobile viewport widths before launch, with those widths named as breakpoints in pixels. Viewport width is the rendering width of the screen the site is viewed on, and a responsive layout reflows its columns, type, and navigation as that width changes.
The responsiveness check tests the rendered layout at the breakpoints in pixels where the design is meant to shift (commonly a narrow phone width near 375 pixels, a tablet width near 768 pixels, and a desktop width at 1024 pixels and above), so each breakpoint in pixels is verified to produce a layout that fits its viewport.
Browser tooling can simulate these widths, but the responsiveness check is most reliable when the layout is tested on real device widths, because a physical phone or tablet renders touch targets, scrolling, and font scaling the way a visitor will encounter them. The answer the check confirms is straightforward: the layout adapts across widths, with no horizontal scroll, no clipped content, and no tap target too small to use at the narrowest breakpoint.
Where browser compatibility verifies a correct render across engines, mobile responsiveness verifies a correct render across widths, the two are co-hyponyms that together confirm the site renders right in every environment a visitor brings to it.
Caching
The caching check verifies that caching is enabled and configured before launch, and it sits in the performance category of the WordPress pre-launch QA checklist because a configured cache is one of the conditions that holds page load time down. Caching is the storage of a pre-built copy of a page so that a repeat request is served the stored copy instead of rebuilding the page from the database on every visit.
The caching check confirms two states: that caching is enabled, and that it is configured to serve cached pages without breaking dynamic content: a logged-in session, a cart total, a form that must reflect the current request.
The failure state the cache check guards against is a stale cache that serves outdated content, or a configuration that caches the dynamic content it should leave live. Verifying the cache means loading both a static page and a dynamic one and confirming the static page serves fast from cache while the dynamic content stays current.
Because a working cache spares the server from rebuilding each page, caching contributes directly to the acceptable load time the loading-time check measures. It is one of the two conditions, alongside image weight, that the load-time reading depends on. Confirming the cache serves correctly leaves the second of those conditions to verify: the weight of the images the page has to deliver.
Image Optimization
The image-optimization check verifies that images are compressed to an acceptable file weight before launch, measured in kilobytes with a percent reduction recorded after compression. Image weight is the file size each image adds to a page, and the optimization check confirms that weight has been reduced to a level the page can deliver quickly: a hero image brought from several megabytes down to a few hundred kilobytes, a typical reduction of seventy to ninety percent once the image is compressed and correctly sized to its display dimensions. Recording both the resulting weight in kilobytes and the percent reduction keeps the reading comparable across every image checked.
Image weight matters in the performance category because it drives page load time: heavier images take longer to transfer and delay the largest contentful paint the loading-time check measures in milliseconds. This is why image optimization is a performance verification and not a content one. The concern is load speed, not whether the right picture appears.
The optimization check measures the delivered weight of each image and confirms it clears the acceptable threshold, closing the loop opened by the loading-time check: caching removes the rebuild cost, image optimization removes the transfer cost, and together they hold the load-time figure that the performance category exists to verify.
Functional Checks
Functional checks confirm that the built site’s interactive features actually work before launch: the forms, the links, the error page, and the menus that visitors will touch the moment the site is reachable. Where the earlier search-engine, security, content, and performance items verify what the site contains, the functional checks verify what the site does when someone clicks, types, or follows a path through it.
The WordPress pre-launch QA checklist treats this category as the last of the in-page verifications: every interactive element is tested against its intended behavior, and any element that fails is fixed before the readiness verdict is signed off.
Four items carry the weight of this category, and each gets its own verification pass:
Forms: every form submits and delivers its notification email to the right inbox.
Broken links: a sitewide scan finds dead internal and external links, and each one is replaced or removed.
404 page: a custom error page exists and routes lost visitors back into the site.
Navigation: every menu item and call-to-action lands on the correct page.
Each of these owns the detail below, so the summary stays a summary. What matters at this level is the shared standard: a functional element is not finished because it was built, it is finished because it was tested and behaves correctly on the production site rather than only in the editor preview.
Once those four in-page categories pass, the unanswered questions are no longer about what sits inside any single page. They turn outward, to launch-readiness as a whole: what the testing discipline actually covers as a named practice, whether the staging copy still matches the production site it was built against, which build route the project took and what that implies for the final handoff, and whether a current backup exists. Those are the readiness questions the rest of the checklist works through, beginning with the testing discipline itself, what WordPress QA names and covers as a practice.
Forms
Forms pass the functional check when every form on the built site submits and delivers its notification email before launch. A form that renders correctly and shows a success message has only cleared half the test; the other half is the message itself reaching its destination. So each contact form, quote request, and signup field is submitted with real test data, and the resulting notification email is traced to the inbox that is supposed to receive it.
The two halves matter separately. The submit action proves the form accepts input and fires; the delivered email proves the notification email reaches the intended recipient and is not silently dropped by a misconfigured mail route or a spam filter.
Verifying both, the form submits and the email arrives, is the difference between a form that looks like it works and one that does. WordPress QA treats a form as confirmed only when the test submission produces a real message in the real inbox, with the expected fields intact. Any form that fails either half is fixed and re-tested, never left for a visitor to discover after the site is reachable.
Broken Links
Broken links are internal or external links that no longer resolve to a working destination, and the built site is scanned for them sitewide before launch. A link scan crawls every page and reports each dead link: an internal link to a page that was renamed or removed during the build, or an external link to a third-party resource that has since moved. The scan is the detection step; it produces the list of broken links that still remain on the site.
Detection alone settles nothing. Each broken link found is then remediated: an internal link is pointed at the correct current page, an external link is updated to its new location, and a link whose target is gone is either replaced with a working equivalent or deleted outright. The standard the WordPress pre-launch QA checklist holds here is plain, no broken links remain across the site when the scan is re-run clean. A single dead link erodes trust on the production site and wastes the crawl budget search engines spend on it, which is why link integrity is verified and fixed in the same pass rather than deferred.
404 Page
The 404 page is the custom error page a site serves when a visitor requests an address that does not exist, and the functional check confirms that this page exists and routes correctly before launch. The default error response on many builds is a bare, unstyled message that leaves the visitor with no navigable route back into the site. A custom 404 page replaces that response with a page that belongs to the site and routes the visitor somewhere useful.
Confirming the page exists is the first half of the check; confirming where it leads is the second. The 404 page routes visitors back into the live site rather than leaving them with no route back, through a link to the homepage, a search field, or the primary menu, so a mistyped or outdated address becomes a recoverable detour instead of an exit.
WordPress QA verifies the routing the same way a visitor would meet it: by requesting an address that cannot resolve and confirming the custom 404 page appears and links back into the site. WordPress website QA testing treats a missing or dead-ending error page as a failed item, because the page that handles mistakes is exactly the page that should not be left untested.
Navigation
Navigation is the system of menus and links that moves visitors between pages, and the check confirms that every menu and navigation link routes to the correct page before launch. A menu that displays correctly is not the same as a menu that works; the label can be right while the destination behind it points at a draft, a deleted page, or an old address left over from the build. So each menu item is tested by following it to where it actually lands.
The test runs across every routing point, not a sample. Each item in the primary menu, the footer menu, and any secondary navigation is followed to confirm the click resolves to the intended page, and the primary call-to-action (the button or link that carries the most weight on the site) is checked to confirm it reaches its intended destination rather than a near-miss.
The WordPress pre-launch QA checklist holds navigation to a single answer: every menu item routes to the correct page, and the call-to-action lands where it is meant to. Any item that routes to the wrong page is corrected and re-tested, closing the functional category once the menus carry visitors exactly where the site intends.
What Is WordPress QA?
WordPress QA is the testing discipline that covers the functional, content, performance, SEO, and security checks a WordPress site is tested against. It is software quality assurance applied to a WordPress site: a structured way to check that every part of a build behaves as intended before that build is treated as finished. The discipline includes functional testing, content testing, performance testing, SEO testing, and security testing, and it consists of the methods by which each of those categories is verified rather than assumed.
The WordPress pre-launch QA checklist is that discipline applied to a single moment. Where WordPress QA names the ongoing practice (the testing that recurs across a project’s lifetime, on every change and every release), the checklist is the one pass that runs immediately before launch, against the staging site, on a build that is already complete.
The discipline answers what gets tested and how; the checklist answers what must pass right now, before the site is treated as launch-ready. The phrasing varies across QA WordPress, WordPress website QA testing, and the spelling WordPress Q&A, but each names the same testing discipline, not a list of questions and answers.
A professional QA pass is warranted when a build is large, when custom code carries real risk, or when an in-house owner lacks the time to test every category methodically. At that point the discipline is best handed to specialists who run it as part of a wider build engagement. A development agency that follows a full WordPress development guide treats QA not as a final afterthought but as a phase with its own verification standards, deleting placeholder content and replacing untested assumptions with confirmed results before a build is signed off.
Staging Verification
Staging verification is the check that confirms the staging environment matches production before launch, a step both competing checklists omit. The staging environment is a private copy of the site, served from configuration meant to mirror the live server, and verifying it means confirming that what passed in staging will behave identically once the same build reaches production. The pre-launch QA checklist includes this verification because a build that tests clean on a mismatched staging environment proves nothing about the live site.
The verification turns on environment parity: the staging environment and production must align across the facets that change behavior. The PHP version, the active plugin set, and the configuration values are each compared, because a difference in any of them can let a check pass in staging and fail in production. The verification also confirms the reverse: that no staging-only setting, such as a search-engine-blocking flag or a debug mode, reaches the live site.
This pass verifies an existing staging environment; it does not build one. Standing up a staging copy in the first place, provisioning the server, cloning the database, mirroring the configuration, belongs to the install stage and is covered in detail under how to install WordPress, which owns staging-setup depth. The checklist assumes that environment already exists and confirms its parity, then turns to where parity is defined facet by facet and to how the build route changes which checks apply.
Environment Parity
Environment parity is the staging environment matching production across the facets that matter: PHP version, active plugin set, and configuration values. Parity is the state in which staging and production are identical on every setting that can change how the build runs, so a result confirmed in one holds true in the other. WordPress QA treats parity as the precondition that makes staging verification meaningful at all.
The facets to compare are specific. The PHP version is checked against production, because a version mismatch can break a plugin or a custom function that ran cleanly in staging. The active plugin set is compared so that no plugin present in one environment is absent or differently configured in the other.
The configuration values (caching rules, debug flags, search-engine visibility, redirect settings) are checked against the live server so that no staging-only value drifts into production. Where a facet differs, that mismatch is corrected or the difference is documented before the build is treated as verified, so no staging-only setting reaches the live site.
Build Route
The build route is how the site was built, and which checks apply depends on it, a distinction neither competing checklist defines. A site assembled from custom code carries different risks than one assembled from a prebuilt theme or page builder, so the build route determines what gets tested and how much. The WordPress pre-launch QA checklist scopes its test coverage to the route, because applying a single flat check set to every build either misses route-specific risks or wastes effort on checks that do not apply.
The route splits into two cases that vary the test scope: a custom build and a prebuilt build. A custom-built site shifts the emphasis toward code-level verification; a prebuilt site shifts it toward layout and demo-content removal. The route determines which of the two test profiles applies, and the build route itself is fixed long before QA begins.
Which route is the right choice for a project (weighing control against speed, cost against flexibility) is a build decision in its own right, examined in custom WordPress development vs themes, which owns that comparison. The checklist does not adjudicate the choice; it scopes the QA to whichever route was taken, in the two cases that follow.
Custom
A custom-built site requires the full functional and code-level check set before launch. Custom code is code written specifically for the site rather than supplied by an off-the-shelf theme, and it introduces test surface that no baseline checklist anticipates, so the full check set applies and additional code-level checks are added to it. WordPress QA on a custom build verifies not only that the site works but that the bespoke code works under the conditions production will impose.
Custom code introduces checks that prebuilt routes never need. Custom templates are verified across the content types they render, because a template that displays one post correctly can break on another. Custom database queries are checked for correctness and for load, because a query that runs fast on a small staging dataset can slow a populated production site. These code-level checks sit on top of the baseline functional, content, performance, SEO, and security checks; the custom route adds to the checklist, it does not replace it.
Prebuilt
A prebuilt theme or page-builder site shifts the check emphasis toward layout, responsiveness, and demo-content removal before launch. A prebuilt build is one assembled from a ready-made theme or a visual page builder rather than from custom code, and its risks cluster around presentation and leftover sample material rather than bespoke logic. WordPress QA on a prebuilt build spends less effort on code-level verification and more on confirming the imported design renders correctly and carries nothing it should not.
Prebuilt routes commonly leave material behind that the checklist must catch. Placeholder content (the filler text and stock images shipped with a theme demo) is verified as removed or replaced. Unused demo pages and sample widgets, imported wholesale when a starter template is applied, are checked and deleted where they are not wanted. Layout and responsiveness receive closer attention because the design originates from a template rather than from the build itself, so its behavior across breakpoints is confirmed rather than assumed. As with the custom route, these checks sit on top of the baseline categories.
Site Backup Before Launch
A current site backup must exist before launch, the last item the WordPress pre-launch QA checklist verifies, and one that concerns restorability rather than the hardening the security checks cover. A site backup is a complete, recoverable copy of the site, and the checklist confirms that such a copy exists and is recent before the build is treated as finished. The backup belongs at the end of the checklist, not within the security category, because its purpose is not to prevent an attack but to make recovery possible if anything goes wrong at or after the moment the site changes hands.
A complete backup covers both files and database. The files include the WordPress core, the active theme, the plugins, and the uploaded media; the database holds the content, the settings, and the user records. A backup that captures one without the other cannot restore the site, so the checklist verifies that both are included and that the backup is recent rather than weeks stale. A backup that predates the final build changes is no safer than no backup at all.
Once every check category passes (functional, content, performance, SEO, and security) and staging verification, the build-route scope, and a current backup are all confirmed, the WordPress pre-launch QA checklist is complete and the site is launch-ready. The checklist is the verification pass that confirms an already-built WordPress site is ready, and it ends precisely there, at launch-readiness, for the site owner or developer who ran it against the staging site.
Sites reaching this pass have already been assembled and installed, as set out in how to build a WordPress website; the checklist confirms that finished build is sound. Verification and assembly stay separate concerns here, the build produces the site, the checklist judges it, and neither one moves the site to its public address.
That separation is precisely why the checklist hands the verified build back rather than acting on it. With every category passed and a current backup in hand, the next action is to launch your WordPress website, which the parent build guide carries out. Launch-readiness is the state this checklist delivers; the cutover itself is the build guide’s to perform.


 Gemini