Explore our specialized services, tailored solutions, and industry expertise to elevate your digital presence. From custom WordPress development to seamless integrations, we build high-performing websites that deliver impact.
A WordPressstaging site is a private, server-side test copy of a live WordPress site that lets you safely try updates, design changes, configuration adjustments, and new functionality before those changes affect visitors. If you want to create a WordPress staging site, the goal is to work with a staging copy that mirrors the live site so you can test changes in an isolated environment and verify results before they reach production.
This guide explains how to create and set up a WordPress staging site using three common methods: a host-provided one-click staging tool, a dedicated staging plugin, or a manual site copy. It also covers how to access the staging site, test changes on the staging copy, and move forward with approved updates once validation is complete.
What Is a WordPress Staging Site?
A WordPress staging site is a server-side test copy of a live WordPress site, isolated from production so that changes made on the copy never reach visitors. The live site keeps serving its audience untouched while the staging copy absorbs every experiment, an update that might break a layout, a redesign that needs a second look, a plugin nobody has trusted yet. The live site stays unaffected while the copy absorbs every change.
Isolation is the whole point. Because the staging copy runs in its own space, a mistake there has no audience and no consequences for the real site. A developer can break the copy, study what went wrong, fix it, and break it again, and the live WordPress site never registers any of it. That freedom to fail safely is what a staging copy exists to provide. The isolated test environment stands between an untested idea and the production site it would otherwise endanger.
A staging copy mirrors the live site closely enough to be trustworthy. It carries the same files and the same database content, so a change that behaves well on the copy is a reliable signal that it will behave well once it goes live. The value lies in that fidelity: a test that runs against a faithful copy of production tells the truth, where a test against something only roughly similar does not.
Two distinctions sharpen the picture: how a staging copy differs from a development site built without any live original, and what the staging environment is actually made of.
Staging Site Versus a Local Dev Site
A staging site is a test copy of a live WordPress site, and that origin is exactly what sets it apart from a WordPress dev site built on a local machine. The staging copy begins as a duplicate of something already running in production; it inherits a real site’s files, content, and configuration.
A local dev site has no such ancestor. It runs on a local machine at localhost, assembled piece by piece on the developer’s own computer rather than cloned from anything live.
The contrast comes down to where each one starts. A staging site mirrors an existing live site, so it is the natural place to test changes destined for that very site; whatever gets tested on the copy is being tested against a faithful reflection of production. A local dev site, with no live original behind it, suits early construction and isolated experiments that do not yet answer to a real audience.
Managed platforms such as WordPress.com offer their own staging slots, but the principle holds across all of them: staging copies a live site, while local development builds without one. Because the staging copy descends directly from production, it is where changes to that production site are proven before they ship.
The WordPress Staging Environment
The WordPress staging environment is the files of the live site plus a copy of its database, placed together in an isolated location away from production. Those two parts, the file set and the database, are what a working copy of a WordPress site actually consists of, and reproducing both is what makes the environment a genuine stand-in rather than a hollow shell. One half without the other is not a usable copy; the files need the database, and the database needs the files.
The isolated location takes a few familiar shapes. It might sit on a staging subdomain, in a staging subdirectory of the same site, or in a dedicated staging slot inside a host control panel. Whichever form it takes, the defining trait is separation: the environment sits apart from the live site so that nothing tried inside it leaks outward.
Because it always carries a copy of the live files and database, this same server-side environment is often called a WordPress test environment, named for its purpose rather than its construction, the place where changes to the production site are tried before they count, distinct from a localhost build that answers to no live original.
Files, database, and an isolated address are the constituent parts every creation method has to produce, and the methods that follow each assemble exactly that.
Create the Staging Copy
Creating the staging copy means producing a working clone of the live WordPress site in an isolated location, ready to receive changes. The result is a duplicate of two things together, the site files and the database, set up under a subdomain, a subdirectory, or a host-panel staging slot kept apart from the live site. That copy is what every method here builds toward, and once it exists the live site can stay untouched while work happens on the clone.
Three routes reach the same staging copy, each through a different instrument. A host control panel can clone the live site in a single action. A staging plugin can run the same clone from inside the WordPress admin. Or a developer can copy the files and database by hand.
The end state is identical; only the tool changes. Selecting among them comes down to what the hosting account already offers and how much control over the files and database the work calls for: the host one-click method takes a single action, the staging plugin runs the clone from the dashboard, and the manual route performs each copy step by hand.
Setting up a staging site sits naturally alongside the broader install workflow, since both create a fresh WordPress files-and-database pair from a known source. A developer who has worked through how to install WordPress will recognize the same moving parts here (files in place, a database wired to them) only applied to a copy rather than a first-time setup.
Once the staging copy is created, the lifecycle moves on: the copy gets accessed at its own address, changes are tested on it, and the approved ones eventually reach the live site. The first and lightest route starts at the hosting control panel.
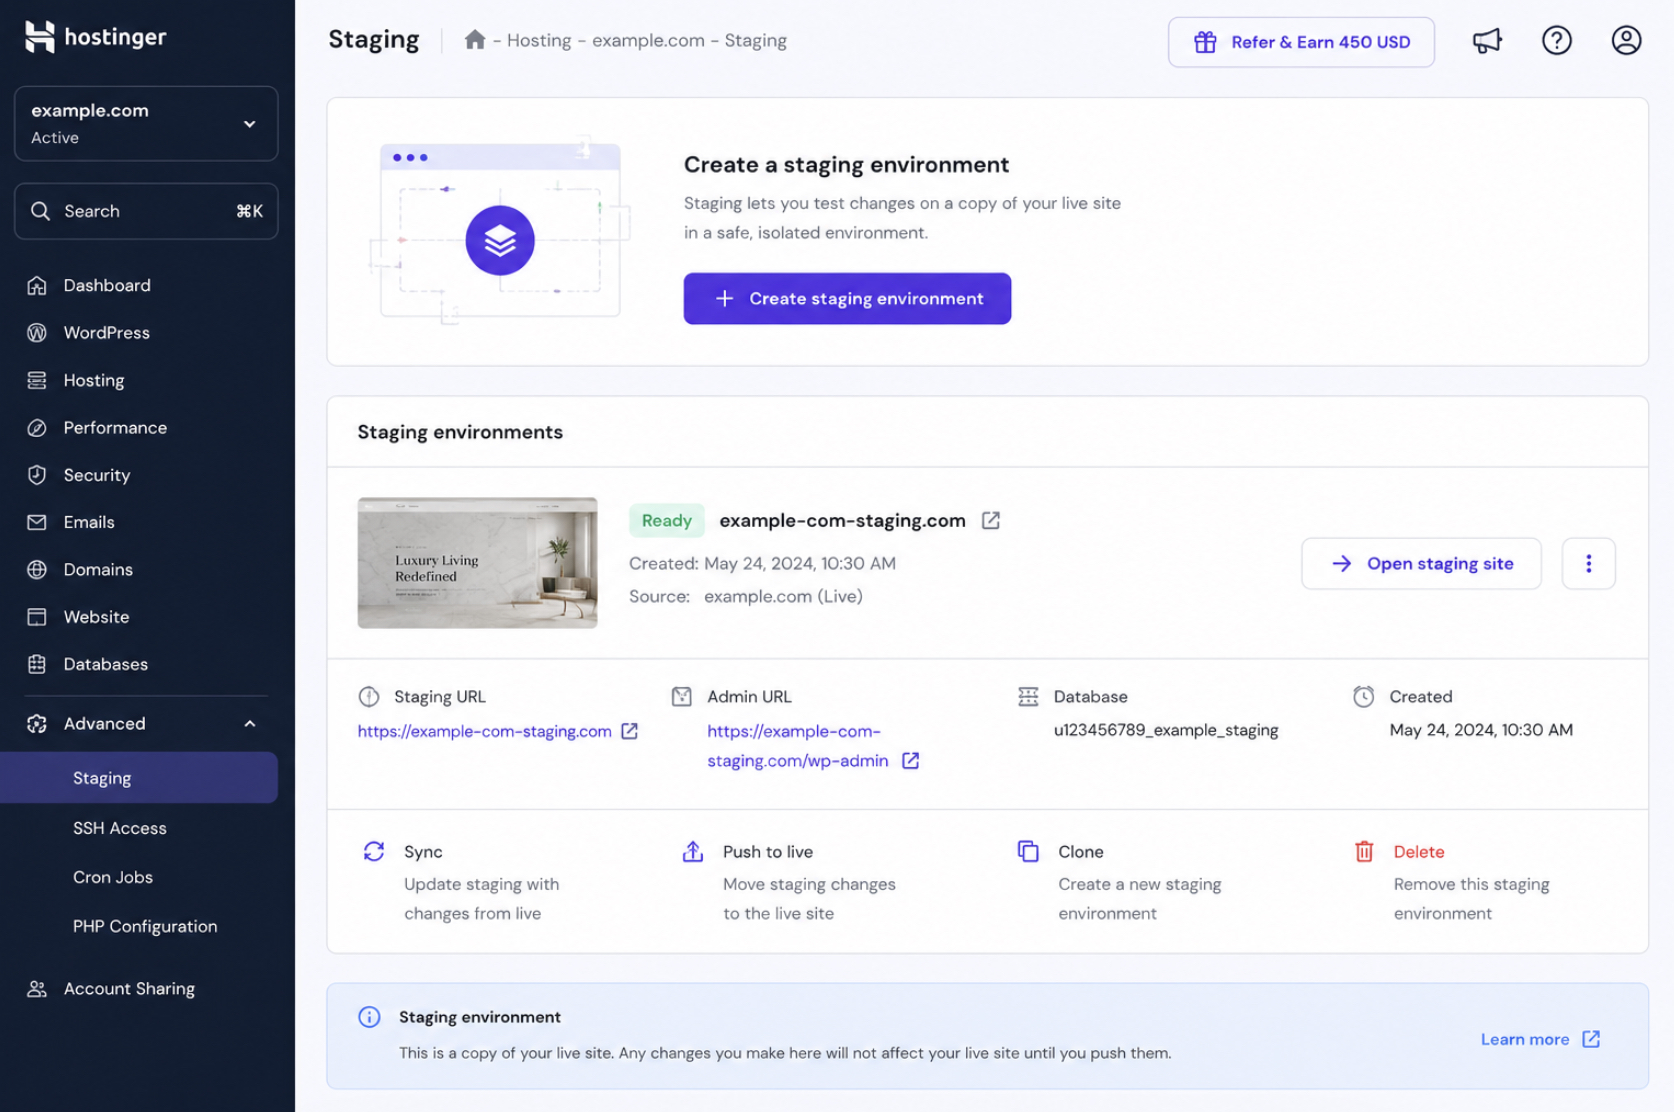
Host One-Click Staging
Host one-click staging is a control-panel action that clones the live site into a staging copy in a single step, with the host doing the file-and-database duplication in the background. The developer never touches the files directly; the staging tool inside the host panel handles the copy and returns a ready staging site. Where a hosting account includes this tool, it produces the staging copy in one action, with no files or database handled by hand.
The flow is short and follows the same shape across panels that offer it:
Open the host control panel for the live site.
Locate the staging tool, usually labelled as a staging or “create staging environment” action.
Run the create action to clone the live site into a staging copy.
Open the new staging site at the address the panel provides.
What comes back from those four steps is the same staging copy any other method would produce, a files-and-database clone of the live site in an isolated location, except the host assembled it. The convenience is real, but it depends entirely on the hosting plan including a staging feature. Accounts without one need a different instrument, and the next route runs the clone from inside WordPress itself.
Staging Plugin
A staging plugin clones the live site into a staging copy from within the WordPress admin, making it the route for sites whose host offers no staging tool of its own. The plugin reads the live site’s files and database, duplicates them to an isolated location, and reports back the address of the resulting copy, all without leaving the dashboard.
Three steps cover it:
Install a staging plugin on the live site and activate it.
Run the plugin’s clone-to-staging action.
Open the staging copy the plugin creates.
The plugin produces the same staging copy as the host method (a clone of the files and database in an isolated location), only the work happens through a dashboard action rather than a control-panel one.
That keeps the whole operation inside WordPress, which suits anyone who would rather not leave the admin or whose host stays out of the staging business entirely. For full control over where the files land and how the database is moved, without depending on any plugin, the manual route is the third option.
Manual Copy
The manual copy route has the developer duplicate the site files and database to an isolated location by hand, with no host tool and no plugin in between. It carries the most steps of the three, and in exchange it gives the most control: every file’s destination and the database’s handling are decided directly rather than left to an automated action.
The work breaks into five steps, in execution order:
Create a subdomain or subdirectory to hold the staging copy.
Copy the live site’s files into that location.
Export the live database and import it into a separate staging database.
Point the staging copy’s configuration file at the staging database.
Update the staging copy’s site address so its database and configuration reference the staging URL rather than the live one.
Setting up the files and a database for the copy mirrors the process of a fresh WordPress setup applied to existing content rather than a blank one, the same pairing a developer follows to install WordPress manually, with the files and database copied from the live site instead of downloaded clean. Done carefully, the five steps leave a complete clone of the live site running under the new subdomain or subdirectory: a staging copy identical to what the host and plugin routes return. With the copy created by any of the three methods, the next move is the same: reach the staging site at its own address to start working on it.
Access the Staging Site
Accessing the staging site means reaching the finished staging copy at its own staging address and signing in to its WordPress dashboard. The copy already exists once one of the earlier methods has finished, so the next move is to open it. A developer or site owner reaches the staging site the same way they would reach any WordPress install: by loading its address in a browser and logging in at the wp-admin screen with the staging copy’s own credentials.
What separates this from working on the live site is the address. The staging site sits at a separate location from the production site, which is exactly why it is safe to work inside. Every edit, every update, every experiment happens on the copy. Nothing a developer does after logging in touches the live site or its visitors until it is deliberately sent there.
Reaching the copy is the gate to everything that follows. Once inside the staging dashboard, the staging site behaves like the real thing (same theme, same plugins, same content), but with no audience watching. That is the working state every later change depends on.
The Staging Site URL
The staging site has its own URL, a distinct web address that identifies the copy and keeps it apart from the live site’s URL. This separate address is the practical marker of isolation: two WordPress installs, two addresses, one of them public and one of them not.
The form of that staging address is recognizable once named. Most setups place the copy on a staging subdomain, something like staging.example.com, or on a staging subdirectory such as example.com/staging. Either pattern points at the staging copy rather than the live homepage, and either one tells a developer at a glance which install they are looking at. The exact scheme varies with how the copy was produced, so the address is worth confirming rather than assuming.
That distinct URL is also where the work gets done. Changes are applied and verified at the staging address, never at the live one. That separation keeps a tested change from ever reaching visitors as a public mistake.
Test Changes on the Staging Site
Testing changes on the staging site means trying every edit on the staging copy first, never on the live site, so visitors never encounter unfinished work. The staging environment is built precisely for this: a server-side WordPress test environment that mirrors the live production site closely enough to trust, yet stays sealed off from it. A change behaves on the copy the way it will behave once it goes live, which is the whole reason the copy exists.
Plenty of work belongs here. Theme switches and theme customizations, plugin installs and plugin updates, core version bumps, content edits, layout and design changes, each one gets applied to the staging copy and then checked. A plugin update that quietly breaks a checkout page reveals itself on the staging site, where no real customer is affected, instead of on production, where every visitor is. Run the change, look at the result, confirm the site still works, and only then treat the change as approved.
Some changes warrant more than a quick look. A theme overhaul or a major version jump deserves a deliberate walkthrough of forms, payments, navigation, and responsive layout before anyone trusts it. That deeper, repeatable verification belongs to a full pre-launch QA checklist, which catches the edge cases a casual review misses. The staging site is where that checklist runs, on a copy that can absorb a broken test without consequence. Once a change clears it, the change is ready to move toward the live site.
Push Approved Changes Live
Pushing approved changes live is the final act in the staging lifecycle: once changes have been tested and approved on the staging copy, they are pushed to the live site, closing the loop that began when the copy was first created. This is the WordPress staging to production step, the deploy that carries finished, verified work from the safe copy onto the public site.
Naming the step is one thing; performing the full cutover is another, and the mechanics of that cutover run deeper than this lifecycle close. The work of moving a finished staging copy onto production (reconciling files, merging database changes, swapping addresses without breaking links) is its own procedure, covered in detail when it comes time to move WordPress from staging to production.
There is also the question of what happens after the first deploy, when the live site keeps changing while a staging copy stands beside it. Keeping the two aligned over time is a recurring workflow rather than a one-time push, and the cadence for that is covered by the steps to keep staging in sync with production. For the staging lifecycle itself, the close is simple: approved work leaves the copy and reaches the live site.
A WordPress staging site, then, is a working copy of a live WordPress site, and using one is the standard safe-change habit for any WordPress site owner. The copy is created, changes are developed and tested on it away from any audience, and only approved, verified work is pushed to the live site: the same create, test, and deploy arc every careful WordPress change follows. From here, the path continues outward, into the cutover that carries each release across and the rhythm that keeps the copy and the live site aligned for the next round of changes.


 Gemini