Explore our specialized services, tailored solutions, and industry expertise to elevate your digital presence. From custom WordPress development to seamless integrations, we build high-performing websites that deliver impact.
To install WordPress manually means performing a WordPress installation directly on a hosting account rather than relying on a one-click installer or automatic setup tool. In this approach, a site owner, developer, or agency installs WordPress manually by working with the WordPress core files, a web server, and a MySQLdatabase through tools such as an FTP client or file manager, a hosting control panel, and a web browser. A manual WordPress install is the by-hand alternative to automated installation methods, giving complete control over the deployment process and environment.
Many users choose to manually install WordPress when they want greater visibility into how the application is deployed, need compatibility with a specific hosting configuration, or prefer direct control over files and database settings. Whether the goal is learning how to manually install WordPress, completing a WordPress manual install on a custom hosting platform, understanding how to manually install WordPress with cPanel, performing install WordPress in cPanel manually, or even planning to install WordPress manually on Windows Server 2016, the core process follows the same foundation.
A manual WordPress installation requires access to a hosting account and consists of preparing the required environment, downloading the WordPress package, uploading the files to the web server, creating and connecting a MySQL database, adding the necessary settings to the wp-config.php configuration file, completing the installation routine, and launching the site’s first boot experience. Once these components are in place, the result is a live WordPress website ready for customization, content creation, and ongoing management.
WordPress Manual Install Requirements
A manual WordPress install requires a small set of resources to be in place before the first file is ever downloaded. These requirements are the server environment and the materials the by-hand procedure consumes: somewhere to host the site, a server that can execute WordPress, a database for its content, and the WordPress software itself. Confirming the manual install requirements first prevents a half-finished setup later, because every later step assumes these are already present.
The central requirement is web hosting. A web hosting account provides the web server where the WordPress files are hosted and run, and it is the one resource the whole install is built on top of. Most hosting accounts include the rest of what a manual WordPress install needs, a PHP-capable server and MySQL, which is why the hosting account, paired with a domain name pointed at it, is the natural starting point. The host supplies the environment; the manual procedure supplies the steps.
Before downloading anything, the following resources should be ready:
A web hosting account. An active account on a web host, with access to its control panel and a domain name pointing at the server.
A PHP-capable web server. WordPress runs on PHP, so the server needs a current version installed, PHP 7.4 or higher being the practical minimum for a modern release.
An empty MySQL database with a database user. A fresh, empty database on MySQL 5.7 or higher (or the equivalent MariaDB 10.3 or higher), plus a database user that has rights on it.
The downloaded WordPress zip. The latest WordPress core package, obtained as a zip file and kept on hand for the upload step.
Deeper PHP setup belongs to its own topic; for the install itself, the requirement is simply that PHP is present at a workable version.
This hands-on checklist is what separates the manual route from the host’s automatic path. The one-click option, often presented as the convenient alternative to this procedure, hides all four of these prerequisites behind a single button and provisions the database for the site owner. The manual install does the opposite: it surfaces each requirement so the person doing the setup knows exactly what the server holds.
For anyone who would rather skip the by-hand work, the host’s automated route is covered separately as the WordPress 5-minute install; the rest of this procedure assumes the manual path, with all four resources confirmed. With the hosting account, PHP server, empty MySQL database, and the WordPress zip ready, the next step is getting the core files in hand.
Download the WordPress Files
Downloading the WordPress files means obtaining the latest WordPress core package as a single zip from wordpress.org, the official source. The manual install begins in earnest here: the package that the requirements step listed as the fourth thing to have in hand is now the thing to fetch. One file, one source, one version to take.
The version to take is always the latest version. WordPress.org publishes the current core release as a downloadable zip, and that current release is the one a manual WordPress installation is built on. A site owner, developer, or agency obtains it, saves it to the local machine, and sets it aside, ready for the next move. The package stays a single compressed file for now; the upload step decides where it gets unpacked, either on the local machine before transfer or on the server after it arrives.
That brevity is deliberate. Choosing a mirror, checking a release checksum, or weighing one version against an older one is a separate concern with its own walkthrough, covered in the guide on how to download WordPress. For the install itself, the core package in hand is all that the upload step needs.
Upload WordPress to the Web Server
Uploading WordPress to the web server means placing the extracted WordPress files into the server’s root directory, the public_html folder where the live site is served from. The downloaded zip from the previous step is the payload, and the web server is the destination. The root directory, public_html, is where the files land so that the domain resolves to a working WordPress installation rather than an empty folder.
One detail decides whether the domain root loads WordPress or a blank page. The official wordpress.org zip unpacks into a single top-level folder named wordpress, so an extracted package holds public_html/wordpress/index.php rather than public_html/index.php. Left that way, the install answers at example.com/wordpress/, not at the domain root.
The fix is the same for either upload method: the contents of that wordpress folder move up one level so the core files sit directly in public_html. A deliberate subfolder install, such as a staging path or a blog kept apart from the main site, keeps that nested directory on purpose and answers at the matching path, but the default manual install puts the files at the web root.
Two instruments perform this transfer, and a manual install uses whichever one the hosting account makes convenient.
The first is an FTP client, a desktop application that connects to the server over a file-transfer connection and sends files that were already unpacked on the local machine.
The second is the cPanel File Manager, an in-browser tool built into the hosting control panel that uploads the compressed package and unpacks it on the server.
Both land the same WordPress files in the same root directory. The FTP client comes first.
FTP Client
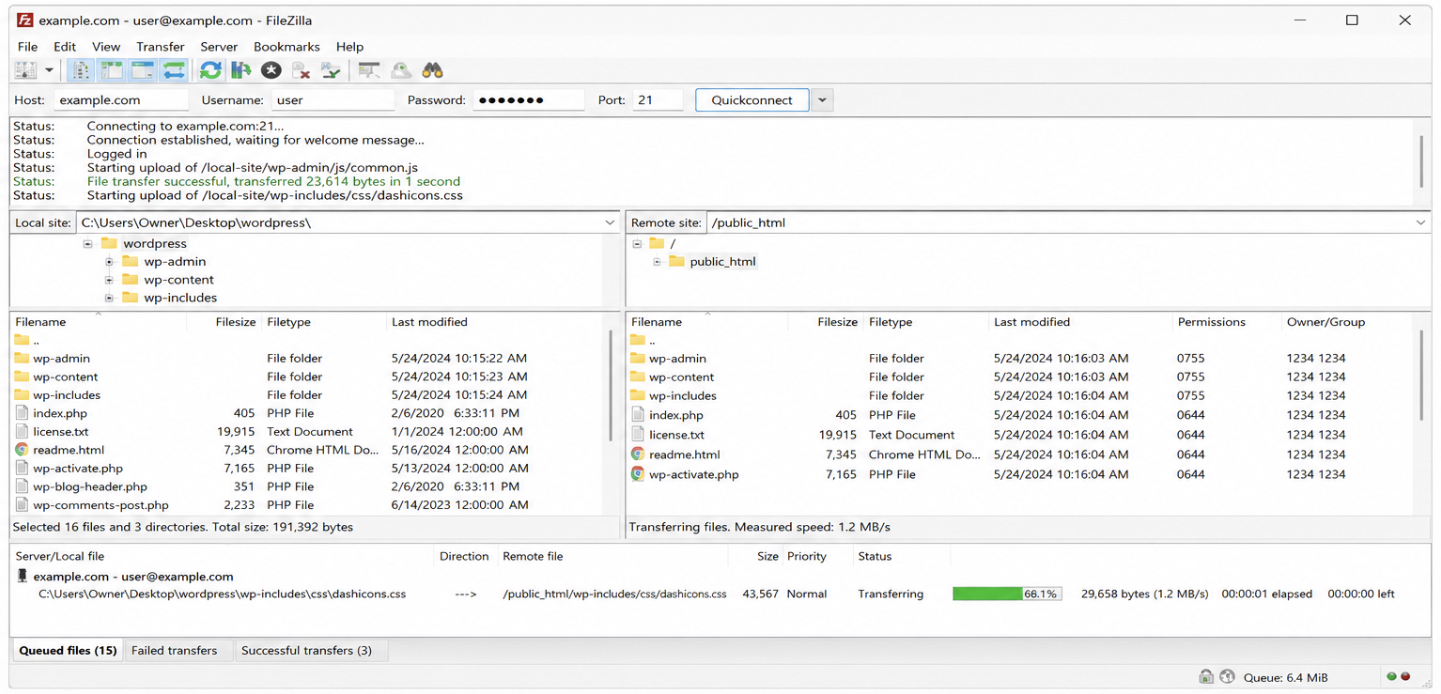
An FTP client is one of the two instruments that perform the upload: a desktop file-transfer application, such as FileZilla, that connects to the web server and moves the WordPress files into public_html. The upload step uses it as a tool, and the client’s whole job is to carry the core files from the local machine to the root directory on the host. An FTP client sends individual files, not a compressed archive, so the package gets unpacked first.
Unzipping comes before any connection. Extract the downloaded wordpress.org zip on the local machine, then open the wordpress folder it produces so the loose core files, wp-admin, wp-includes, index.php, and the rest, are ready to send. Those loose files are what travels, not the zip.
The client connects to the host next. Connecting requires four details from the hosting account: the host address, the username, the password, and the port. With those entered, the client opens a session to the web server and shows two panes side by side, the local machine on one side and the server on the other.
Set the server pane to the root directory, public_html, and the local pane to the inside of the extracted wordpress folder, then select the core files there rather than the folder that contains them.
Transferring the files is the final move. The extracted WordPress core files travel from the local pane into public_html, and because the selection started inside the wordpress folder, they land directly at the web root rather than inside a public_html/wordpress subfolder.
Once the transfer finishes, the same core package that came down from wordpress.org sits on the web server, ready for the database step. FileZilla is one common client and a fair example, though it is not the only one; the connection details and the destination directory stay the same whichever client does the work. The cPanel File Manager reaches the same destination by a different route.
cPanel File Manager
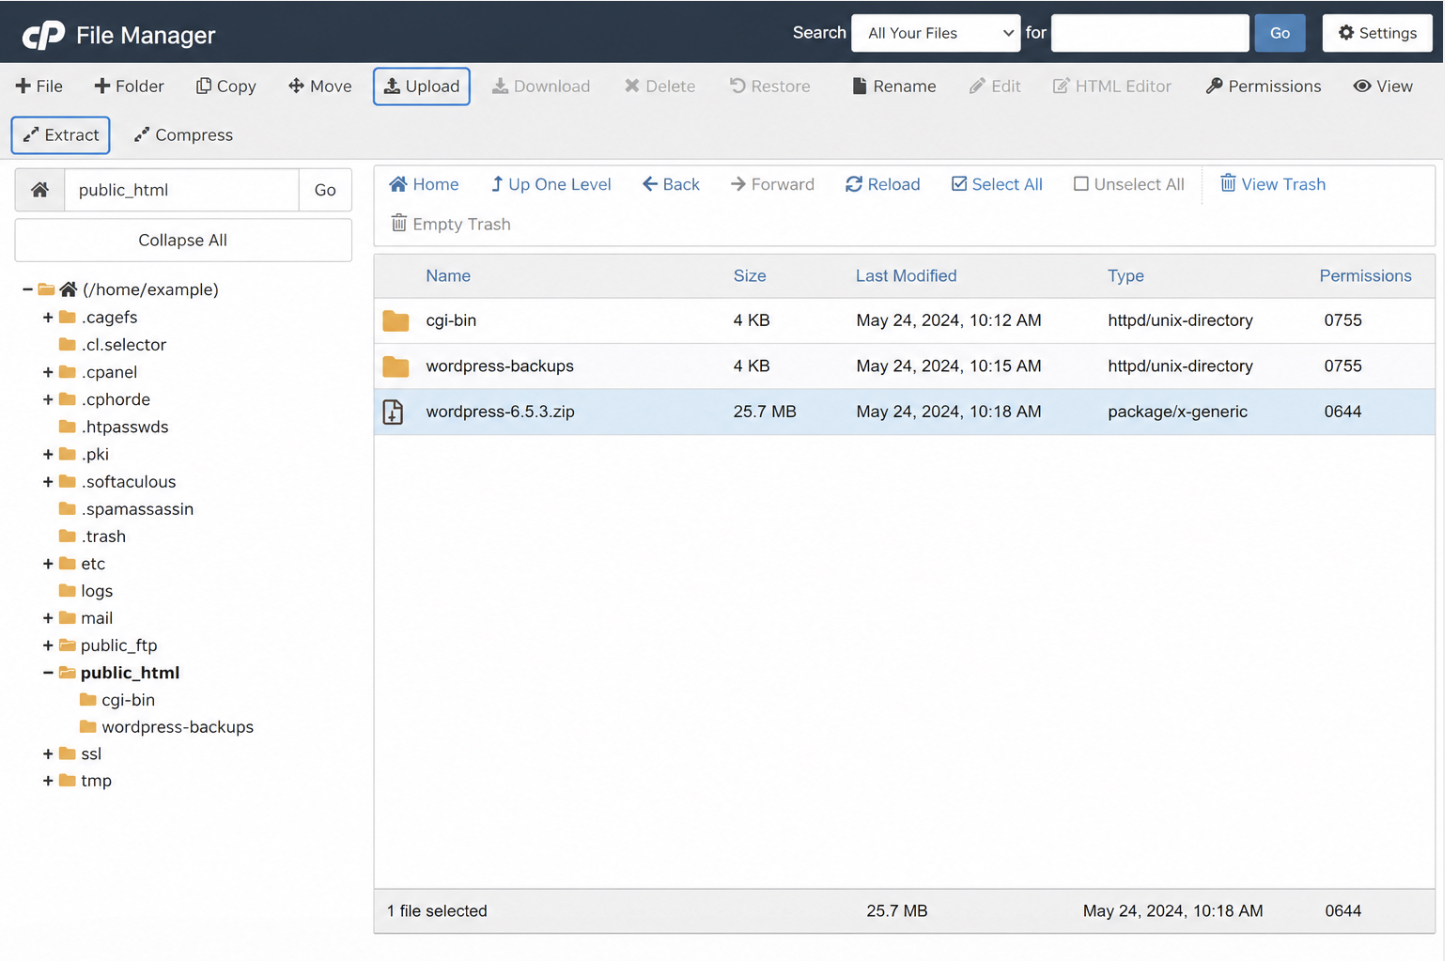
The cPanel File Manager is the in-browser alternative to the FTP client: a file tool built into the hosting control panel that uploads and extracts the WordPress files inside public_html without a separate desktop application. Where the FTP client connects from the local machine, the File Manager opens in a web browser as part of cPanel itself, so the upload happens entirely inside the hosting account.
The File Manager opens at the root directory. Inside cPanel, locate the File Manager, open it, and navigate to public_html. The next move is to upload the WordPress zip straight into that folder, using the toolbar’s upload control rather than transferring loose files one by one. The whole core package travels up as a single compressed file, so no local extraction happens on this route.
Extracting the zip in place comes next. With the package sitting in public_html, the File Manager’s extract control unpacks it on the server, and because the official zip carries a top-level wordpress folder, that extraction produces public_html/wordpress rather than core files at the root.
Moving the contents up finishes the job: open the new wordpress folder, select everything inside it, and move those files into public_html so wp-admin, wp-includes, and index.php sit directly at the web root, the same place the FTP route delivers them to. The destination matches, only the instrument differs. With the core files on the web server by either route, the next thing a manual WordPress installation needs is somewhere to store its data: a MySQL database and a user to reach it.
Create the MySQL Database and User
A MySQL database is the empty storage container a manual WordPress installation requires before the install can run, and creating it means provisioning that database together with a database user that holds the right to read and write it. WordPress keeps every post, page, setting, and account inside this database, so the by-hand route cannot reach the install screen until an empty MySQL database exists and a database user is attached to it. A one-click installer hides this step. The manual install exposes it, because the site owner, developer, or agency supplies the connection facts that WordPress later reads.
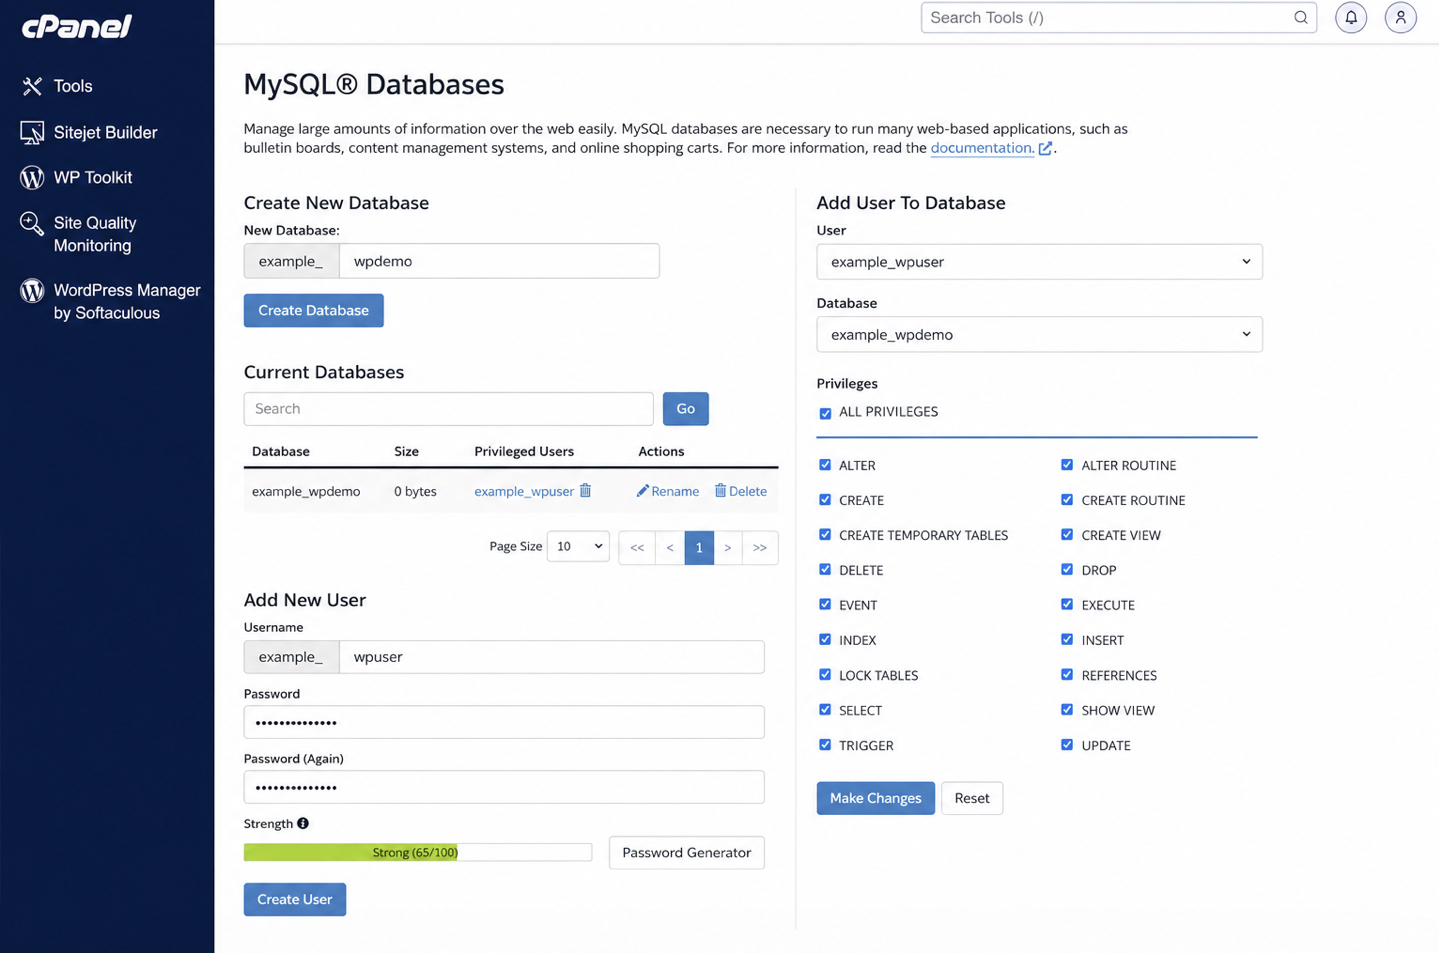
The cPanel MySQL Databases tool is the usual place to do this on a shared hosting account, and phpMyAdmin covers the same ground on hosts that expose it instead. In cPanel, the “Create New Database” field takes a database name. Enter a short, recognizable name, submit it, and the empty database appears in the list below. The database holds no tables yet. WordPress writes its own tables during the install, so an empty container is exactly what the procedure needs at this point.
A database with no user behind it is unreachable. After the database exists, locate the “Add User” controls, create a database user with a password, then open the “Add User To Database” panel to attach that user to the database just created. The grant step matters here: select the user, select the database, and grant all privileges so the user can create tables, insert rows, and alter records. WordPress performs all three actions during installation, and a user without full privileges stalls the install with a connection or permission error.
Three facts come out of this step, and a manual WordPress installation carries all three forward: the database name, the database user, and the password set for that user. Each one becomes a value WordPress reads to reach its data, so it helps to record them as they are created. With the empty database provisioned and the user granted privileges on it, the installation screen has somewhere to write to.
The WordPress Installation Screen
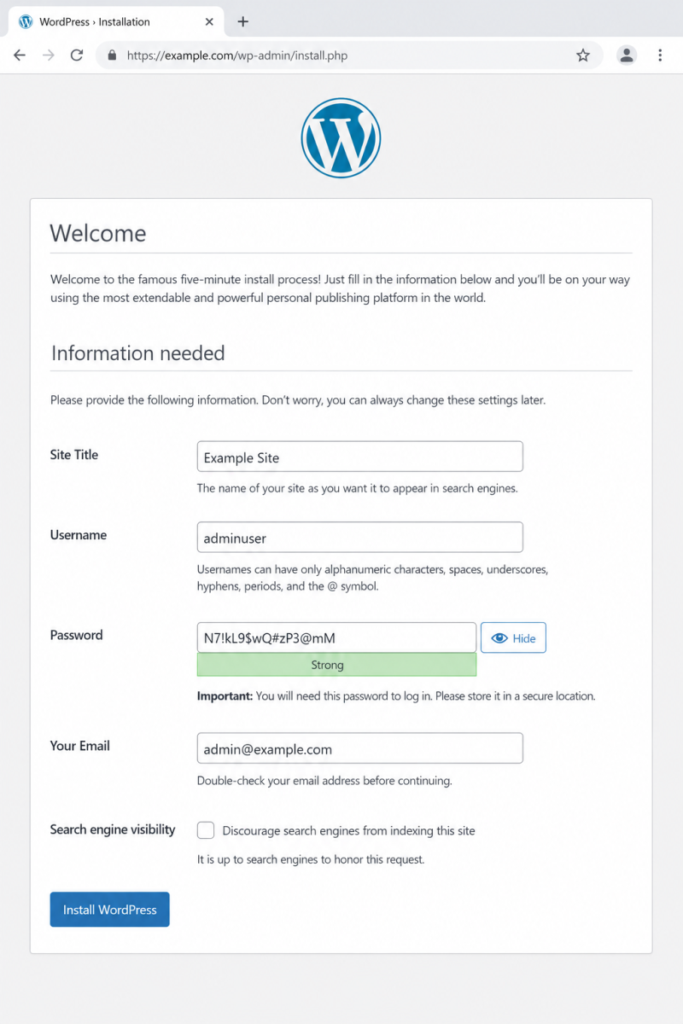
The WordPress installation screen is the five-minute install opened in a web browser, the short on-screen process that turns the uploaded files and the empty database from the previous step into a working site. The installation process loads at the install URL, which on a live domain reads https://example.com/wp-admin/install.php, and it collects the handful of facts WordPress needs to create its administrator account and write its first records. This screen is where the manual WordPress installation stops being files on a server and starts being a site.
The install screen presents a small set of text boxes, and the installation process reads them in order. The first text box takes the site title, the name shown across the front end. The next collects the admin username, the login name for the first administrator. The password text box follows, holding the credential paired with that username, and the email text box captures the address WordPress uses for recovery and notices.
One check box sits below these fields under the heading “Search engine visibility,” and it controls whether search engines are invited to index the new site. Leave that check box for the moment; the search-engine-visibility decision is a first-boot setting handled right after the install completes.
Click “Install WordPress,” and the installation process writes its tables into the MySQL database created in the previous step, stores the administrator account, and reports success. The completed install produces a live WordPress site reachable at the domain. The same connection facts the database step produced, the database name, the user, and the password, can also be written by hand rather than through this wizard, which is where the configuration file comes in.
The wp-config.php Configuration File
The wp-config.php configuration file is the PHP file that holds the database connection details WordPress reads to reach the database created in the earlier step. The installation wizard writes this configuration file automatically when the install URL loads, but on a manual WordPress installation the same config php file can be created by hand from the bundled sample, which is the path that gives the site owner, developer, or agency full control over the connection values before the install ever runs. The file sits in the WordPress root alongside install.php, and WordPress loads it on every request to open its connection to the database.
Four constants carry the database connection credentials, and each one maps directly to a value produced when the MySQL database and user were created. The site owner, developer, or agency who wants to learn the full set of recommended safeguards before opening the file can follow the route on how to “edit wp-config.php safely” for the security keys and debug options that sit beyond the install-time values. For the connection itself, the install-time constants are these:
DB_NAME takes the database name entered in the “Create New Database” field. DB_USER takes the database user added to that database, and DB_PASSWORD takes the password set for that user. DB_HOST stays at localhost on the vast majority of shared hosting accounts, because the database server runs on the same machine as the WordPress files; only a host that runs MySQL on a separate server replaces that default.
The table prefix defaults to wp_, the string WordPress prepends to every table name it creates. Enter the three database values, leave localhost and wp_ in place unless the host documents otherwise, save the configuration file, and WordPress can reach its database the moment the install runs.
With the connection details in place and the install complete, the new site faces its first decisions. The first is whether search engines should see it yet, the search-engine-visibility setting that the install screen previewed and left unresolved. The second reuses the very credentials entered into the configuration file: the admin username and password open the wp-admin login, the entry point to the dashboard where the first administrator manages the new WordPress site.
Search Engine Visibility Setting
The search-engine-visibility setting is the first-boot decision, made at the manual installation, on whether search engines may index the freshly built WordPress site. It controls one thing only: whether the new site is discoverable in search results, or held back while construction continues. WordPress exposes it as a single discourage-indexing checkbox, and the checkbox sits on the same install screen that just finished writing the administrator account and the database credentials.
Leaving the site discoverable is the correct setting once the install is meant to go live immediately. Discouraging indexing is the deliberate choice while a manual WordPress installation is still being shaped, when themes, pages, and structure are half-finished and not ready for a search engine to crawl. The discourage-indexing checkbox, when ticked, requests that search engines not index the site; left unticked, it permits indexing. A site owner, developer, or agency decides this at the first admin visit, not weeks later, because the setting is recorded during the install itself.
One caution belongs here, kept short. The visibility setting is a request, not an enforced block: it discourages indexing rather than preventing it, so the same checkbox is the place to revisit once the site is finished and ready to be found. With that one decision recorded, the manual install has nothing left to do on the install screen, and the next move is to open the dashboard for the first time.
Log In to wp-admin for the First Time
The first wp-admin login is reaching the WordPress dashboard with the administrator login credentials that were created during the install. Those login credentials, the administrator username and password, were set on the install screen a moment earlier, so the first login simply puts them to use. The site owner, developer, or agency opens wp-admin by appending the admin path to the site address, then enters the username and password to log in.
What appears next is the dashboard, the control panel for everything the new WordPress site will hold. The dashboard landing is the proof that the manual route worked end to end: files uploaded, database connected, install screen completed, credentials accepted. From a blank server directory, the completed manual WordPress installation is now a live site, ready to receive themes, pages, and content.
That first login is also where the install ends and the next stage of work begins. Turning a fresh dashboard into a published, content-bearing site is a separate procedure, documented in how to start a WordPress blog, which continues from the point this first login reaches. For the wider manual-install reference, including the route variations and the one-click alternative left to the host installer, the parent overview of how to install WordPress covers the full procedure. The manual installation itself is done: WordPress is installed, the administrator can log in, and the site is live.


 Gemini