Explore our specialized services, tailored solutions, and industry expertise to elevate your digital presence. From custom WordPress development to seamless integrations, we build high-performing websites that deliver impact.
A WordPress site owner can create a WordPress ecommerce website that takes payments, manages products, and launches as a fully functional online store without locking the business into a single platform path. This build sequence covers the complete process behind creating an online store with WordPress: choosing a domain and hosting environment, configuring WordPress with an ecommerce plugin, adding products, connecting payment and shipping settings, and preparing the store for launch. A WordPress ecommerce website keeps the site self-hosted and flexible while still supporting modern storefront features for physical, digital, or hybrid products.
For many site owners, ecommerce WordPress development becomes the specialized branch of the broader website-building workflow: selecting the CMS, structuring the website, configuring commerce functionality, and developing the storefront around customer transactions. If you are still evaluating content management systems before building your store, the CMS selection framework belongs earlier in the website-planning stage. Once the WordPress foundation is chosen, the ecommerce specialization begins with the store architecture, checkout flow, catalog structure, payment processing, and launch preparation.
Whether you want to make a small product catalog or develop a scalable online store WordPress build with multiple product categories and shipping regions, the process follows the same end-to-end structure: build the website foundation, configure ecommerce capabilities, create the storefront experience, test the purchase flow, and launch the store publicly. This WordPress ecommerce tutorial now moves into the core terminology and structural concepts behind how to create an ecommerce website with WordPress before the practical setup steps begin.
What Is a WordPress Ecommerce Website?
A WordPress ecommerce website is a self-hosted online store built on WordPress with an ecommerce plugin added to it. The store is self-hosted, which means its files and database run on hosting the owner controls, in contrast to a hosted software-as-a-service store where the platform owns the infrastructure and the merchant rents space inside it. The store is a plain WordPress site with product, payment, and shipping capability layered on top.
The store consists of several parts that work together:
WordPress core, the content management system that runs the site
An ecommerce plugin, most commonly WooCommerce, that adds selling capability
A domain name and hosting, the address and the server space the store occupies
A theme that controls how the storefront looks
Store pages such as shop, cart, and checkout
Products, the items listed for sale
Payment and shipping settings that process and fulfil orders
The store exists to sell products or services online and collect payment for them. The ecommerce plugin is the component that adds that selling capability to an otherwise ordinary WordPress site; it is not a separate destination but a layer on the same platform. Every part above attaches to one foundation, and the first piece of that foundation is the address customers reach the store at: the domain name.
Domain Name for Your Ecommerce Website
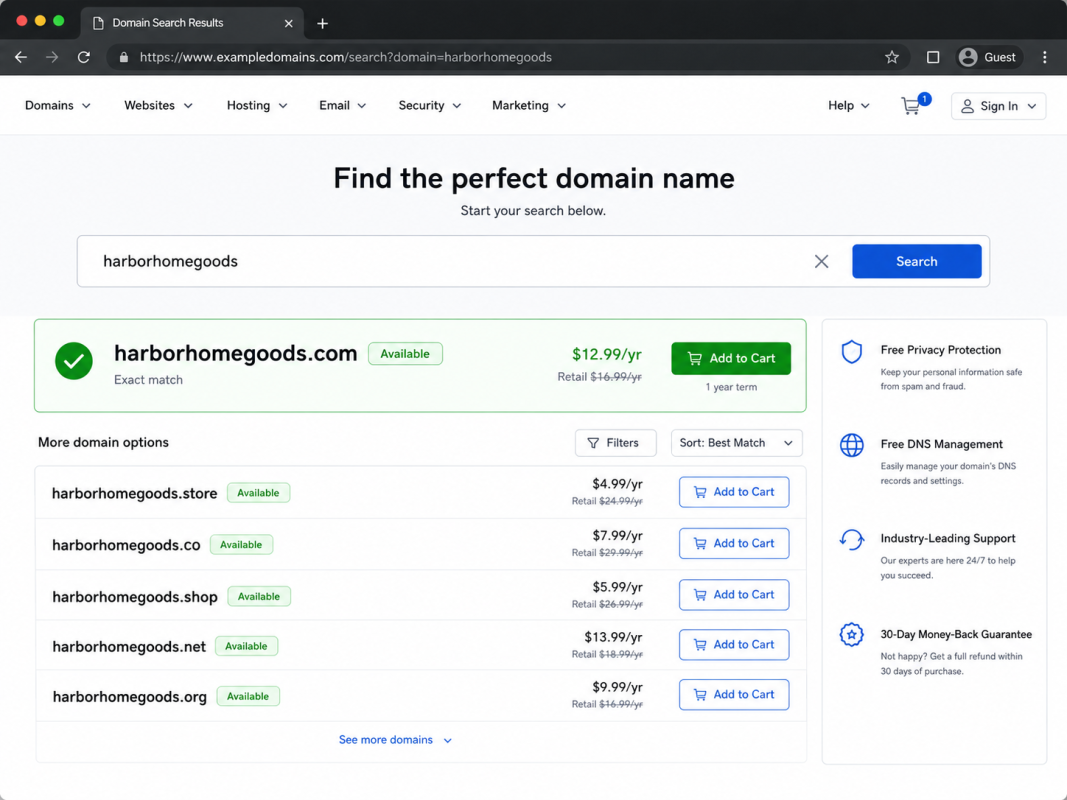
A domain name is the store’s web address, and it represents the first prerequisite the store needs before anything is installed. The domain name is what customers type to reach the store and what every link to it resolves to, so it carries the store’s identity as much as its location. A good store domain is short, brandable, and easy to recall, paired with a store-appropriate top-level domain such as .com, the default for a commercial site, or .store, a top-level domain that signals retail directly.
A domain name costs a small recurring fee in USD per year, typically a low double-digit figure for a .com or .store, and registrars often bundle the first year with a hosting plan at no extra charge. The domain is registered through a domain registrar, then either registered with or pointed at the hosting account that will run the store, so the address and the server space connect. A registrar search box shows whether a chosen name is available and at what yearly price before it is secured.
With the address chosen and secured, the store has a name and a destination but nowhere yet for its files to run. The second prerequisite supplies that: hosting.
Hosting for Your Ecommerce Website
Hosting is the server space where the store’s files and database are hosted and served from, and it is the second prerequisite the WordPress ecommerce website requires after a domain name. Hosting holds every file the store runs on and the database that records its products, orders, and customers, serving them to visitors whenever the store is requested. A store needs more from hosting than a simple blog does, because it processes payments and carries a catalog rather than just text.
A store-suitable hosting plan supports SSL so that payment and customer data travel encrypted, which is required for any site that handles payments. Beyond SSL, the plan provides enough storage and bandwidth, measured in GB, to hold a growing product catalog and serve traffic without slowing down, plus the performance a checkout needs to stay responsive.
Most ecommerce-suitable plans also include a one-click WordPress install, which sets up the content management system on the host in a single step rather than a manual upload. The choice of host stays open: any plan that supplies SSL, sufficient storage and bandwidth, and a one-click installer supports the store, and no single provider is the required path.
Hosting costs a recurring fee in USD per month, billed monthly or as USD per year when paid annually, and it is the largest single line item in the build. With the domain pointed at a host that supplies SSL, storage, bandwidth, and a one-click installer, the foundation is complete and the store is ready for its software. Installing WordPress comes next.
WordPress Installation
WordPress installation is the step that puts the content management system onto the hosting account, turning paid-for server space into a working WordPress site that the ecommerce build will grow from. With the domain registered and the host in place, this is where the store’s foundation is laid: WordPress is the software that every later step depends on, and the WordPress ecommerce website cannot exist until WordPress itself runs on the host.
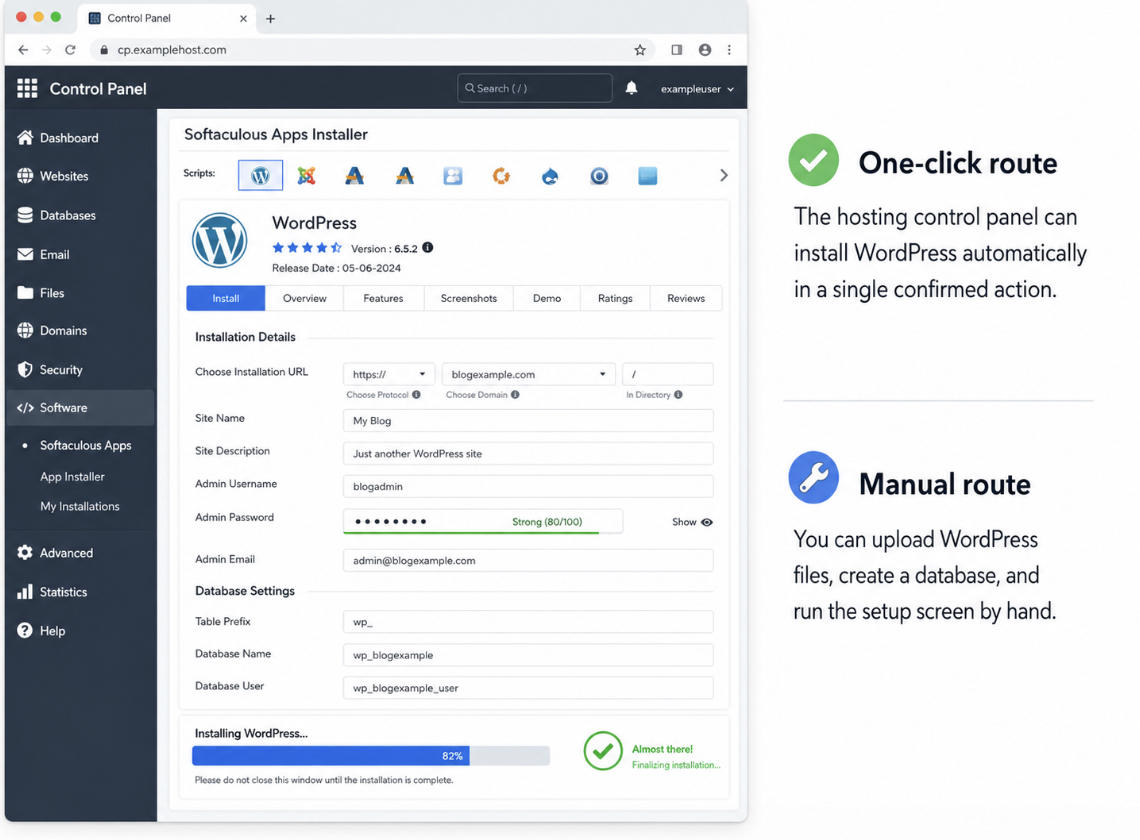
Two routes install WordPress. The one-click installer is the common path. Most ecommerce-suitable hosting plans bundle an application installer, a Softaculous-style tool in the hosting control panel, that downloads, unpacks, and configures WordPress against the account’s database in a single confirmed action.
The manual route does the same work by hand: download the WordPress files, upload them to the server, create a database, and run the setup screen that finishes in a few minutes. The one-click installer reaches a running site faster and suits a first store; the manual route gives more control over where and how the files sit. A step-by-step account of either route, including the manual upload and database creation, sits in the dedicated coverage of how to install WordPress.
The install itself follows a short, ordered sequence:
Choose the install location: the root of the domain, so the store answers at the bare domain name rather than a subfolder.
Set the administrator credentials: an admin username and a strong password, which become the keys to the dashboard.
Run the install: the host or the setup screen writes the WordPress tables into the database and reports the site as installed.
Log in to wp-admin: the WordPress dashboard opens at the /wp-admin/ address using the credentials just set.
The standalone WordPress install walkthrough works through each step in full; the ecommerce build needs only enough to reach a working dashboard.
A fresh WordPress install is a site, not a store. Logging in to wp-admin confirms WordPress runs on the host, yet what stands there is a plain WordPress site. It publishes pages and posts, but it has no cart, no checkout, and no way to take an order. The ecommerce capability arrives with a plugin. Installing that plugin is the step that turns the running WordPress site into a store able to sell.
WooCommerce Installation
WooCommerce installation adds the WordPress ecommerce plugin to the running WordPress site, the build action that turns a plain site into a store. WooCommerce is the WordPress plugin that gives a site the cart, the checkout, the product catalog, and the order handling that a plain WordPress install lacks; installing it is build step four, and it depends on the WordPress install completed before it, because a plugin can only be added to WordPress once WordPress itself is running. WooCommerce is also what separates an ecommerce build from a plain WordPress build: every step before it set up a generic site, and this is the one that commits it to selling.
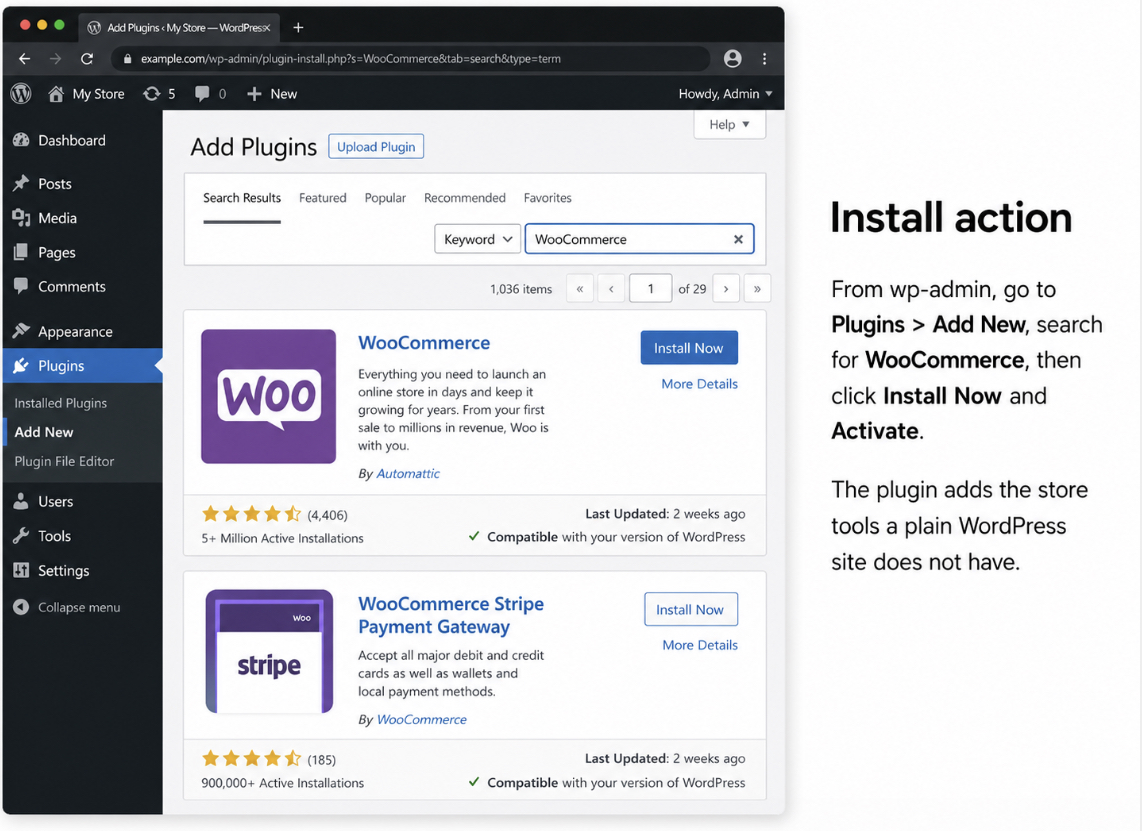
Installing WooCommerce is a single short action from inside the dashboard. From wp-admin, the path runs Plugins > Add New, then a search for WooCommerce surfaces the plugin, the Install button downloads it, and the Activate button switches it on. The plugin is free, it sits in the official WordPress plugin directory, and the whole install resolves in one pass without leaving the dashboard.
Activation does two things at once. It launches the WooCommerce setup wizard, the guided configuration screen that opens automatically the first time the plugin runs, and it leaves the plugin installed but unconfigured. The site now carries the functional components of a store: the database tables for products and orders exist, the cart and checkout code is loaded, and the storefront pages are queued. None of it holds the store’s own details yet. WooCommerce knows how to sell; it does not yet know what the store sells, in which currency, to which places, or under which shipping and tax rules. Those answers come from the wizard that activation just opened, which is where the store’s commerce settings are configured.
WooCommerce Setup
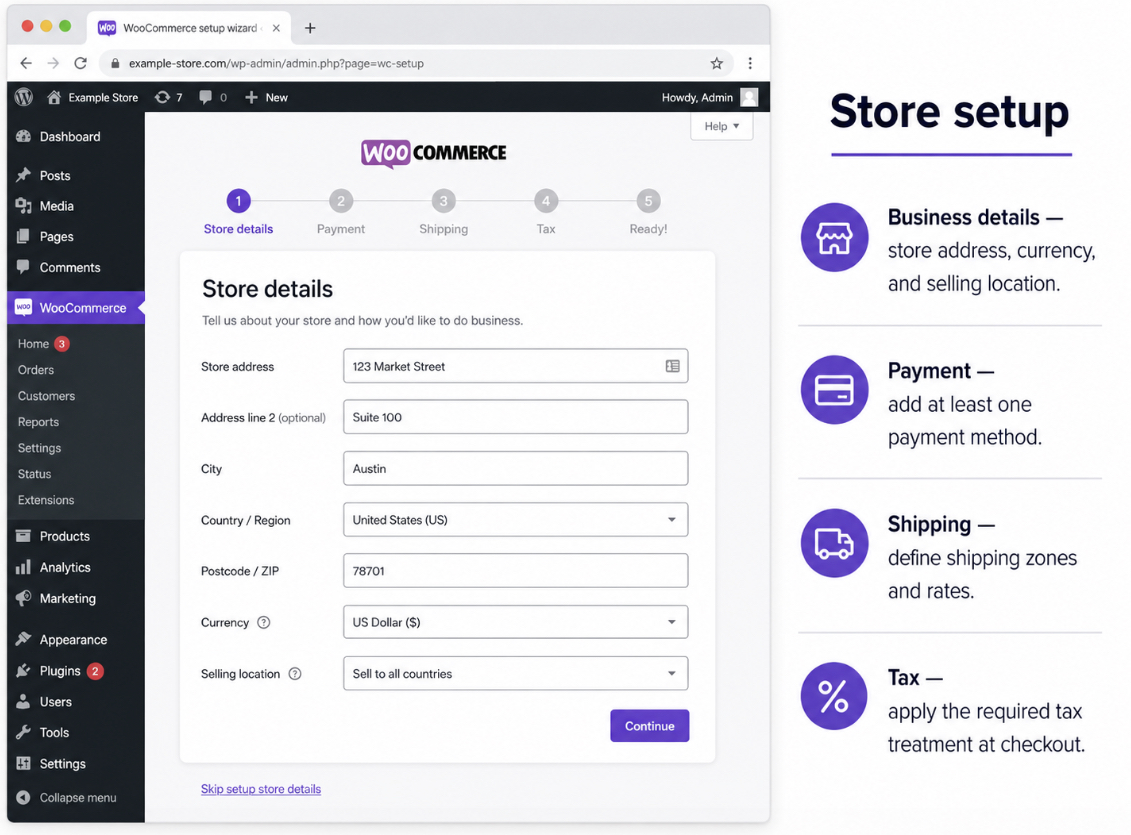
WooCommerce setup configures the store’s commerce settings through the setup wizard that activation launched, the point at which an installed-but-empty plugin becomes a store that knows how to take an order. With WooCommerce active, the wizard walks through the base configuration in order, the foundation the WordPress ecommerce website needs before it can list a product or accept money. Each step records one field, and the wizard moves through them in this order:
Business details: the store address, the selling currency, and the location the store sells from and to.
Payment: at least one payment method, so the checkout can take money for an order.
Shipping: the zones the store ships to and the rate assigned to each zone.
Tax: the tax treatment the store’s selling location requires, applied at checkout.
The setup covers base configuration only; the store grows on top of it.
Business details come first. The wizard records the store address, the selling currency, and the location the store sells from and to. The address establishes where the business operates, the currency fixes the unit every price and total is shown and charged in, US dollars for a store pricing in USD, and the selling location sets the geography the later shipping and tax rules apply against. These details are what tells WooCommerce who the store is before it handles a single order.
Payment configuration follows, because a store that cannot take payment is not yet a store that can sell. The setup enables at least one payment method so the WordPress ecommerce website can accept money for an order (a card-processing gateway, an account-based option, or both), and connecting one method is enough to make the checkout functional. Without an active payment method the cart fills and the checkout opens, but the order cannot complete; enabling a method closes that gap and makes the store able to take orders.
Shipping is configured next, for any store that sends physical goods. The setup defines shipping zones, the regions the store ships to, and assigns each zone a rate, whether a flat fee in US dollars, a free-shipping rule past a spend threshold, or a per-region charge. A zone groups the destinations that share one set of rates, so a domestic zone and an international zone can each carry their own price. Mapping zones to rates is what lets the checkout quote a correct delivery cost the moment a customer’s address is known.
Tax closes the base configuration. The setup enters the tax treatment the store’s selling location requires, a percentage rate applied at checkout, or a flat charge in US dollars where that applies, so the totals a customer sees include the tax the store is obligated to collect. This is the base tax setting only; the store’s selling location and the wizard’s standard rate fields cover the build, and the deeper layers a larger catalog might need sit outside the first configuration.
With business details recorded, a payment method live, shipping zones and rates mapped, and tax set, the store is configured and able to take an order. What it does not yet have is a storefront a customer would recognize. The configured store still has whatever default appearance WordPress installed with. Giving the store its own look is the next step, and that look comes from the theme.
Theme for Your Ecommerce Website
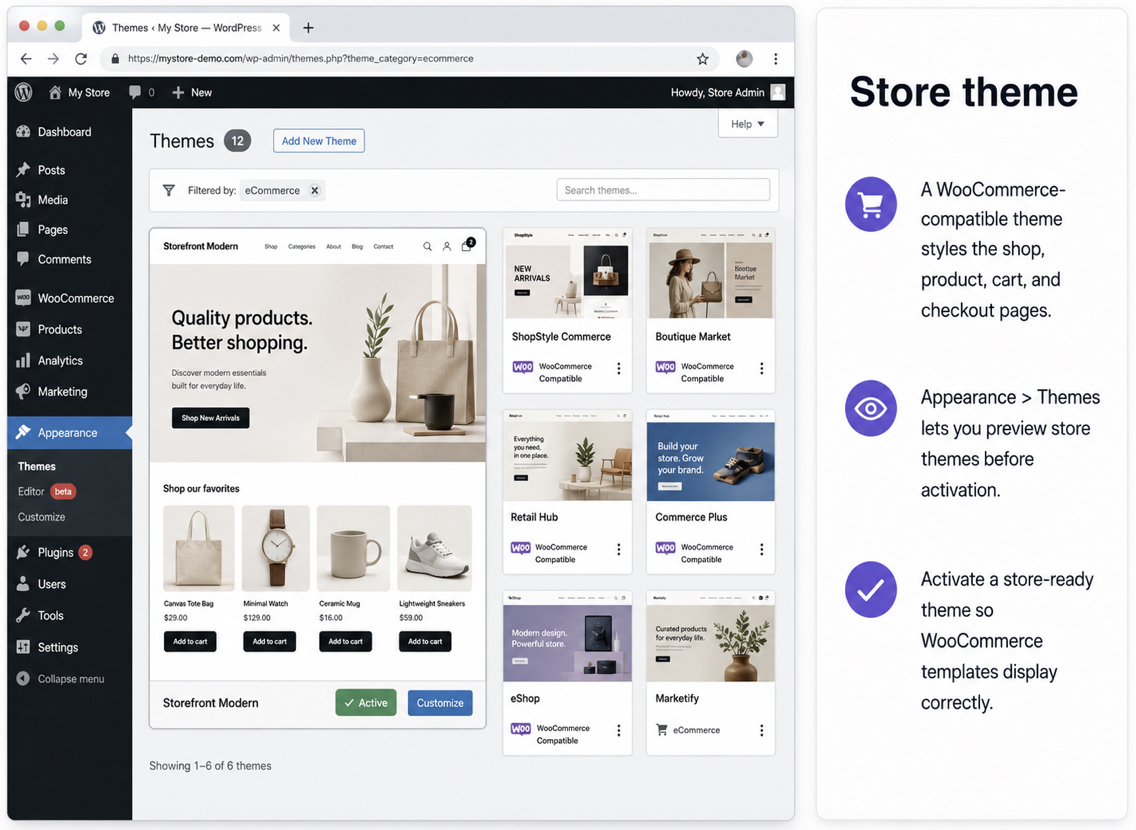
A store theme is the storefront look of the WordPress ecommerce website, the visual layer that controls how the shop, product pages, cart, and checkout appear to a customer. The theme is chosen after the platform is built, once WordPress runs and WooCommerce is active, because the theme styles a working store rather than starting one.
A store theme supports WooCommerce. That support is what separates a store-capable theme from an ordinary WordPress theme: it carries product, cart, and checkout templates that render the WooCommerce shop, the single-product layout, the cart page, and the checkout flow correctly. A theme without WooCommerce compatibility displays posts and pages well but mishandles the commerce templates, so a WooCommerce-compatible theme is the requirement for a store. WordPress Appearance > Themes lists available themes; filtering the directory to ecommerce or previewing a store theme shows whether it carries those storefront templates before activation.
Choosing a store theme follows one of three routes. A prebuilt WooCommerce theme installs and activates from Appearance > Themes and delivers a ready storefront. A page builder assembles store layouts visually on top of a base theme. Custom development produces a bespoke storefront for a store that needs one. The trade-offs between a prebuilt theme and custom development belong to the deeper coverage of custom WordPress development vs themes, and the visual-assembly route is detailed in the guide to the best WordPress page builders. For the build itself, selecting and activating a WooCommerce-compatible theme is the step.
Activating the theme gives the WordPress ecommerce website a storefront, but an empty one. The templates are ready and the layout displays, yet nothing sells through them until products fill the catalog. Stocking that storefront is the next step.
Products in Your Online Store
A product is a store item the WordPress ecommerce website sells, the sellable unit a customer browses, adds to the cart, and buys. With the store configured and themed, the products it will sell come next, because a storefront with working commerce templates still shows nothing to buy until a product exists.
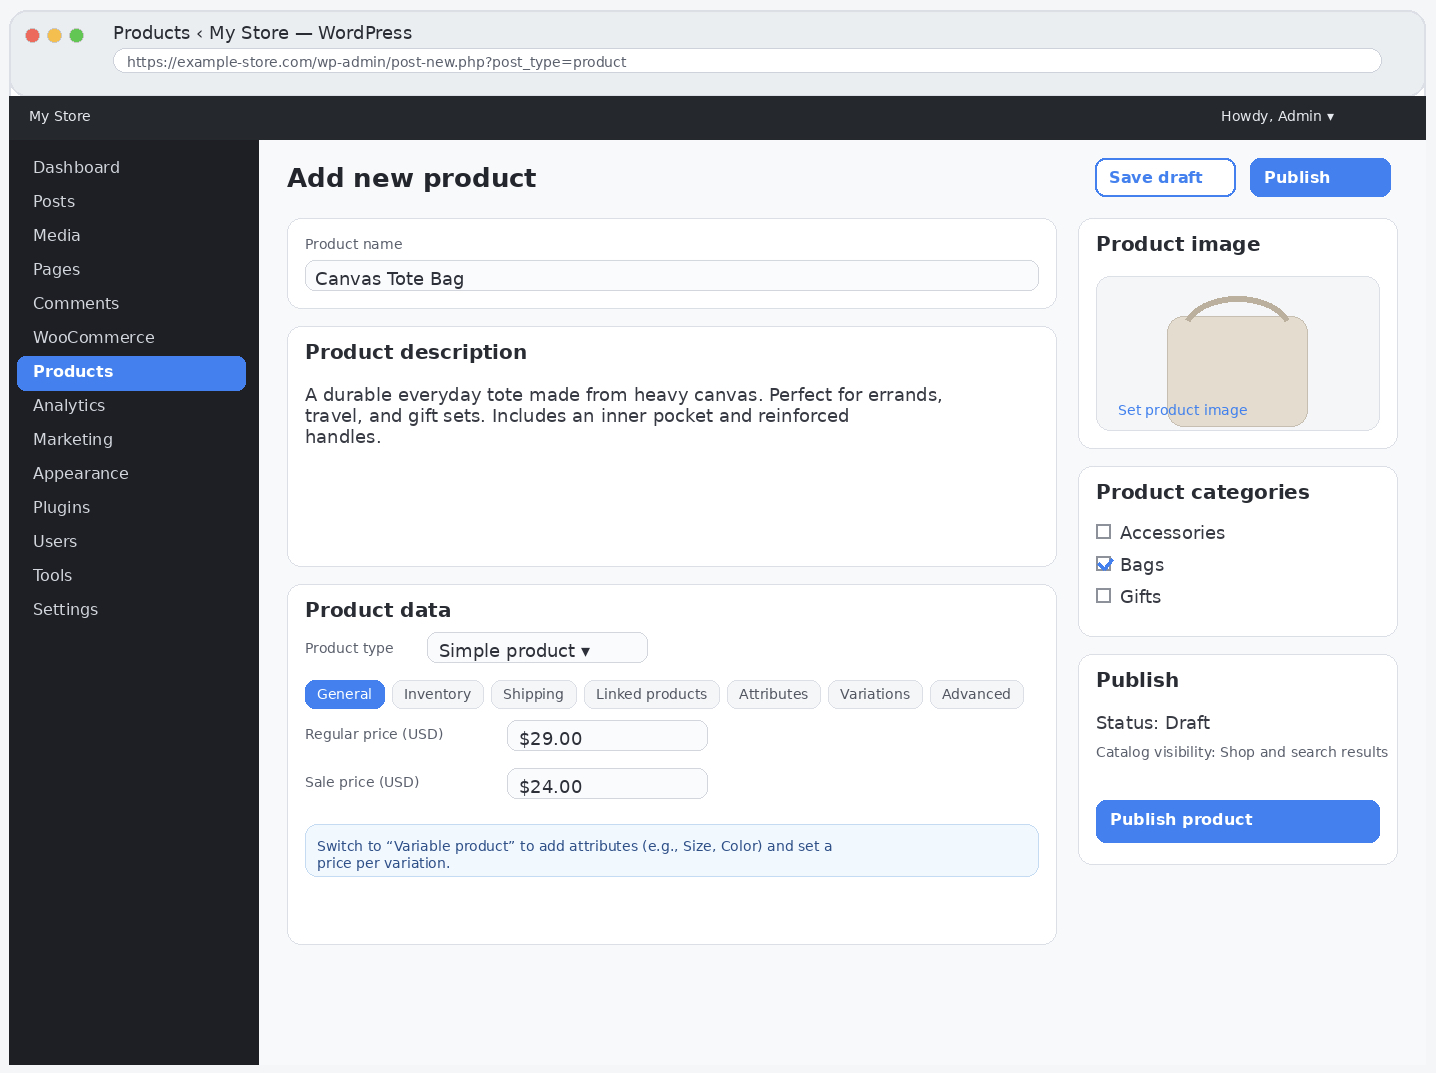
A product has a defined set of fields. WooCommerce Products > Add New opens the product editor, where each field is entered:
Title: the product name shown in the shop and on the product page.
Price (USD): the amount charged at checkout.
Description: the selling copy and details a customer reads before buying.
Image: the product photo uploaded to the media library and set as the product image.
Inventory: the stock quantity and stock status that control availability.
Product type: Simple for a single fixed item, Variable for a product with options such as size or color.
Publishing one product makes the storefront live with its first sellable item. Entering a title, setting a price in USD, writing a description, uploading and assigning an image, and then publishing adds a Simple product and pushes it into the storefront, where the WooCommerce-compatible theme displays it on the shop and on its own product page. That single published product is the first thing a customer can browse and buy.
Products now exist and appear in the storefront, but a sellable item is only one piece. A customer needs somewhere to browse the catalog, hold a selection, and complete a purchase, the pages that turn a list of products into a working store.
How to Create Your Store Pages
A store page is a WordPress page a customer moves through to shop and buy: the shop listing, the cart, the checkout, and the account area that together carry a visitor from browsing to a completed order. Activating WooCommerce auto-creates the four pages that handle commerce, so the core navigation exists the moment the plugin is active.
WooCommerce auto-creates the transactional pages on install; the remaining supporting pages are added by hand:
Shop: the catalog listing of published products (auto-created).
Cart: the page that holds selected products before purchase (auto-created).
Checkout: the page that collects payment and completes the order (auto-created).
My Account: the customer’s order history and account area (auto-created).
About: the page that introduces the store.
Contact: the page that gives customers a way to reach the store.
Privacy Policy: the page that states how customer data is handled, required for a store that takes payments. WordPress provides this one as a draft at Settings > Privacy, not as a blank new page.
Creating the About and Contact pages uses the standard WordPress Pages > Add New action, add the title, write the content, and publish. The Privacy Policy page starts from a draft WordPress core supplies at Settings > Privacy, so it is completed and published rather than written on a blank page. That Privacy Policy page is the one a payment-handling store cannot skip, because collecting names, addresses, and payment details obligates the store to state how that data is used.
Pointing WooCommerce at the correct pages keeps the cart and checkout working. WooCommerce > Settings holds the page assignments that route the Cart and Checkout pages, so confirming each commerce page is set there makes a product added to the cart move to the right checkout and complete an order. With the pages created and routed, the store handles a purchase end to end: browse, cart, checkout, account.
The WordPress ecommerce website is now functionally complete: a customer can find a product, add it to the cart, and pay through checkout. It is not yet hardened, though. A store that handles payments and customer data needs protection the build steps so far have not added, security against intrusion and a way to recover the store if something fails.
Essential Plugins for a WordPress Ecommerce Website
WordPress ecommerce website development reaches a point where the build basics are in place (the platform installed, the store configured, themed, stocked, and paged), but a store that now accepts customer details and payment data carries exposure that none of the earlier build steps removed.
The same WordPress ecommerce website that collects names, addresses, and card transactions becomes a target the moment it goes live, and the default WordPress install ships with no firewall, no malware scanner, and no automated recovery. Two plugin categories close that gap and finish the build as a defensible store rather than an exposed one.
A security plugin guards the store against the threats that follow payment handling. It adds a firewall that filters malicious traffic before it reaches the site, login protection that limits brute-force attempts against the administrator account, and malware scanning that flags injected code. For a store moving real money and storing customer information, this layer turns an open WordPress install into a hardened one.
A backup plugin answers the opposite risk: when something fails (a bad update, a compromised file, a server fault), a recoverable copy restores the products, orders, and store data without rebuilding the store by hand. Scheduled backups run on their own and keep a recent, restorable version of the store available at all times.
Security plugin: adds a firewall, login protection, and malware scanning, defending the store against intrusion and attacks that target a payment-handling site.
Backup plugin: runs scheduled backups that recover products, orders, and store data after a fault or compromise.
Each category is illustrated by the protection it provides rather than by a single mandatory product; several well-supported options exist in either category, and any reputable choice secures the store and keeps it recoverable. With a security layer defending against intrusion and a backup layer protecting against loss, the WordPress ecommerce website is now built, configured, themed, stocked, paged, and hardened. One step remains before customers can buy.
Launch of Your WordPress Ecommerce Website
The launch of a WordPress ecommerce website is the moment a fully built store stops being a private project and becomes a public storefront that takes real orders and real payments. By this point how to make an ecommerce website with WordPress has been answered end to end; the store runs on hosting under its own domain, WordPress and WooCommerce are installed, payments and shipping and tax are configured, a store-capable theme displays the products, the essential pages route customers through cart and checkout, and security and backup protect the data. Launch verifies that this completed store works for a paying customer and then opens it to the public.
A pre-launch quality check confirms the store handles money correctly before any customer does. The store owner places a test transaction through checkout using the payment gateway’s sandbox keys, and confirms the order, the payment, and the confirmation behave as expected, the same end-to-end verification that finishes any build covered in how to build a WordPress website. The sandbox keys belong to the payment gateway, not to WooCommerce itself, so the test moves no money while it exercises the full checkout. A focused pre-launch pass keeps to the commerce-critical items:
Run a test transaction end to end through the gateway’s sandbox keys and verify the order appears in WooCommerce.
Confirm the SSL certificate is active, since a payment-handling store must encrypt every transaction.
Check the store on mobile, where most shoppers browse and buy.
Review the configured shipping zones and tax rates against a test order total.
Switch the payment keys from sandbox to live as the final step before going public.
Switching the payment keys from sandbox to live is what takes the store from tested to open: sandbox proves the flow without moving money, and live keys turn the same checkout into a working transaction. Once those keys are live and the test order has cleared, the store is launched, the build sequence is complete and the store is open for business.
With a built, tested, and launched store in hand, the questions that remain are narrower than the build itself. The biggest of them is cost: how much a working WordPress ecommerce website actually takes to run, and whether any of it can be built for free. The other is the plugin that made the store an ecommerce store in the first place, which one powers it, and why it is the one to reach for.
Can You Build a WordPress Ecommerce Website for Free?
Building a WordPress ecommerce website for free is partly possible: the software that runs the store costs nothing, but a live store that takes payments carries a few unavoidable charges. The WordPress core software is free and open-source, WooCommerce is free and open-source, and a large share of available themes and plugins are free as well. What cannot be free is the part of the store that exists on the public internet, the address customers type and the server space that holds the store’s files and database.
The free components and the paid components separate cleanly. WordPress core, WooCommerce, many open-source themes, and many open-source plugins together supply the full software stack at no cost, so the platform that powers the store is free to obtain and run. The two paid components are the domain name, billed as a small recurring amount each year, and hosting, billed each month. A premium theme or a premium plugin can add to the total, but each of those stays optional; a free theme and free plugins keep a functioning store within the free tier of software.
Build element
Typical cost
Domain name
USD 10–20 per year
Hosting
USD 5–15 per month
WooCommerce
Free
Theme
Free, or USD 30–100 for a premium theme
Plugins
Free, or paid for premium add-ons
A realistic first year therefore lands in the USD 100–250 range for a store built on free software with only the domain and hosting paid for. The WordPress ecommerce website costs that small recurring budget because the domain and hosting are the only required paid components; the theme and the plugins remain choices that a careful build can keep free. The store runs on free software and pays only for the two parts that have to exist online.
WooCommerce as the WordPress Ecommerce Plugin
WooCommerce is the WordPress ecommerce plugin that turns a standard WordPress site into a store, and it is the same plugin installed earlier in the build. It is the default ecommerce-enabling component for three reasons: it is free, it is built and maintained as part of the WordPress family so it integrates deeply with the platform, and it is the most widely supported store plugin, which means documentation, compatible themes, and extensions are abundant. Other ecommerce plugins for WordPress exist, but WooCommerce is the one that powers the store this build produces.
WooCommerce provides the cart, checkout, product, and payment capability that a plain WordPress site does not have on its own, and it does so as a WordPress ecommerce website builder layered directly onto WordPress rather than as a separate platform. The WordPress ecommerce website is, in the end, a self-hosted online store anyone can build themselves, and WooCommerce is the free, integrated plugin that gave that store its commerce.


 Gemini