Explore our specialized services, tailored solutions, and industry expertise to elevate your digital presence. From custom WordPress development to seamless integrations, we build high-performing websites that deliver impact.
If you’re using a WordPress website builder and wondering how to build a WordPress website from scratch, the core idea is simple: you’re building your WordPress website in an ordered sequence, so each step supports the next: setup first, structure next, then features, then launch.
Building a WordPress website is a do-it-yourself process where you secure the basics (your site address and where it “lives” online), install WordPress, shape the look and layout, add only the functionality you need, and then publish. This article is the “spine” that frames the full sequence for a beginner, so you always know what comes next and why.
Here’s the roadmap we’ll follow, in order:
Domain
Hosting
Install WordPress
Theme + structure
Plugins
Pages
Launch
You’ll see the same steps described with slightly different verbs: how to build a WordPress website, how to make a WordPress website, or create WordPress website, but the process stays the same: start, setup, build, and go live.
Also, “building” is only one part of the broader lifecycle of planning, building, improving, and maintaining your site over time. That wider scope is usually discussed under WordPress development, but for now, we’ll keep the focus tight: the beginner build sequence that gets your site ready to launch.
How to Choose Your Domain Name
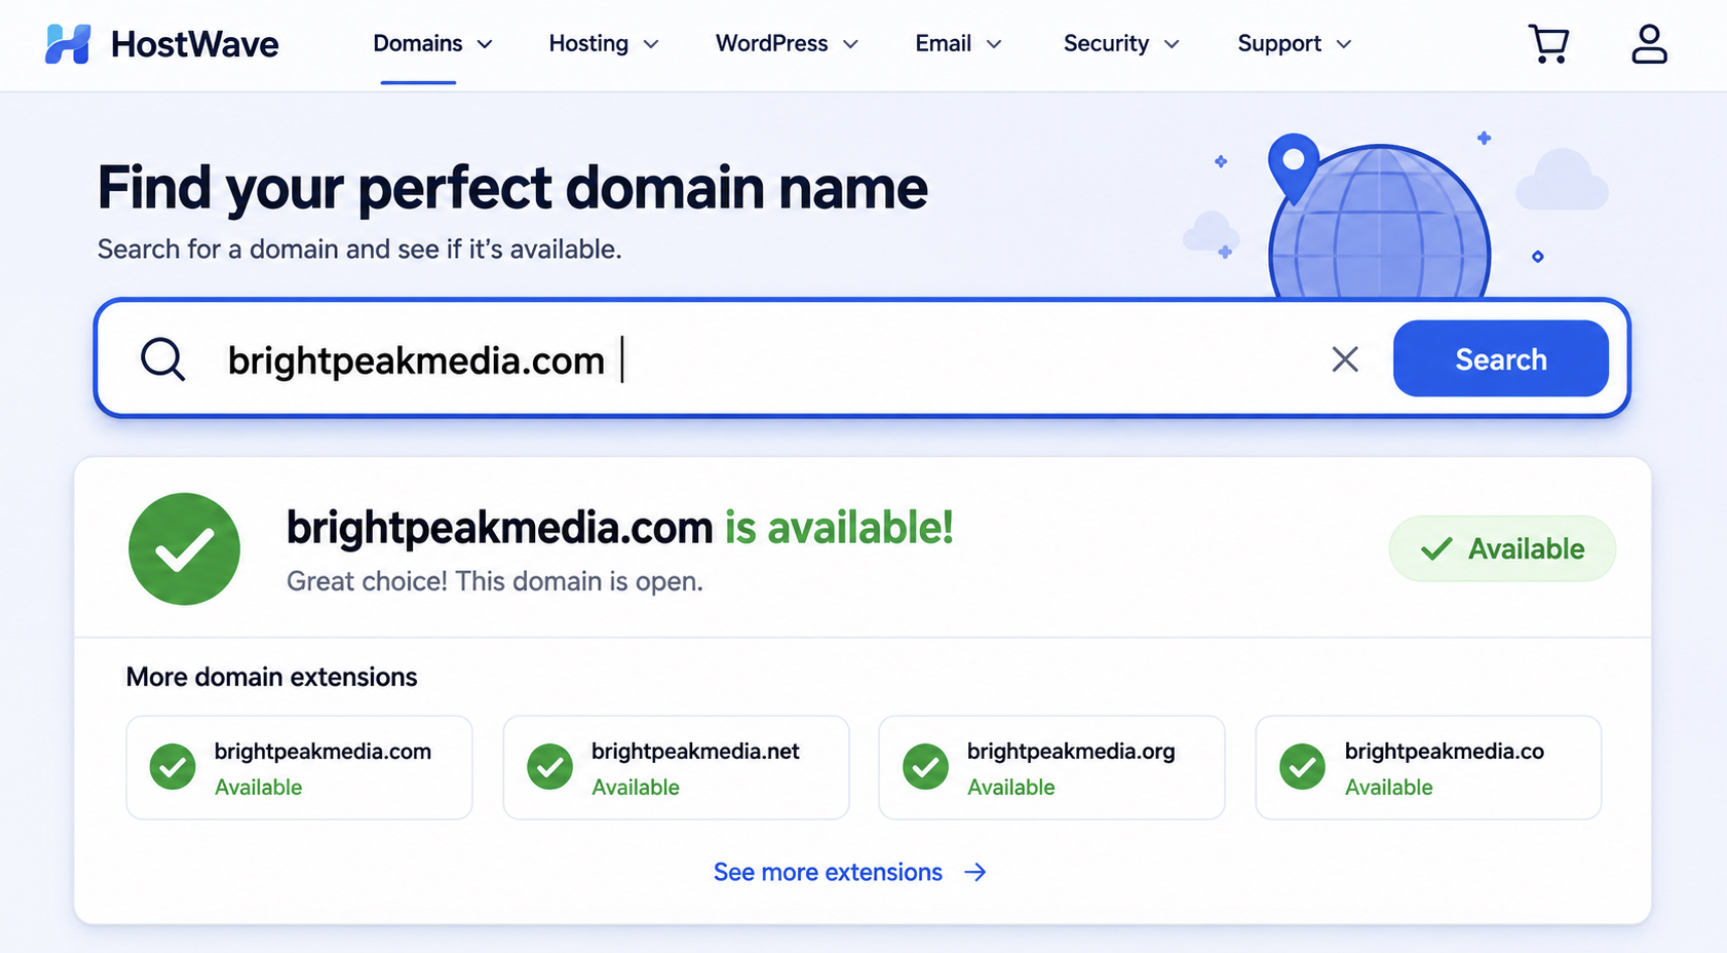
A domain name is the address of your WordPress website, the words people type into a browser to reach the site you are about to build. The domain name is what turns an abstract plan into something findable: before a domain name exists, the WordPress website has no address anyone can visit. Choosing a domain name is therefore the first concrete decision in the build, made before any software is installed and before hosting is arranged.
The domain name is the first thing you acquire, because everything that follows attaches to it. Hosting connects to the domain. WordPress installs against the domain. The pages you build are all served under the domain. That ordering is why you choose your domain before anything else: it is the readiness step that the rest of the build assumes is already done. You acquire the domain first, then move on.
When you choose a domain name, keep the criteria simple. A good domain name is brandable, so it reads as a name rather than a string of keywords. It is memorable, so a visitor who hears it once can type it later without checking. And it is available, no one else has registered it. You test that last quality directly: open a domain search field at a registrar or hosting provider, type the name you want, and read the availability result the search box returns. If the name is taken, you try a variation until the search returns one that is free.
With an available, brandable, memorable domain chosen, the next decision is hosting, the place the site will actually run.
How to Choose WordPress Hosting
WordPress hosting is where your WordPress website is hosted and served from: the server space that stores the site’s files and serves them to visitors who reach you through your domain name. Without hosting, WordPress has nowhere to run and the website cannot exist online. Choosing WordPress hosting is the second acquisition decision in the build, made after the domain name and before WordPress itself goes in.
Your WordPress website needs hosting because the platform has to run somewhere. The domain name points visitors to a location, and hosting is that location, the place that answers when the address is requested. This is why hosting follows the domain and precedes installation: you choose the host so that there is somewhere to install WordPress onto. Installing WordPress on K, for example, means putting the platform onto that host’s server space; the host is simply where the install lands.
For a new WordPress site, the kind of hosting you choose matters more than the brand on it. Managed WordPress hosting handles much of the platform’s upkeep for you, which suits a beginner who would rather build than administer a server. Shared hosting puts your site alongside others on the same server and keeps the setup straightforward. Either kind gives a new site suitable server space; for a first build, managed hosting removes the server-administration step, while shared hosting keeps setup simple. With hosting in place, the site finally has somewhere to exist, and the next step is to install WordPress onto it.
How to Install WordPress
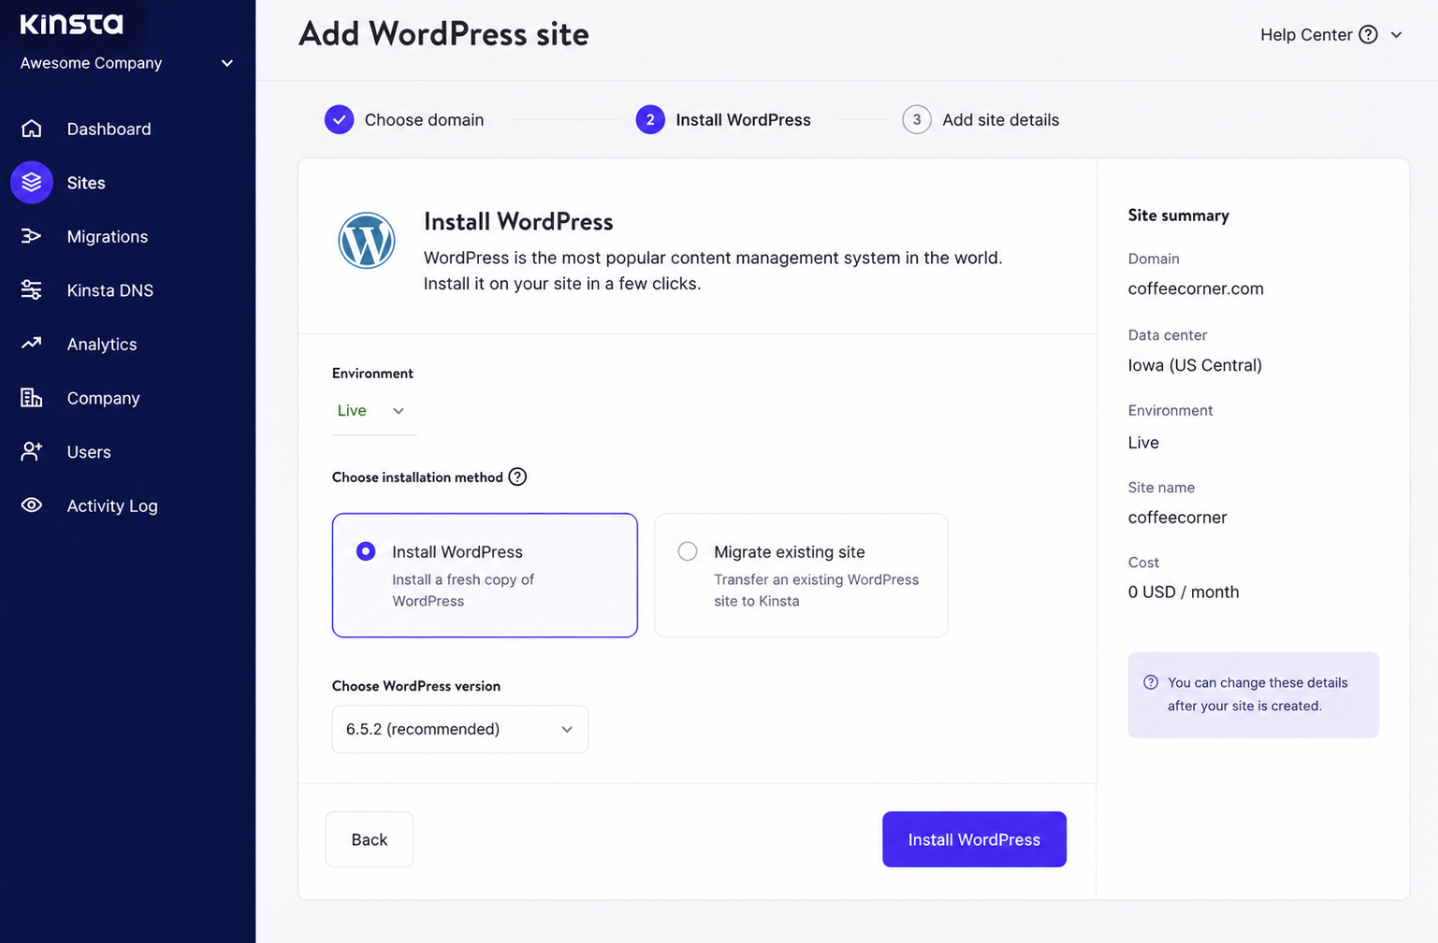
With your domain registered and your hosting account ready, the next move in building a WordPress website is to install WordPress itself. Installing WordPress means placing the content management system onto your host so the software runs on the server your domain points to. The host is where WordPress runs; the install is the action that puts it there.
Most hosts make this the simplest part of the build. You start the process from your hosting control panel, where a one-click WordPress installer handles the setup for you. You choose the domain to install on, the installer copies the content management system to the host, and within a minute or two WordPress is running on your site. Installing WordPress on Kinsta, for example, follows this same one-click pattern from the control panel, the button does the placing, and you confirm a few details. The exact label varies by host, but you are always looking for the WordPress install option inside the panel.
If you would rather place WordPress on the host yourself, the hands-on routes work differently and need their own walkthrough, the full path is covered in “how to install WordPress“. For a first WordPress website, the one-click installer is enough to get the content management system running and ready.
Once the install finishes, WordPress is on the host but still carries its defaults. The first-boot configuration is what turns the freshly installed software into a site that behaves the way you want, and that is where you start next.
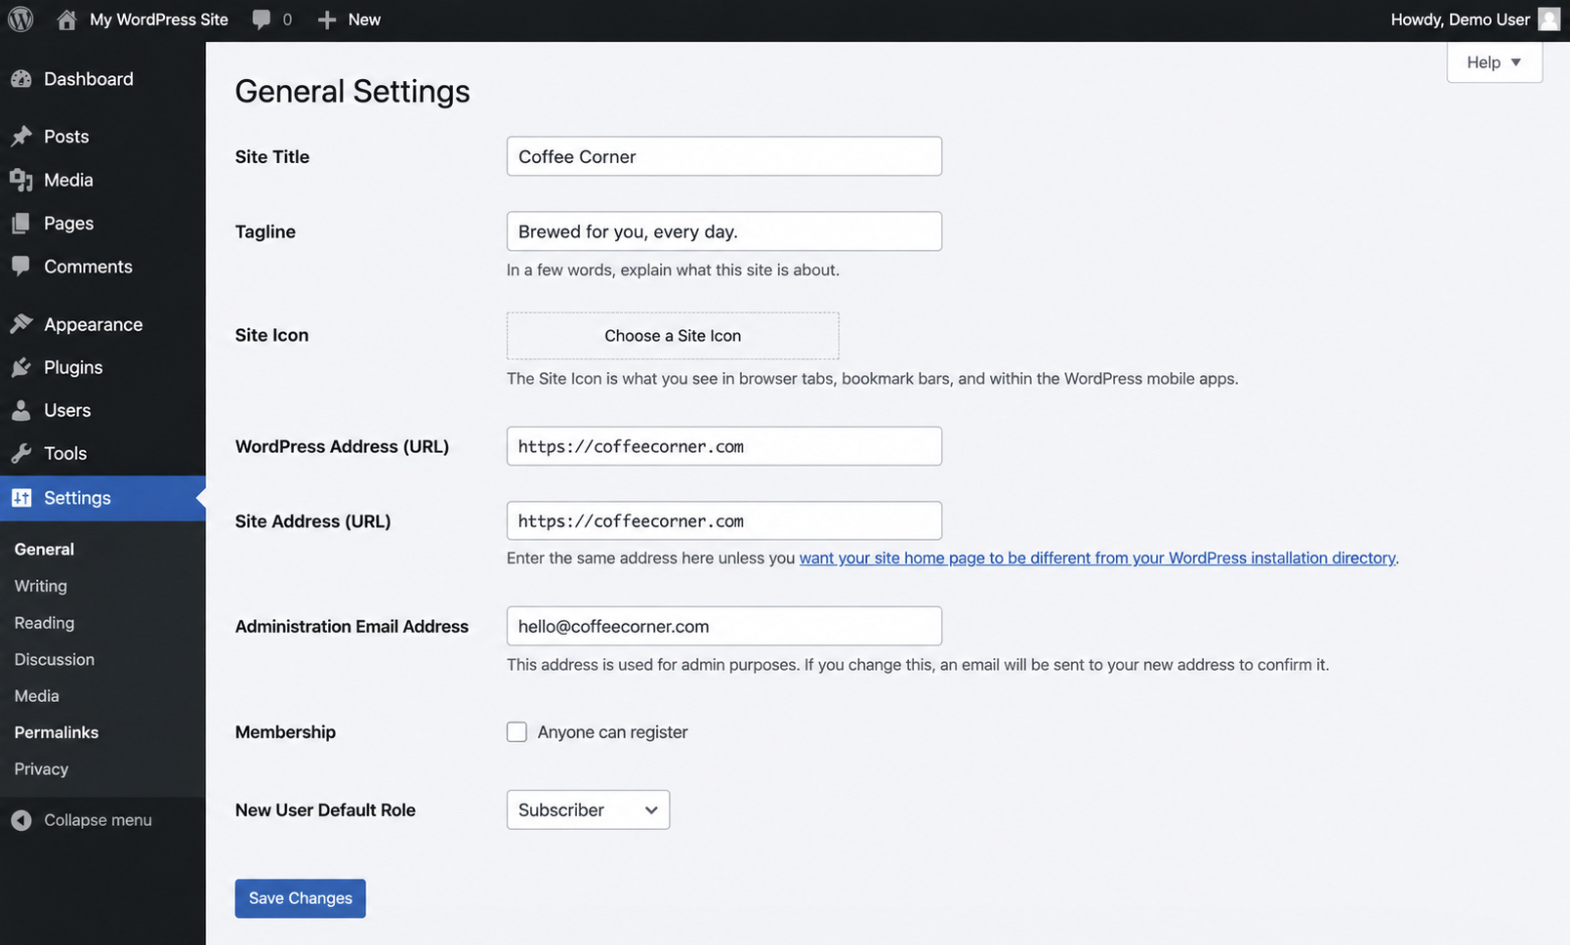
Setting Up Your WordPress Website
Setting up your WordPress website is the first-boot configuration you do right after the install finishes, the round of core settings that tune a brand-new site before you add a theme, plugins, or pages. The content management system arrives on the host with safe defaults, and setting up the WordPress website replaces those defaults with choices that fit your project. This is configuration, not building yet; you are telling WordPress how the site should behave from the dashboard.
A new site needs only a short set of core settings configured first, and the order matters because each one shapes how everything you add later looks and works:
Permalinks: the URL structure WordPress uses for every page and post.
Site title and tagline: the identity strings that name your site.
Timezone: the clock WordPress uses for publishing and scheduling.
Timezone is a quick choice on the General settings screen: set it to your own region so post dates and scheduled content land at the times you expect. The other two settings carry more weight for how the site reads and how it is found, so each gets its own pass.
Permalinks come first. The URL structure is the setting most worth getting right before you publish anything, because changing it after you have live pages means changing the addresses people and search engines already know. Setting up permalinks is the first real configuration choice on a new WordPress website.
Setting Up Permalinks
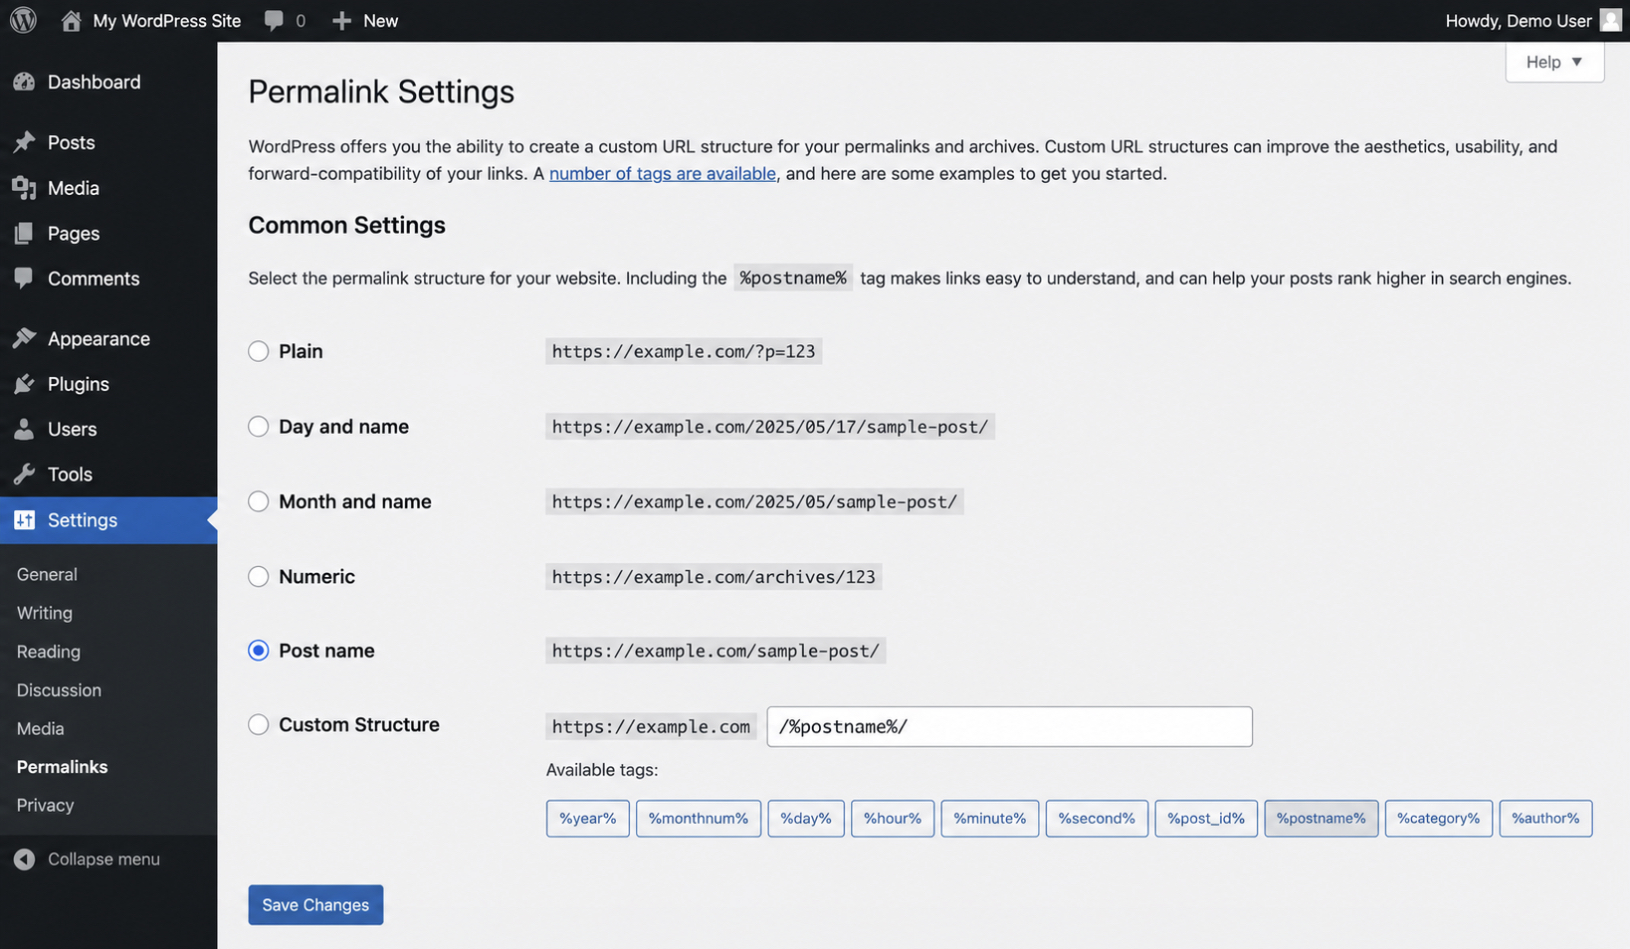
Permalinks are the URL structure WordPress uses for every piece of content on the site — the readable address that sits after your domain name and points to a specific page or post. Setting up permalinks means choosing how that URL structure is built, and you set it on one screen at Settings → Permalinks.
The structure to choose is the “Post name” option. On the Permalinks screen, WordPress offers several structures (plain, day-and-name, month-and-name, numeric, and post name), and “Post name” produces the cleanest, most readable URLs. A plain default turns an address into a string of question marks and numbers, while “Post name” puts the actual page or post title into the URL, so a visitor or a search engine reads a clear, meaningful link instead of a code. Select “Post name,” save the change, and every URL WordPress builds from then on follows that clean structure.
With the URL structure set, the next first-boot setting gives the site its name. The site title and tagline are the identity strings that tell visitors and search engines what the site is.
Setting Your Site Title and Tagline
The site title and tagline are your WordPress website’s identity strings, the short pieces of text that name the site and describe it in a single line. The site title is the name itself; the tagline is the brief description that sits beside it. You set both on one screen at Settings → General, in the Site Title and Tagline fields.
The site title and tagline appear wherever the site identifies itself. The site title shows in the browser tab, often in the site header, and search engines read it as part of how the site presents in results; the tagline appears alongside it in some themes and gives that one-line description. Because both strings show up to visitors and to search engines, enter a clear site title that matches your brand and a short tagline that says what the site is about. There is no need to chase keywords here, just an accurate name and description. Save the General settings once both fields read the way you want.
With permalinks, the site title, and the tagline configured, the first-boot setup is complete and your WordPress website is running on clean settings. The site is ready for its look, which means choosing and designing a theme. The next major step in building the WordPress website.
How to Choose and Design Your WordPress Theme
A WordPress theme is the design framework that controls the look and layout of every page on your WordPress website. The theme sets the visual frame your site is displayed within: the header, the placement of content, the typography, and the overall structure that visitors see before they read a single word. When you start a WordPress website, the theme is the design decision that everything else sits on top of.
Working with a theme runs through three connected pieces of work: designing the site by applying colors, a logo, and fonts inside the chosen theme; choosing the site structure that decides which pages exist and how they nest; and setting up the navigation menus that turn that structure into the links visitors follow.
You choose a theme that fits the goals of your WordPress website. A portfolio site, a small business site, and a blog each ask different things of a design framework, and the theme you pick should match what the site is for. WordPress offers free themes, premium themes, and block themes, and any of them can serve a new site well when the layout suits the pages you plan to publish. The practical move is to settle on a theme whose default design already resembles the site you want, so most of the work becomes adjustment rather than reconstruction.
You install and activate a theme from the Appearance → Themes screen inside your WordPress dashboard. The themes screen lets you browse the directory, install a theme, and activate it so it becomes the live design framework for your WordPress website.
Once a theme is active, it controls the site’s design until you choose to swap it.
A theme is not the only route to a WordPress website’s design. A page builder can replace the theme’s role in shaping layout, and a page builder sits alongside themes as a sibling design route. The theme and the page builder are two distinct ways to control a WordPress website’s layout, and the theme is the framework the site is built on.
Design and structure decisions are made together. The theme you choose shapes how your pages can be designed and how your site can be organized, so the look of the site and the way its pages are arranged are settled in the same pass. With a theme active, the next move is designing the WordPress website inside the framework the theme provides.
Designing Your WordPress Website
Designing your WordPress website means customizing the look of your site within the chosen theme: the colors, the layout, and the logo that make the design your own. The theme supplies the framework; the design is the set of choices you apply inside it. A new WordPress website starts with the theme’s default appearance, and designing the site is the work of adjusting that default until it fits your brand.
A new builder makes a small set of light design decisions. You add a logo, set a color scheme, and choose the fonts that carry your site’s tone. These choices are applied through the theme rather than written by hand, and they account for most of what visitors register as the site’s design. Keeping these decisions light at the start serves a new WordPress website well — the logo, the colors, and a readable font do more for first impressions than fine detail does.
Most look-and-feel changes happen inside the theme without code. The WordPress Customizer and the Appearance settings let you apply colors, upload a logo, and set typography through controls rather than through CSS, so the design choices stay inside the theme where they belong. The site’s branding is stored in these settings, and the design is its value, a property of the theme, not a separate piece you bolt on.
With the design choices applied, the next thing your WordPress website needs is a clear arrangement of its pages, the site structure that decides how those designed pages connect.
Choosing Your Site Structure
Site structure, sometimes called information architecture, is the way your WordPress website organizes navigation and page hierarchy. It includes your main pages, how those pages relate to one another, and how visitors move through the site.
Making structure decisions early helps keep navigation simple as your website grows. Planning key pages before you create them gives you a clear hierarchy that can later be reflected in menus, internal links, and navigation paths. For example, your structure may center around a blog, an online store, a dedicated landing page, or a portfolio depending on your site’s purpose.
If you’re deciding whether to organize your site around a theme or use a visual builder workflow, see our guide to best WordPress page builders. Once that decision is made, return to your overall structure and focus on organizing content logically.
A well-planned page hierarchy keeps navigation clean, helps visitors find information quickly, and makes future menu organization much easier. The next step is turning that hierarchy into navigation menus that guide users throughout the site.
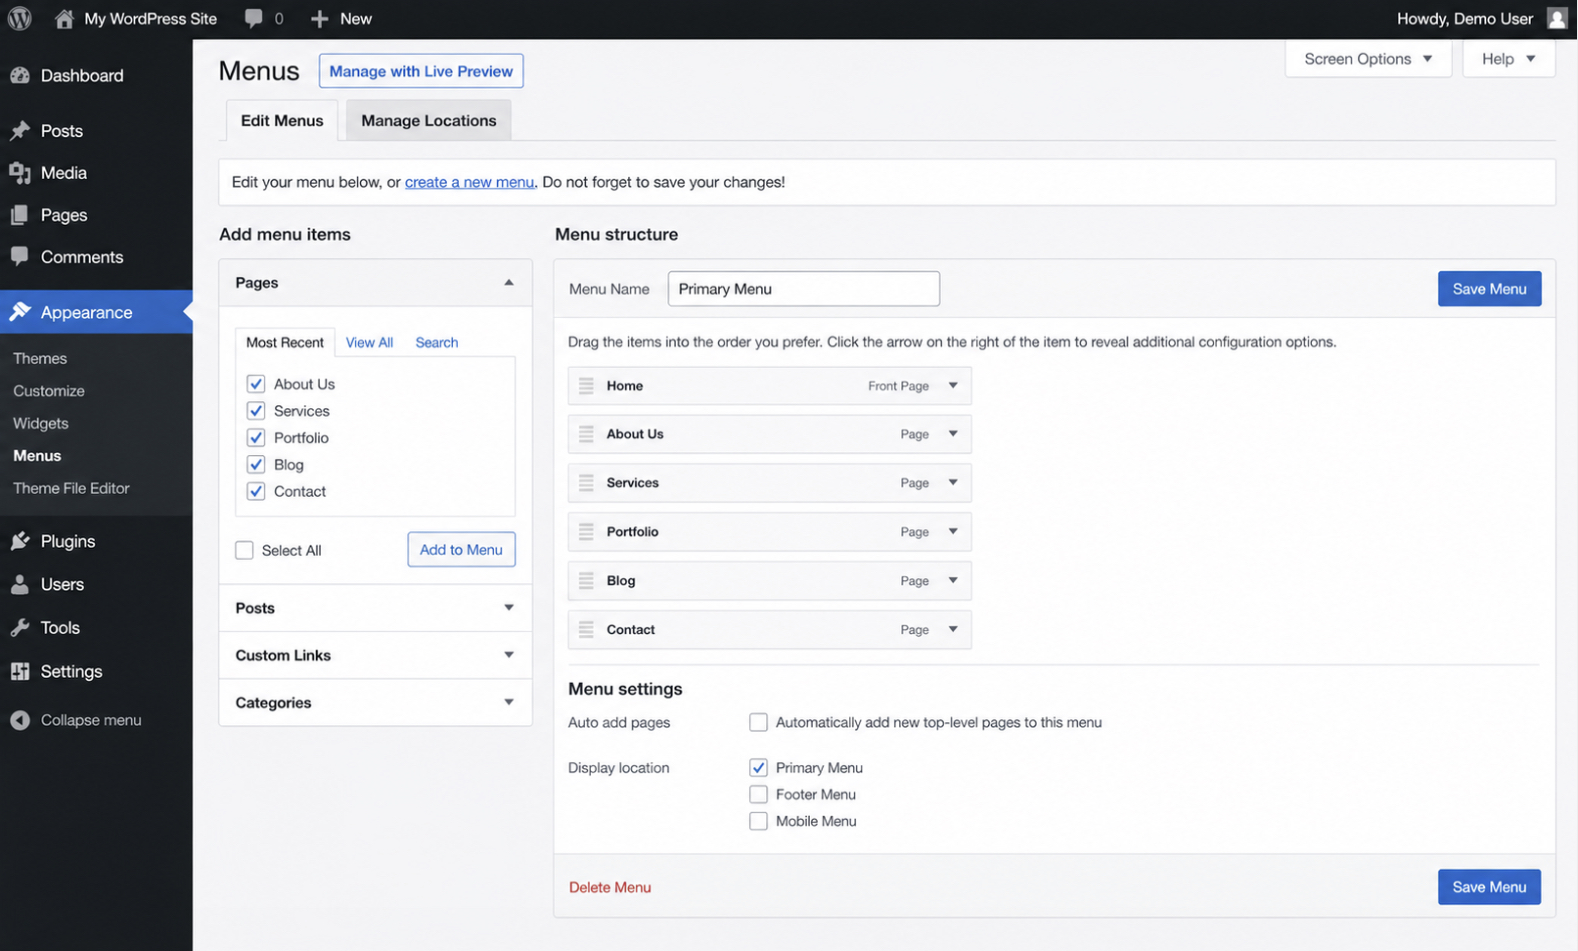
Setting Up Navigation Menus
Navigation menus are how visitors move through your WordPress website, the lists of links that carry someone from the homepage to the pages underneath it. A navigation menu is a set of menu items assigned to a theme menu location, and it turns the planned site structure into a path visitors can follow. The menu is the working surface of the page hierarchy you chose.
You set up a navigation menu from the Appearance → Menus screen in WordPress. You create a menu, add your existing pages to it as menu items, and assign the menu to a theme menu location (the primary menu position the theme defines, or a footer menu), then save.
The theme defines where menus appear, so the locations available depend on the theme you activated; the menu you build fills one of those locations with the pages you planned. The pages added here are pages that already exist. The menu links to them rather than creating them.
With the theme chosen, the design applied, and the navigation menus assigned, the WordPress website’s framework is in place. The next thing the site needs is the core plugins a new WordPress website depends on to run safely and rank well.
Which Core Plugins a New WordPress Website Needs
A new WordPress website needs a small set of core plugins to finish its setup, not a sprawling catalog of every add-on available. Core plugins are the launch essentials: the handful of extensions a new WordPress website requires to be searchable, recoverable, and protected the day it goes live. The principle is restraint: a new site adds only what it needs at launch, then grows its plugin set later as real requirements appear.
The launch baseline rests on three plugins a new WordPress website needs in place the day it goes live:
A search optimization plugin so search engines can read and index its pages.
A backup plugin so its data can be restored if something breaks.
A security plugin so the fresh install starts with a baseline of hardening.
These three cover the gaps a default WordPress install leaves open at launch.
Two more plugins round out the core set in most cases. A forms plugin gives the site a working contact form, and a caching plugin speeds up page delivery so visitors are not kept waiting. A new WordPress website needs these alongside the three essentials, though they sit a step below in priority. The site functions without them, while it should never go live without search optimization, backups, and security in place.
The first of the three to install handles how the site appears to search engines, so the search optimization plugin comes first.
SEO Plugin
An SEO plugin is the extension that gives a new WordPress website control over how its pages appear to search engines: the meta titles, descriptions, and XML sitemaps that a fresh install does not generate on its own. A new site installs an SEO plugin at launch because WordPress out of the box leaves these on-page basics unmanaged, and search engines need them to read and rank the pages correctly.
The SEO plugin handles the on-page work the reader would otherwise do by hand. It sets the title and description each page shows in search results, builds the sitemap that tells search engines which pages exist, and flags pages that are missing the signals search engines look for. For a new site with no content history, this is the difference between pages that surface in search and pages search engines struggle to interpret.
Yoast SEO is one widely used example that covers these basics for a new install. One plugin of this kind is enough at launch; the site does not need a stack of search optimization tools, only the on-page foundation in place from day one.
With search optimization handled, the next launch essential protects the site’s data.
Backup Plugin
A backup plugin is the extension that protects a new WordPress website’s data by saving copies of its files and database that can be restored after a failure. A new site sets up automatic backups at launch (before content and traffic accumulate), because data loss grows more costly the more a site has to lose. Starting backups on day one means there is always a recent restore point, even when the first real problem is months away.
The backup plugin protects site data by running on a schedule rather than waiting for the reader to remember. It creates scheduled backups, keeps an off-site copy so a server failure does not take the backups down with the site, and holds restore points the reader can roll back to if an update or edit breaks something. Automatic backups remove the single biggest risk of a manual routine, which is forgetting to run it.
UpdraftPlus is one common example that handles scheduled, off-site backups for a new site. One backup plugin covers the launch baseline; the site needs reliable automatic backups in place, not a comparison of every option.
With the site’s data protected, the last of the three essentials guards the site itself.
Security Plugin
A security plugin is the extension that protects a new WordPress website with a baseline of hardening: the login protection, firewall rules, and malware scanning a fresh install does not apply by default. A new site adds a security plugin at launch because a default WordPress install ships with no extra defenses, and automated attacks find new sites quickly regardless of how little traffic they have.
The security plugin protects the new site by closing the openings attackers probe first. It limits failed login attempts so brute-force guessing stalls, adds a firewall that blocks malicious requests before they reach the site, and scans for malware so an infection is caught early rather than after damage spreads. This baseline of hardening turns a fresh install from an open target into a defended one from launch day.
Wordfence is one well-known example that provides login protection, a firewall, and malware scanning for a new site. One security plugin is enough for the launch baseline; the site needs the defenses switched on, not a security audit.
Those three (search optimization, backups, and security) are the core of the launch set, and a forms plugin for contact submissions and a caching plugin for page speed complete the shortlist a new WordPress website needs. With the core plugins added, a new WordPress website is ready for the next step: creating the essential pages that give visitors somewhere to land.
How to Create Your Essential WordPress Pages
Building a WordPress website includes creating its essential pages, the small set of pages every site needs before it can serve a visitor. To create a WordPress website that is ready for people to use, you build the pages that hold its core content and tell visitors who you are, what you offer, and how to reach you. These essential pages are the homepage, the about page, and the contact page:
Homepage: the first page visitors land on, the page that frames the whole site.
About page: the page that explains who runs the site and what it stands for.
Contact page: the page that gives visitors a direct way to reach the owner.
Each of these is a component of the WordPress website, not a separate project. You create them inside the same install you set up earlier, using the page editor that ships with WordPress. The homepage carries the first impression, the about page builds trust, and the contact page opens a line back to you. Together they form the page set a WordPress website builder produces before anything goes public.
The essential pages are the last concrete component you build before launch. Once they exist, the site has a place for visitors to arrive, a place to learn about you, and a place to get in touch, the working surface a real WordPress website needs. With the page set in place, the build is complete and the site is launch-ready.
The same page set scales to any site type you build from scratch, whether a business site, a blog, or a focused build like a WordPress portfolio website that applies this sequence to one purpose. What remains is to make each page, starting with the homepage and finishing with the contact page, then move the site live.
Building Your Homepage
The homepage is the front page of your WordPress website, the static front page visitors see when they arrive at your address. You build the homepage as the first essential page because it frames everything else. It sets the tone, points visitors toward your main content, and acts as the entry page for the whole site.
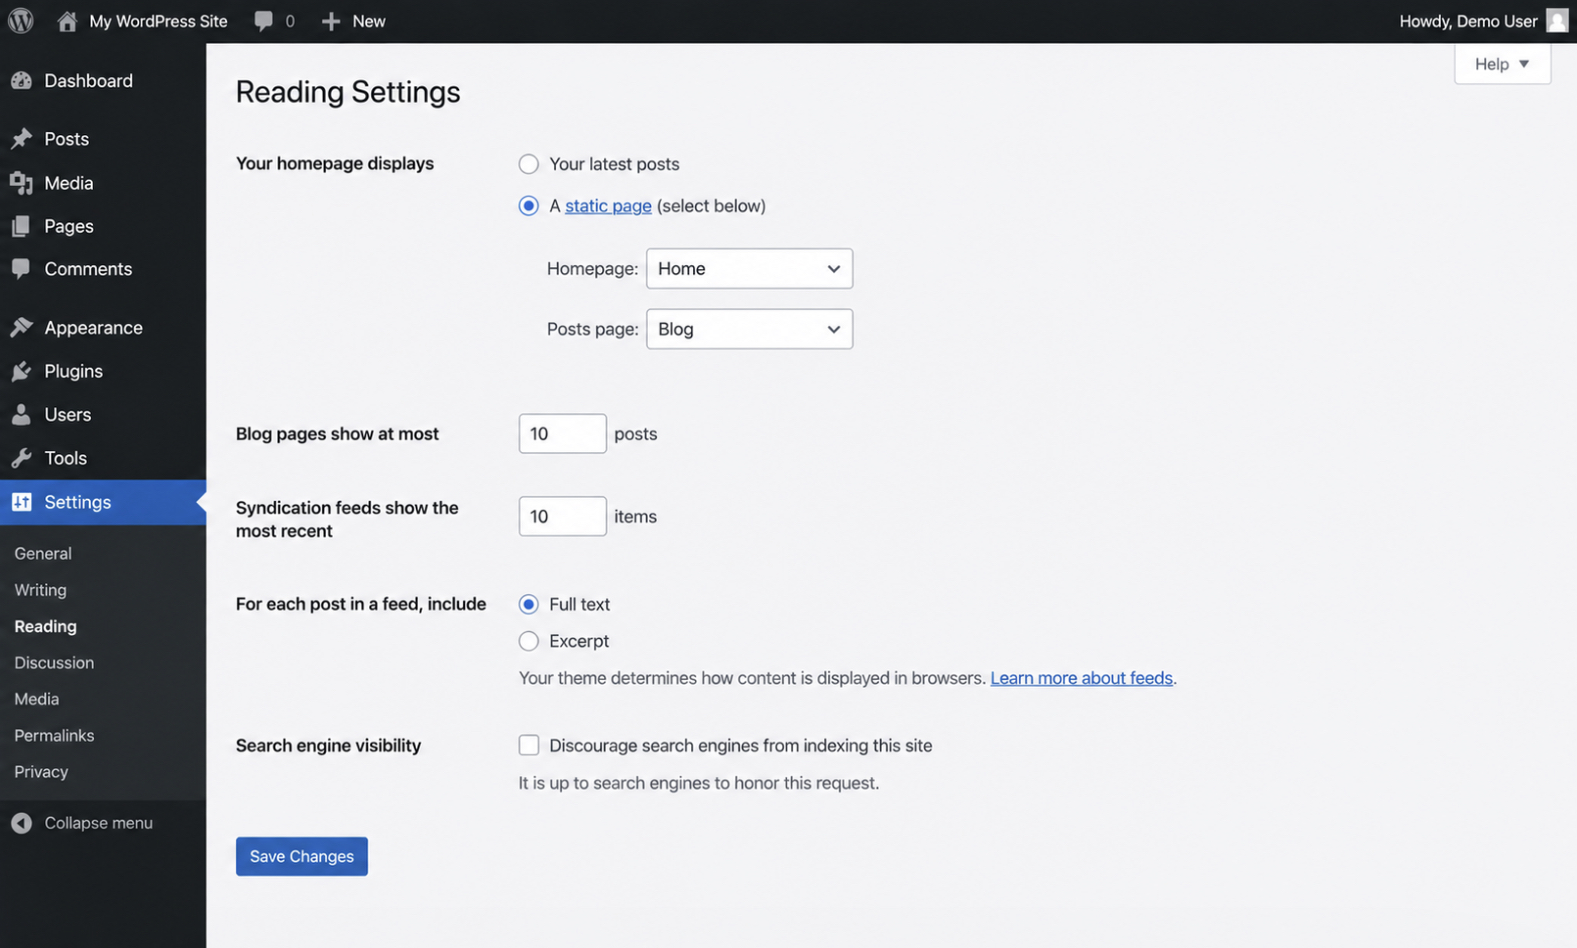
To build your home page, you create a new page in the page editor, give it your headline content, and save it. WordPress then needs to know that this page is the front page rather than your latest posts. You set this in Settings → Reading, where the “Your homepage displays” option switches from showing recent posts to showing a static page.
Choose your new page there, and WordPress treats it as the static front page from then on. The homepage now has a fixed entry-page role instead of changing every time you publish.
With the front page set, the next page to add is the about page.
Creating Your About Page
The about page is the page that explains who runs your WordPress website and what it stands for. You create the about page as the second essential page so a visitor who arrives through the homepage can learn who is behind the site before deciding to trust it.
To create the about page, you add a new page in the page editor, give it a title so visitors recognize it, and write a few lines on who runs the site and what it stands for: the story, the people, or the purpose that gives the site its credibility. With those lines written and the page saved, the about page is built and ready for visitors.
With the about page in place, the next page to add is the contact page.
Adding Your Contact Page
The contact page is how visitors reach the owner of your WordPress website, the page that turns a one-way site into a two-way one. You add the contact page as the third essential page so that anyone who reads your homepage or about page has a clear, direct way to get in touch.
To add the contact page, you create a new page, title it so visitors recognize it, and place a contact form on it. The contact form collects a visitor’s name, message, and reply address, then sends it to you. It is the working part of the page. You build the form with the forms plugin you installed among your core plugins, dropping its block into the page rather than coding a form by hand. With the form added and the page saved, the contact page is live.
The essential pages are now in place: a homepage that frames the site, an about page that explains it, and a contact page that opens a channel to you. With the page set built, the WordPress website is launch-ready. Every core component a visitor needs is present. What is left is to check the finished site and take it live.
How Do You Launch Your WordPress Website?
Launching your WordPress website means taking the finished site live so the public can reach it. Launch is the terminal phase of the build: the domain points to your hosting, WordPress is installed, the theme and structure are in place, the core plugins are active, and your essential pages exist. Once that build sequence is complete, the WordPress website is ready to go live, and launch is the act that moves it from a private work-in-progress into a public destination.
A clean launch runs as a two-part gate. You first work through the final checks that confirm the site behaves the way visitors expect, and you then perform the cutover that makes the WordPress website public. Treating launch as those two ordered phases keeps a do-it-yourself builder from publishing a site that looks finished in the editor but breaks the moment a real visitor arrives.
The full first-launch sequence runs every check and every cutover step in a fixed order. For that complete sequence, the WordPress website launch follows the steps in our “first-launch checklist”. The two phases together tell you what launching involves, starting with the final checks you run before the site goes live.
Running Pre-Launch QA
Pre-launch QA is the set of final checks you run on the WordPress website before going live. These checks confirm the site is verified ready rather than merely finished-looking, and a do-it-yourself builder works through a short list so nothing visible to a first visitor is left broken. Pre-launch QA sits inside the launch gate as the phase immediately before the cutover.
A few checks catch most launch-day problems on a WordPress website:
Test every form, so contact and signup submissions actually arrive.
Check the site on mobile, since most first visits come from a phone.
Confirm the search-engine and indexing settings, so the site is set to be found rather than hidden.
Verify that a working backup exists, so you can roll back if the cutover goes wrong.
If a check turns up a missing setting, you add it before moving on. These items are a readiness gate, not the complete sequence; the full WordPress site pre-launch QA checklist covers every step in order. Once the site is verified, you go to the final phase and take it public.
Going Live With Your Site
Going live is the moment you flip the WordPress website from not-public to public, completing the not-live to live transition that ends the build. Before going live the site exists but no visitor can reach it; after the cutover the site is a live destination. Going live is the cutover phase of the launch gate, and a do-it-yourself builder runs it in two short steps.
First, you remove the coming-soon or maintenance state that has been keeping your site private. With that gate lifted, the WordPress website becomes a public, live site that anyone can open. Second, you submit the site to search engines, so the pages can be found and indexed rather than waiting to be discovered. With the coming-soon mode removed and the submission sent, your site has gone live and the build is complete, which leaves one variation of the build worth covering: the custom route.
How to Build a Custom WordPress Website
A custom WordPress website is the same build sequence applied to a bespoke or own build rather than a stock one. The steps do not change. You still set up the domain, hosting, WordPress, theme, structure, plugins, and pages, but a custom WordPress website carries a design and a feature set built around your specific needs instead of a ready-made template. A portfolio site is one common build-variant: a designer or writer who wants a bespoke showcase still follows the same build sequence, just with custom choices at each step.
The build still produces a working site, yet do-it-yourself is not always the right route for a custom WordPress website. When the design or functionality you need outgrows what you can assemble yourself, the decision becomes which build route fits, and that route choice between building it yourself, using a prebuilt theme, or commissioning a build belongs to “custom WordPress development vs themes”. Weigh that decision before you commit, then return to the do-it-yourself path, where you create your own custom site.
Creating Your Own WordPress Website
Creating your own WordPress website is the do-it-yourself custom route. The build sequence run by the owner rather than an agency. You make the choices and you do the work at each step, which gives a custom WordPress website that matches your own needs without commissioning anyone. A portfolio site you build yourself is one variation of this owner-run route.
Creating your own site keeps you in control of the build from domain to launch, and it suits a builder who wants a custom WordPress website without handing the work to someone else. Where the build outgrows the do-it-yourself approach, the build-route decision settles whether to keep going alone or commission the work. With your own build understood, a few recurring questions come up as people put a WordPress website together.
Common Questions About Building a WordPress Website
Can You Build a WordPress Website for Free?
You can build a WordPress website for free in part. The WordPress software itself costs nothing, but a real, public site needs paid pieces around it.
The free part is genuine: WordPress is open-source software you can download, install, and run without a license fee, and you never pay to use it.
The cost sits in the things the software needs to reach visitors. A live WordPress website needs a domain name, which is paid and renews each year, and it needs hosting, which is paid because something has to store and serve the files. So building for free covers the WordPress software itself; it does not cover the address or the hosting that runs the site.
Whether your build stays free depends on scope: a local test site on your own computer can run at no cost, while a site people can actually visit carries the domain and hosting cost. That hosting requirement is the next condition to settle.
Do You Need Hosting to Build a WordPress Website?
You do need hosting to build a WordPress website that goes online. A self-hosted WordPress site needs hosting before anyone can reach it. The need is a plain one.
Hosting is the web hosting service where the WordPress files and the database are stored, and without that place to store them, the build has nowhere to run. The files hold the WordPress software, the theme, the plugins, and your uploaded media; the database holds the content (your pages and posts) and the settings.
Hosting stores both and serves them to visitors, which is what puts the site online. A domain points to that hosting, and the install you set up earlier sits on it. Build a WordPress website on your own computer and only you can see it; put it on hosting and the site is online for everyone.
With hosting settled, your WordPress website is built and live: a real address on the open web that visitors can reach, read, and use.


 Gemini