Explore our specialized services, tailored solutions, and industry expertise to elevate your digital presence. From custom WordPress development to seamless integrations, we build high-performing websites that deliver impact.
Installing WordPress on Bluehost is a host-specific install procedure that runs through the Bluehost account dashboard and its guided one-click installer. The Bluehost install gives site owners and developers with an active Bluehost account a dashboard-based path for placing WordPress on a selected site or domain, rather than requiring a generic web-server install.
This guide covers the account prerequisites the install needs first, the guided one-click installer as the primary path, the manual cPanel fallback as the secondary path, and the first wp-admin login after WordPress is installed. Bluehost also offers WordPress hosting products, but this procedure focuses on how to install WordPress on Bluehost from the account environment, not on choosing a hosting plan.
Before the installer can launch WordPress, the Bluehost account, domain, and site destination need to be ready.
Bluehost Account Prerequisites for Installing WordPress
The Bluehost account prerequisites for installing WordPress are the two conditions the install needs in place before it can run: an active Bluehost account and a domain to assign. Neither condition concerns which hosting plan was purchased. Both describe the state the account must already be in for the guided installer to proceed.
What the install requires reduces to a short checklist:
An active Bluehost account: a live account the account holder can sign in to and reach the dashboard from.
A domain to assign: the address the install will attach WordPress to, whether a temporary one Bluehost supplies or a permanent one already in hand.
The active account is what the install runs against, and the domain is the address it points the new site toward. Held together, they let the install proceed. Once an account signs in and a domain is ready to attach, the guided one-click installer has everything it needs, and the primary path proceeds from there.
Active Bluehost Account
An active Bluehost account is the first precondition for installing WordPress on Bluehost: a live, signed-in account that reaches the dashboard before the installer runs. “Active” here describes the state of the account, not the tier behind it. The account is active when it signs in cleanly and opens the Bluehost dashboard, the control panel from which the install begins.
What this rules out is a not-yet-usable account, one still mid-sign-up, or one whose credentials do not yet reach the dashboard. The installer cannot run against an account it cannot open. So the test is simple: the account holder signs in, the Bluehost dashboard loads, and the account counts as active for the install. From there, the second precondition comes into play, the domain the install will attach WordPress to.
Domain to Assign
A domain to assign is the second precondition for the install: the address the install attaches WordPress to once the installer runs. The domain is what gives the new WordPress site a place on the web, and the install needs to know which address it points to. Bluehost handles this in one of two ways, and the install proceeds under either.
A temporary Bluehost-supplied domain lets the install go ahead before a permanent address is settled. Bluehost issues a working temporary address tied to the account, so the site has somewhere to resolve to while a permanent domain is still being arranged. A permanent domain is the alternative, an address already held and ready to attach, assigned to the site directly. In both cases the domain is selected and attached, not bought or registered as part of the install; the install assigns an address that already belongs to the account rather than acquiring a new one.
Both prerequisites are now met: an active account and a domain ready to assign. The guided one-click installer is the path that runs next.
Install WordPress with the Bluehost Guided Installer
The Bluehost guided one-click installer is the host’s primary path for installing WordPress on Bluehost: a setup flow that runs inside the account dashboard and installs a working WordPress site without any manual file handling. Where a server-level install asks an administrator to download the WordPress archive, upload it over file transfer, and wire a database by hand, the guided installer folds all of that into the dashboard. Bluehost supplies the installer, so the database, the core files, and the initial configuration are handled by the host rather than by the person installing.
That difference is what makes this the recommended route on Bluehost. No file transfer client, no separate database step, no editing of configuration files. The installer reads the account that is already active, attaches the WordPress core to a domain, and hands back a site that is ready to log into.
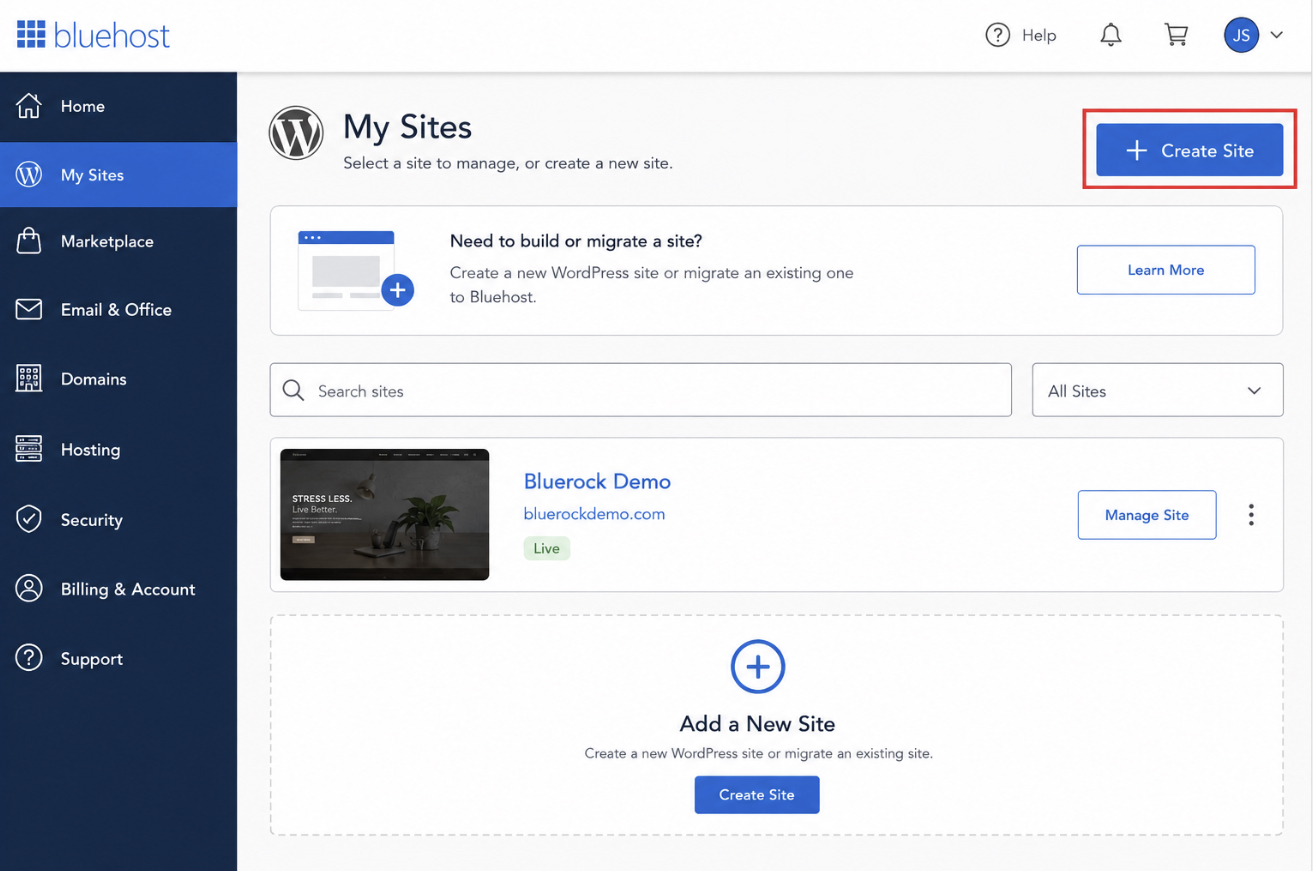
Inside the dashboard, the entry point carries the on-screen label “Create Site” (shown as “Add Site” in the “My Sites” area of the Bluerock dashboard). Selecting it opens the guided setup, which walks through three things in sequence: the dashboard path that starts the flow, the site name and the admin credentials the new site needs, and the domain the installer attaches WordPress to. Each is a short, named step rather than a manual task. When all three are answered, the guided installer produces a running WordPress site on Bluehost. The dashboard flow is where the first of those steps begins.
The Bluehost Dashboard Create Site Flow
The Bluehost dashboard Create Site flow is the named guided path inside the account dashboard that starts the install. It is the on-screen route an administrator follows to reach the guided WordPress setup, and it is the point where installing WordPress on Bluehost actually begins. The flow is host-specific: it lives in the Bluehost dashboard, not in a generic installer screen, which is what separates this procedure from a plain server-side install.
Reaching it follows a short path inside the dashboard. First, open “My Sites” from the dashboard’s left-hand navigation. Second, select “Add Site” to start a new install. Third, choose the guided WordPress setup, which is the option that runs the one-click installer rather than a manual or other-platform route. This is the Bluerock path, and on a current Bluehost account it is the default way new sites are added.
From there, the guided setup takes over. It asks for the details the new WordPress site needs before it can run, and the first of those is the pair of values that identify the site and its administrator. Selecting the guided WordPress setup leads directly into that form, where the site name and the login details are supplied.
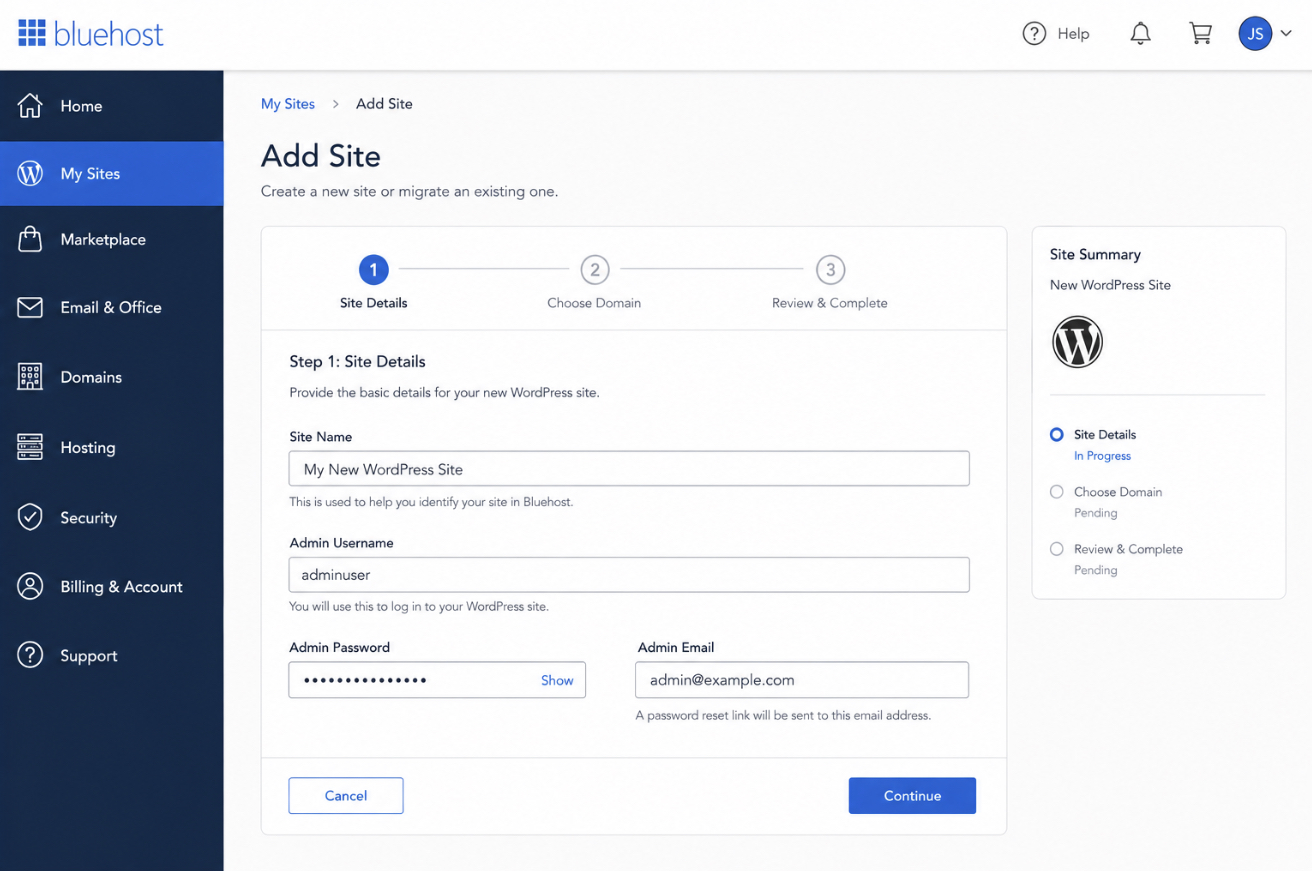
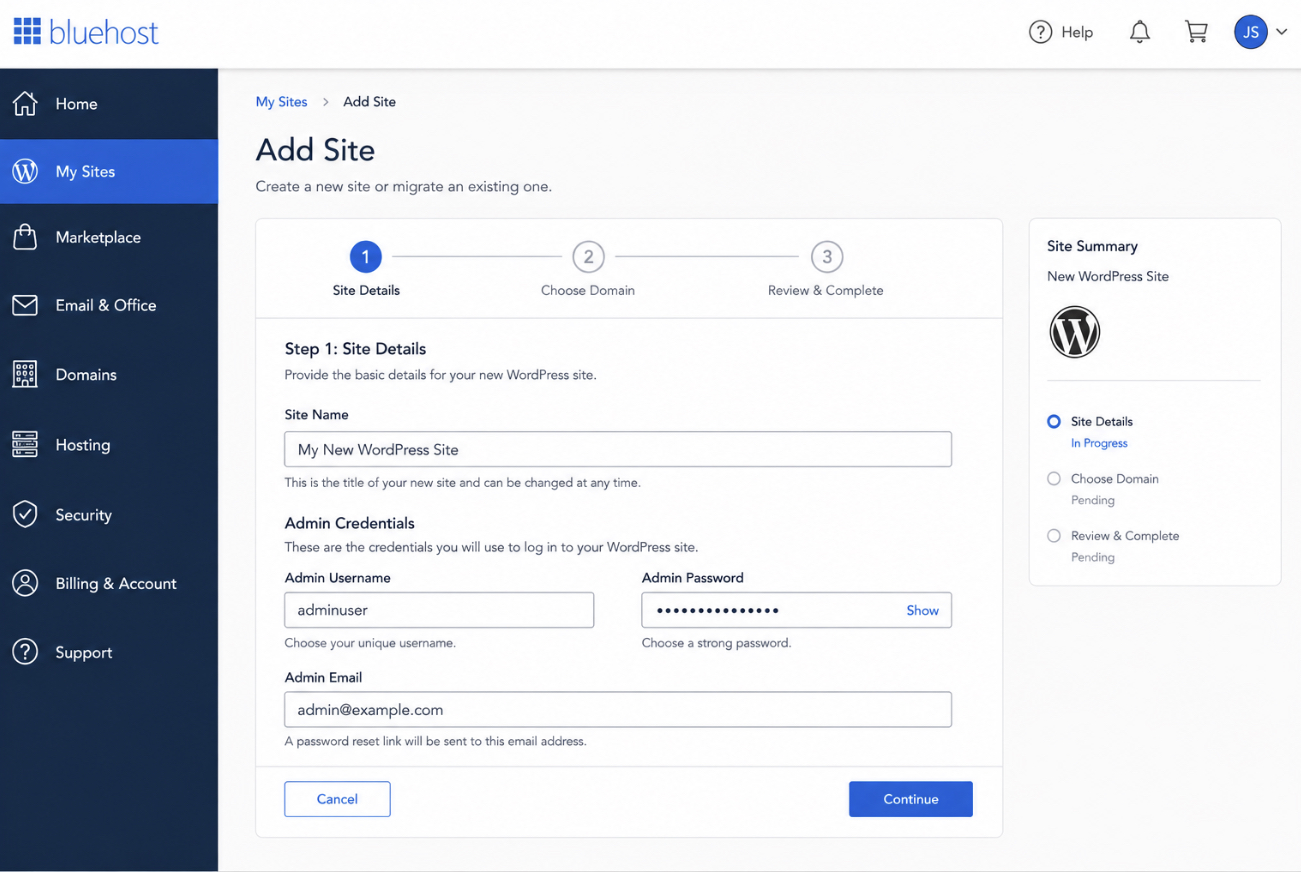
Site Name and Admin Credentials
The site name and the admin credentials are the two values the guided installer collects on the same installer screen, and together they define what the new WordPress site is called and who controls it. The installer asks for both in one step, so they are entered side by side rather than across separate screens.
The site name sets the title of the new WordPress site. It is the name that appears in the browser tab and across the site’s front end, and the installer writes it into the WordPress settings as the install runs. It is a label for the site, not a permanent commitment, since the title can be changed later from inside WordPress; what matters at this step is that the installer has a value to assign.
The admin credentials are the administrator username and password for the new site. The username and password supplied here become the login that reaches the WordPress dashboard once the install finishes. These are the same credentials used later at the wp-admin login, the first point where the install is confirmed to be running. For that reason the password chosen at this step should be a strong one: it is the key to the administrator account on the live install, not a throwaway value.
With the name and the login details entered on this installer screen, one field remains before the install runs: the domain the new site answers on.
Domain Assignment in the Installer
Domain assignment in the installer is the step where the Bluehost guided installer attaches the new WordPress site to a domain, connecting an address to the site about to be installed. It is the last value the installer needs, and it draws on the domain already prepared as a prerequisite rather than asking for a new one.
The domain selected here comes from the prerequisites step. An administrator chooses from the domains already attached to the active Bluehost account, whether that is the temporary Bluehost-supplied address that lets the install proceed before a permanent domain is in place, or the permanent domain set on the account. The installer assigns one of those prepared domains to the new site; there is no purchase or registration at this point, only a selection.
Once the domain is assigned, the guided installer has every value it needs, and the install runs. Bluehost installs the WordPress core against the chosen domain, applies the site name, and sets the administrator account from the credentials entered earlier. What the flow produces is a working WordPress site on Bluehost, installed and ready to be reached at its address. For accounts where the guided one-click path is not the route taken, the install can instead start from the Bluehost cPanel, which is the manual fallback.
Manual Install from the Bluehost cPanel
The manual install from the Bluehost cPanel is the no-installer fallback that puts WordPress on Bluehost without the guided one-click path. It exists for the case where the dashboard installer is skipped on purpose: a developer who wants to place every file by hand, or an account that needs WordPress dropped into a subdirectory the guided setup does not offer. Where the one-click installer runs the whole sequence from inside the account dashboard, the manual route starts a step lower, at the hosting control panel itself.
That control panel is the Bluehost cPanel, and its File Manager is the entry point. From File Manager the WordPress files land in the document root of the assigned domain, and a database gets attached through the cPanel database tools rather than through an installer screen. Bluehost exposes both of these in the same panel, which is what keeps the fallback host-specific rather than abstract.
The Bluehost-specific part stops there. Everything past the File Manager entry (downloading the WordPress package, moving files over, adding the MySQL database, and editing the configuration file that connects WordPress to that database) is the generic manual procedure, identical whether the server belongs to Bluehost or any other host. That full sequence has its own dedicated walkthrough; repeating it here would only split the procedure across two pages. For the complete file-by-file method, the guide on how to install WordPress manually carries the download, database, and configuration steps end to end.
Whichever route reaches it, the guided installer or the cPanel fallback, the install arrives at the same checkpoint: the first administrator login.
First WordPress Admin Login at wp-admin
The first WordPress admin login at wp-admin is the verifiable end-state of the whole procedure; not a configuration step, but the confirmation that the files, the database, and the domain assignment from the installer all resolved into a WordPress site that actually loads and accepts an administrator.
Reaching it takes one address and one set of values. The address is the wp-admin URL, the assigned domain followed by /wp-admin, which opens the standard WordPress login form: a Username/Email field, a Password field, and the Log In button. The values are the admin credentials set earlier on the installer screen: the same username and password entered during the guided setup. No new account is involved here. The login screen reuses the credentials the installer already recorded.
A successful login lands on the WordPress dashboard, and that single result confirms WordPress is installed and running on Bluehost: the install script completed, the database connection holds, and the administrator role exists with the credentials it was given. If the form rejects the login, the failure points back to the credentials step rather than to anything broken in the site itself, the install otherwise stands. WordPress is now on Bluehost, served from the assigned domain, and under administrator control.
From an installed and verified site, the remaining question is no longer how to install it but how to make it public.
How to Launch the WordPress Site on Bluehost
Launching the WordPress site on Bluehost moves it from installed to live, from a site that exists and runs to one the public can reach. Install and launch share the same running-site end-state; the difference is audience. Once the first admin login confirms WordPress is installed on Bluehost, the files and database are already doing their work, and going live is the step that opens that working site to visitors rather than keeping it private to the administrator.
On Bluehost the gap between installed and live has a concrete switch behind it. A guided install lands the new site behind a default “Coming Soon” page, so a visitor reaching the domain sees a placeholder rather than the WordPress site. Launching on Bluehost means turning that page off: in the dashboard, open Websites, then Settings, and toggle “Coming Soon” off, or follow the “click here” prompt in the wp-admin dashboard notice that flags the site as still hidden. Once “Coming Soon” is off, the assigned domain serves the live WordPress site to the public.
A site can be launched the moment the install verifies, but the steadier sequence puts a test pass in between. A staging environment holds a private copy of the site where themes, content, and settings get exercised before anything reaches the public address. Testing on staging first means the live launch flips a site that has already been checked, not one seen for the first time at go-live.
The one-click route that produced this install is itself a packaged form of a more general pattern. Bluehost’s guided installer runs the same underlying operations a generic installer performs by hand (the database setup, the configuration write, the install script) just wrapped and automated for the account. For the host-neutral version of that same sequence, the WordPress 5-minute install describes the canonical install script pattern that the managed installer automates. That staging step, the test pass before go-live, is the practical next move.
WordPress Staging Site Hand-off
The staging-site hand-off is the natural next step once WordPress runs on Bluehost: the move from the live site to the staging copy where changes are tested first. It matters for one plain reason: edits made on staging never touch the live site until they are deliberately pushed across, so a broken theme or a bad setting stays contained where no visitor sees it.
Preparing that staging environment is its own procedure rather than part of the install, and it has a dedicated walkthrough. The full method lives in the guide to create a WordPress staging site, which covers preparing the staging copy, working on it safely, and moving the tested changes to the live site.
This Bluehost install sits inside a wider set of install methods, each suited to a different host or environment. For that broader reference (the manual route, the local-stack route, and the other hosted paths gathered alongside this one), the overview of how to install WordPress places the Bluehost procedure in the full install picture. WordPress is installed and verified on Bluehost; staging is where the work continues.


 Gemini