Explore our specialized services, tailored solutions, and industry expertise to elevate your digital presence. From custom WordPress development to seamless integrations, we build high-performing websites that deliver impact.
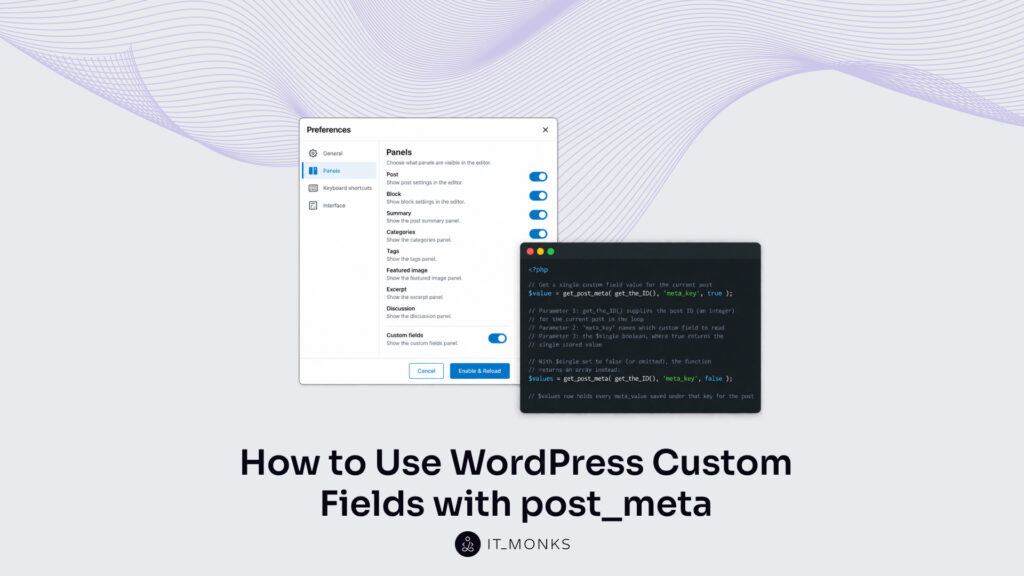
WordPress custom fields are the native post_meta system built into WordPress, and knowing how to use custom fields in WordPress means working that built-in system directly instead of reaching for a plugin. Every post already carries a place for extra information beyond its title and body, and post_meta is the mechanism that records it. No add-on to set up, no separate field builder. The feature ships with core, and the official WordPress documentation describes each function the system exposes.
The native WordPress custom-fields workflow runs from start to finish through the built-in system. First, the panel enables in the editor so the metadata box becomes visible. Then you add a custom field as a simple name-and-value pair. After that, the value gets read in code with the post_meta API and shown on the front-end through a theme template. Developers who prefer to stay on core, with no third-party dependency, can do everything from enabling the panel to printing a value on a single post using functions WordPress already provides.
Once that core path is clear, the same post_meta pattern extends outward. When the panel refuses to appear, a native cause and a native fix account for it. The same functions drive block bindings inside the block editor, attach metadata to a custom post type, and publish a field into the REST API. Each of these built-in routes suits developers and technical site-builders who prefer core over a plugin.
What Are WordPress Custom Fields?
WordPress custom fields are native post_meta: extra structured information recorded about a single post beyond the default editor fields. A custom field in WordPress attaches to the same post as the built-in content, but stores it separately. While the title, content body, and featured image are standard fields every post has, a custom field holds anything else a site needs to attach to that post, keyed by a name a developer chooses.
Each custom field is a meta_key and meta_value pair tied to a post ID. The meta_key is the label (something like subtitle, price, or event_date), and the meta_value is the data stored under that label. One post can carry as many of these pairs as a project requires. That structure is what separates native custom fields from a plugin field builder such as Advanced Custom Fields, which wraps the same underlying storage in its own interface and its own functions. Underneath, both write to the same place.
The post ID matters here, because it is the integer that connects a meta_key and meta_value pair back to one specific post. Without it, a value would have no content to belong to. With it, WordPress knows exactly which post a field belongs to. WordPress stores those pairs in one native database table, wp_postmeta, with a fixed four-column structure.
What Is in the wp_postmeta Table?
The wp_postmeta table is the native database table where every custom field is kept as a single row. When a post gains a WordPress custom field, that field becomes one line in wp_postmeta, not a new column anywhere. This is the storage layer the whole feature depends on.
Each row pairs a meta_key with a meta_value and points back to a post through post_id. Because storage works row by row rather than column by column, one post can hold many custom fields (many rows sharing the same post_id), and a single meta_key can repeat across several rows to hold many values. The table carries four columns.
meta_id
post_id
meta_key
meta_value
87
42
subtitle
A Field Guide
The meta_id is the unique integer for the row itself. The post_id, also an integer, names the post the field belongs to. The meta_key holds the field name, and the meta_value holds the data. Two sibling tables sit beside it in the same database, wp_posts for the posts themselves and wp_options for site-wide settings, though neither stores custom fields.
That row shape is exactly what the native functions write and read. add_post_meta creates a row, and get_post_meta reads one back. Before either function comes into play, though, the editor panel that produces these rows by hand has to be switched on.
How to Enable the Custom Fields Panel
The Custom Fields panel is the native editor interface for the post_meta box, and WordPress keeps it hidden by default, so the first practical step is to enable custom fields in WordPress by switching that panel on. The box does not appear on a fresh installation until a developer turns it on, which is why many site-builders assume the feature is missing when it is only dormant.
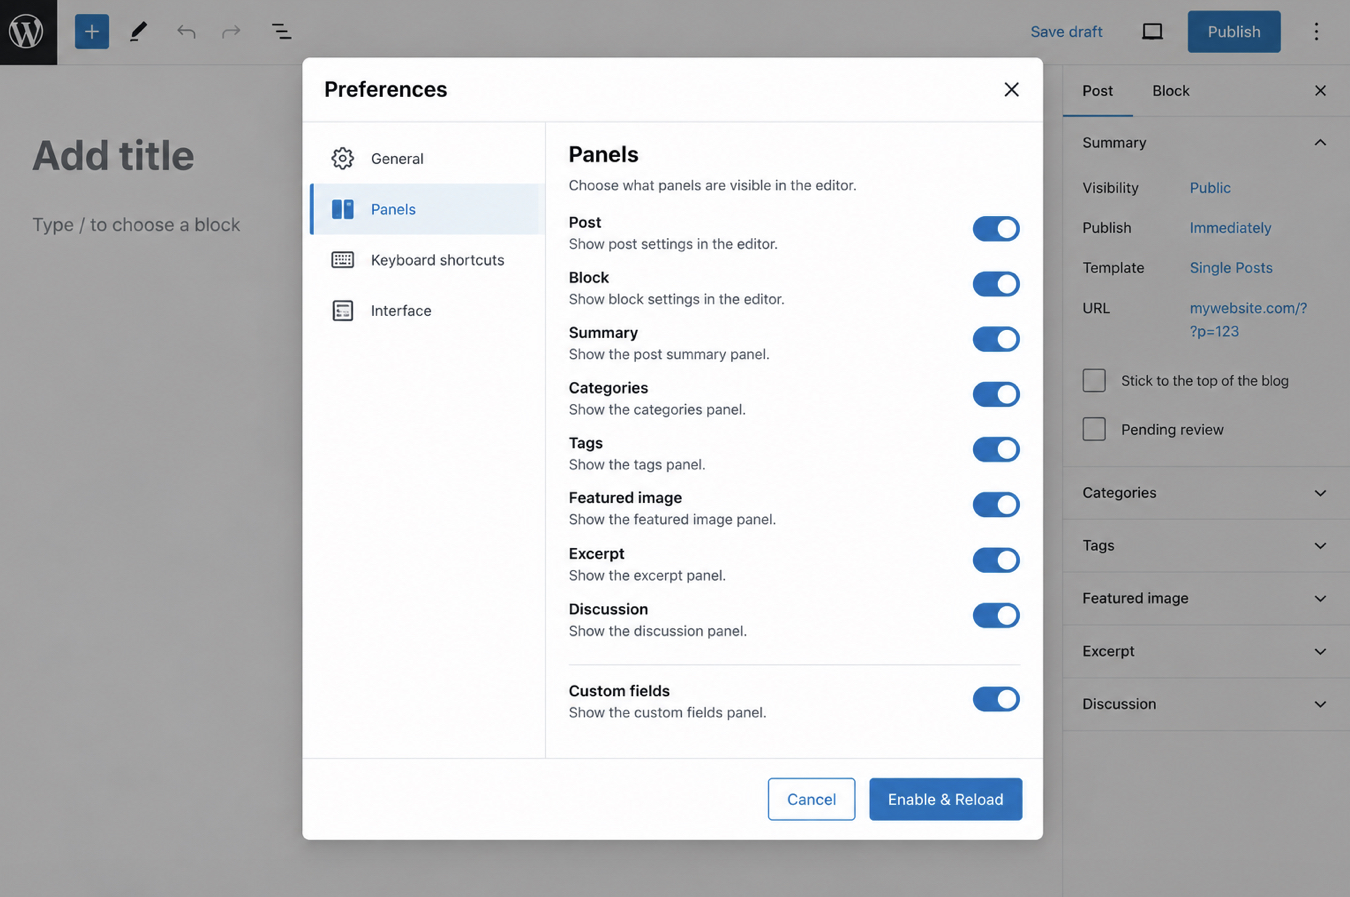
In the block editor, the panel is enabled through the editor options:
Open the options menu (the three dots) in the top corner of the editor.
Choose Preferences.
Open the Panels tab.
Toggle the Custom fields switch on.
Confirm with Enable & Reload, which refreshes the editor.
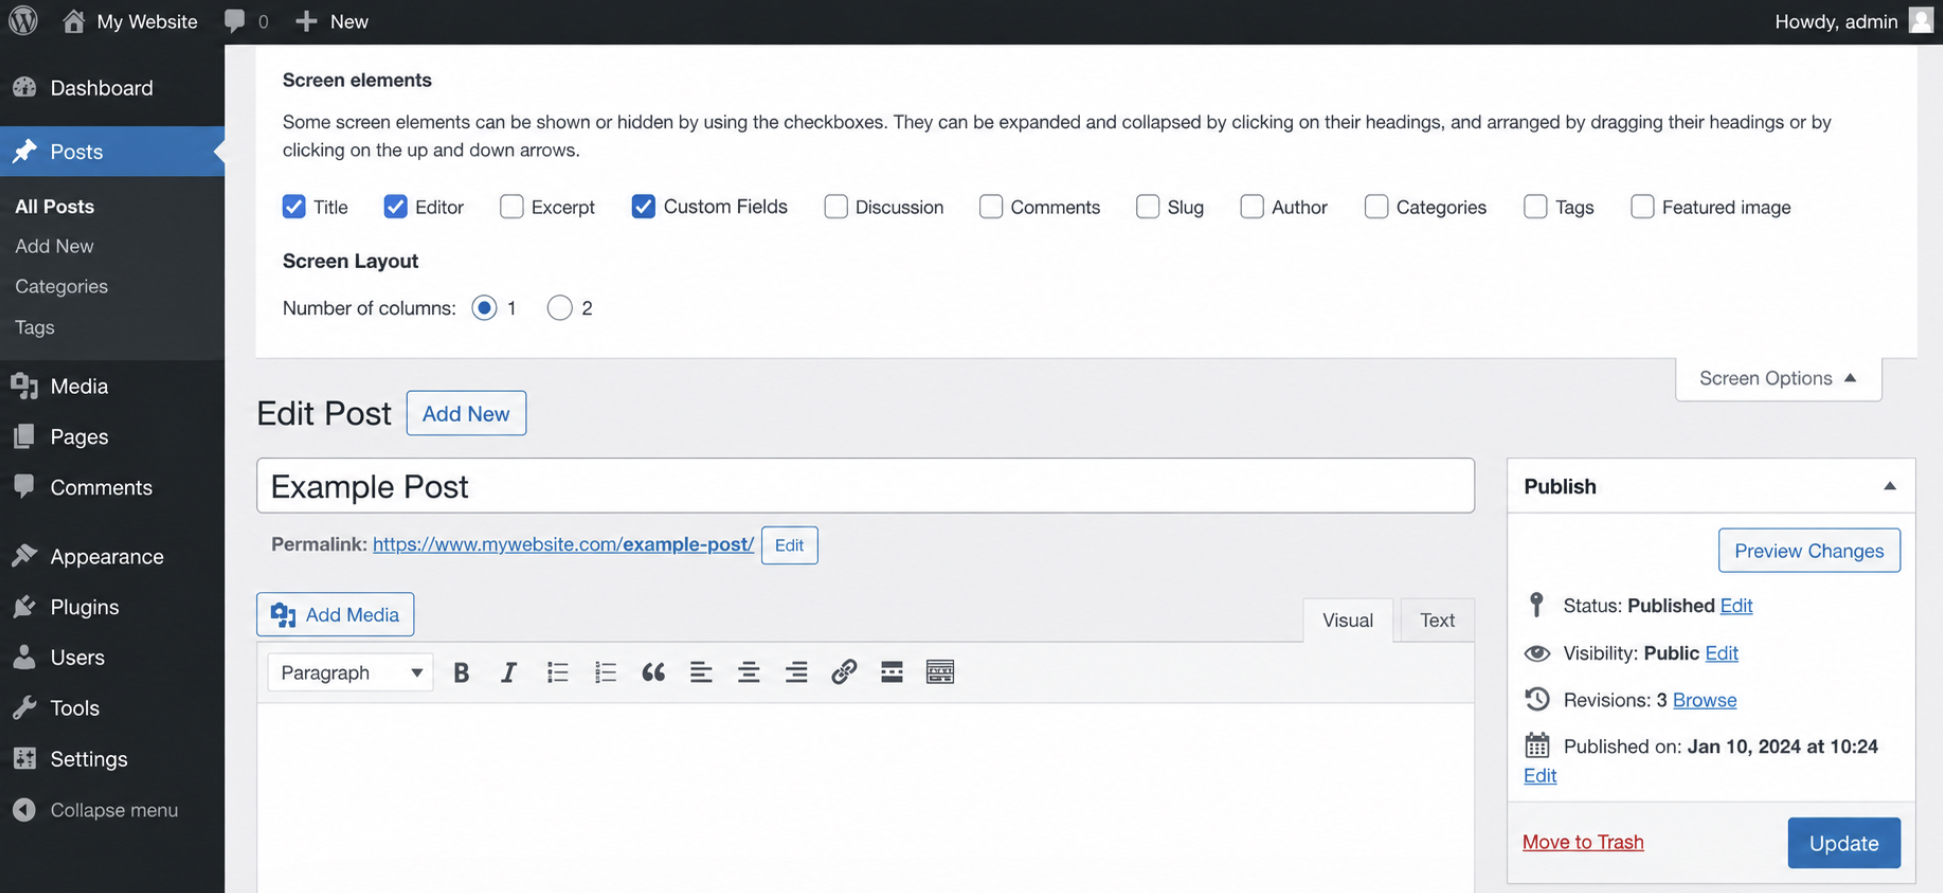
The classic editor reaches the same panel by a different route. There, the control sits under Screen Options at the very top of the edit screen:
Click Screen Options in the top bar.
Check the Custom Fields box.
Both routes lead to one panel, not two separate features. Whichever editor a site runs, once the toggle is on, the Custom Fields box appears below the main content area, ready for the first field.
How to Add a Custom Field to a Post
Adding a custom field to a post writes one meta_key and meta_value pair onto that post from the editor. With the panel visible below the content area, a developer names the field, sets its value, and commits it, and WordPress writes the corresponding wp_postmeta row.
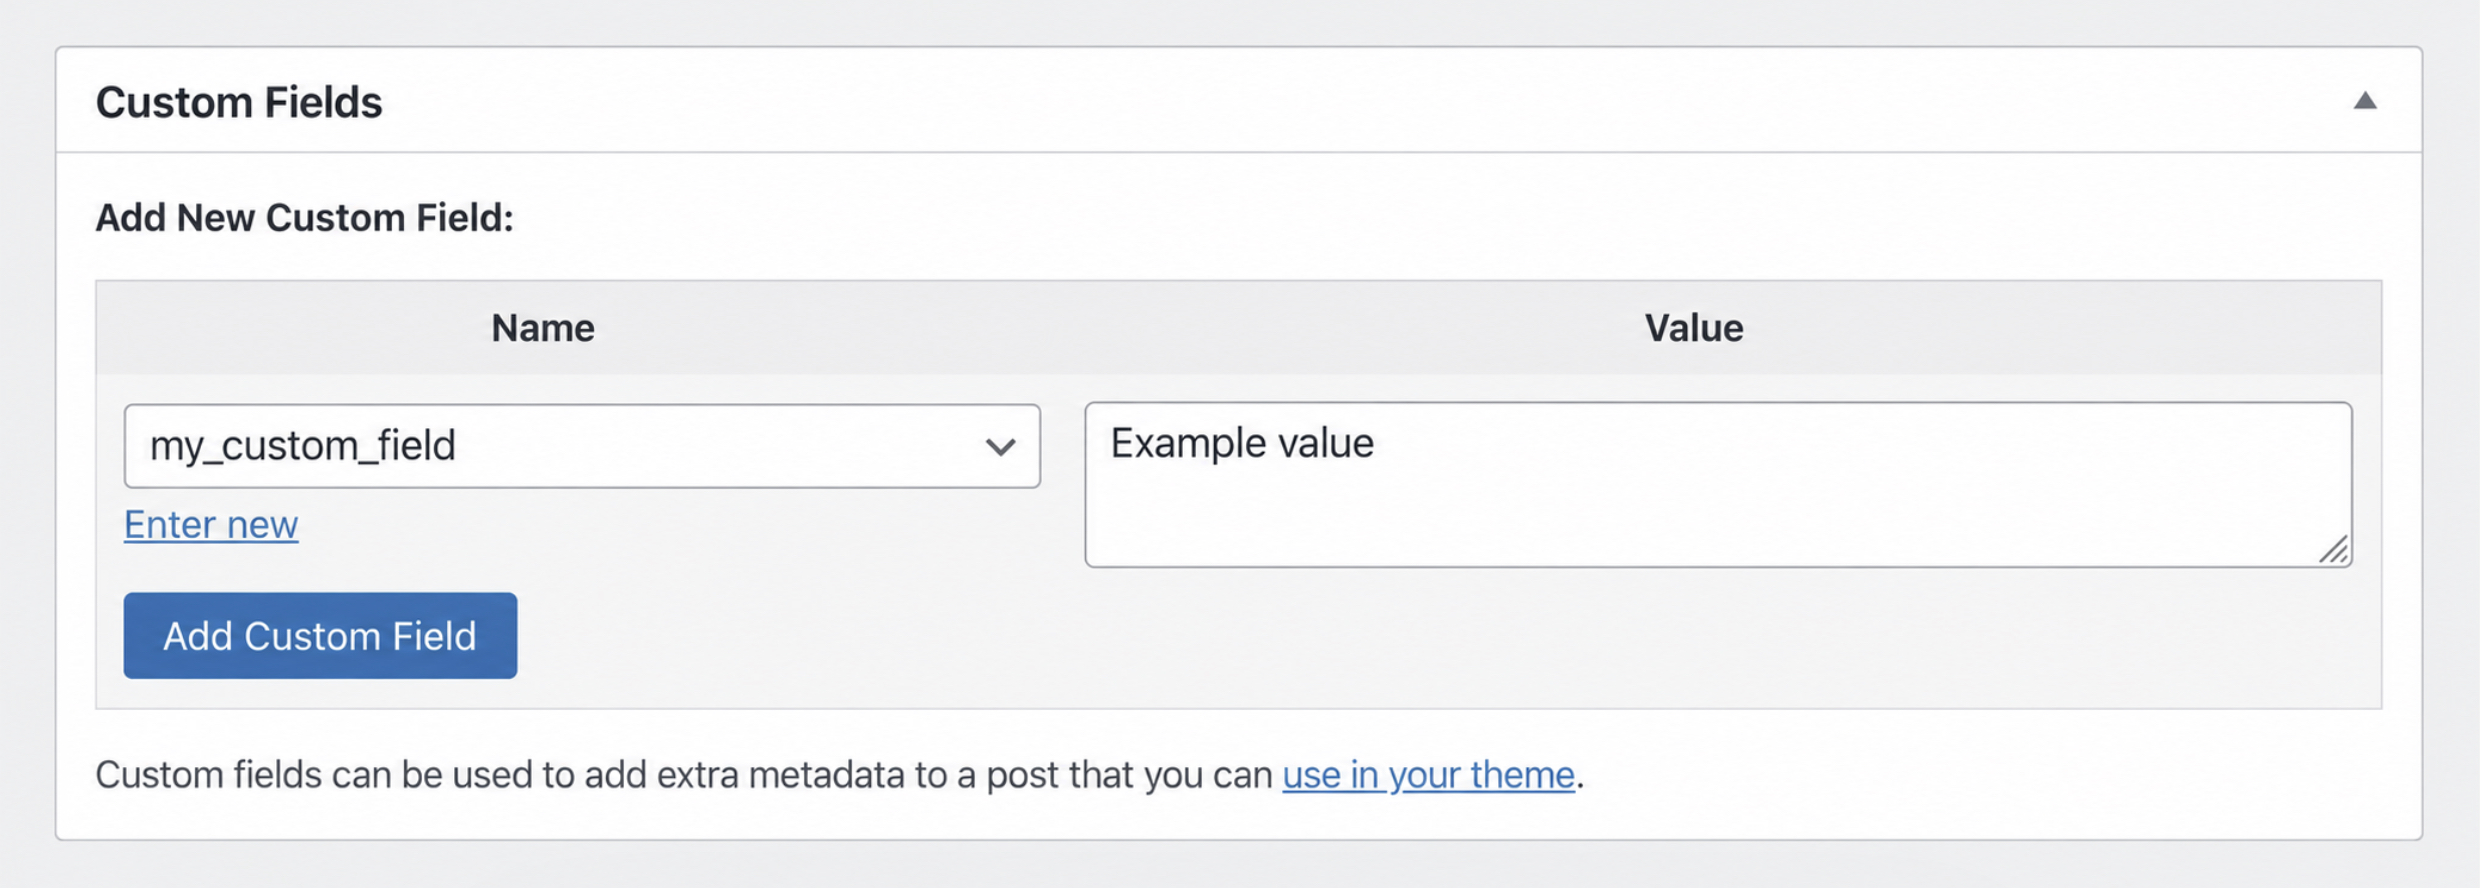
The steps inside the Custom Fields box run in order:
In the Name field, choose an existing key from the dropdown or type a new one. This Name becomes the meta_key.
In the Value box, enter the data the field should carry. This Value becomes the meta_value.
Click Add Custom Field.
That single action writes one row into wp_postmeta, with the Name in the meta_key column and the Value in the meta_value column, tied to the post through its post_id. The editor is one way to produce that row. In code, a single function does the identical write:
add_post_meta( $post_id, 'meta_key', 'value' );
add_post_meta takes the post ID, the meta_key, and the meta_value, and writes the pair exactly as the editor would. The programmatic equivalent matters most when values come from somewhere other than a person typing. Its counterpart reads a stored value back out through get_post_meta.
How to Get a Custom Field Value with the post_meta API
The post_meta API is the set of native functions that read and write custom-field values in code, with no plugin involved. Getting a WordPress custom field value in code runs through get_post_meta, the read function at the center of that API. It is the native answer to a question every dynamic template eventually asks: what value did a post record under a given key?
get_post_meta reads. Three companion functions handle writing: add_post_meta creates a new pair, update_post_meta changes an existing one, and delete_post_meta removes it. Together they cover the full lifecycle of a custom field entirely in core PHP.
// Read a single value
$subtitle = get_post_meta( $post_id, 'subtitle', true );

// $single controls the return shape:
//   true  -> the stored value itself
//   false -> an array of every value under that key

// The paired writers:
// add_post_meta( $post_id, 'subtitle', 'A Field Guide' );
// update_post_meta( $post_id, 'subtitle', 'Second Edition' );
// delete_post_meta( $post_id, 'subtitle' );
Every one of these functions works against the same wp_postmeta rows the editor produces. A value added by hand through the panel is read by get_post_meta without any difference, and a value written by add_post_meta shows up in the editor panel the same way. The API and the interface are two ways of writing to the same table. This is the native approach that most tutorials skip, deferring instead to a plugin call such as ACFget_field(). The exact call takes three arguments, and each one controls a distinct part of the result.
How to Get a Value with get_post_meta()
get_post_meta() is the native function that returns a stored value for a given post and meta_key. Called with the right arguments, it hands back whatever a custom field holds, ready to use. The whole function turns on three parameters, and each one controls a distinct part of the result.
$value = get_post_meta( get_the_ID(), 'meta_key', true );
// Parameter 1: get_the_ID() supplies the post ID (an integer) for the current post in the loop
// Parameter 2: 'meta_key' names which custom field to read
// Parameter 3: the $single boolean, where true returns the single stored value

// With $single set to false (or omitted), the function returns an array instead:
$values = get_post_meta( get_the_ID(), 'meta_key', false );
// $values now holds every meta_value saved under that key for the post
The first argument is the post ID. Inside The Loop, get_the_ID() supplies it for whatever post is being rendered, so the call stays generic across every post that uses the template. The second argument, the meta_key string, names the field. The third, the $single boolean, decides the return shape: true gives back one value, while false or an omitted third argument gives back an array of all values stored under that key. That array form is what makes repeated keys usable, since a single meta_key that holds several rows returns each of them.
Whichever form the call takes, the returned value comes back ready to output. Putting it on the front-end is the final step of the native path.
How to Display a Custom Field in a Theme Template
Displaying a WordPress custom field in a theme template means outputting a stored value on the front-end with get_post_meta and echo. Displaying a value always follows getting the value: get_post_meta runs first to read the value, then echo prints it. The two are a sequence, not a choice, and display is the terminal step of the native workflow.
The esc_html wrapper is not optional decoration. Any stored value that reaches the page should pass through an escaping function first, because custom-field data can contain characters that would otherwise break the markup or allow injected content to run. esc_html neutralises those characters for output inside ordinary text, and sibling functions such as esc_attr and esc_url cover values printed into attributes or links.
The same read-then-output pattern carries straight into the rest of the native surfaces. Attach a field to a custom post type, and the identical get_post_meta and echo pair prints it. Publish a field into the REST API, and the same saved value travels in the response. Bind a field inside the block editor, and the value appears without any template code at all. In a real theme file, the display line belongs inside single.php.
How to Display a Custom Field in single.php
single.php is the theme template that renders one post on its own, which makes it the natural place to output a single post’s WordPress custom field. When a visitor opens an individual post, WordPress loads this template file, so a field meant to appear on that view goes here.
The display line belongs inside The Loop, the block of template code that sets up the current post. That placement matters because get_the_ID() only returns the right post ID while The Loop is running.
<?php
// Inside single.php, within The Loop, where the post is already set up:
while ( have_posts() ) :
    the_post();

    the_title( '<h1>', '</h1>' );
    the_content();

    // Output the custom field, escaped, below the post content:
    echo esc_html( get_post_meta( get_the_ID(), 'subtitle', true ) );

endwhile;
?>
Sat inside The Loop, the escaped get_post_meta call reads the field for whichever post is on screen and prints it in place. The value now renders on the single-post front-end, alongside the title and content. That completes the native path from an empty panel to a value on the page. The remaining native surfaces each reuse the same functions in a slightly different setting.
Why Custom Fields Are Not Showing?
A plugin such as Secure Custom Fields or Advanced Custom Fields disables the core Custom Fields panel on purpose, and that deliberate switch-off is the usual reason WordPress custom fields are not showing. The metadata box that should sit below the editor goes missing, so the field data has nowhere to be entered. The trigger is a specific active component, not a broken installation.
Secure Custom Fields, the fork of Advanced Custom Fields bundled into some managed WordPress hosting installs, is the specific component that hides the panel. When Advanced Custom Fields or its Secure Custom Fields fork is active, that plugin expects field entry to happen through its own interface, so it hides the core box to avoid confusion. The panel is not gone; it is switched off by another component.
Two fixes address it directly:
If the native panel is wanted, re-enable it through Preferences and the Panels tab (block editor) or Screen Options (classic editor), the same toggle that turns it on in the first place.
If the plugin is the intended field system, resolve the conflict by working inside that plugin instead of the core panel.
A site running the plugin will manage its fields through the plugin’s own screens, and the route for that path is covered in how to use ACF. For a site meant to stay on core, though, the native panel comes back the moment the disabling component is turned off or removed.
How to Use Custom Fields in the Block Editor
The block editor, also called Gutenberg, offers two native custom-field surfaces once the panel is enabled: the Custom Fields section that still appears below the content, and block bindings that connect a block’s attribute to a meta_key. Using custom fields in the block editor means working either surface, and the second is the more powerful of the two.
Block bindings, available in WordPress 6.5 and later, link a block attribute directly to a stored meta_value. A paragraph or heading block, bound to a meta_key, renders that field’s value on the front-end with no template code written at all. The binding names the meta_key as its source, and WordPress reads the value through the same post_meta layer the theme functions use. The get-then-display pattern moves into the editor itself, handled declaratively instead of in PHP.
The binding is declared in the block’s markup, where the metadata.bindings attribute names core/post-meta as the source and the meta_key as its argument:
WordPress then replaces the paragraph’s content with the subtitle field’s stored value when the post renders.
For listing custom-field values across many posts, especially a custom post type, the Query Loop block is the block-editor counterpart, repeating a bound template for every matching post. Everything here stays on core, with block bindings and the Query Loop covering in the editor what get_post_meta covers in a template.
How to Add Custom Fields to a Custom Post Type
Custom fields on a custom post type are the same native post_meta, attached to a registered custom post type post rather than a default post. Adding custom fields to a custom post type uses the exact functions already covered, because post_meta does not care what post type a post belongs to. A post ID is a post ID.
One prerequisite comes first: the custom post type has to exist. The type must already be registered before any metadata attaches to its posts, and registering it is its own task, covered in register a custom post type rather than here. With a registered type in place, the metadata functions behave identically:
// $product_id is the ID of a post belonging to a registered custom post type
add_post_meta( $product_id, 'sku', 'ITM-4021' );
$sku = get_post_meta( $product_id, 'sku', true );
The same write works for any registered post type, and the sibling API for metadata on taxonomies rather than posts, term meta on taxonomies, mirrors this native name-and-value pattern for categories and tags instead of individual posts.
Nothing about add_post_meta or get_post_meta changes for a custom post type. The same call that reads a field on a blog post reads it on a product, an event, or any other registered type, as long as the post ID points at the right post.
Native post_meta eventually reaches its limit. When fields need grouping, repeaters, or a friendlier editing interface than the raw name and value box, the plugin route becomes the alternative worth weighing. The comparison in custom post type vs ACF sets the native custom post type approach against Advanced Custom Fields, the plugin that wraps the same post_meta storage in a richer interface.
How to Show Custom Fields in the REST API
Showing a WordPress custom field in the REST API means making a stored post_meta value readable in the WordPress REST response. By default this does not happen, because post meta is private in the REST API unless a field is explicitly published. A custom field that renders fine in a theme will not appear in the API output until it is registered for it.
register_meta() with show_in_rest set to true publishes one field to the response. The call declares the field to WordPress, names its type, and marks it for REST exposure through the show_in_rest flag:
register_meta( 'post', 'subtitle', array(
    'show_in_rest' => true,   // publish this field to the REST response
    'single'       => true,   // a single value rather than an array
    'type'         => 'string',
) );
With that registration in place, the subtitle field appears under the meta object in the post’s REST endpoint, readable by any client that queries it. Both show_in_rest and single are booleans: the first controls whether the field is published to the API at all, the second controls whether it comes back as one value or an array. That single registration call closes the native post_meta path, from a hidden editor panel through the database table, the read and write functions, the theme template, and finally out to the REST API, all on functions WordPress ships in core.






 ChatGPT
  Claude
  Grok
Grok  Gemini