Explore our specialized services, tailored solutions, and industry expertise to elevate your digital presence. From custom WordPress development to seamless integrations, we build high-performing websites that deliver impact.
DevKinsta is Kinsta’s free, Docker-based local WordPress development suite, the desktop app a WordPress developer sets up to build and run a local dev site entirely on one machine. The suite bundles the stack a WordPress install expects, an Nginxweb server and a MariaDB database along with a built-in database manager and local email tooling, so an agency builder can create, break, and rebuild sites to develop themes, plugins, and custom projects locally. It installs on Windows, macOS, and Ubuntu. It is free forever, and more than 60,000 developers, web designers, and freelancers use it, by Kinsta’s own count.
One mix-up is worth settling before anything gets downloaded. DevKinsta, the app, is a different product from Kinsta, the managed host. The suite costs nothing, requires no hosting plan, and handles purely local work on its own; MyKinsta and the staging connection appear only as optional capabilities when a site moves between the local machine and Kinsta’s platform.
A working setup runs through four stages: a machine that meets the system requirements, an installation matched to the operating system, fixes for the known failures that can block a first launch, and a first WordPress site running locally. The machine requirements come first, and they are short.
DevKinsta System Requirements
DevKinsta system requirements are the disk space, memory, operating system, and Docker Desktop version a machine needs before the DevKinsta download starts. Kinsta publishes each requirement as a pair, a minimum that lets the app run and a preferred value that keeps site creation responsive, and the pairs fit in one short specification.
Requirement
Minimum
Preferred
Disk space
5 GB
10 GB
Memory
2 GB
4 GB
Operating system
Windows 10/11, macOS 12.0 or newer, or Ubuntu 20.04 LTS or later
—
Docker Desktop (Windows and macOS)
v2.0.0
>=v4.17.0
The values are Kinsta’s own, drawn from the DevKinsta installation documentation and its FAQ. The two pages disagree on one figure (the FAQ still lists macOS 10.14+), and the installation page’s newer floor, macOS 12.0, is the requirement that applies.
Three product limits stand beside the hardware values, and treating them as prerequisites avoids surprises later. DevKinsta supports WordPress only; the suite creates no other kind of application. The web server and the database type are fixed: every site runs on Nginx with MariaDB, and neither field can be changed. And a finished local site pushes only to a Kinsta staging environment, never directly to a live site; the Push to Staging workflow carries that transfer once local work is done.
A machine that meets the specification and accepts the limits is nearly prepared. One requirement remains, and the entire local stack runs on it.
Docker Desktop Version
The Docker Desktop version requirement follows from DevKinsta’s architecture: the suite is “Powered by Docker”, in Kinsta’s own product-page wording, and runs every component of its local stack inside Docker containers, which makes Docker Desktop a prerequisite rather than an optional add-on.
On Windows and macOS, DevKinsta requires Docker Desktop v2.0.0 at minimum and prefers v4.17.0 or later, the two identifiers Kinsta lists in the installation documentation; the Linux flow relies on Docker Engine instead, at v2.0.0 minimum and v2.5.0 or later preferred. An outdated engine can cause real failures, not hypothetical ones: in one Kinsta community thread, a DevKinsta app stuck during startup on Windows 10 Home began working only after the developer updated an old Docker Desktop build.
The order rule matters as much as the version. Install and start Docker Desktop before installing DevKinsta, because the first DevKinsta launch checks for a running Docker engine; when Docker Desktop is missing or stopped, DevKinsta cannot detect it and prompts for a Docker installation instead of starting. That detection failure is recoverable without a reinstall (troubleshooting resolves it once the app is in place), but starting Docker first avoids it entirely.
With Docker Desktop installed, running, and at v4.17.0 or later, the machine meets every precondition, and the DevKinsta download itself comes next.
How to Install DevKinsta
To install DevKinsta is to move through three stages that end with a working desktop app: downloading the installer, running it on the operating system at hand, and letting the first launch pull in the dependencies the app runs on. These stages sit between a developer and the first local WordPress dev site, and their order never changes.
The download delivers one installer per operating system: Windows, macOS, or Ubuntu. The installer places the app. The first launch then completes the setup, which is the point where DevKinsta becomes usable rather than merely present. Installing DevKinsta takes minutes of attention; most of the waiting belongs to that final stage. The download comes first, and it asks for exactly two things.
The DevKinsta Download
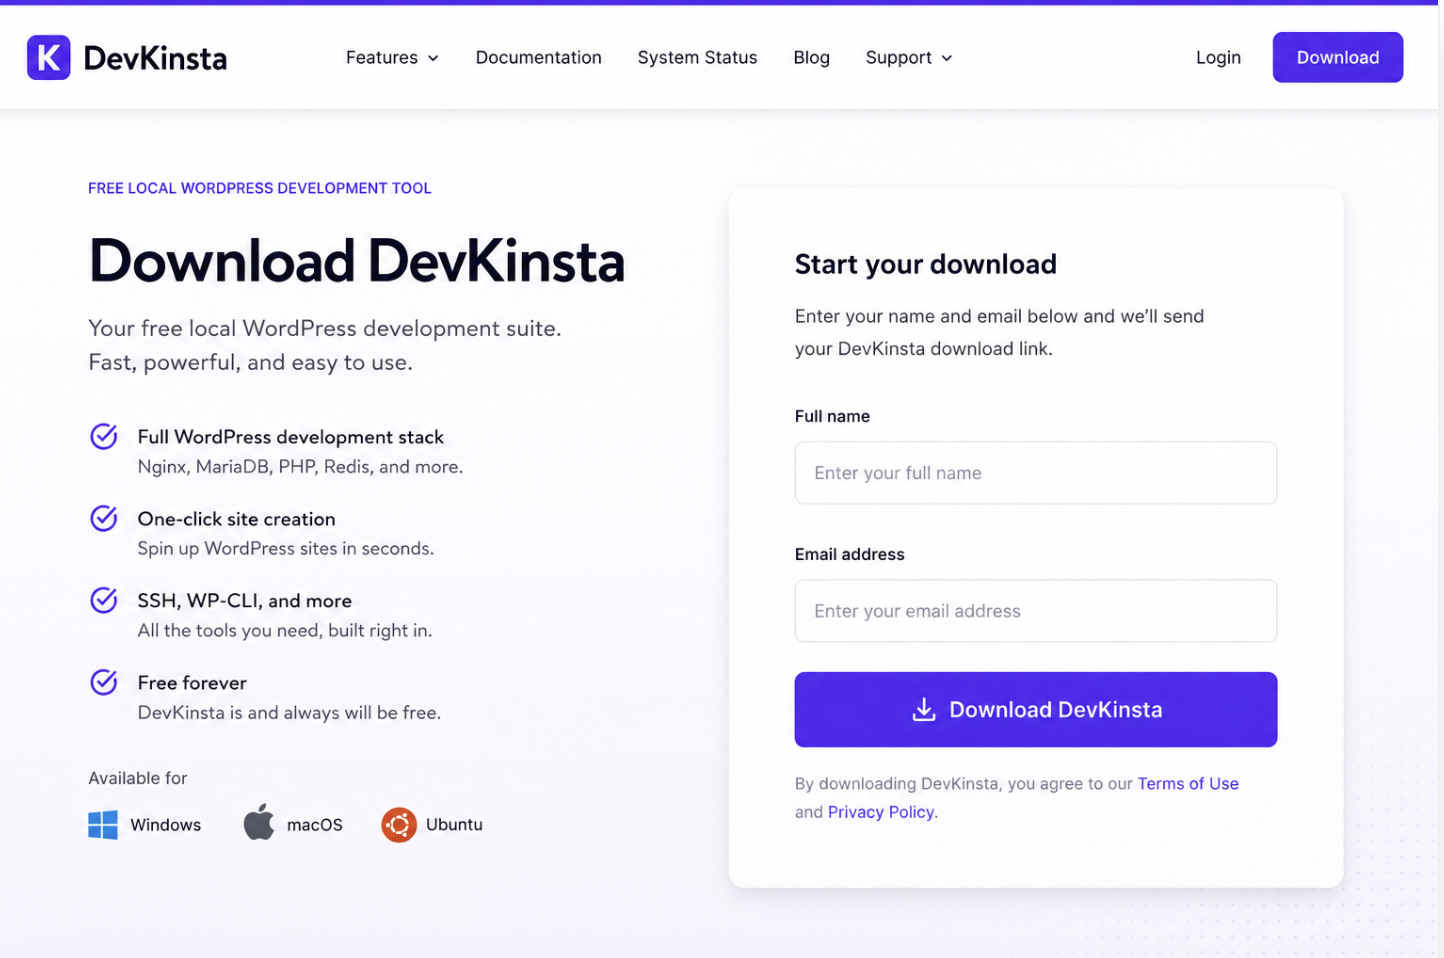
The DevKinsta download is gated on a name and an email address: Kinsta’s site serves the installer only after both fields of a short form are filled in. Entering a name and email starts the download, and the form is the entire gate. DevKinsta is free forever, so nothing else stands between the developer and the installer file.
What arrives depends on the machine. Windows and Ubuntu each get a single installer file, while Mac downloads split by processor: DevKinsta_arm64.dmg for Apple silicon, DevKinsta_x64.dmg for Intel. The installer file therefore matches the operating system and, on a Mac, the processor. Running it is where the three routes diverge.
Windows Installation
The Windows installation runs the downloaded .exe installer and finishes in a handful of prompts.
Double-click the downloaded .exe file to launch the installer.
Follow the installer prompts, choosing Yes when Windows asks for permission.
If Docker Desktop is missing, download and install it when the installer prompts for it.
That Docker Desktop prompt is conditional. It appears only when Docker is absent from the machine, which is exactly the stall the Docker Desktop prerequisite exists to prevent. Once the prompts finish, the installation completes, and the installer .exe has no further role; deleting it is safe. A Mac takes a different route to the same result.
macOS Installation
The macOS installation opens the .dmg image chosen by processor at the download stage and moves the app into place by hand.
Double-click the downloaded .dmg file.
Drag the DevKinsta application from the opened window into the Applications folder.
Open the app from Applications for the first time.
The drag is the whole install: no wizard runs, and the installation completes the moment DevKinsta lands in Applications and opens. Ubuntu is the third route.
Ubuntu Installation
The Ubuntu installation targets Ubuntu 20.04 LTS or later, the one Linux release line DevKinsta officially supports; other distributions sit outside the supported set.
Double-click the downloaded DevKinsta installer file to install the package.
Launch the app.
Both steps complete the package install without a terminal, the same double-click flow the desktop platforms use. One dependency differs on this route: the vendor’s Linux install steps prompt for Docker Engine rather than Docker Desktop. Launching the app hands over to the one stage every operating system shares.
The First DevKinsta Launch
The first DevKinsta launch is the closing stage of the installation: before the interface opens, DevKinsta downloads the Docker dependencies it runs on, and until that download finishes there is nothing to click. The first launch needs 5-10 minutes, depending on connection speed, according to Kinsta’s installation documentation, so a progress screen holding at an initializing state for several minutes is expected behaviour, not a hang.
A launch that reaches the interface completes the installation. DevKinsta reaches its installed state at that moment, and the app stands ready to run its first local WordPress site. An interrupted launch announces itself in one of two recognizable ways: DevKinsta reports that it cannot detect Docker even though Docker is present, or the startup stalls at “Configuring database root user…” Neither symptom ends the installation. Both are named failure classes with documented fixes, and Docker detection is the first of them.
DevKinsta Troubleshooting
DevKinsta troubleshooting is the resolution of the recurring failures that interrupt the app’s installation, first launch, and site creation. Kinsta’s own documentation and public forum record show the same failures returning again and again, and they sort into five classes: Docker detection failures at first launch, port conflicts with another local server during stack start, site timeouts on running sites left idle, “Something bad happened” errors during site creation, and WSL2 conflicts on Windows machines.
DevKinsta error codes run from DK0001 through DK0083 in the vendor’s registry; when a failure shows a code, the code identifies it faster than the message does: DK0001 means “Not enough free disk space.”, DK0020 means “Database creation failed.” The registry pairs each code with its meaning, so it works as the lookup companion whenever a code appears that the five classes do not explain.
Each class pairs a symptom with a fix evidenced in the vendor’s documentation or its forum record, so a stalled setup continues instead of restarting from zero. The first class sits at the base of the stack: whether DevKinsta detects Docker at all.
Docker Detection
A Docker detection failure is DevKinsta’s inability to recognize a Docker installation already present on the system; the app then prompts to install Docker at every launch, which is the symptom exactly as Kinsta’s Docker-issues documentation records it. A detection failure blocks everything that follows, because Docker Desktop powers DevKinsta’s entire local stack.
The vendor’s fix sequence escalates one step at a time:
Confirm Docker Desktop is installed, that it is running, and that it meets the version floor from the requirements.
On macOS, open Settings > Advanced and select “Allow the default Docker socket to be used”.
Recreate the docker.sock symlink with the vendor’s command:bash sudo ln -s "$HOME/.docker/run/docker.sock" /var/run/docker.sock
In Docker Desktop, check the notifications for warnings and click Repair; for a warning in the banner across the top, click Re-apply configuration.
Reinstall completely as the last resort. This process deletes everything related to DevKinsta and Docker, per Kinsta’s documentation.
Each step resolves one narrow thing, DevKinsta’s ability to recognize an otherwise healthy Docker Desktop, and none of them reaches into Docker beyond that. Once the app detects Docker, the next failure class waits at the network layer: ports another server already holds.
Port Conflicts
A port conflict means DevKinsta’s web stack needs ports 80 and 443 while another local server already occupies them. DevKinsta signals the conflict as DK0031, “Port 80 or 443 is used.” The same contention can surface deeper in the stack as a listen-tcp bind error on the devkinsta_nginx container, a Windows report in the public record shows the form it takes: “Ports are not available … bind: An attempt was made to access a socket in a way forbidden by its access permissions”.
The symptom-to-fix sequence stays short:
Recognize the signal: the DK0031 code, or the listen-tcp bind error when the failure appears at the container level.
Identify which local server or container occupies the port. A second web stack on the same machine is the usual holder, another local dev tool, visible in its own interface, or a separate Docker container, listed among the running containers in Docker Desktop.
Move DevKinsta’s external port mapping in the global-settings Port Selector. Sites are then reachable at addresses like sitename.local:8443, which is how a Mac developer running a second Docker container resolved a port conflict of the same kind on Kinsta’s forum.
The fix stays on DevKinsta’s side of the stack. Identifying the occupying process is enough; the Port Selector remaps the app’s external ports, and nothing requires shutting the other server down. A conflict-free port set still does not guarantee a reachable site, though. A created site can load once and then stop responding, which is the next class.
Site Timeouts
A site timeout is a created site that never loads, ending in the browser message “This site can’t be reached – timed out”. The site itself is rarely broken. The cause sits in Docker Desktop: its Resource Saver feature suspends idle containers on a 5-minute timeout, and DevKinsta’s containers go idle whenever no local pages load and no WordPress edits run.
Increasing or disabling Resource Saver restores the site. Kinsta’s staff identified the setting on a forum thread where all local sites timed out within 5 to 10 minutes of inactivity, and the reporting developer confirmed the fix: after raising the interval from 5 to 30 minutes, a restart routine that had run 8 to 14 times daily dropped to a single restart for the whole day. The adjustment stays inside that one Docker Desktop setting; nothing else in Docker needs to change. Timeouts affect sites that already run. The harder class occurs earlier, when site creation fails outright.
Something Bad Happened Errors
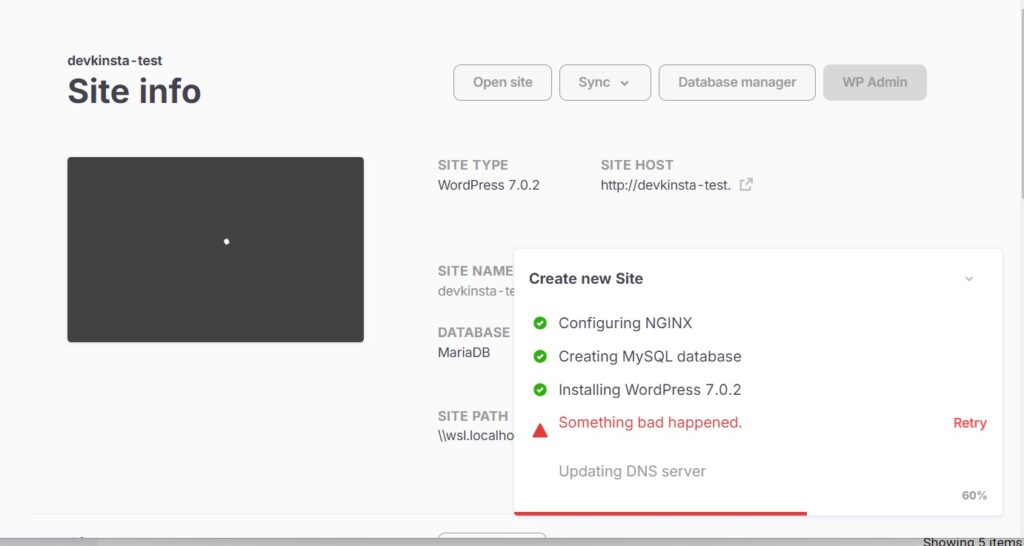
“Something bad happened” is the literal message DevKinsta shows when site creation, database creation, or a MyKinsta import fails. The wording explains nothing on its own, which is why this class fills more of Kinsta’s forum than any other. Three contexts recur in the record: site creation failing on every attempt, with a MySQL access-denied entry in the logs; database creation; and MyKinsta imports stuck mid-clone, one at 35%, another failing repeatedly around the 1.4GB and 4GB marks of a roughly 14GB transfer.
The evidenced recovery escalates through four steps:
Retry the operation once; interrupted transfers and transient container states sometimes clear on the second attempt.
Delete the devkinsta_db container in Docker Desktop, quit DevKinsta fully, then reload the app so it recreates the container. A forum moderator supplied this fix for the site-creation case.
Reset the database container state with the vendor’s cleanup command from the error-codes registry:bash docker container rm devkinsta_db && docker volume rm devkinsta_db_data
Reinstall completely as the last resort. In the follow-up to the original thread, a full removal of DevKinsta and Docker Desktop resolved a case the container fix alone did not.
The recovery resets what the error most often corrupts, the database-container state, and the goal past it is a clean creation run: a new WordPress site, a custom site, or an import that completes. One failure class remains, and it appears only on Windows.
WSL2 Conflicts
A WSL2 conflict is a WSL2 limit surfacing as a DevKinsta failure: DevKinsta’s Docker stack runs through WSL2 on Windows, so the subsystem’s own limits appear inside the app rather than as Windows errors. Three registry codes name the install states: DK0032 for WSL2 not installed, DK0035 for a failed WSL2 download, DK0036 for the WSL2 feature not enabled. Each code resolves by completing the state it names, and nothing deeper in Windows is involved.
Two patterns from the public record run past those install states.
In the first, the vmmemWSL process keeps consuming memory after Docker Desktop closes: a Windows 11 developer running DevKinsta found that a manual WSL shutdown worked only temporarily, with the docker-desktop-data distribution restarting within 5 minutes, and the archived answer confirms no setting prevents it. The bounded fix is to shut WSL down manually again after closing Docker Desktop and DevKinsta.
In the second, DevKinsta reports a volume path not supported by WSL, which the registry records as DK0083, “Volume path is not supported.” The error surfaces right after installation, and its cause is a version change in Docker Desktop. Builds 4.30.0 and later consolidated the two WSL2 distributions and removed the separate docker-desktop-data distribution.
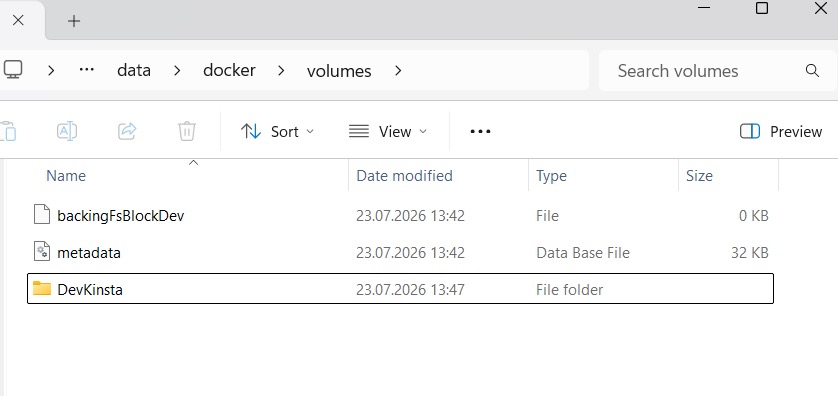
DevKinsta still expects its volume path there: wsl.localhostdocker-desktop-datadatadockervolumesDevKinsta, so the mount target no longer exists. Kinsta’s error-codes registry names the same conflict and gives two routes out: switch Docker to the Hyper-V backend, or downgrade Docker Desktop to 4.29.0 or earlier.
The Hyper-V backend ships only with Windows Pro, Enterprise, and Education, so on Windows Home the downgrade is the available route, and 4.29.0, the last build before the merge, stays above the app’s preferred Docker Desktop floor. The sequence runs in order: uninstall the newer Docker Desktop, then install version 4.29.0 on the WSL2 backend to restore the docker-desktop-data distribution.
That restore brings the distribution back without DevKinsta’s own volume folder, because the original error blocked its creation, so the folder is recreated by hand: make a folder named DevKinsta inside wsl.localhostdocker-desktop-datadatadockervolumes, then relaunch DevKinsta so it mounts the path it expects and clears the error.
With detection, ports, timeouts, creation errors, and WSL2 each paired to an evidenced fix, a failure reads as a symptom with a known resolution, and the setup resumes at its goal: the first running WordPress dev site.
How to Run the First WordPress Dev Site in DevKinsta
To run the first WordPress dev site in DevKinsta is to reach one goal state: a created site, listed in the app, whose front end opens in the browser at a local address. Nothing goes live at this point. The site runs entirely inside the local environment, which is exactly what the setup so far has been building toward.
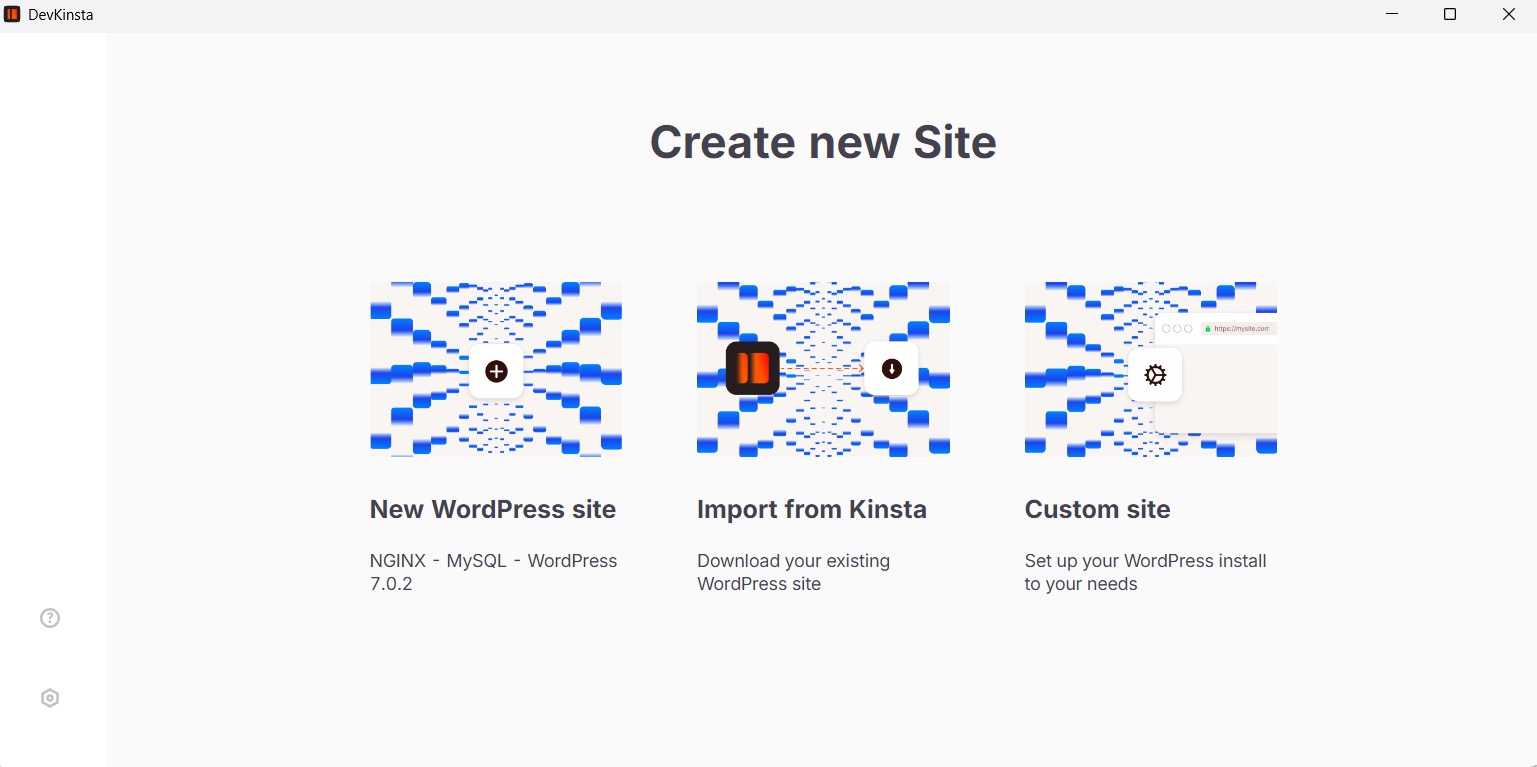
DevKinsta creates that first site through three creation options: New WordPress site, Custom site, and Import from Kinsta, all presented on the Create New Site screen. One provisions a fresh install, one exposes the stack settings before anything is created, and one starts from a site that already exists.
Whichever creation option the developer selects, verification is identical. The new site appears in DevKinsta’s site list, and its front end opens locally in the browser; when both hold true, the site works. A creation attempt that stalls behind the “Something bad happened” error instead has a named recovery among DevKinsta’s troubleshooting fixes, so a stalled first attempt is a known failure class rather than a mystery. For most first sites, though, the default route finishes without incident, and it asks for almost nothing.
New WordPress Site
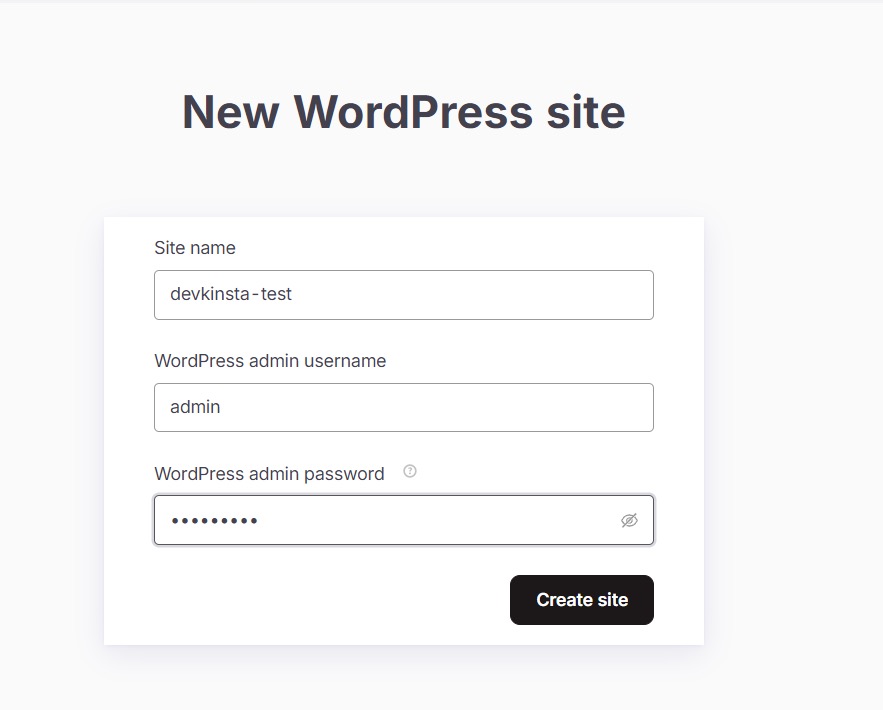
New WordPress site is the default creation route: one click, and DevKinsta provisions a standard local WordPress install without asking a single question about the stack underneath it.
Select the New WordPress site option on the Create New Site screen, or Add Site, once other sites already exist.
Provide the site name, together with the WordPress admin username and password.
Click Create Site.
Site creation takes about 15-60 seconds, the range Kinsta’s documentation sets for a normal run, a wait inside that window means the process is working, not hanging. Some projects need more control than a default install offers. A specific PHP version, a named database, a secure local address, for those decisions, the configurable route exists.
Custom Site
Custom site is the configurable creation route, the same site creation, with the stack settings exposed before DevKinsta builds anything. The route includes these settings fields:
PHP version: the version the new site starts on.
Database name: the label the site’s local database is created under.
Enable HTTPS: serves the new site over a secure local address from the start.
Multisite: subdirectory or subdomain, chosen at creation.
The developer chooses a value or provides a name for each field, enables what the project calls for, and DevKinsta creates the site with those settings already applied. Both routes so far build a site from nothing. The third begins from a site that already runs on Kinsta’s platform.
Import from Kinsta
Import from Kinsta is the creation route that clones an existing Kinsta-hosted site into the local environment, so the first WordPress dev site can be a working copy of one that already exists rather than an empty install.
Connect the MyKinsta account when DevKinsta prompts for the sign-in.
Select the site to clone from the account’s site list.
Start the clone. DevKinsta copies the site’s files and database to the local machine.
Cloning takes 30-60 seconds for a typical site, and large sites can take up to 10-20 minutes, per the same documentation. Import is also where the “Something bad happened” error surfaces most often (stalled imports are a recurring report on Kinsta’s community forum), and that failure, too, has its documented recovery among the DevKinsta troubleshooting fixes. Once the cloned site, or a fresh one from either other route, runs locally, the setup goal is met, and attention shifts to the tooling DevKinsta builds in for a running site: the database manager, the local email inbox, PHP version switching, and WP-CLI.
DevKinsta Site Management
DevKinsta site management is the bundled tooling for working on a local site once setup is behind it: the app includes a database manager, an email inbox, per-site PHP versions, and WP-CLI support. Kinsta describes the set as local database and email management tools to develop themes, plugins, and custom sites, which is how agency builders use it in practice: one desktop suite managing data, mail, runtimes, and commands for every client site on the machine.
Local by Flywheel bundles a comparable tooling set around its own local sites; teams that standardized on that app instead can install WordPress with Local by Flywheel and reach a similar day-to-day workflow. Within DevKinsta, the work usually starts at the data layer before switching to mail, runtime, or command-line tasks.
Database Manager
The database manager built into DevKinsta is Adminer, included with every site the app creates. Local database work therefore needs no separate install, no phpMyAdmin, no third-party client. The site database opens straight from the site panel, and the developer edits tables, rows, and options in place. Mail sent by the same local site never has to leave the machine either.
Email Inbox
The email inbox is DevKinsta’s local SMTP server and email testing tool: every message a local site sends is captured in the app rather than sent to a real recipient. That capture is what makes form and notification testing safe on client work: a contact form can fire test submissions all afternoon without one of them landing in an actual customer inbox. Each captured email sits in the inbox for inspection, headers and body included. The runtime beneath the site is just as adjustable.
PHP Versions
DevKinsta supports PHP versions 7.2 through 8.3, switchable per site with just a few clicks (Kinsta’s own wording). From the site’s settings, the developer switches to a new version, and the site restarts on that runtime. The switch matters most on client work: a site can run and be tested against the exact PHP version its host uses, so a compatibility problem surfaces locally instead of on the client’s server. Command-line work against the same sites is the fourth capability.
WP-CLI
WP-CLI is the WordPress command line, and DevKinsta sites accept it alongside the visual tooling. Anything a developer would rather script than click (routine updates, database exports, bulk changes across a client roster) runs as a repeatable command against the local site. Some developers want the terminal as the primary interface rather than a supplement. WordPress itself maintains wp-env, a terminal-driven local environment built for exactly that preference, and pairing DevKinsta with wp-env covers the scripted and the visual workflow at once. Managed visually or scripted, a finished local site eventually has to move somewhere, and DevKinsta’s built-in route out leads to Kinsta.
Kinsta Integration in DevKinsta
The Kinsta integration in DevKinsta is the app’s connection to a MyKinsta account: with the account linked, a local site can move between the desktop and Kinsta environments. The connection works in two directions. Inbound, an existing site comes down from Kinsta for local work through the import option.
Outbound, finished work goes back up, the one part of DevKinsta that reaches past the local machine. The integration assumes the tool decision is already made; developers still weighing local environments will find local WordPress development environments compared a better starting point. For everyone else, the outbound direction carries one hard limit, and that limit defines where DevKinsta stops: the push.
Push to Staging
The push to staging sends a finished local site from DevKinsta up to a Kinsta staging environment. Its scope is narrow by design: the push allows a Standard or Premium Staging Environment as its only destination and never a live site. Kinsta’s DevKinsta documentation states that a direct push to a live site is not possible from the app. Kinsta’s support staff confirm the same path in practice: a 2025 forum thread about a stuck site migration was resolved once the site went to staging first, with staff replying, “you must first push it to a staging site,” before anything else could move.
Going live is therefore a separate step, performed from the staging environment inside MyKinsta rather than from DevKinsta. In the app itself, the sequence stays short. The developer selects the connected site, starts the push, and DevKinsta moves the files and the database up to staging.
That limit also completes the setup path. DevKinsta’s job runs from a machine that meets the requirements, through installation and the known failure fixes, to a local WordPress dev site that runs, is managed day to day, and finally reaches staging. Everything past staging belongs to the hosting side; the local suite completes its work at the staging boundary.





 ChatGPT
  Claude
  Grok
Grok  Gemini