Explore our specialized services, tailored solutions, and industry expertise to elevate your digital presence. From custom WordPress development to seamless integrations, we build high-performing websites that deliver impact.
A product MVP built on a headless WordPress stack is built by an ordered build sequence that separates the WordPress backend from the front-end delivery layer and ends in deploy. In this MVP scope, the decoupled stack keeps content modeling, editorial workflow, and publishing in WordPress while the product interface is built and shipped as a separate front end that queries WordPress as the system of record.
The MVP build consists of a single spine that moves from architecture choice into backend setup, then front-end wiring, then the query layer that connects the two, and finally a deploy step that makes the product runnable as a minimal release. A WordPress MVP built this way stays focused on shipping the smallest working surface area while keeping the decoupled boundary explicit, so each stage can complete cleanly without drifting into route comparisons or post-MVP concerns.
The sequence starts where the stack separates: the decoupled-architecture decision that fixes what WordPress owns, what the front end owns, and what the boundary must expose for the MVP to ship.
Decoupled Architecture Decision for a Product MVP
A decoupled-architecture decision for a product MVP is the route-fit step that confirms a split between the WordPress backend and a separate front-end suits the product at minimum scope. Decoupled architecture separates the WordPress backend, which stores and manages content, from the front-end, which renders what visitors see, so the two run as independent layers connected by a data request rather than as one coupled application.
Building a product MVP on headless WordPress starts from this route-fit, because every later stage (the backend, the front-end framework, the query layer, the deploy) assumes the backend and front-end are two standing-apart halves. A coupled WordPress install, by contrast, has WordPress both store the content and render the pages through a theme, with no separate front-end to wire.
The decoupled route fits some minimum-scope products and not others, and a short route-fit check settles which. The check stays at MVP depth. It weighs the route against the product’s actual scope, not a full route-by-route comparison. The decoupled route suits a product MVP under four conditions, and any one of them is enough to justify the split.
The front-end demands an interface a WordPress theme does not deliver: a custom application surface, a framework-driven interaction model, or a presentation layer the product owns independently.
The same backend content has to feed more than one front-end: a web app and a native client reading one WordPress source.
The development team already works in a front-end framework and stands up content APIs faster than it themes WordPress.
The product roadmap treats the presentation layer as a place that will keep changing while the content model stays stable.
When the product’s interface is a set of standard pages a theme renders well, a coupled WordPress install fits the same MVP with less to wire, and the decoupled route adds cost the scope does not earn back.
That cost is the trade-off the route-fit weighs. Decoupling buys front-end flexibility (the front-end is free of WordPress rendering and can use any framework) at the price of standing up and connecting two layers instead of one. For a minimum product, the founder weighs that added build cost against the flexibility the product genuinely needs, and the route fits only when the flexibility is real.
The architecture and internals of the decoupled stack itself run deeper than a route-fit needs, and a dedicated guide to headless WordPress carries that depth so this build can stay on the sequence. With the route settled, the build starts where the content does: standing up the WordPress backend.
WordPress Backend Setup
WordPress backend setup, in a decoupled stack, is the stage where WordPress serves as the data source rather than the public website. The WordPress backend stores the product MVP’s content and exposes it for a separate front-end to read, which makes the headless WordPress setup distinct from a traditional install where WordPress renders the pages it stores. Standing up this backend is build step two of the product MVP on headless WordPress: the backend serves content, stores the data model, and stands ready for the front-end to query.
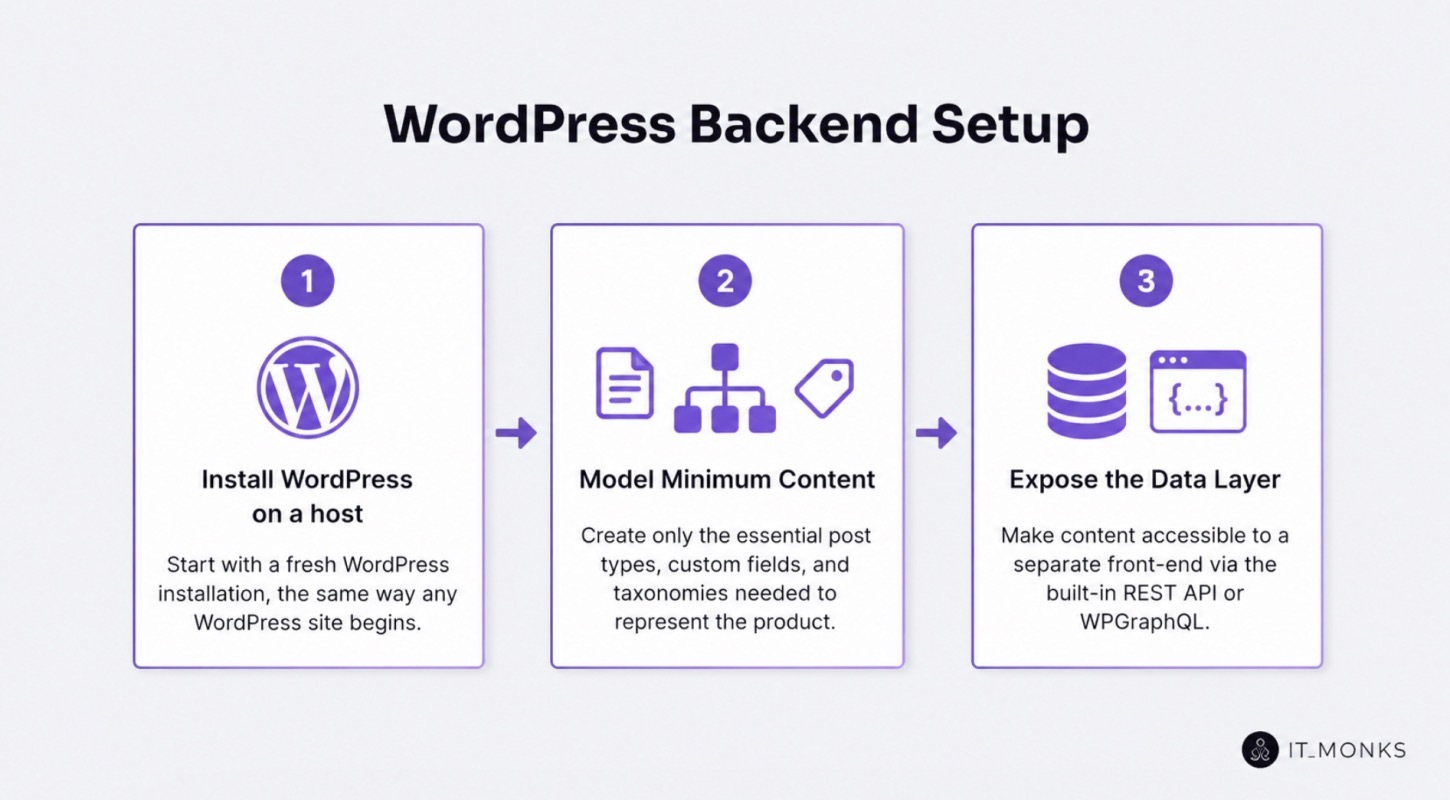
The setup actions follow an ordered sequence. A founder or developer works through three steps to turn a fresh WordPress install into a decoupled data source:
Install WordPress on a host, the same way any WordPress site begins.
Model the minimum content the MVP needs: the post types, fields, and taxonomies that represent the product, and nothing the launch does not require.
Expose the data layer so a separate front-end can read it, switching the install from a renderer of pages into a source of structured data. WordPress exposes that data through its built-in REST API by default, or through WPGraphQL once that plugin is added.
In the WordPress admin, the configured headless backend surfaces the data layer through a concrete control: the REST API endpoint that the platform exposes by default, or the WPGraphQL plugin screen once that route is added. That control is the point where WordPress stops rendering its own front-end and becomes the content store the rest of the sequence consumes.
The backend now stands up the data the next stages depend on. With the WordPress backend serving as the data source and the data layer exposed, the build moves to the half that presents that data, the separate front-end framework that reads from the backend.
Front-End Framework Wiring
Front-end framework wiring, in a decoupled stack, is the stage where a separate front-end framework becomes the presentation layer that the WordPress backend feeds. The front-end framework is the decoupled half that renders the public interface, and it is separate from the WordPress backend by design: the backend stores and serves data, and the front-end reads that data and presents it.
Wiring this front-end is build step three of the product MVP on headless WordPress: the front-end separates the presentation layer from the data source, and it presents the MVP content the backend exposed in the prior stage.
Wiring the front-end follows an ordered sequence of three steps:
Scaffold the framework application, stand up the framework-agnostic project that will render the MVP.
Point the front-end at the backend endpoint stood up in the prior stage, so the presentation layer knows where the data source is served from.
Render the MVP content, pull the modeled content through and display the product the MVP represents.
Pointing the front-end at the backend endpoint surfaces a gap. The front-end framework can locate the WordPress backend, but it still needs a defined way to read the data that endpoint exposes, a structured method for requesting exactly the content each view requires. Naming that gap is the handoff: the wired front-end and the stood-up backend are now two halves of the decoupled stack that need a connector between them.
That connector is the query layer between WordPress and the front-end.
The Query Layer Between WordPress and the Front-End
The query layer is how the front-end reads WordPress data in a decoupled stack. The data-access interface that sits between the stored content and the presentation layer. The query layer connects the two halves the prior stages stood up: the WordPress backend that exposes the data, and the front-end framework that requests it. Connecting them is build step four of the product MVP on headless WordPress, and it is the step that makes the decoupled stack functional, because without a way to read WordPress data the front-end has an endpoint but no content.
Two options implement the query layer at MVP depth. Each gives the front-end a way to read WordPress data, and each fits a different shape of minimum build:
Query-layer option
What it is
When it fits an MVP
WordPress REST API
The data-access interface built into WordPress
The MVP ships fastest with no extra layer to add
GraphQL (WPGraphQL)
A query language added to WordPress that returns precisely shaped responses
The front-end needs to fetch exactly the content each view requires, with less data sorting on the front-end
The fit criterion at MVP depth is the simplest option that ships the MVP, not the one that wins on every axis. A founder building a minimum product chooses whichever query layer reads WordPress data with the least added build work for the views the launch actually has. The deeper trade-off: which option holds up as the product grows, how each performs across larger content models, is a separate comparison; the full WPGraphQL vs WordPress REST API treatment carries that depth. At MVP depth, the query layer reads WordPress data, and the choice between its two implementations defers to whichever ships the build.
Both implementations sit between WordPress and the front-end the same way; they differ in how the front-end asks for data.
WordPress REST API
The WordPress REST API is one query-layer option, and it is built into WordPress, the data-access interface ships with the platform, so the backend exposes its content as readable endpoints with no extra layer to add. For a product MVP, that built-in status is what the REST API gives the build: the query layer already exists the moment WordPress runs, and the front-end can fetch the modeled content without installing or configuring a separate query system.
The other query-layer option does not ship with WordPress and asks for data differently.
GraphQL
GraphQL is the other query-layer option, added to WordPress through WPGraphQL, the plugin that exposes the WordPress backend as a GraphQL endpoint. Where the REST API returns fixed endpoint responses, GraphQL lets the front-end request precise, shaped queries that fetch exactly the content each view needs, so the front-end pulls one tailored response instead of stitching several.
For a product MVP, that precision is what GraphQL gives the build: the front-end queries the WordPress backend for the exact fields it renders, which can keep front-end data handling lean for a small content model.
With both implementations of the query layer named at MVP depth, the decoupled stack is complete in design: backend, front-end, and the connector that reads WordPress data between them. What remains is putting the built stack into production.
Deploying the Decoupled MVP
Deploying the decoupled MVP ships both halves of the headless stack to production and confirms the live MVP serves real traffic, the endpoint that closes the build sequence for a product MVP built on headless WordPress. Deploy here means a decoupled push, not a single hosting upload: the WordPress backend and the separate front-end are two independently shipped applications that go live and connect across production, not one bundle that lands in a single place.
Two deployments stand up the live MVP. The WordPress backend deploys to its own production host, where it serves the modeled content through the query layer. The front-end application deploys to its own production target, then points at the live backend endpoint instead of the local one used during wiring. With backend and front-end both in production and the front-end addressing the live query layer, the decoupled stack runs end to end. A short deploy checklist confirms each move lands in order:
Deploy the WordPress backend to its production host and confirm the query layer responds at its public endpoint.
Deploy the front-end application to its production target.
Point the front-end at the production backend endpoint, not the local development one.
Open the live front-end and verify it reads and renders the modeled MVP content.
Verification completes the build transition. The decoupled MVP goes live when both halves serve; the backend answering query-layer requests in production and the front-end rendering that data to the open web. Launching the MVP is the moment the ordered sequence resolves: architecture fit, backend, front-end, query layer, and now a connected pair in production, serving. Once the live MVP serves, the build is finished and the build-route question is answered; what remains belongs not to the build but to the period after it ships.
Post-Deploy Next Steps for the WordPress MVP
The shipped WordPress MVP has post-deploy next steps, a short handoff to the contexts that sit on either side of the build, not a further build stage. Next steps here means orientation after launch: the MVP is in production and serving, so the work that follows is not more deployment but the decisions that bracket the build sequence. Two of those decisions sit close enough to name and point toward.
The build sequence assumed one decision was already settled before the first stage. The choice of WordPress as the platform for a minimum viable product is the precedent the whole build rested on, treated as decided rather than re-argued; founders weighing that precedent before committing follow the case for why use WordPress for an MVP.
The forward edge sits past the deploy endpoint. A live MVP that earns traction enters a phase the build sequence ends before, the growth work of scaling a WordPress MVP after launch. Both pointers keep headless WordPress a build-route qualifier: the precedent justifies the route taken, the forward path extends past production, and the build sequence itself ends where the live decoupled MVP first serves.


 Gemini