Explore our specialized services, tailored solutions, and industry expertise to elevate your digital presence. From custom WordPress development to seamless integrations, we build high-performing websites that deliver impact.
Using GitHub with WordPress keeps the theme and plugin code of a site in a WordPress GitHub repository. Git records each change, so an earlier version can be brought back. The main risk is the database password of the site, which a push can send to GitHub with the code unless the .gitignore file keeps it out. Using GitHub with WordPress follows a path of Git installation, the .gitignore file, the push to GitHub and deployment to the live site, where the plugin route is one way to deploy. The Git workflow then repeats the push and the deployment for every change.
WordPress and GitHub connect in more than one way, and each GitHub WordPress route, to push or to deploy, is complete in itself. One push route and one deployment route are enough to keep the code for WordPress on GitHub and to deploy it to the site. GitHub for WordPress serves anyone who runs or builds a WordPress site: a site owner with one custom theme can manage WordPress with GitHub as much as a developer with several plugins. Before Git is installed, one thing needs checking: what version control records for a WordPress site, and what it does not.
WordPress Version Control on GitHub
WordPress version control records every change to the theme and plugin files of a site, so a specific version can be brought back later. Git is the version control system that tracks those changes on the computer. GitHub hosts Git repositories in the cloud, so the tracked files are also kept online, where another computer or the server of the site can pull them.
Version control for WordPress is routine development work, as ordinary as the other tasks in the WordPress development guide. In WordPress versioning, Git manages the code that is edited: the theme and plugin files are in the repository, and the other four parts of a site stay out.
Item
In the repository
Reason
Theme files
Yes
Code that is edited
Plugin files
Yes
Custom or edited plugins
WordPress core files
No
WordPress supplies them
Media uploads
No
Large; kept by backups
wp-config.php
No
Holds the database password
WordPress database
No
Git tracks files, not rows
A third-party plugin that is never edited either stays out of the repository or is updated through the repository alone, because each deployment brings the repository copy back onto the site, over a newer copy from a dashboard update.
The WordPress database is not tracked by Git. Posts, pages and settings are rows in that database, not files, so a site backup holds them, together with the media uploads. For version control in WordPress development, Git has to be on the computer that holds the files.
Git Installation for WordPress
Git installation for WordPress is the step that installs the Git program on the computer that holds the WordPress files. Using Git with WordPress needs this one program before anything else. Git is a separate program, not a WordPress plugin, so nothing is installed inside WordPress. Git installs on Windows, macOS and Linux, each from its own download, and a computer runs the same Git for WordPress development as for any other code.
System
How to install
Download
Windows
Run the installer with the default options, then open Git Bash
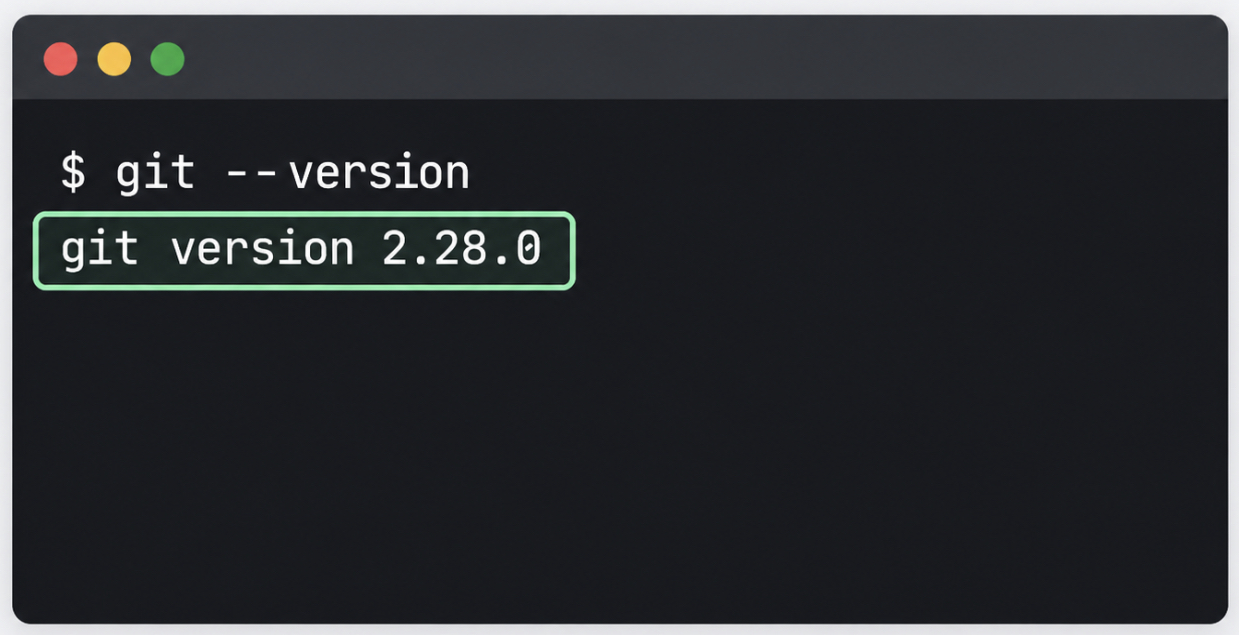
git --version confirms that Git is installed, on any system and on a server: type the command, and Git prints “git version” and a version number in dotted form, such as 2.28.0. The terminal then shows the command and, under it, the git version line.
git --version
With Git installed, the computer holds what it needs to manage WordPress with Git. Before any file is added to a WordPress Git repository, a .gitignore file names what Git ignores.
WordPress .gitignore
The WordPress .gitignore is a text file in the top folder of the repository that lists the files and folders Git leaves untracked. The .gitignore has to exist before the first git add, so wp-config.php and its database password never reach GitHub. Created later, the file is too late for anything already committed: Git ignores only the files it is not tracking yet.
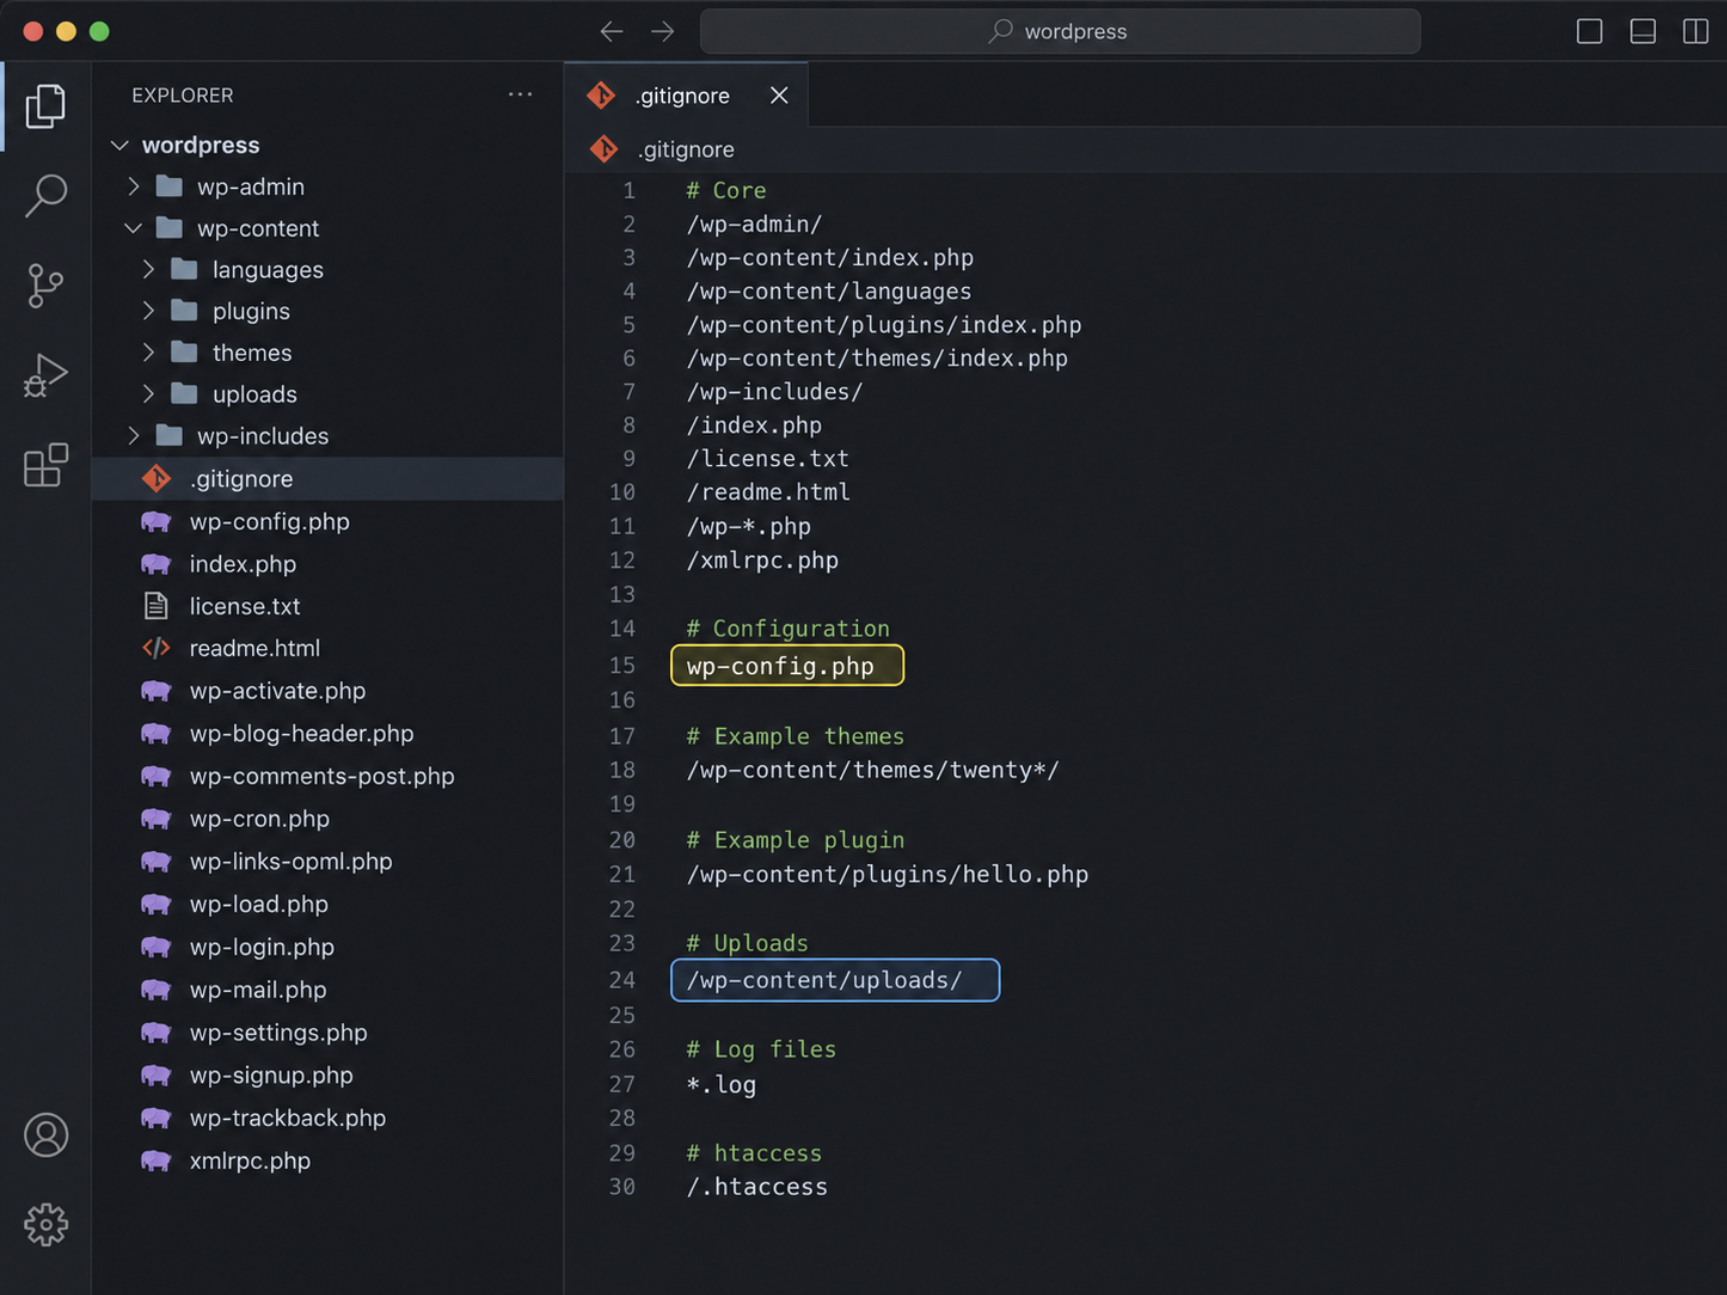
The WordPress .gitignore names seven groups of files, and each group stays out of the GitHub repository for its own reason.
Entry
What it is
Why it stays out
/wp-admin/, /wp-includes/ and the core files in the top folder, such as /index.php and /wp-*.php
WordPress core, together with the index.php files and the languages folder in wp-content
WordPress supplies the same files with every install and update
wp-config.php
The configuration file that holds the database name, username and password
The database password must not reach GitHub
/wp-content/themes/twenty*/
The Twenty themes bundled with WordPress
WordPress supplies them; delete the line if the site uses one
/wp-content/plugins/hello.php
The sample plugin bundled with WordPress
WordPress supplies it, and it is not site code
/wp-content/uploads/
Media: the images and documents uploaded to the site
Site backups keep the media files
*.log
Logs the site writes
Logs record the errors of one server and are not site code
/.htaccess
Server rules
Each server keeps its own copy
The complete WordPress .gitignore carries those seven groups, line for line, from the WordPress.gitignore template, which GitHub keeps in its public gitignore repository. Create a file named .gitignore in the WordPress folder, beside wp-config.php and wp-content, paste these lines into it and save the file.
# WordPress - ignore core, configuration, examples, uploads and logs.
# https://github.com/github/gitignore/blob/main/WordPress.gitignore

# Core
#
# Note: if you want to stage/commit WP core files
# you can delete this whole section/until Configuration.
/wp-admin/
/wp-content/index.php
/wp-content/languages
/wp-content/plugins/index.php
/wp-content/themes/index.php
/wp-includes/
/index.php
/license.txt
/readme.html
/wp-*.php
/xmlrpc.php

# Configuration
wp-config.php

# Example themes
/wp-content/themes/twenty*/

# Example plugin
/wp-content/plugins/hello.php

# Uploads
/wp-content/uploads/

# Log files
*.log

# htaccess
/.htaccess
The WordPress .gitignore keeps custom themes and plugins tracked. With the template lines alone, only the bundled Twenty themes and hello.php stay out, so every other folder in /wp-content/themes/ and /wp-content/plugins/ is pushed to GitHub. Delete the /wp-content/themes/twenty*/ line when the site theme is a Twenty theme, or a child theme whose folder name matches twenty*.
A plugin or theme installed and updated from the dashboard is third-party code, and the template tracks it too. One of two choices keeps the GitHub repository and the live site matched. Add a line with the folder path to the .gitignore, in the form /wp-content/plugins/folder-name/, and the plugin stays out, so the repository holds custom or edited code only.
Or keep the plugin tracked, then commit and push each of its updates before deploying: a deployment from GitHub brings back the repository’s copy of the plugin, which is the older copy after a dashboard update.
The WordPress .gitignore template names WordPress paths only. It carries no line for the backup archives, database dumps, cache folders and error_log files that can sit in the folder of a live site, and the *.log line does not match a file named error_log. Add a line for each of them before the first git add, so none reaches GitHub: a folder by its path between slashes, in the form of /wp-content/uploads/, and a file by its name, in the form of wp-config.php.
The .gitignore of a repository that holds one theme or one plugin needs only the *.log line. Core files, uploads and wp-config.php sit outside a theme or plugin folder, so no other entry matches anything there.
The .gitignore does not affect a file Git already tracks. A wp-config.php that was added or committed earlier stays tracked, even with its line in the .gitignore. Save the .gitignore in the WordPress folder first. git rm --cached then stops tracking a committed file and leaves it on disk; the commit after it records the change.
When git status lists wp-config.php after a git add and before any commit, git rm --cached wp-config.php alone is enough: the file is then in no commit, and neither is the password. After a commit, run both commands. The earlier commits still hold the file, so change the database password if any of them was pushed to GitHub or is pushed later.
With the .gitignore saved and wp-config.php untracked, the WordPress files are ready to push to a GitHub repository.
How to Push WordPress Files to a GitHub Repository
Pushing WordPress files to a GitHub repository sends the committed files from their folder to GitHub, where each later change is added on top. A commit is a saved snapshot of the files at one point in time, and a push sends the commits from the folder to GitHub. The order is fixed: to push WordPress to GitHub, the files are committed first and pushed second.
The push sends one of two folders. The first choice is the whole WordPress folder, where the .gitignore keeps WordPress core, wp-config.php and the uploads out of the repository. The second is the folder of one theme or one plugin, and the repository then holds that code alone. Each choice needs a matching deployment route later.
A repository that holds the whole WordPress folder deploys through a host panel with a Git section, or one theme or plugin at a time through the WP Pusher plugin and its Repository subdirectory field. A ZIP upload and the Git Updater plugin need one theme or one plugin at the top level of the repository, which is the second choice.
Three complete approaches push the chosen folder: two for files on a computer, one for a site that exists only on the server. One approach is enough for a site.
Approach
Use it when
Needs
First Commit to GitHub
Files on the computer, commands typed
Git, the .gitignore in the folder, the address of an empty GitHub repository
GitHub Desktop
Files on the computer, buttons clicked
A GitHub account, the .gitignore in the folder
Live WordPress Site Files
The site exists only on the server
SSH access, Git on the server, the address of an empty GitHub repository
The command-line approach and the live-site approach both start from an empty repository on GitHub.
New GitHub Repository
A new GitHub repository is an empty online folder with its own address that receives the WordPress files. The command-line approach and the live-site approach both use it. GitHub Desktop skips the New repository form and creates its own repository on publish. On github.com, the form creates the empty repository in five steps.
Sign in at GitHub, or create a free account with Sign up.
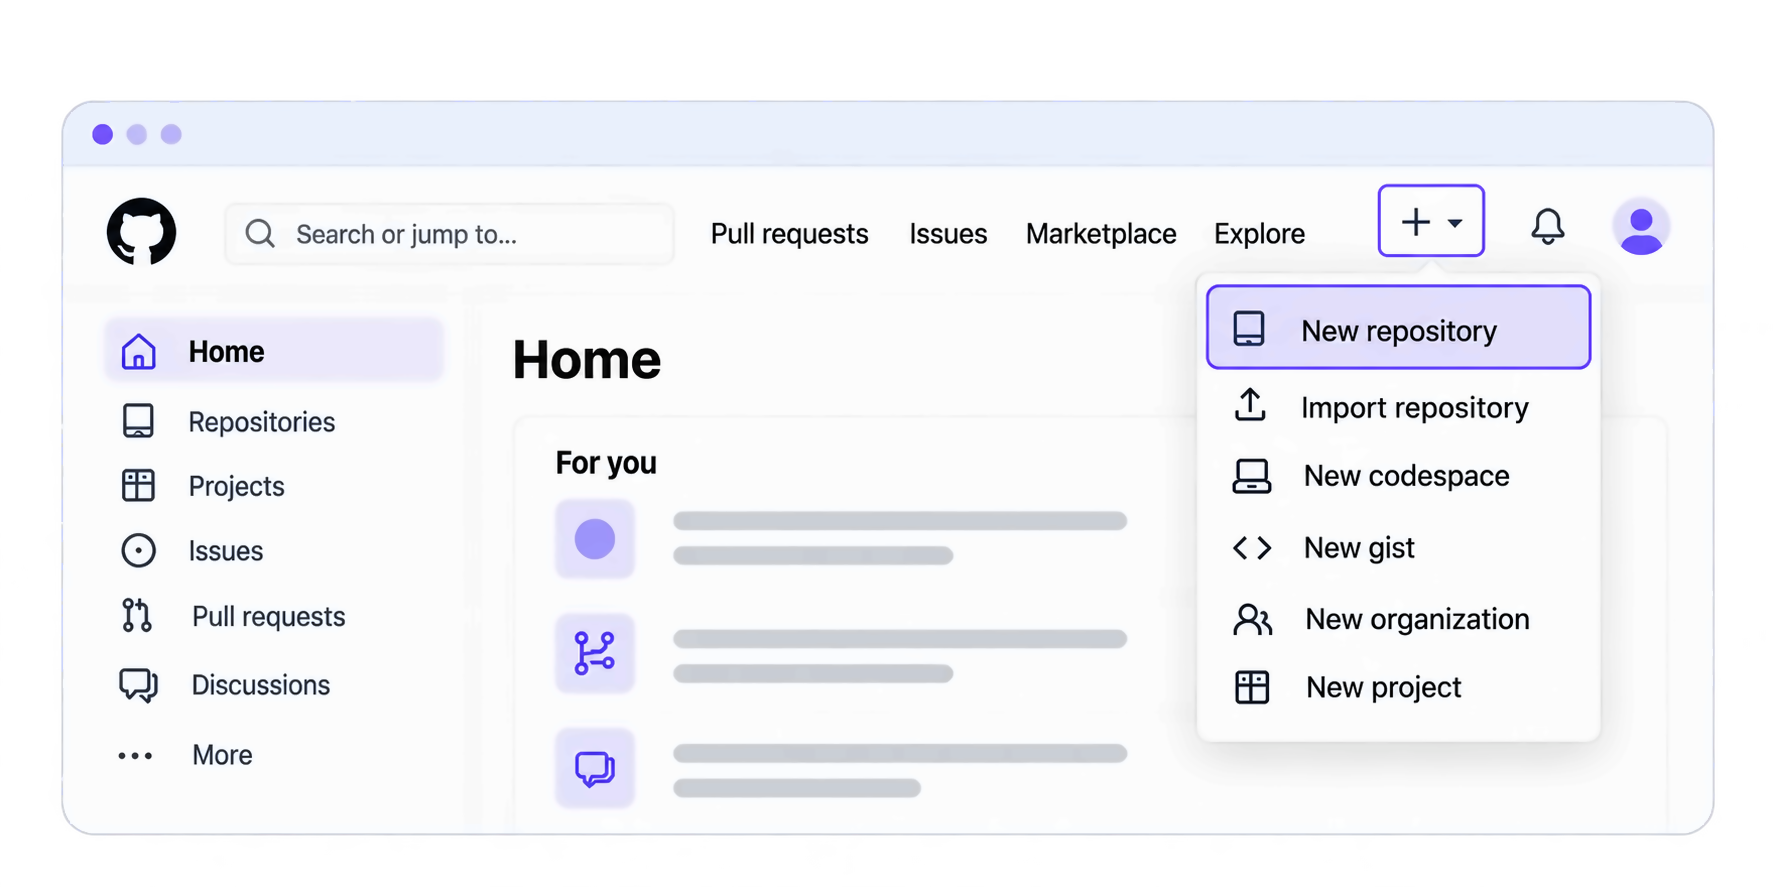
Select the + menu in the upper-right corner, then New repository. The open menu shows the New repository entry.
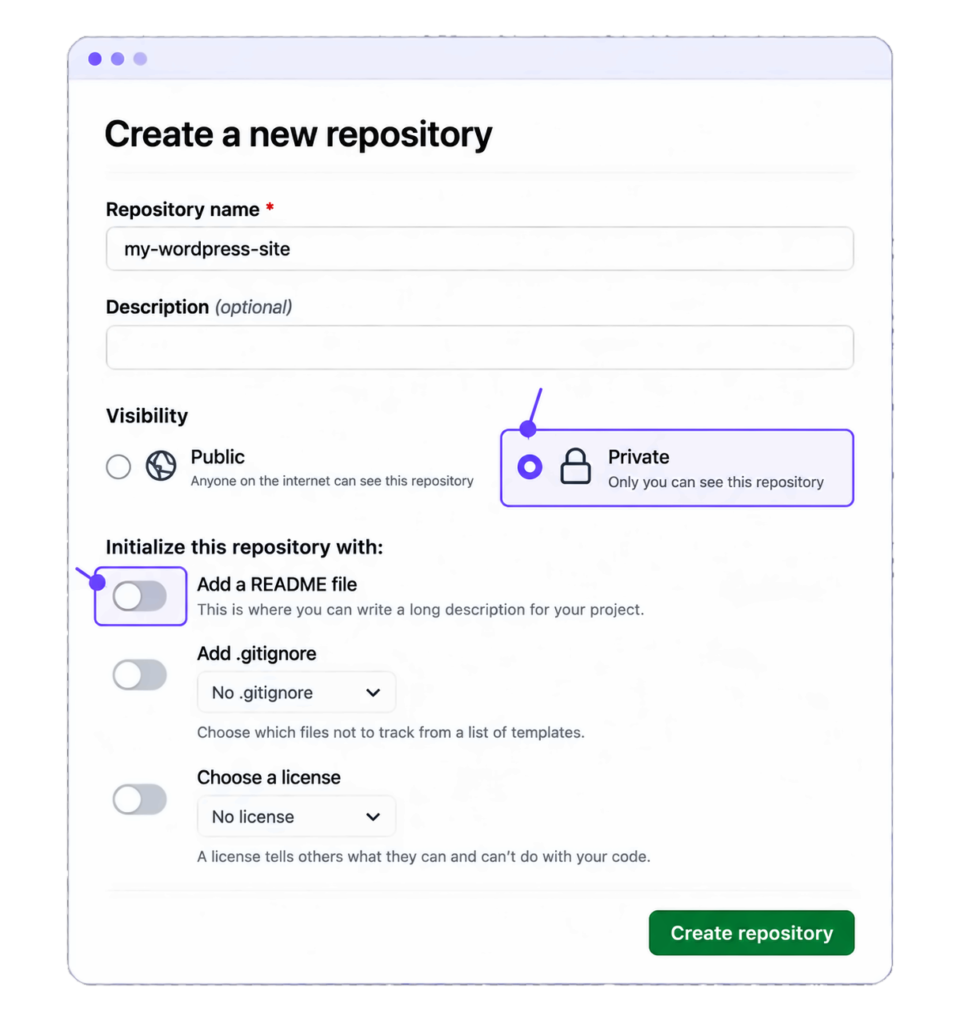
Type a repository name and choose Private. Keep the README option off, and choose no .gitignore and no license. Private keeps the site code out of public view, and Public shows it to everyone. README, .gitignore and license stay off because the GitHub guide to adding local code warns that they cause errors when the files are pushed from an existing folder; the WordPress .gitignore already sits in that folder. The filled form shows the name, Private, the three options turned off and the Create repository button.
Click Create repository.
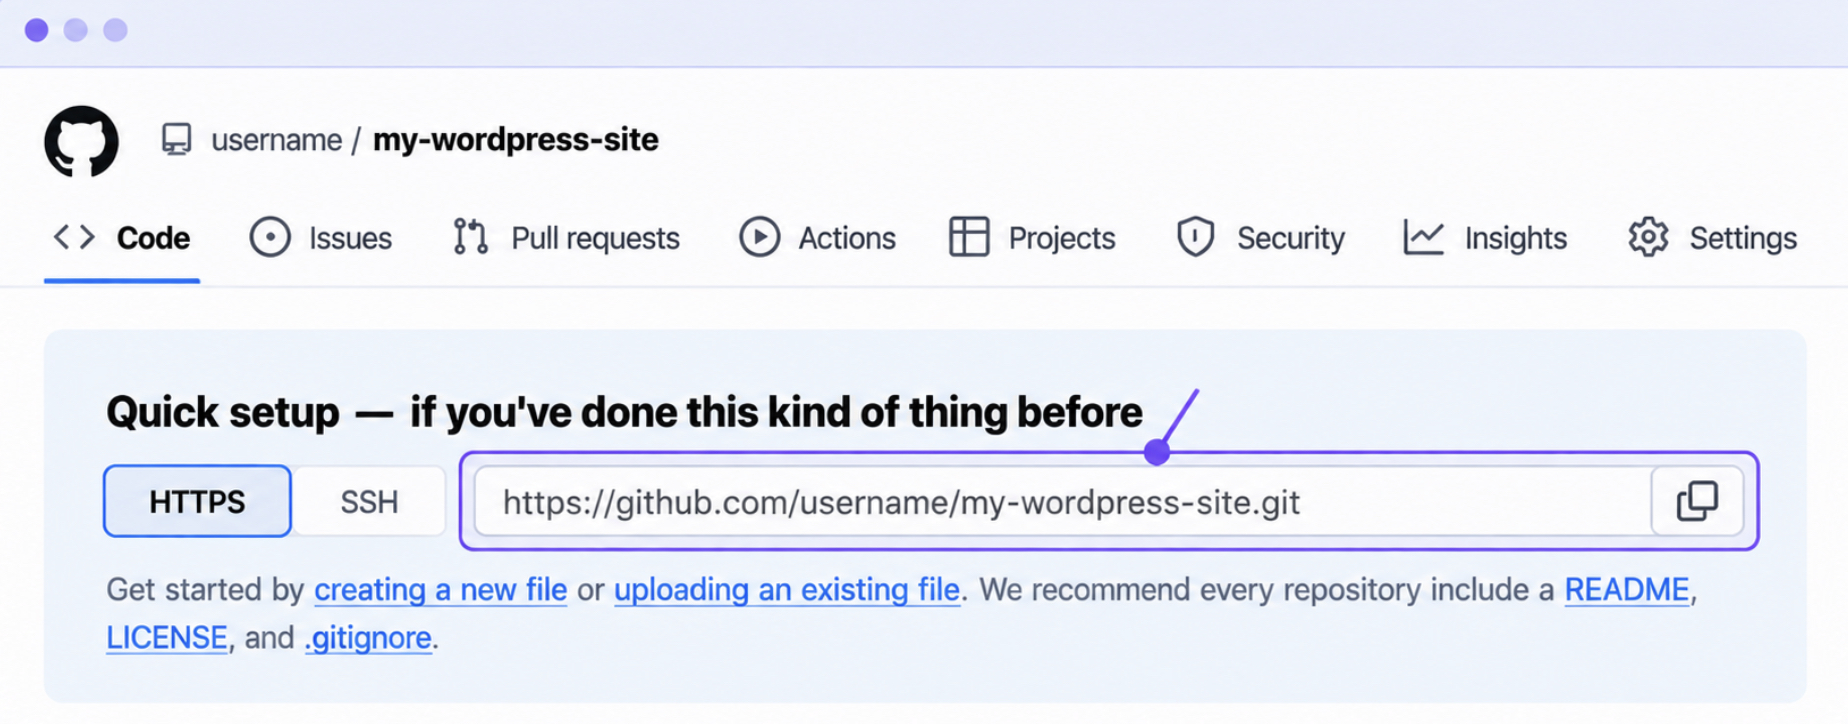
On the Quick setup page, copy the HTTPS address. The Quick setup page of the empty repository shows HTTPS selected, the address in the form https://github.com/OWNER/REPO.git and a copy icon next to it.
The new GitHub repository is empty and holds no file yet, and its HTTPS address is ready for the first push. The first commit from the command line sends the WordPress files to that address.
First Commit to GitHub
The first commit to GitHub is the first saved snapshot of the WordPress files, pushed from a terminal. It is the command-line route from WordPress to GitHub, for files that sit on the computer. The first commit needs three things: Git, the .gitignore in the folder, the address of an empty GitHub repository. Nine steps commit the files and push them to GitHub.
Open a terminal, Git Bash on Windows, and type cd with the path of the WordPress folder.
cd path/to/wordpress
Run git init, which turns the WordPress folder into a Git repository on the branch main. The command matches the GitHub guide to adding local code.
git init -b main
The first time on this computer, type the name and the email address that Git records on every commit.
Add every file that the .gitignore does not ignore.
git add .
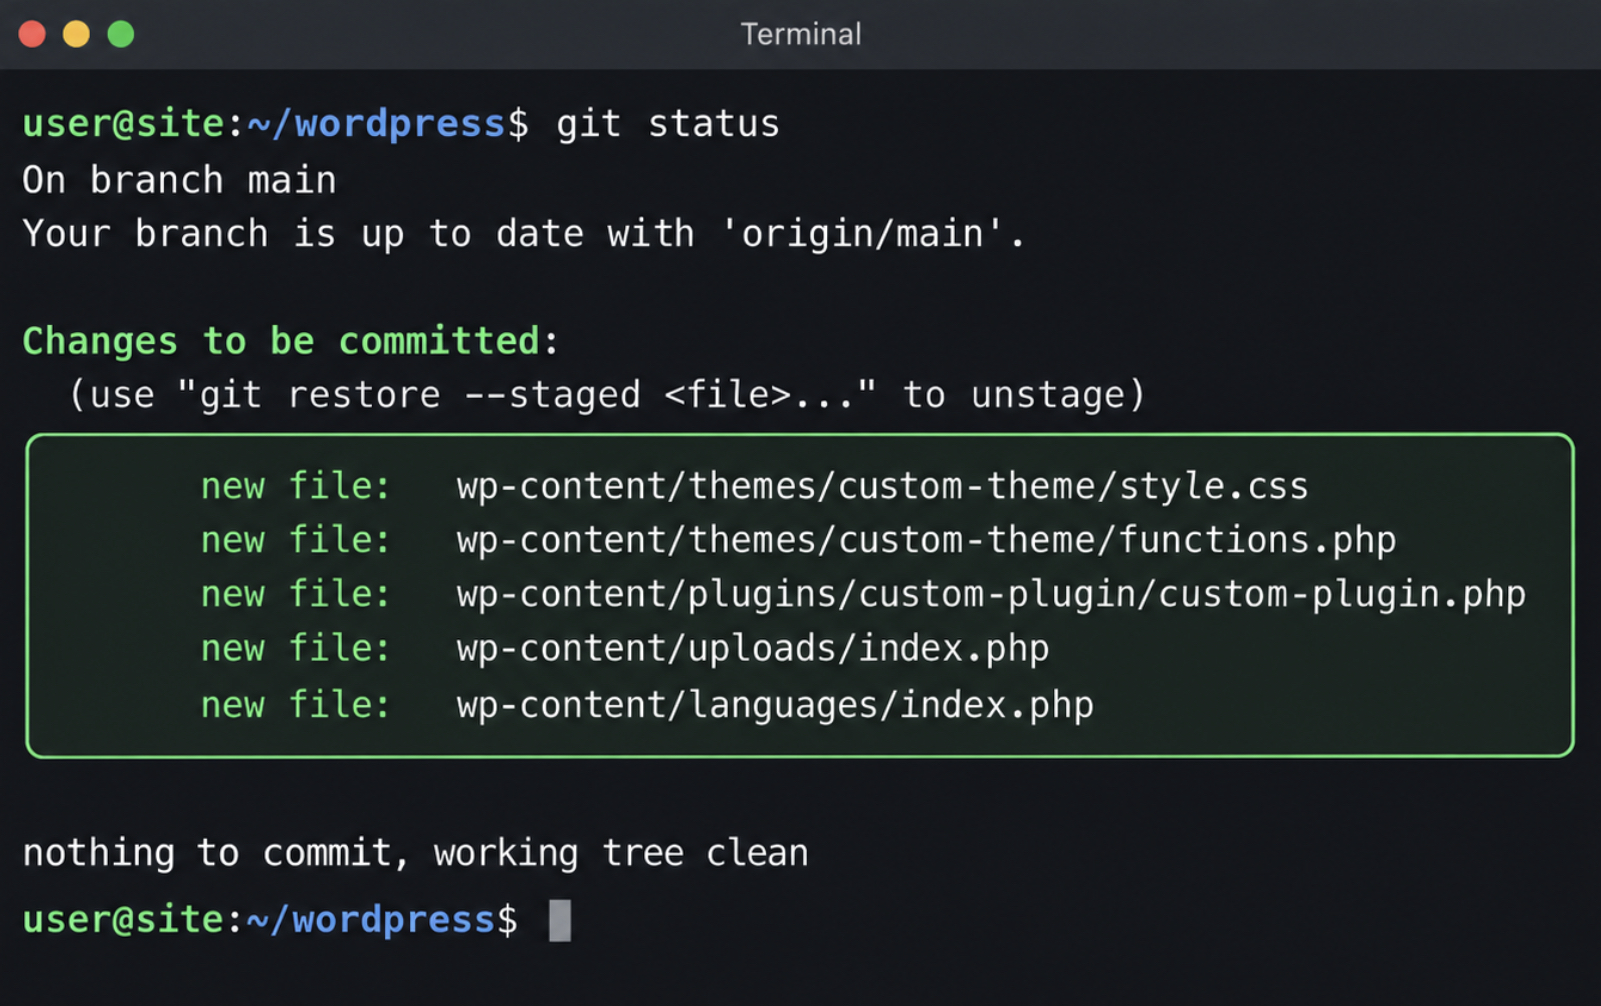
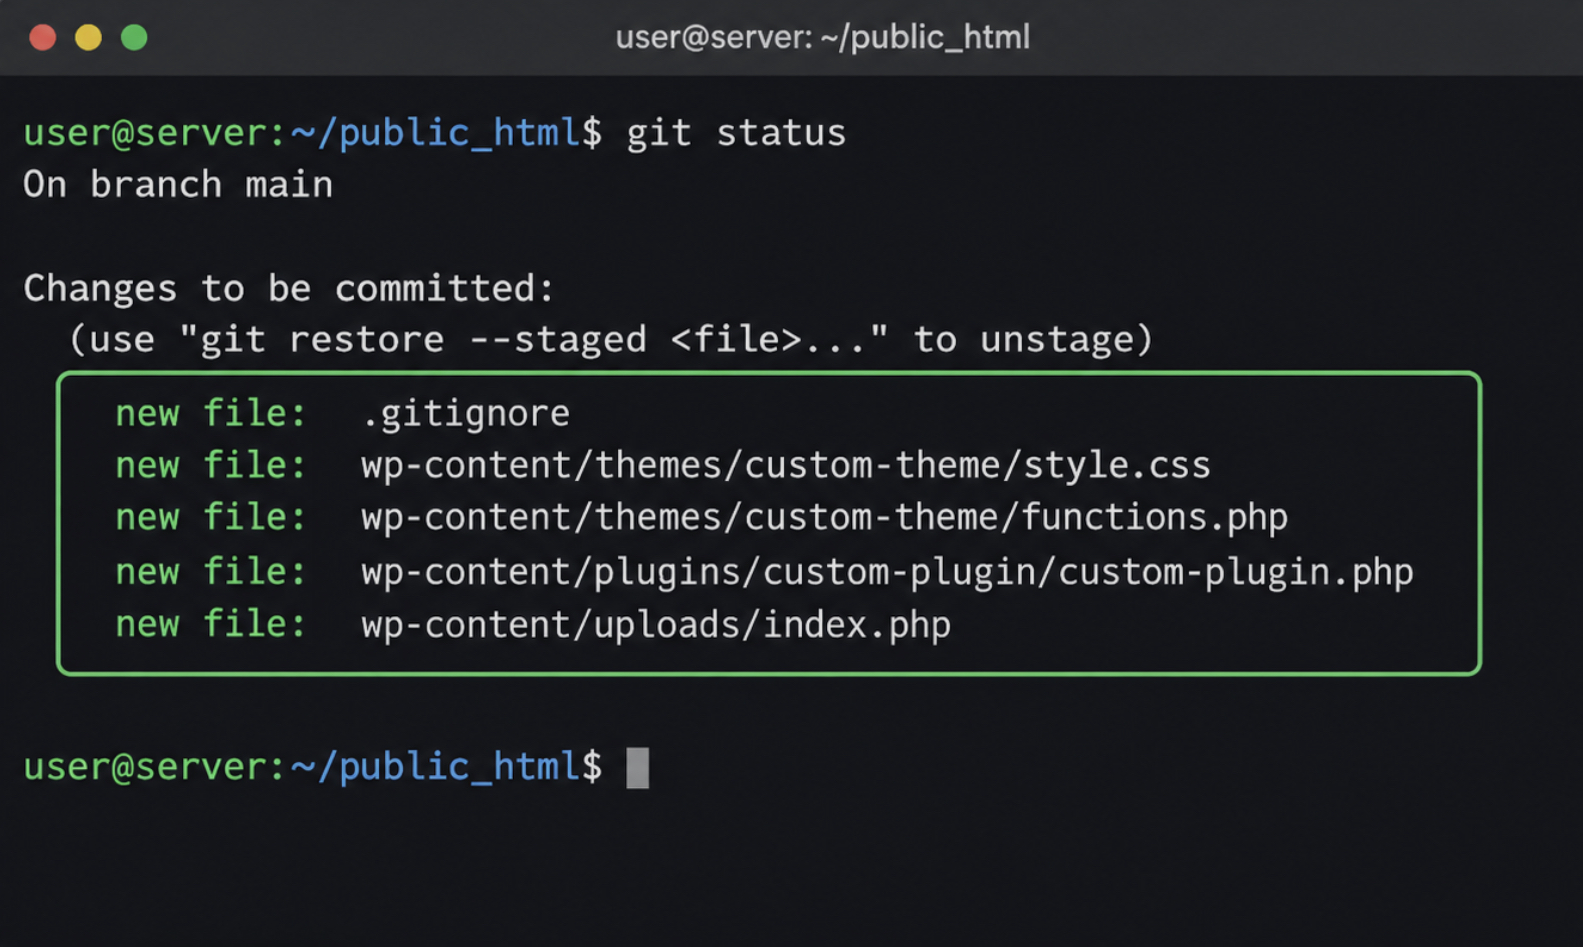
Run git status and check that the file list holds no wp-config.php, no backup archive, no database dump and no folder from outside the site.
git status
The terminal shows the files to commit under wp-content, and no wp-config.php.
With one of those files in the file list, do not commit yet. Check that the .gitignore is in the WordPress folder, add a line to it for the backup archive, the database dump or the outside folder, and save the .gitignore. Then remove every file from the file list, add the files again and check the new list. git rm --cached removes the files from the list only, and every file stays in the folder.
git rm -r --cached .
git add .
git status
GitHub blocks files larger than 100 MiB: with a backup archive of that size in the commit, GitHub rejects the push in Step 9.
Commit the files. The command saves the snapshot as the first commit, with the message First commit.
git commit -m "First commit"
Add the address of the GitHub repository: paste the HTTPS address from the Quick setup page in place of REMOTE-URL.
git remote add origin REMOTE-URL
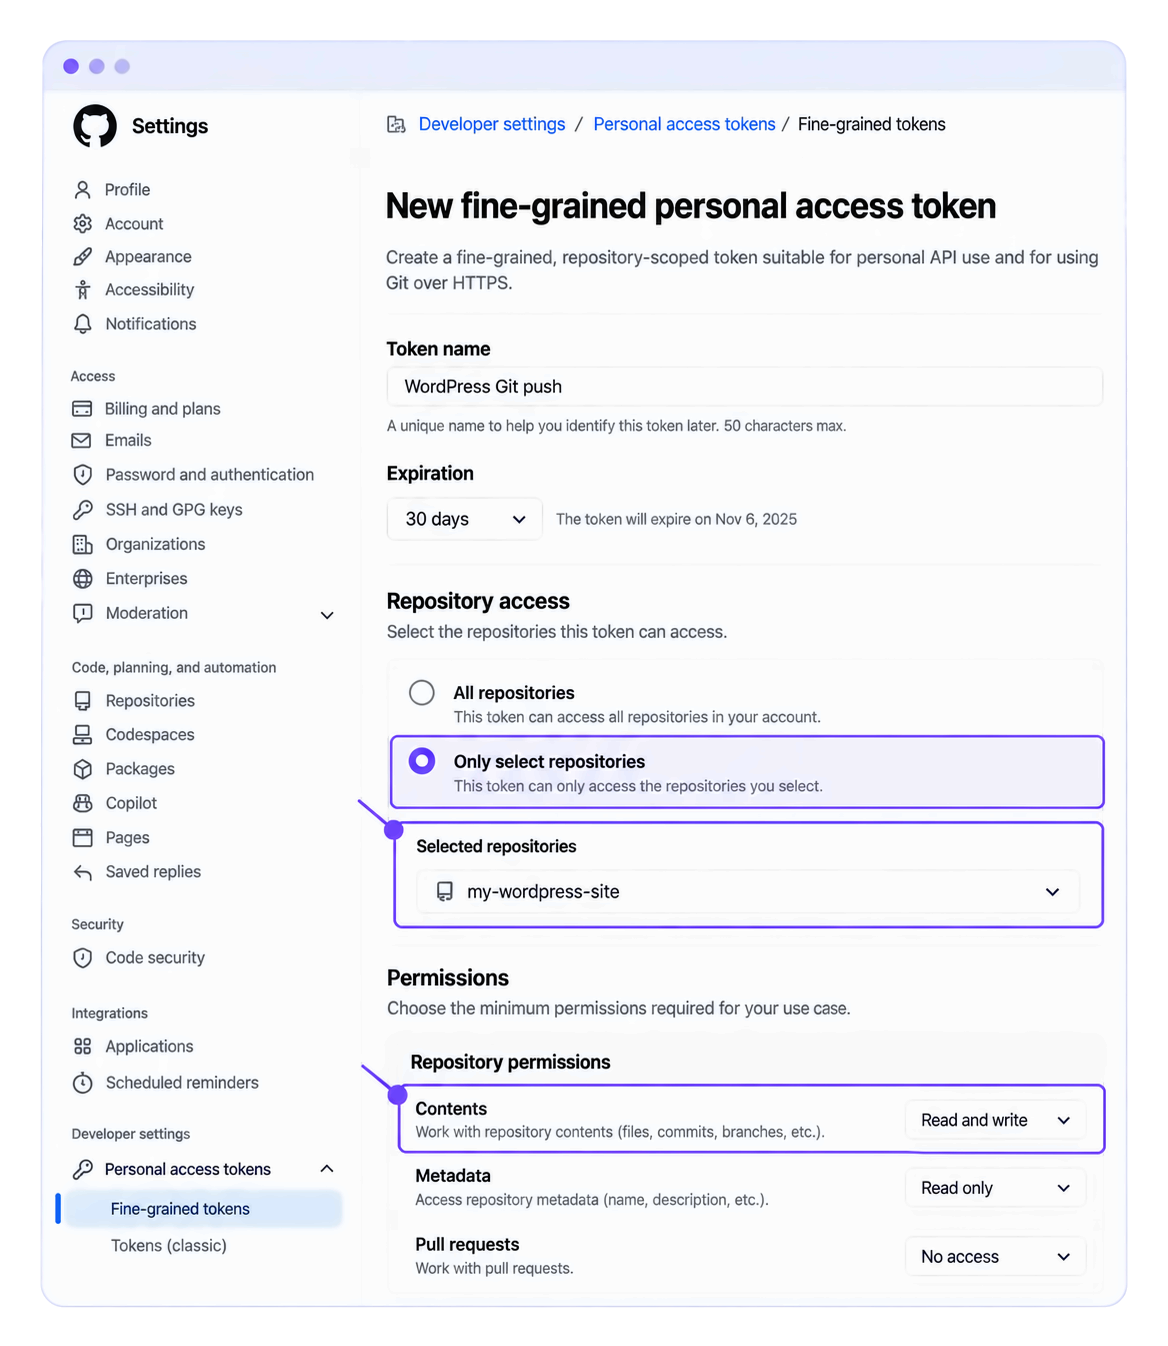
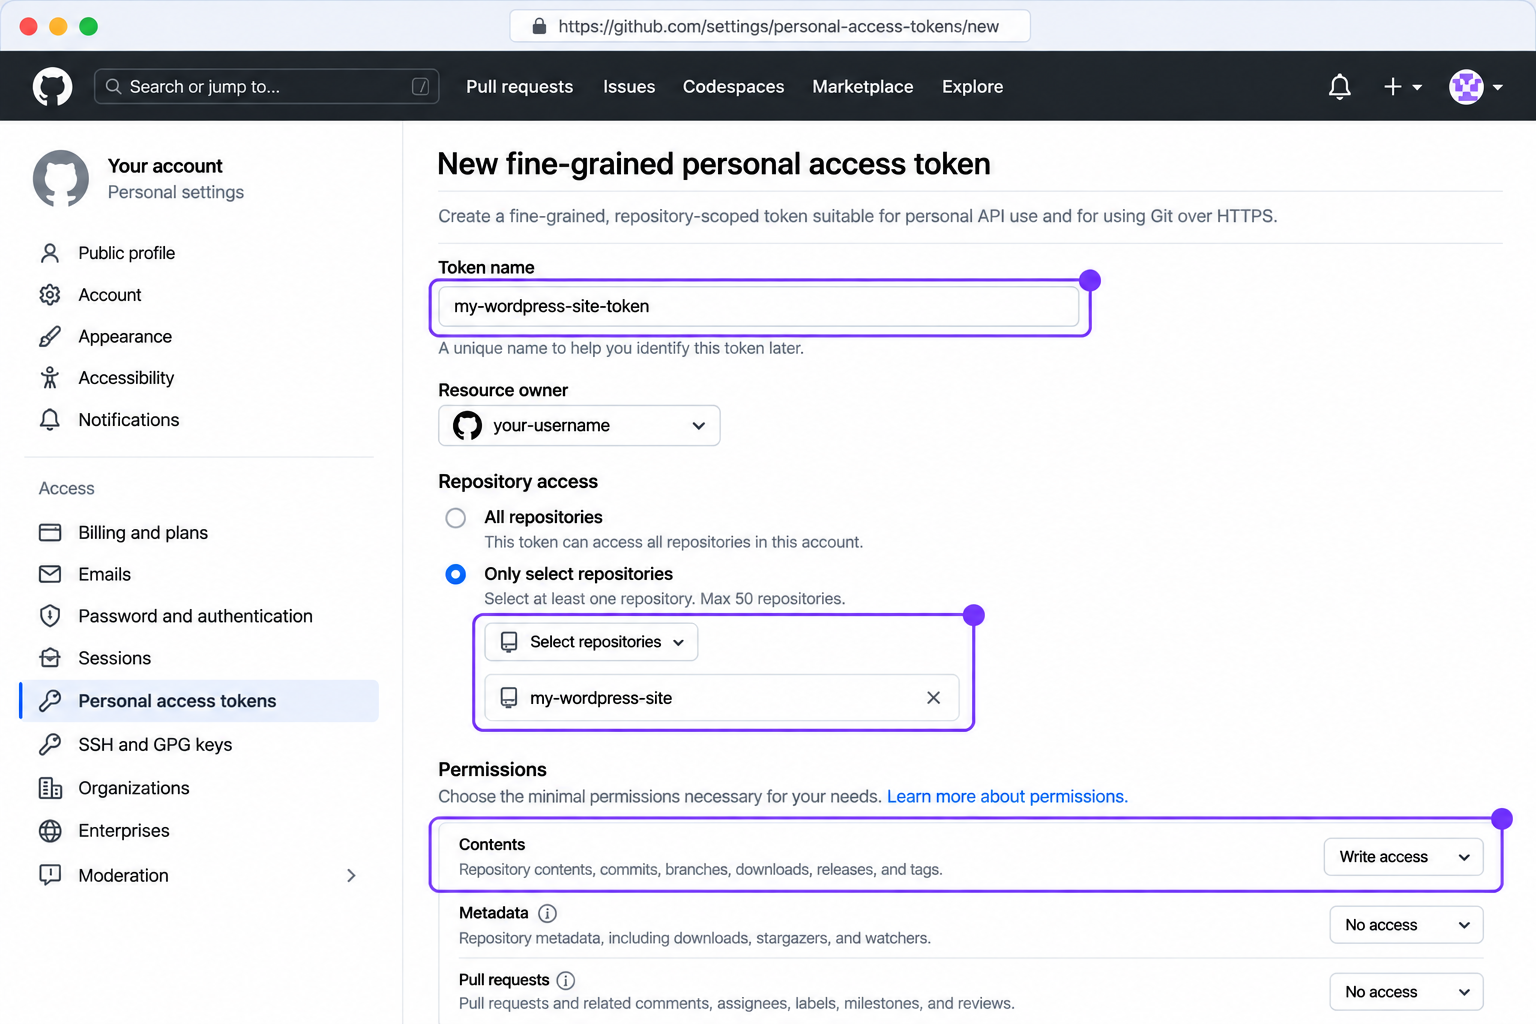
macOS and Linux: create a fine-grained personal access token for this repository only. The token replaces the account password for Git over HTTPS. On GitHub, click the profile picture, then Settings, then Developer settings. Under Personal access tokens, click Fine-grained tokens, then Generate new token. Type a token name. Under Repository access, choose Only select repositories and select this repository. Under Permissions, add Contents with write access. Click Generate token and copy the token. On Windows, Git Bash signs in through the browser in Step 9 and needs no token. The filled form shows the token name, the selected repository and the Contents permission with write access.
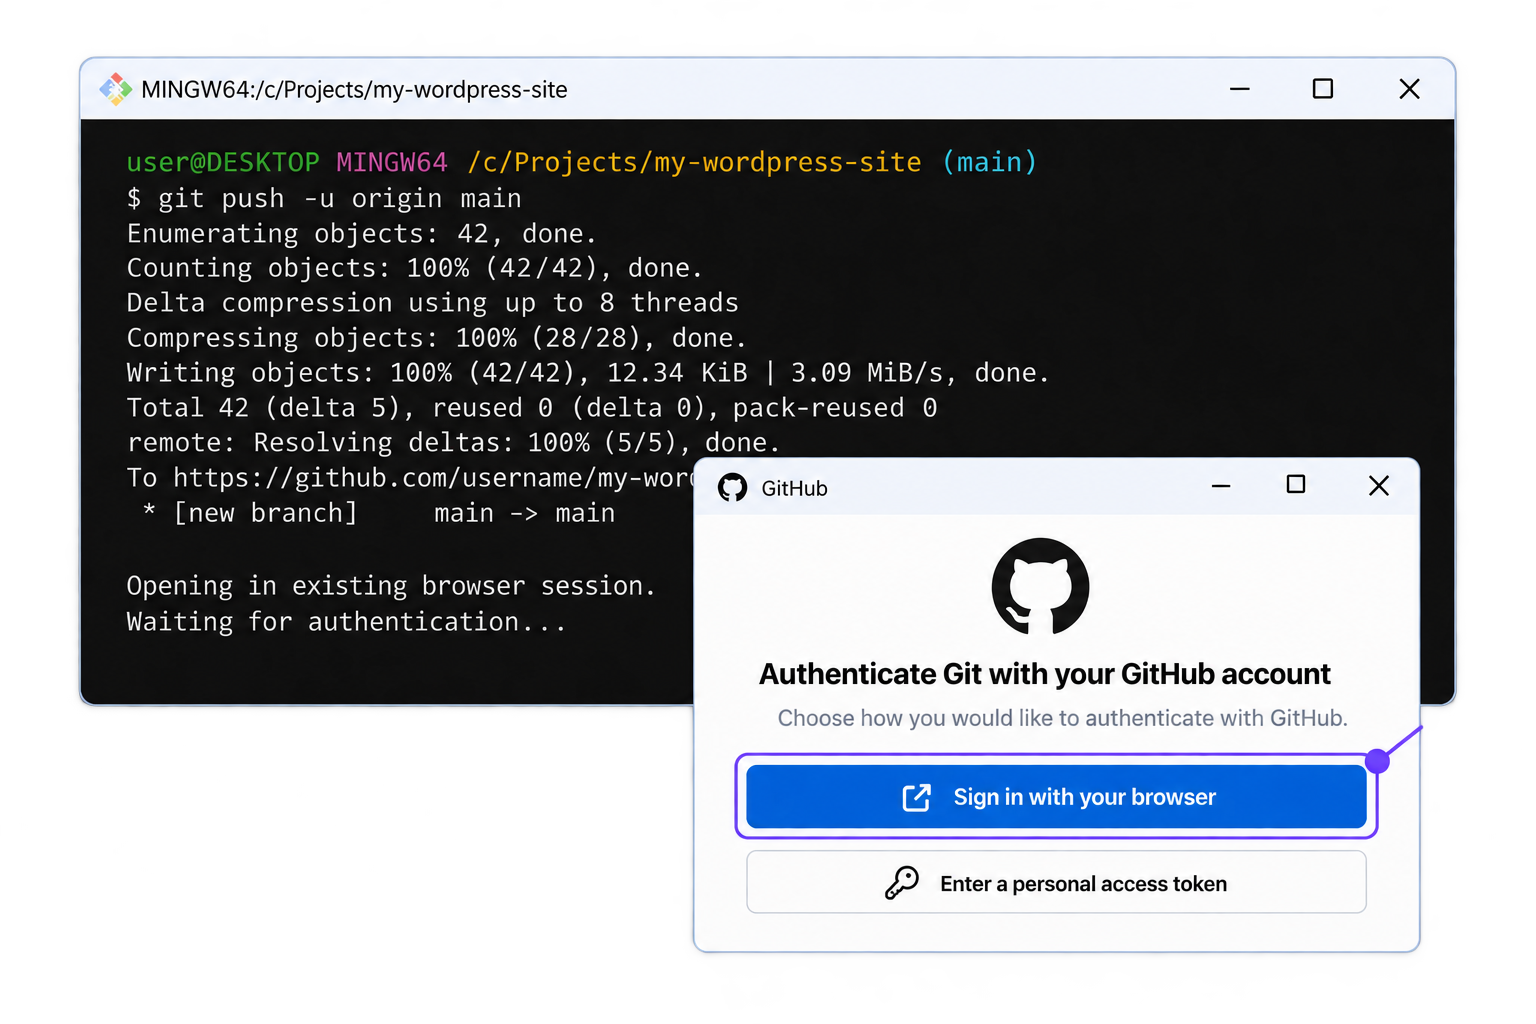
Run git push, which sends the first commit to the GitHub repository on the branch main.
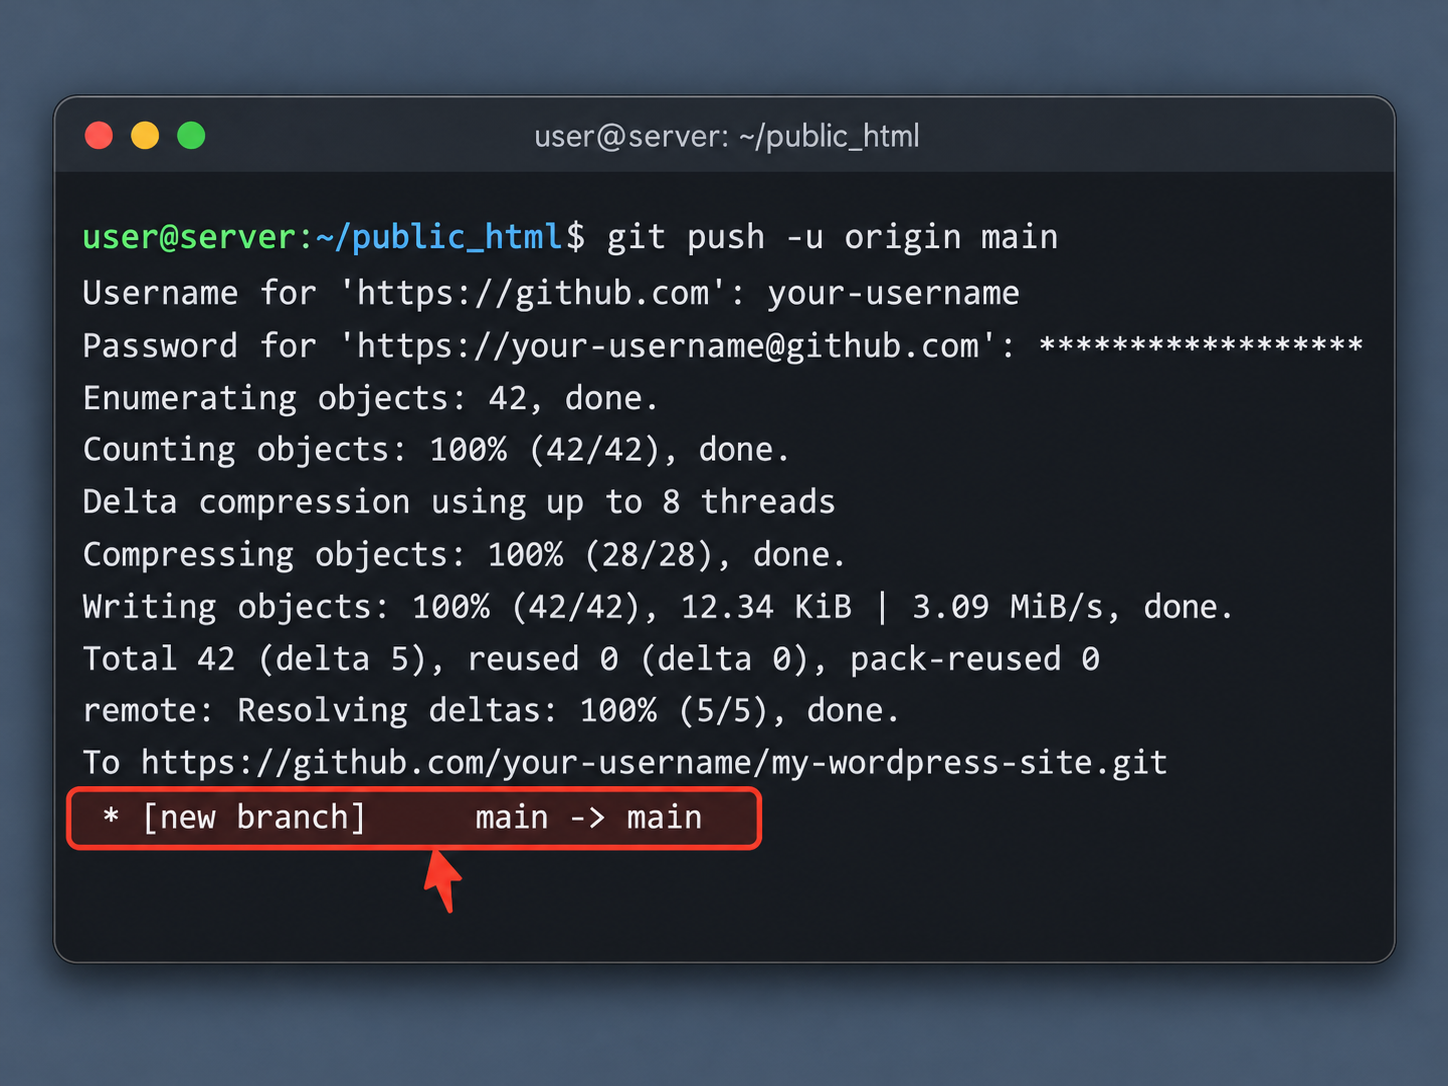
git push -u origin main
GitHub rejects the account password here, so the push needs another sign-in. That sign-in is different on each system.
Windows: in the window that Git Bash opens, choose Sign in with your browser, then authorize Git Credential Manager on the GitHub page. The sign-in window shows the Sign in with your browser button.
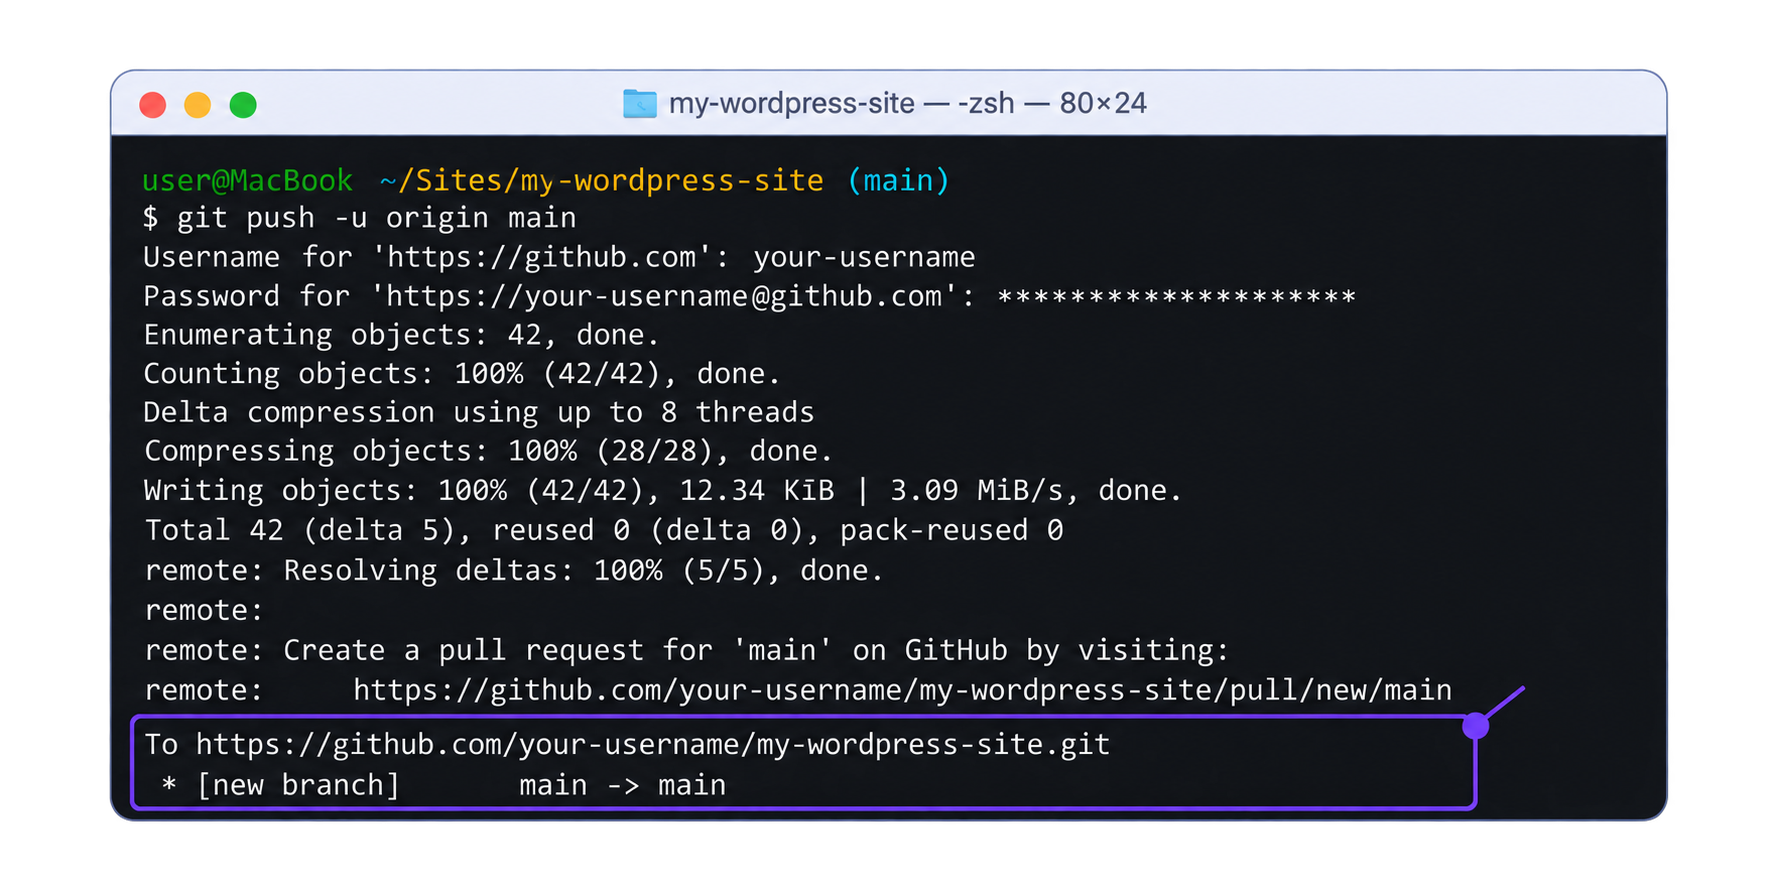
macOS and Linux: at the Username line, type the GitHub username; at the Password line, paste the token as the password. After the push, the closing lines in the terminal name the branch main.
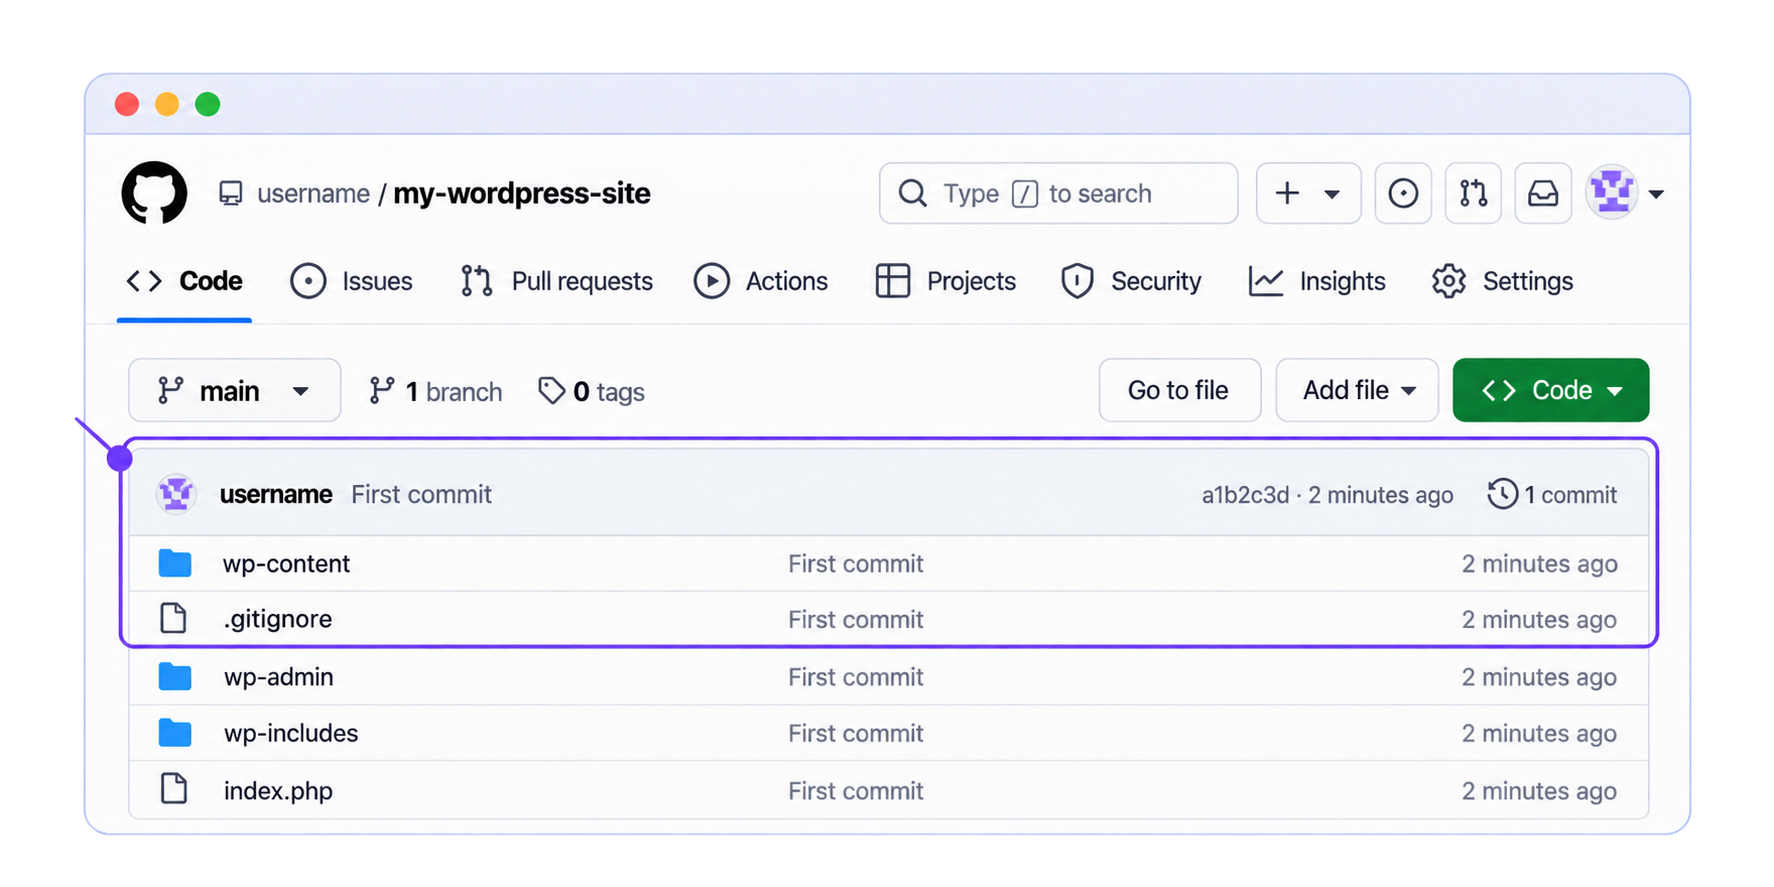
The first commit is now on GitHub. After a refresh, the repository page lists the WordPress files. For a whole WordPress folder, the page shows wp-content and the .gitignore in the file list, the commit message First commit and the branch main.
GitHub Desktop publishes the same files with buttons, and no command is typed.
GitHub Desktop
GitHub Desktop is the free GitHub application that does the work of Git commands, such as commit and push, through buttons. As an approach, it publishes WordPress files from a computer to GitHub with clicks alone. GitHub Desktop needs two things: a GitHub account, the .gitignore in the folder.
That folder is the WordPress folder on the computer, with the WordPress .gitignore saved at its top level, and it is not yet a Git repository. No empty repository is created on github.com beforehand, because publishing creates it. The five steps of GitHub Desktop run from the download to the published repository.
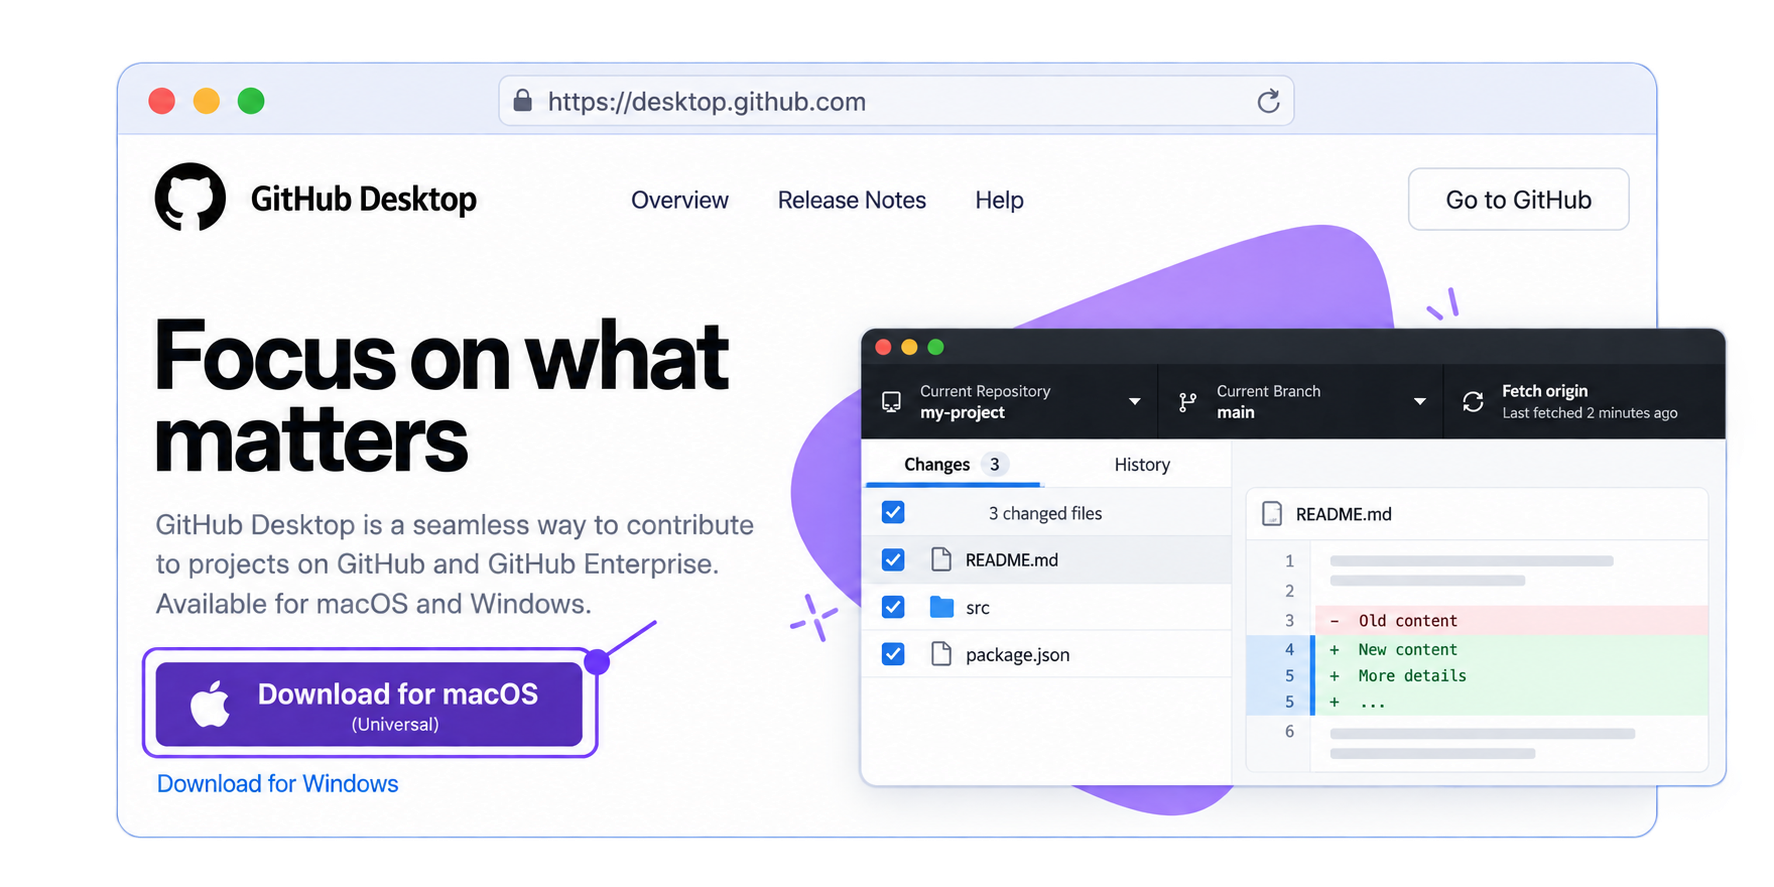
Download GitHub Desktop from its download page, which shows the download button for the application, and install it on the computer.
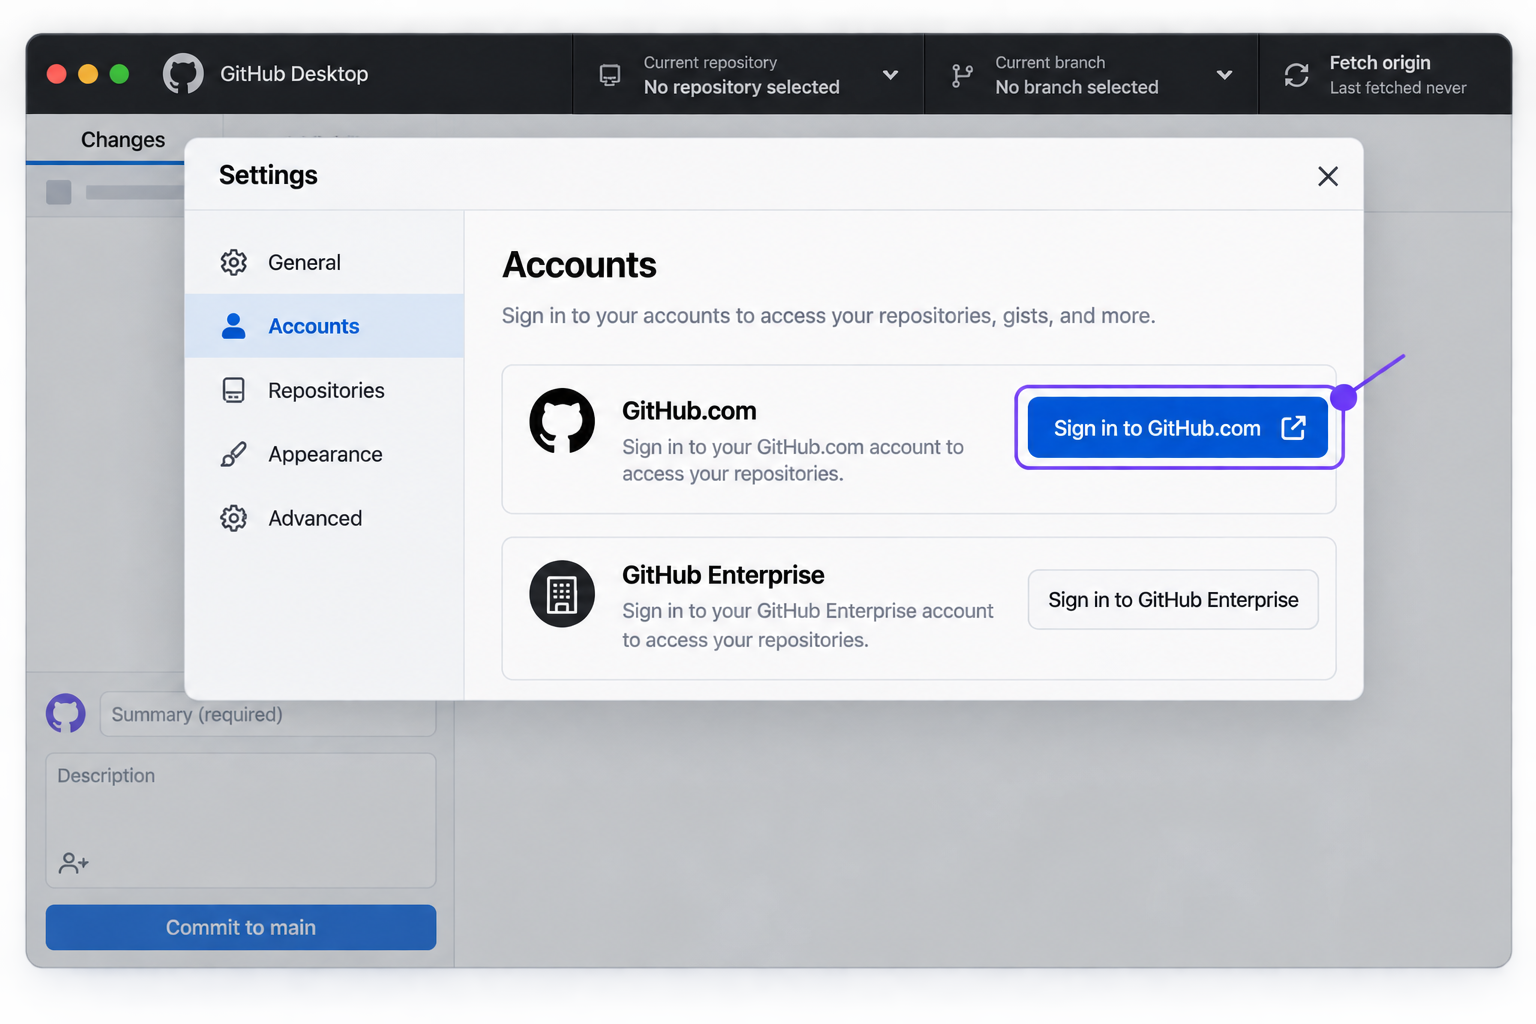
Open GitHub Desktop and sign in to GitHub.com. The sign-in sits on the Accounts pane: in Settings on macOS, and under File, then Options on Windows. The pane shows a sign-in button for GitHub.com; click it and sign in with the GitHub account.
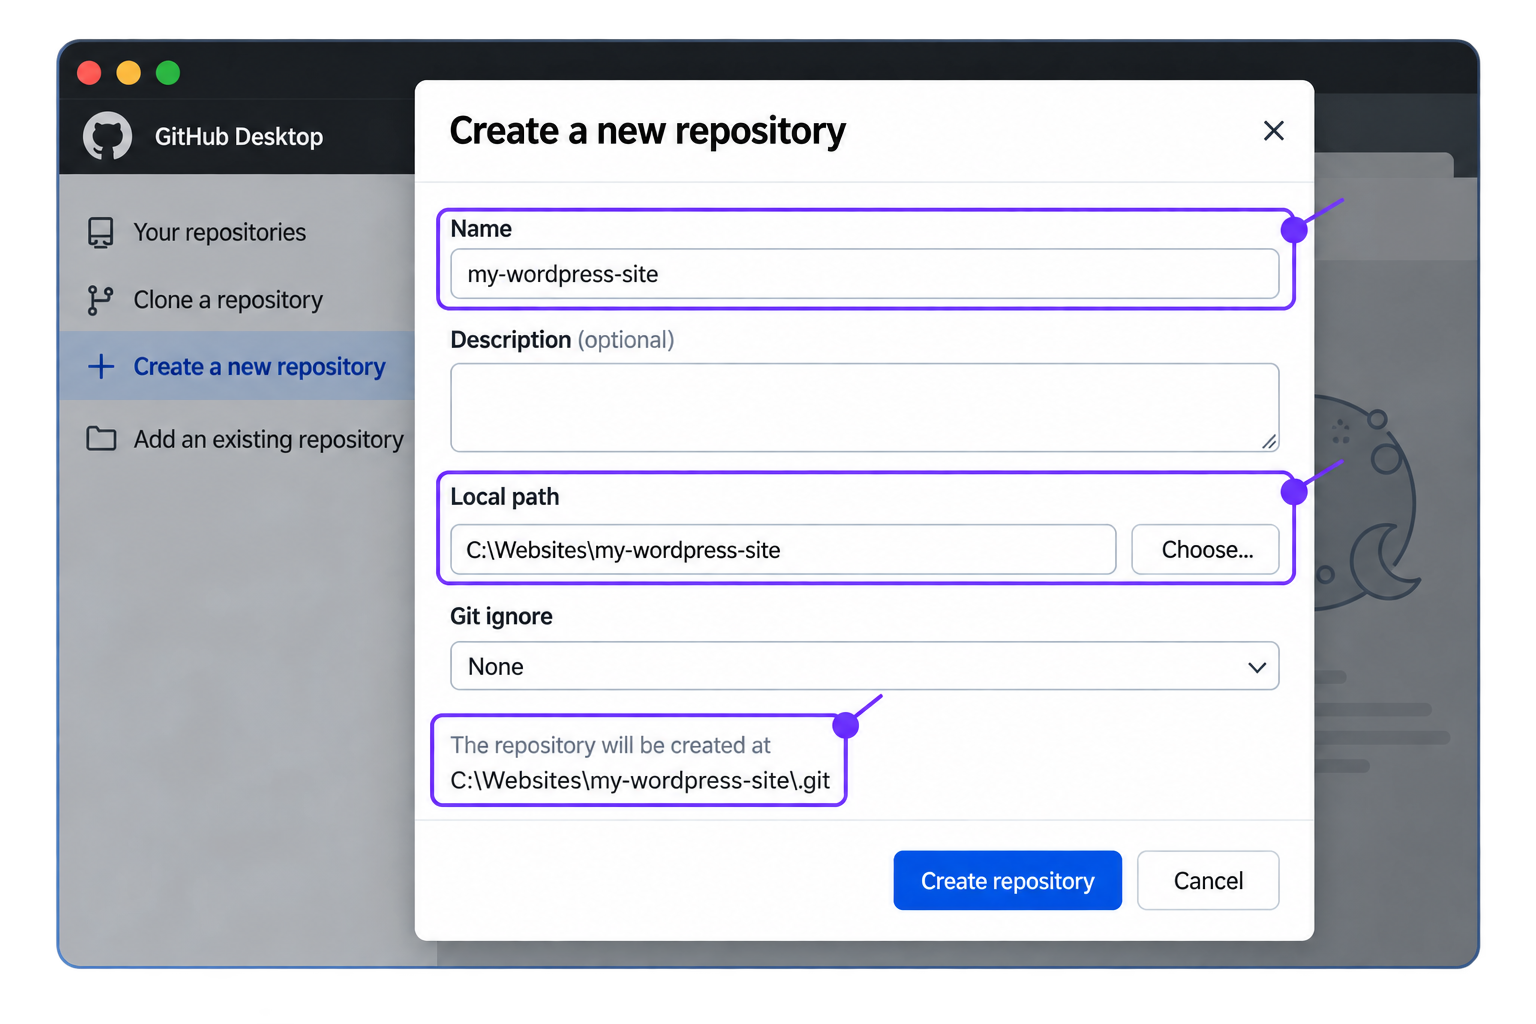
Choose File, then New repository. Type the name of the WordPress folder as Name, and choose the folder that holds it as Local path: for a site in Documents/my-site, Name is my-site and Local path is Documents. Keep the README box unticked and keep Git ignore and License on None, so the .gitignore already in the folder stays. Check the line The repository will be created at, which has to show the path of the WordPress folder itself, then click Create repository.
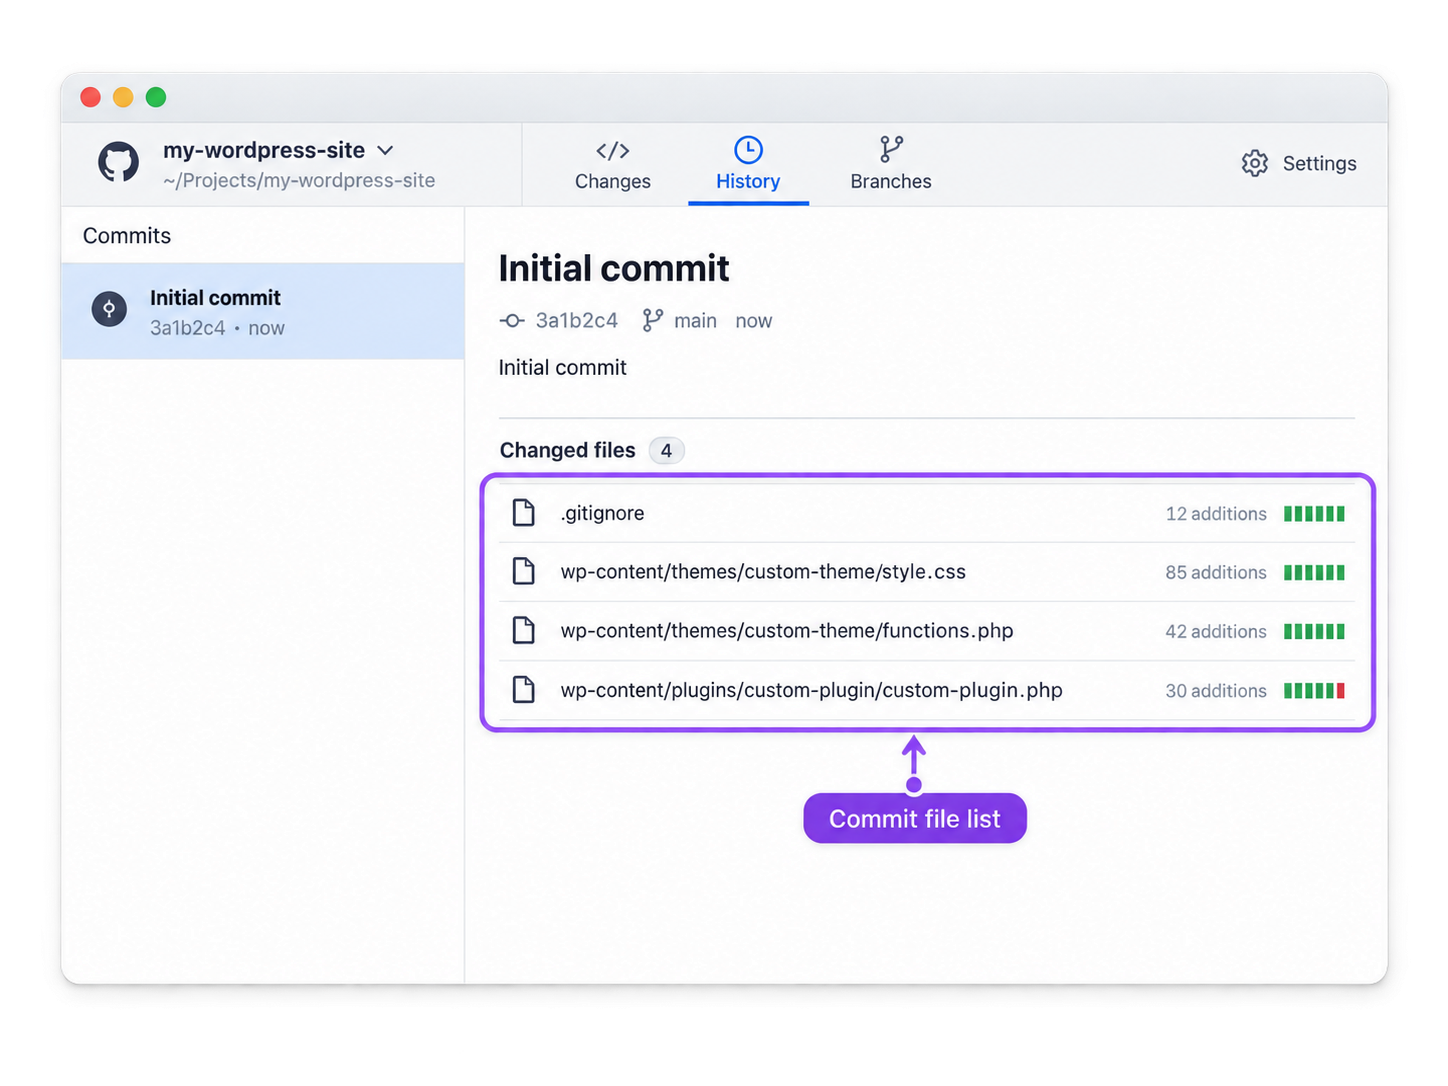
Check the first commit. Create repository saves the existing files in a commit named Initial commit, so nothing is left to commit before publishing. Open the History tab and select that commit: its file list holds the WordPress files and a .gitattributes file that the application adds. A list with wp-config.php in it shows that the .gitignore was not in the folder, and the file is already inside Initial commit: do not publish.
Create repository created a hidden .git folder inside the WordPress folder, and that folder is the whole repository. Remove it in the file manager of the computer, with hidden files shown, so that the WordPress folder is no longer a Git repository. Then save the WordPress .gitignore in the folder and repeat step 3. The correct file list shows the WordPress files without wp-config.php, the file that holds the database password.
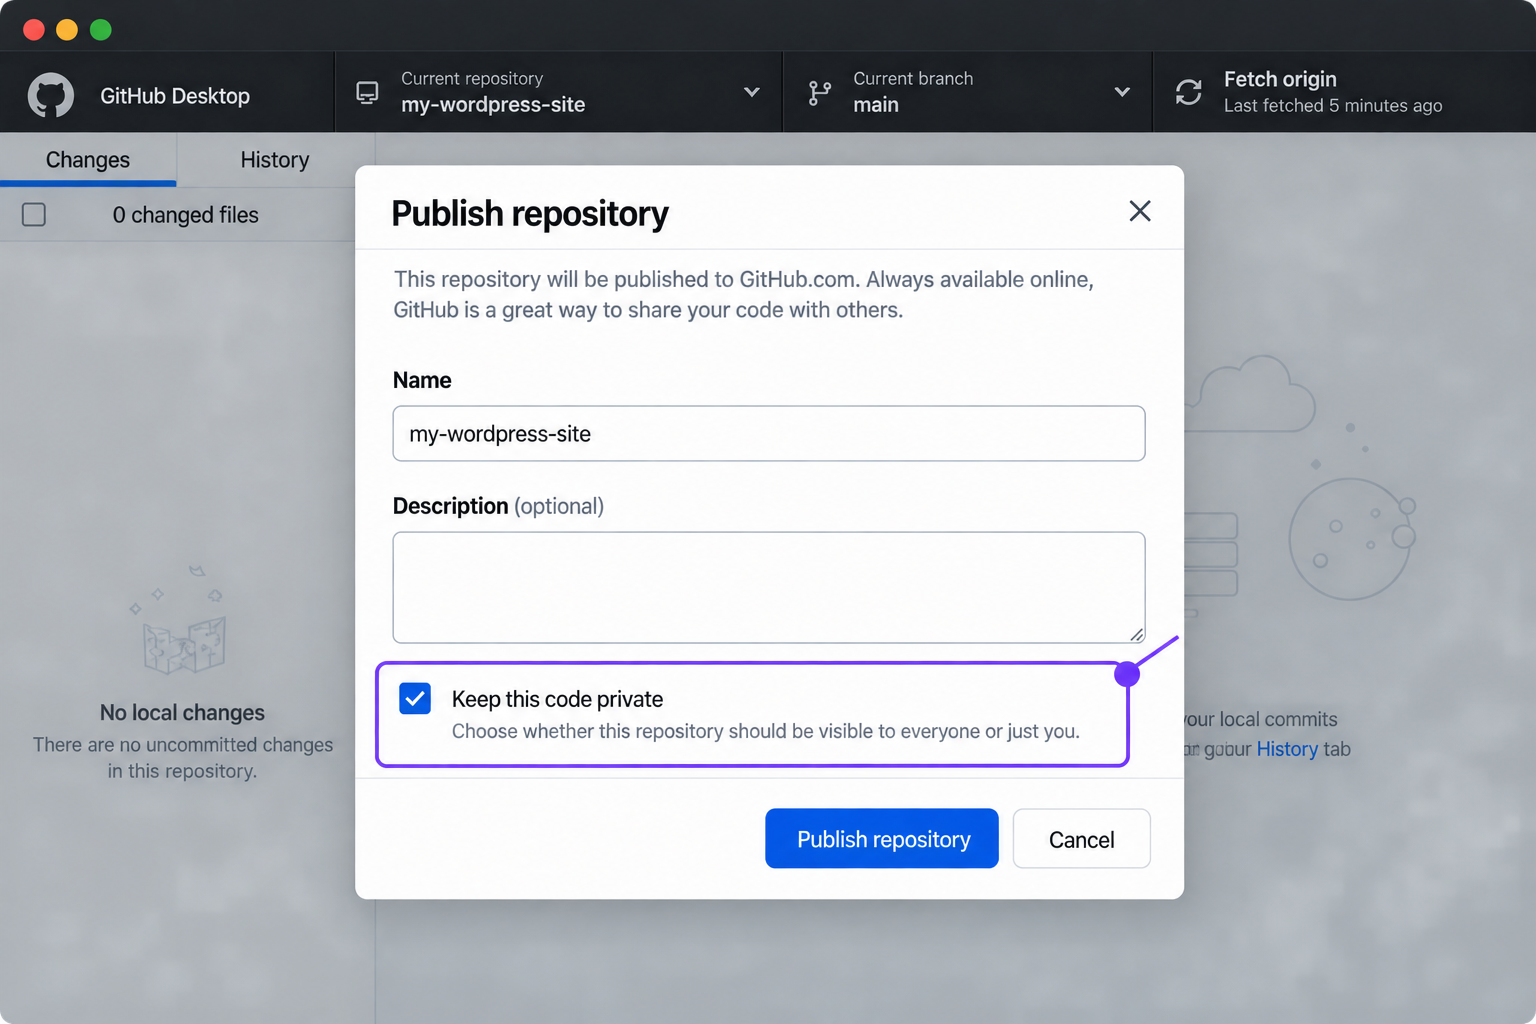
Click Publish repository in the repository bar. Publish repository creates the repository on GitHub and sends the files to it. In the window that opens, keep the name and keep Keep this code private ticked, so the site code stays out of public view, then click Publish repository.
The repository now appears on github.com under the signed-in account, with the WordPress files in it. After each later change to the files, click the Commit button and then Push origin: the first saves the change as a commit, the second pushes it to GitHub.
GitHub Desktop needs the files on a computer. A site whose files sit only on the hosting server is pushed to GitHub from that server.
Live WordPress Site Files
Live WordPress site files are the files that sit in the site folder on the hosting server, and this approach pushes them to GitHub from the terminal of that server. It serves a site that has no copy on a computer. The push from the server needs three things: SSH access, Git on the server, the address of an empty GitHub repository. SSH access is the login that opens a command line on the server. The address is the HTTPS address that the Quick setup page of a new, empty repository shows.
The live wp-config.php holds the real database password, so the .gitignore is created before any git add. A server also has no browser window for the GitHub sign-in, so the push uses a personal access token, generated in step 8. The nine steps of the push run from the SSH terminal to the repository page on GitHub.
Open the SSH terminal of the hosting account, either in the host panel or in an SSH client on the computer. Every command from here on is typed in that terminal and runs on the server.
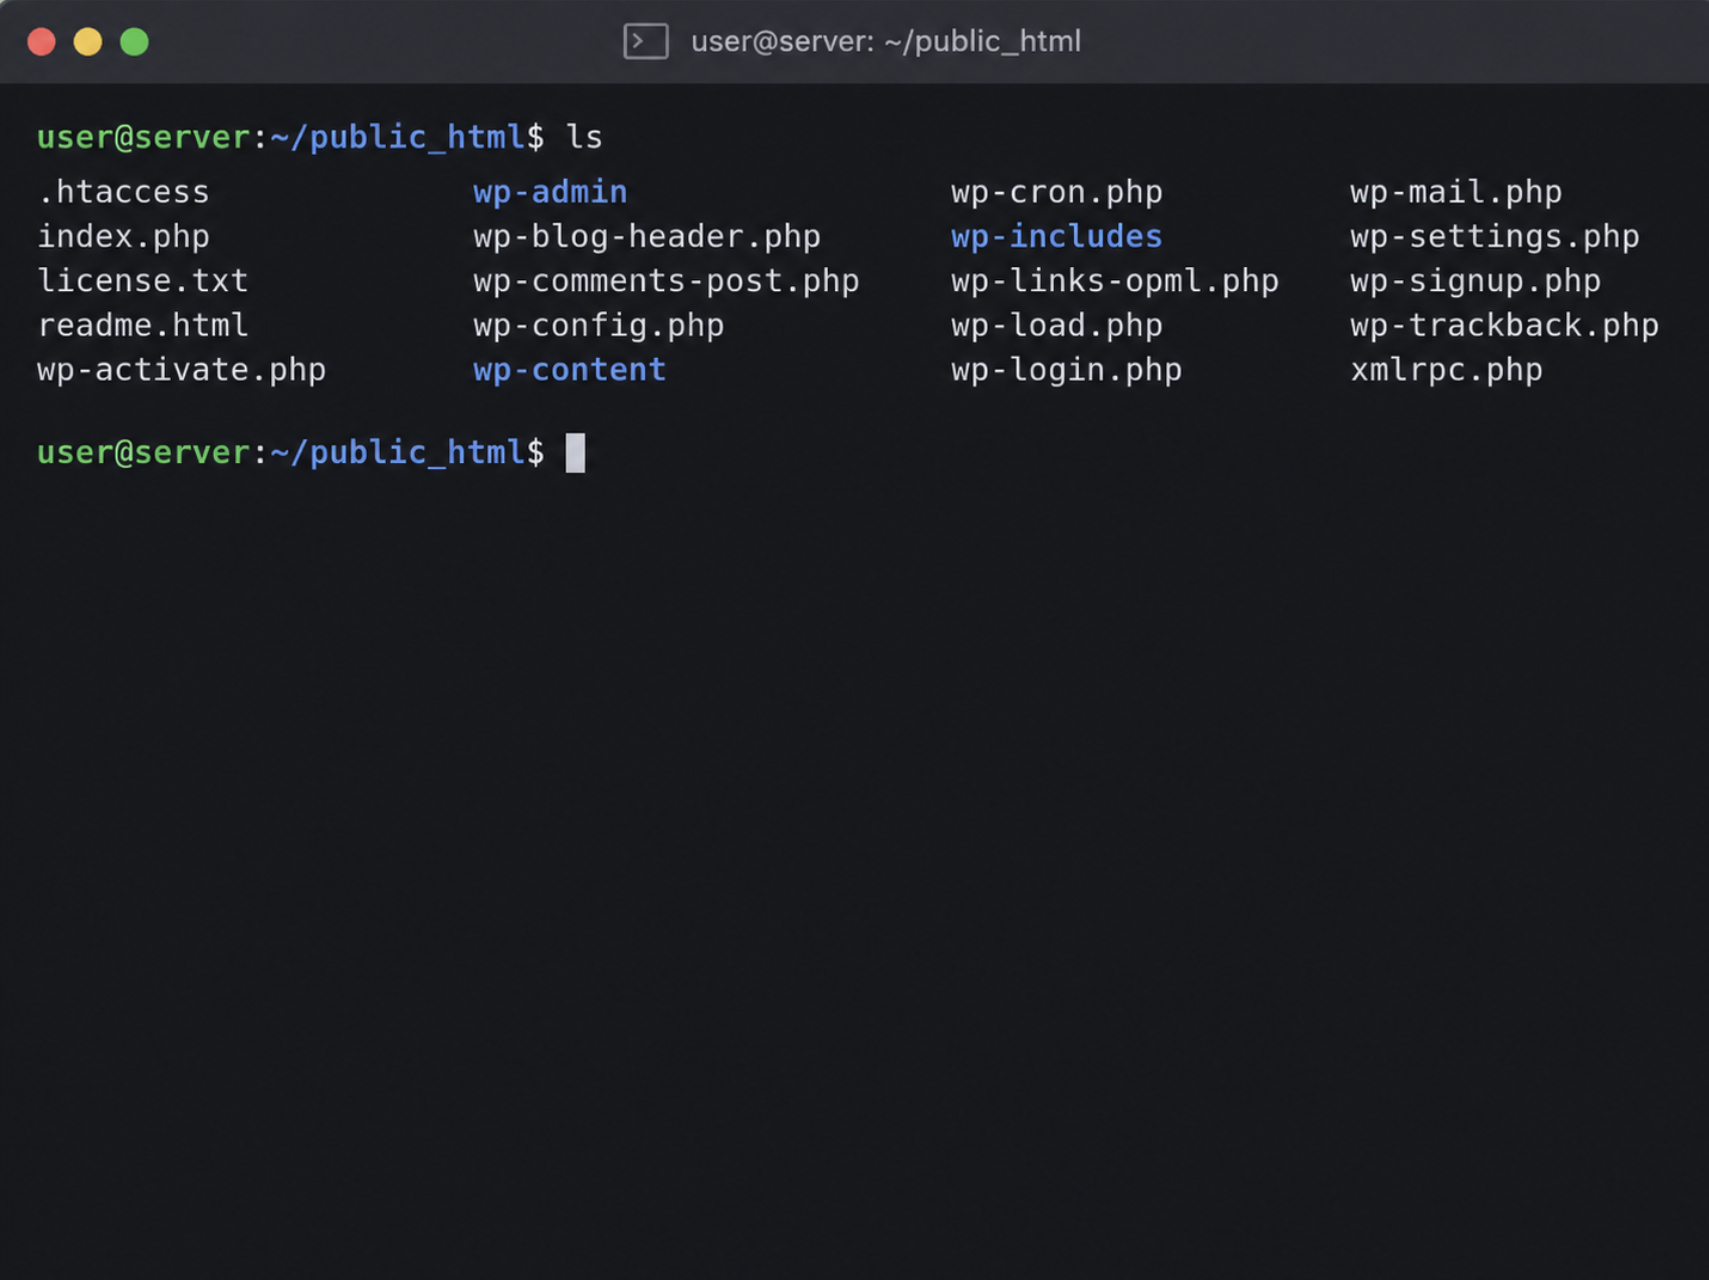
Open the WordPress folder, list its files and check the Git version:
cd public_html
ls
git --version
public_html is the WordPress folder on many hosts; when the site sits in another folder, type the name of that folder after cd. git --version prints the Git version as a dotted number, and a server that prints no number has no Git. In the WordPress folder, the ls output shows wp-config.php and wp-content.
Create the .gitignore in the same folder:
nano .gitignore
Paste the complete WordPress .gitignore into the empty file:
# WordPress - ignore core, configuration, examples, uploads and logs.
# https://github.com/github/gitignore/blob/main/WordPress.gitignore

# Core
#
# Note: if you want to stage/commit WP core files
# you can delete this whole section/until Configuration.
/wp-admin/
/wp-content/index.php
/wp-content/languages
/wp-content/plugins/index.php
/wp-content/themes/index.php
/wp-includes/
/index.php
/license.txt
/readme.html
/wp-*.php
/xmlrpc.php

# Configuration
wp-config.php

# Example themes
/wp-content/themes/twenty*/

# Example plugin
/wp-content/plugins/hello.php

# Uploads
/wp-content/uploads/

# Log files
*.log

# htaccess
/.htaccess
Save the file with Ctrl+O, then Enter; Ctrl+X brings back the command prompt. The .gitignore keeps the live wp-config.php out of the first commit.
Create a Git repository in the folder, on the branch main:
git init -b main
Git older than 2.28.0 needs a different line, according to the GitHub guide to adding local code. When git --version printed a lower number, run this one in its place:
git init && git symbolic-ref HEAD refs/heads/main
Add every file that Git does not ignore to the next commit, then check the list:
git add .
git status
git status lists the files to commit, and on a live server that list can hold more than the site code. Check it for three things: wp-config.php, backup archives and database dumps, such as .zip and .sql files, and folders that are not part of this site. The WordPress .gitignore has no line for backups, dumps or other folders, so git add . adds them.
When the list holds one of the three, do not commit. wp-config.php in the list shows that the .gitignore of step 3 was not saved in this folder, so repeat step 3. For a backup, a dump or a folder, open the file again with nano .gitignore and add one line per item: the path from the WordPress folder with a slash in front, and a slash at the end for a folder, in the form of the /wp-content/uploads/ line.
A line such as *.sql keeps every file with that ending out, as *.log does for log files. Then, in both cases, remove the files from the list, add them again and check the new list:
git rm -r --cached .
git add .
git status
git rm -r --cached . removes every file from the list and prints one rm line for each; the files themselves stay on the server. The correct git status output lists the files to commit, with no wp-config.php, no backup archive and no database dump among them.
The first time Git is used on this server, type the name and the email address that Git records on each commit, in place of the two sample values:
Save the snapshot of the files as the first commit:
git commit -m "First commit"
Generate a personal access token in a browser. A personal access token replaces the account password for Git over HTTPS, because GitHub rejects the account password on a push. Sign in to GitHub and open the fine-grained token form; the same form sits under the profile picture, Settings, Developer settings, Personal access tokens, Fine-grained tokens, Generate new token.
Type a token name, choose Only select repositories under Repository access and select the new repository, then add Contents with write access under Permissions. Click Generate token and copy the token at once, because GitHub shows it one time only. Before that click, the filled form shows the token name, the single repository and the Contents permission.
Add the address of the GitHub repository, then push the commit to main:
git remote add origin REMOTE-URL
git push -u origin main
REMOTE-URL is the HTTPS address of the empty repository. git push prints a Username prompt and a Password prompt: type the GitHub username at the first, and paste the personal access token at the second as the password. The terminal shows no characters while the token is pasted.
GitHub can reject the push over file size: GitHub blocks files larger than 100 MiB, according to the GitHub documentation on large files, and one such file in the commit is enough. After that rejection, add a line for the file to the .gitignore, remove the file from the commit and push again:
FILE-NAME is the path of the large file, and the file itself stays on the server. The closing lines of the output name main once the push is complete.
The live WordPress site files are now in the GitHub repository. After a refresh, the repository page on github.com lists wp-content, with the theme and plugin folders inside it, and the .gitignore; wp-config.php is not on the page.
One more action on the server is needed after the push. git init created a .git folder inside the WordPress folder, and that folder holds the whole repository: every committed file, the name and email address of step 6, and the repository address.
The server serves the WordPress folder to the web, so any visitor can download those files from a server that does not block the .git folder. GitHub now holds the same commits, and each later change is deployed to the site from GitHub, so the server no longer needs its own repository. Once the repository page shows the files, remove the folder, and type the line exactly as shown:
rm -rf .git
The command removes the repository on the server only. The site files stay in place, and so does the repository on GitHub.
To edit the files on a computer, run one more command there, with Git installed:
git clone REMOTE-URL
git clone copies the repository into a new folder on that computer.
The push sends files from the live site to GitHub. Deployment sends each later change in the opposite direction, from GitHub to the live WordPress site.
Deployment from GitHub to the Live WordPress Site
Deployment from GitHub to the live WordPress site is the copy of the repository files onto the server that runs the site. GitHub does not send files to a site by itself. The live site pulls them from the GitHub repository, through one of three routes: a host panel connected to GitHub, a ZIP upload, or a plugin. One route is enough for a site. The three need different things from the host, and each updates the site in its own way.
Approach
Use it when
The site updates by
Git Deployment in the Host Panel
The host has a Git section
A Pull or Redeploy button, or automatically on push
ZIP Download from GitHub
The host has no Git section; a one-time install
A new ZIP upload each time
Plugin
The host has no Git section; repeated updates
An update in the dashboard, or automatically on push
The shape of the repository is part of the choice. A repository that holds the whole WordPress folder deploys through the host panel, the one route of the three that pulls a whole site. A ZIP upload and a plugin each install one theme or one plugin, and the ZIP upload needs that theme or plugin at the top level of the repository.
Every route needs a repository that is already on GitHub. The push sends the files to GitHub; the deployment copies them from GitHub onto the site. On a host with a Git section, the panel itself pulls the repository, and no file is uploaded by hand.
Git Deployment in the Host Panel
Git deployment in the host panel is the hosting feature that pulls a GitHub repository into the site folder. The feature connects GitHub to WordPress on the host’s side, so each later update is one click in the panel.
Two things are needed: a host with a Git section in its panel, and a repository whose top folder matches the folder it deploys into. Create a backup of the site before the first deployment, because files from the repository update the files with the same names in that folder.
A panel connects to GitHub in one of two ways, by a deploy key or by a GitHub sign-in. A deploy key is an SSH key added to one repository, and it grants read-only access to that single repository for as long as write access stays off. Three example panels show both connection types.
Seven steps connect the host panel to the GitHub repository and deploy main to the live site. Steps 2 to 4 serve a panel that connects by a deploy key. A panel with a GitHub sign-in needs Step 5 in their place.
Open the Git section of the hosting panel.
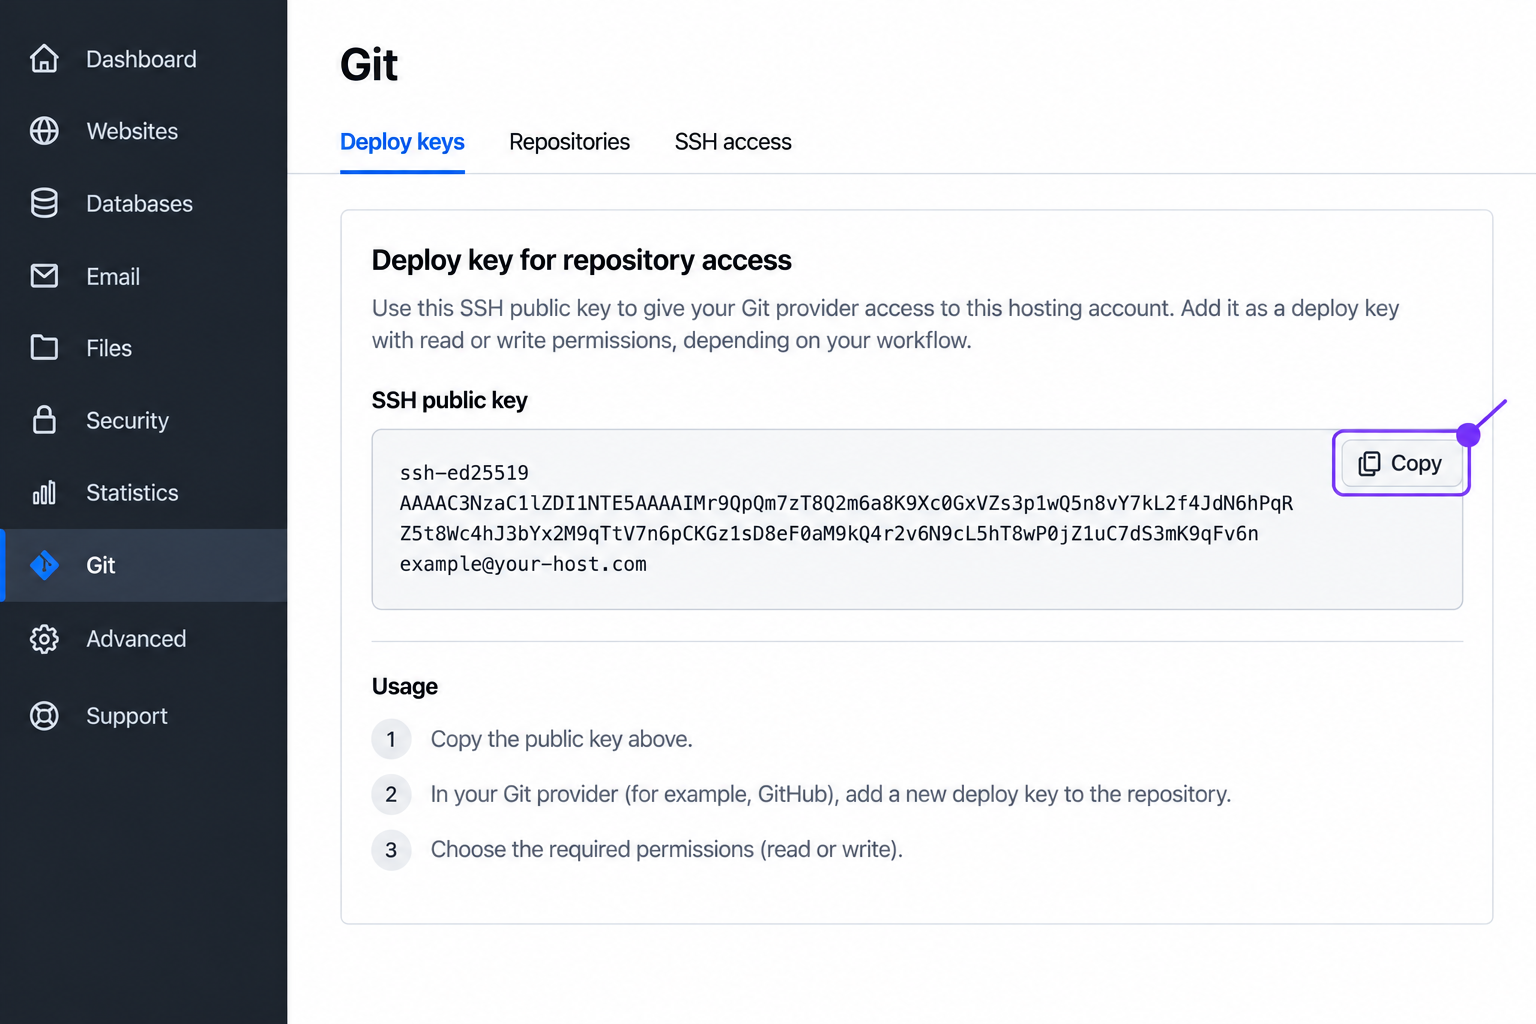
Deploy key: generate the SSH key, or open it if the panel already holds one, and copy the public key. The Git section shows the public key with a copy control next to it.
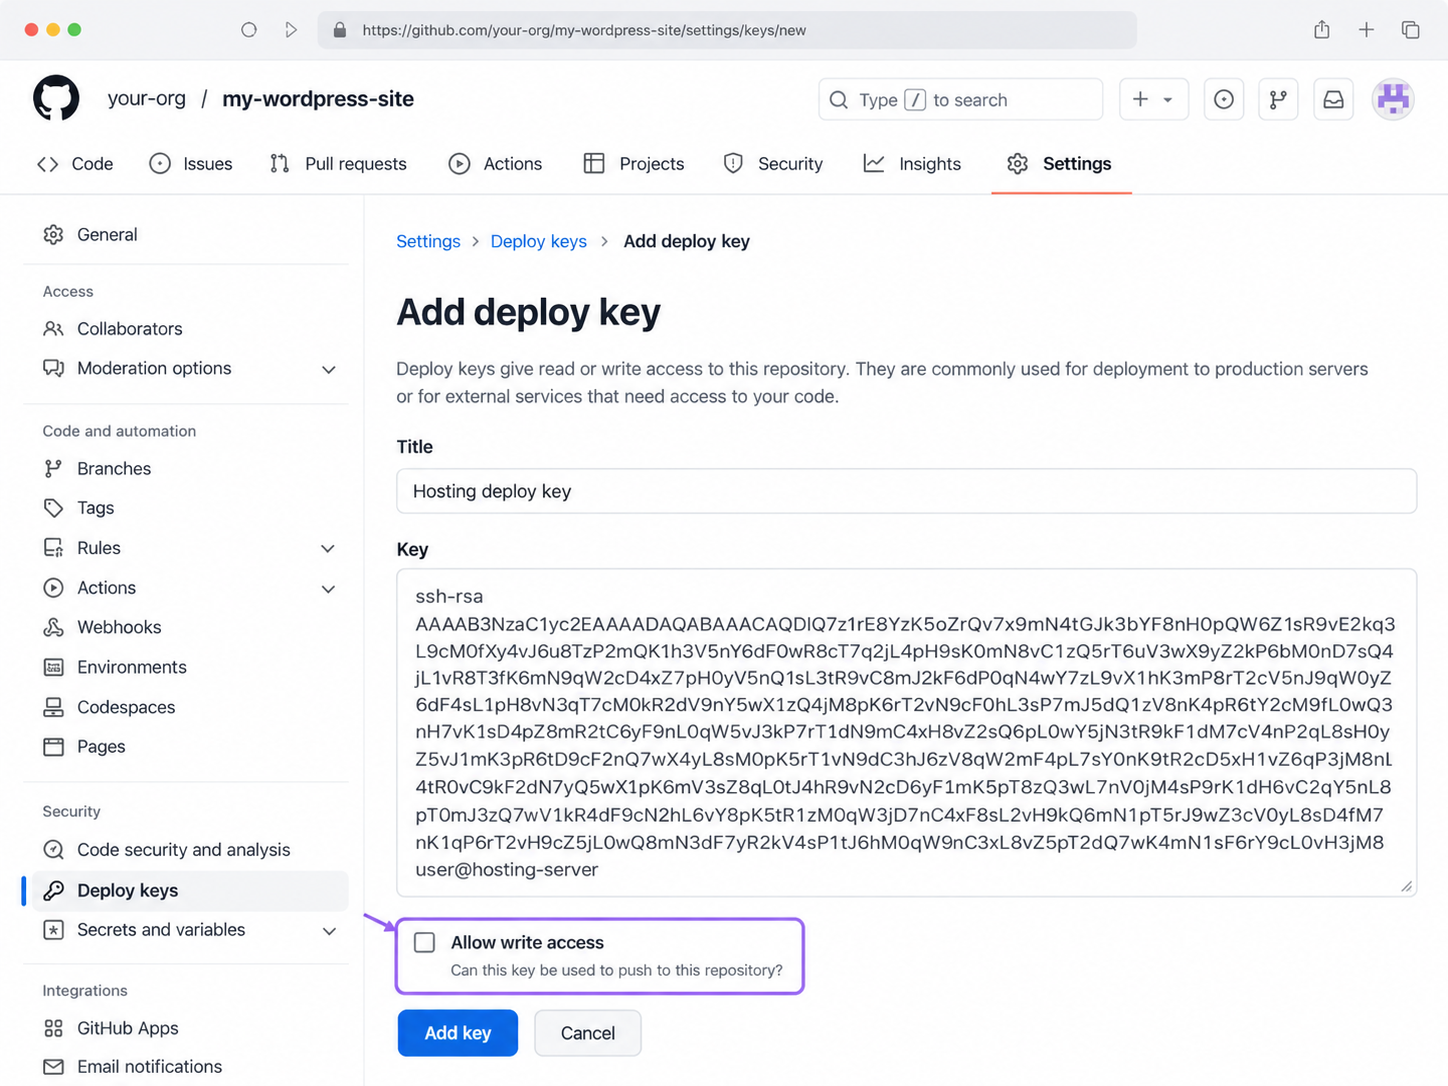
Deploy key: on GitHub, open the repository and click Settings, then Deploy keys, then Add deploy key. Type a title, paste the public key, keep Allow write access unticked and click Add key. The form adds the public key to this one repository as a deploy key, and it shows the Title field, the Key field and the unticked checkbox.
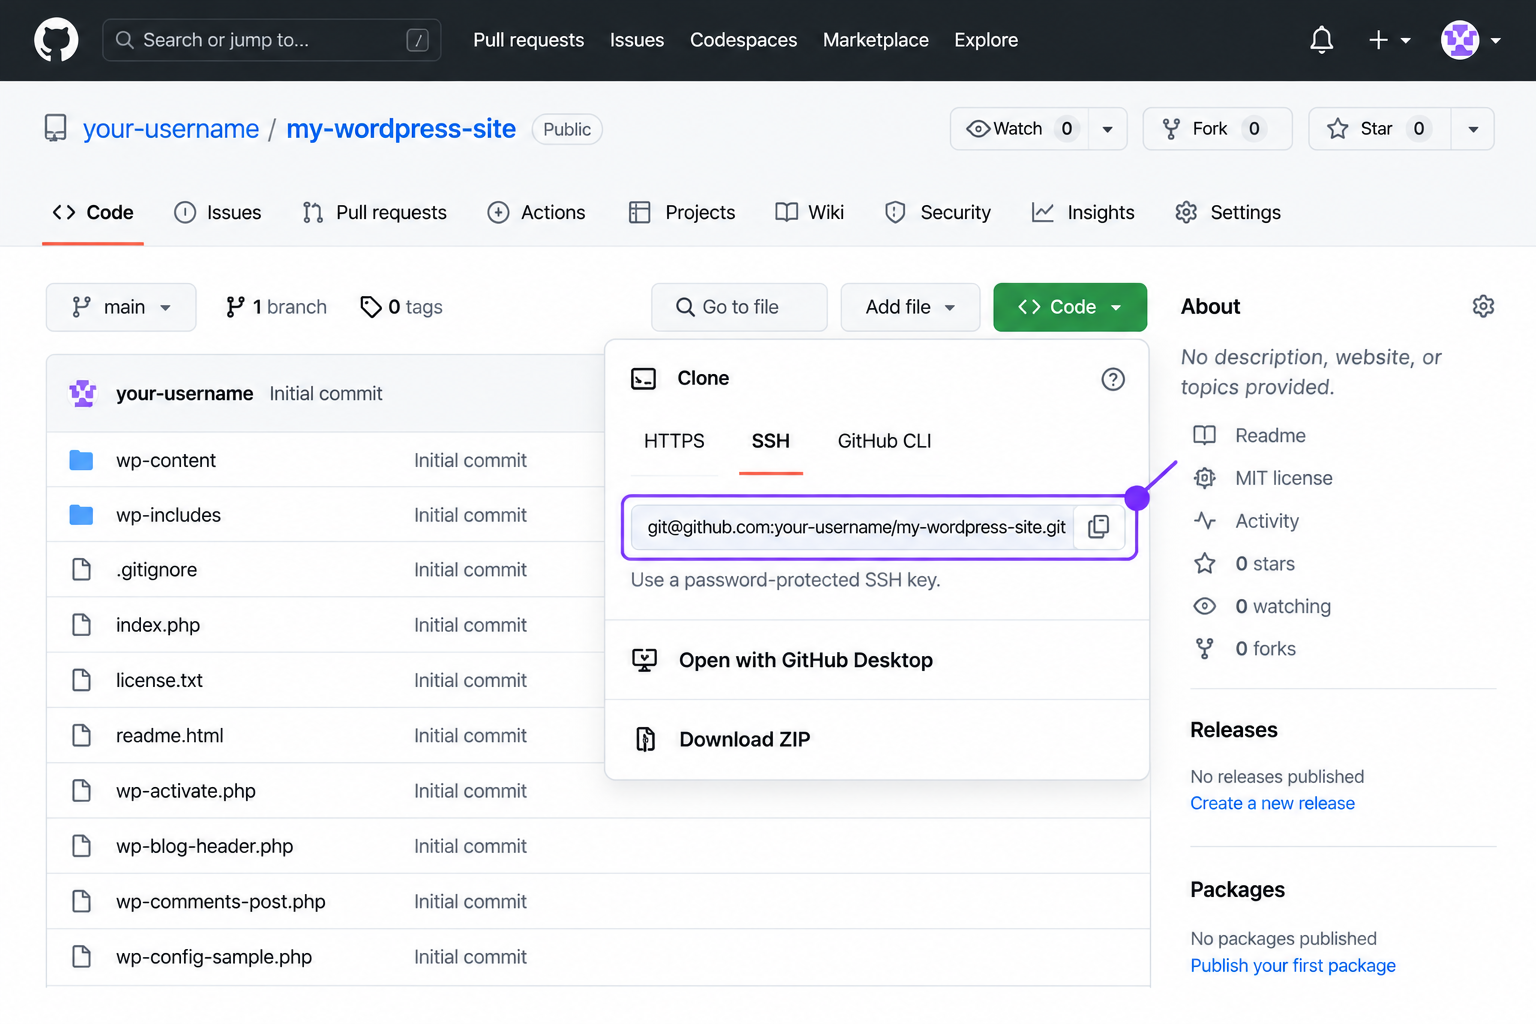
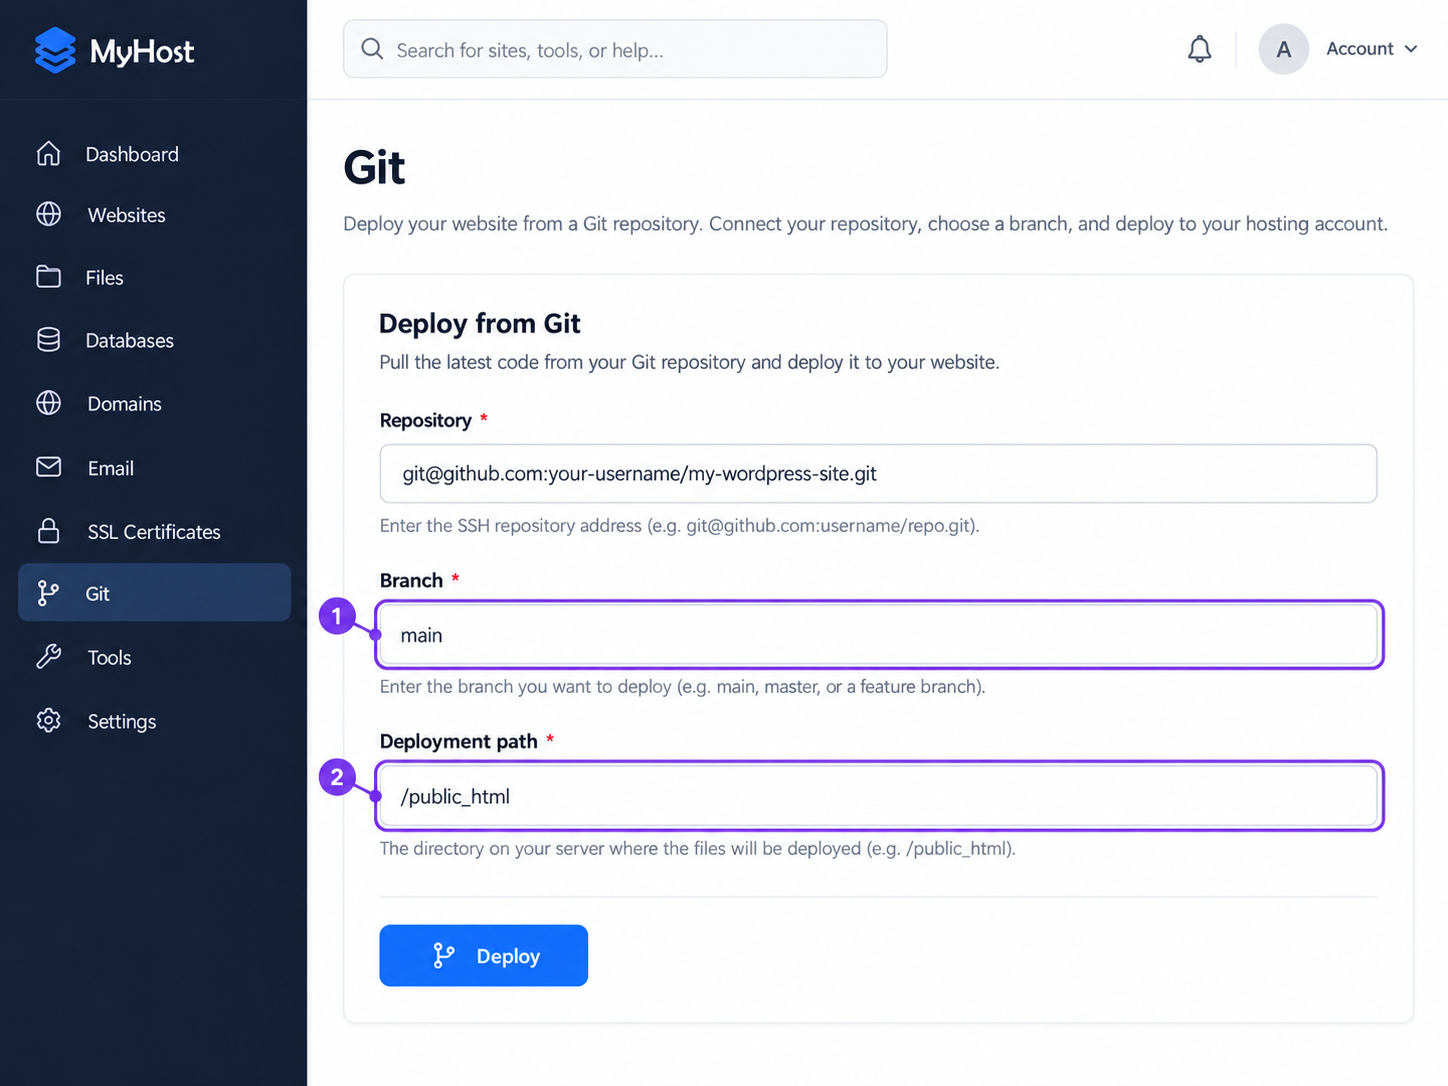
Deploy key: on the repository page, click Code, choose SSH and copy the address. Paste it into the repository address field of the panel. The SSH tab of the Code menu shows the address in the form git@github.com:OWNER/REPO.git, with a copy icon next to it.
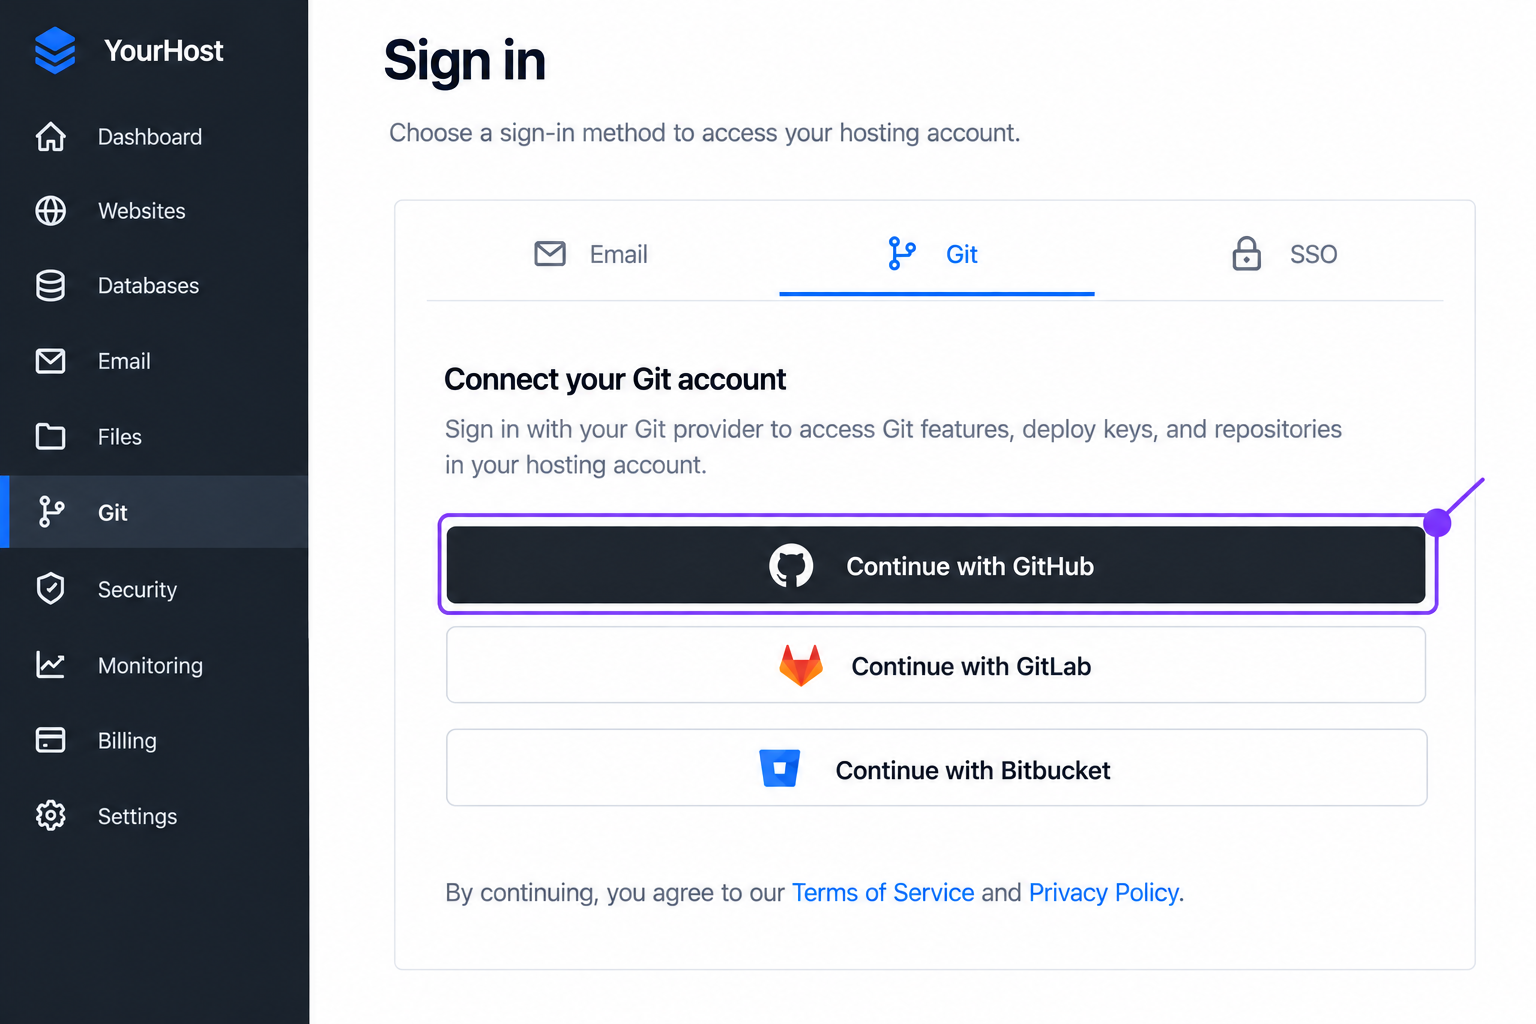
GitHub sign-in, in place of Steps 2 to 4: click the button that connects GitHub, authorize the host on the GitHub screen that opens, and choose the repository. Before any repository is connected, the Git section shows only that button.
Choose the branch main. Type the path of the folder that the top folder of the repository matches: the WordPress folder for a whole site, or the folder of one theme or one plugin inside wp-content/themes or wp-content/plugins. Then click the deploy button. The filled form shows the repository, the branch and the path.
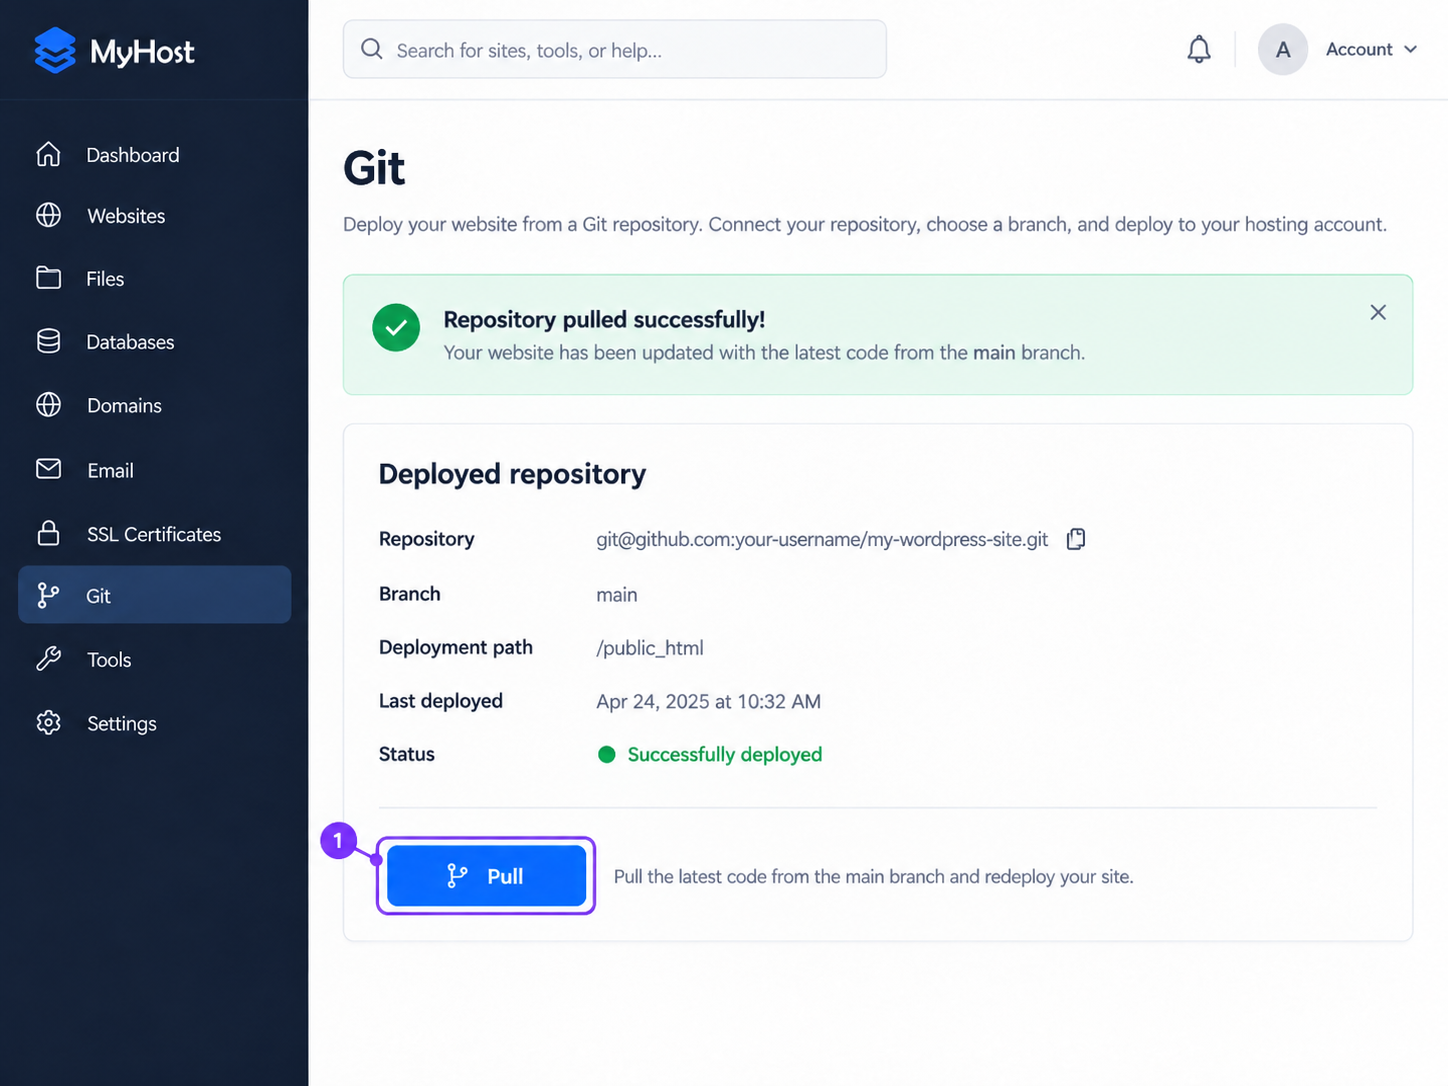
Click Pull or Redeploy after each push to main. If the panel deploys on every push, turn that off for the live site and keep it on for a staging site: a manual pull keeps an untested change off the live site until the button is clicked. After the pull, the panel shows the button and a success notice.
The files on the live site now match main. One check is still needed, because the server serves the deployment folder to the web: whether the deployment keeps a .git folder there, the folder that holds a whole repository. Type the web address of the deployment folder, which is the site address for a whole site, with /.git/config at its end into a browser. An error page shows that no such folder is served. A page of text or a file download shows that it is served, and the host’s support is the party that turns off web access to it.
On a host with no Git section, a ZIP file copies the same files onto the site once.
ZIP Download from GitHub
A ZIP download from GitHub is a compressed copy of the repository files at one moment, saved from the Code menu of the repository page. It is the manual route from GitHub to WordPress: no Git on the server, no extra plugin. The ZIP file holds the files of main as they are at download time, and none of the commit history.
The WordPress dashboard installs a theme or a plugin from an uploaded ZIP file, so the repository needs one theme or one plugin at its top level. Admin access to the dashboard is the only other need. Four steps download the ZIP file from GitHub and install it in the dashboard.
Open the repository page on GitHub.
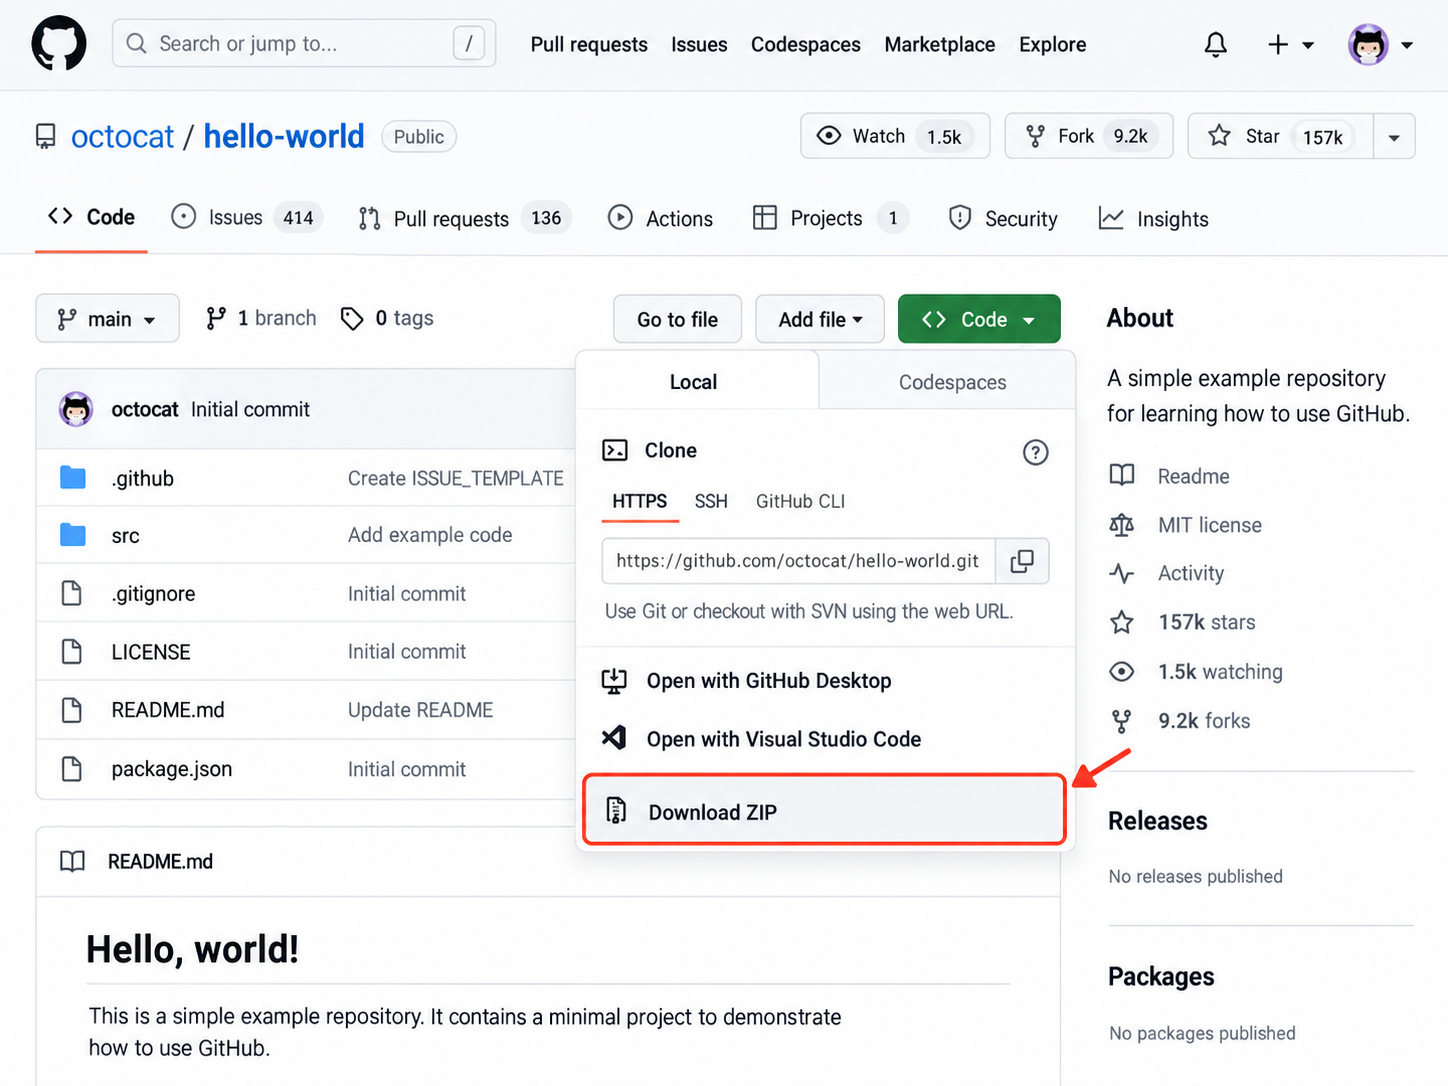
Click Code, then Download ZIP. The open Code menu shows the Download ZIP entry, and the browser saves the repository files as one compressed file.
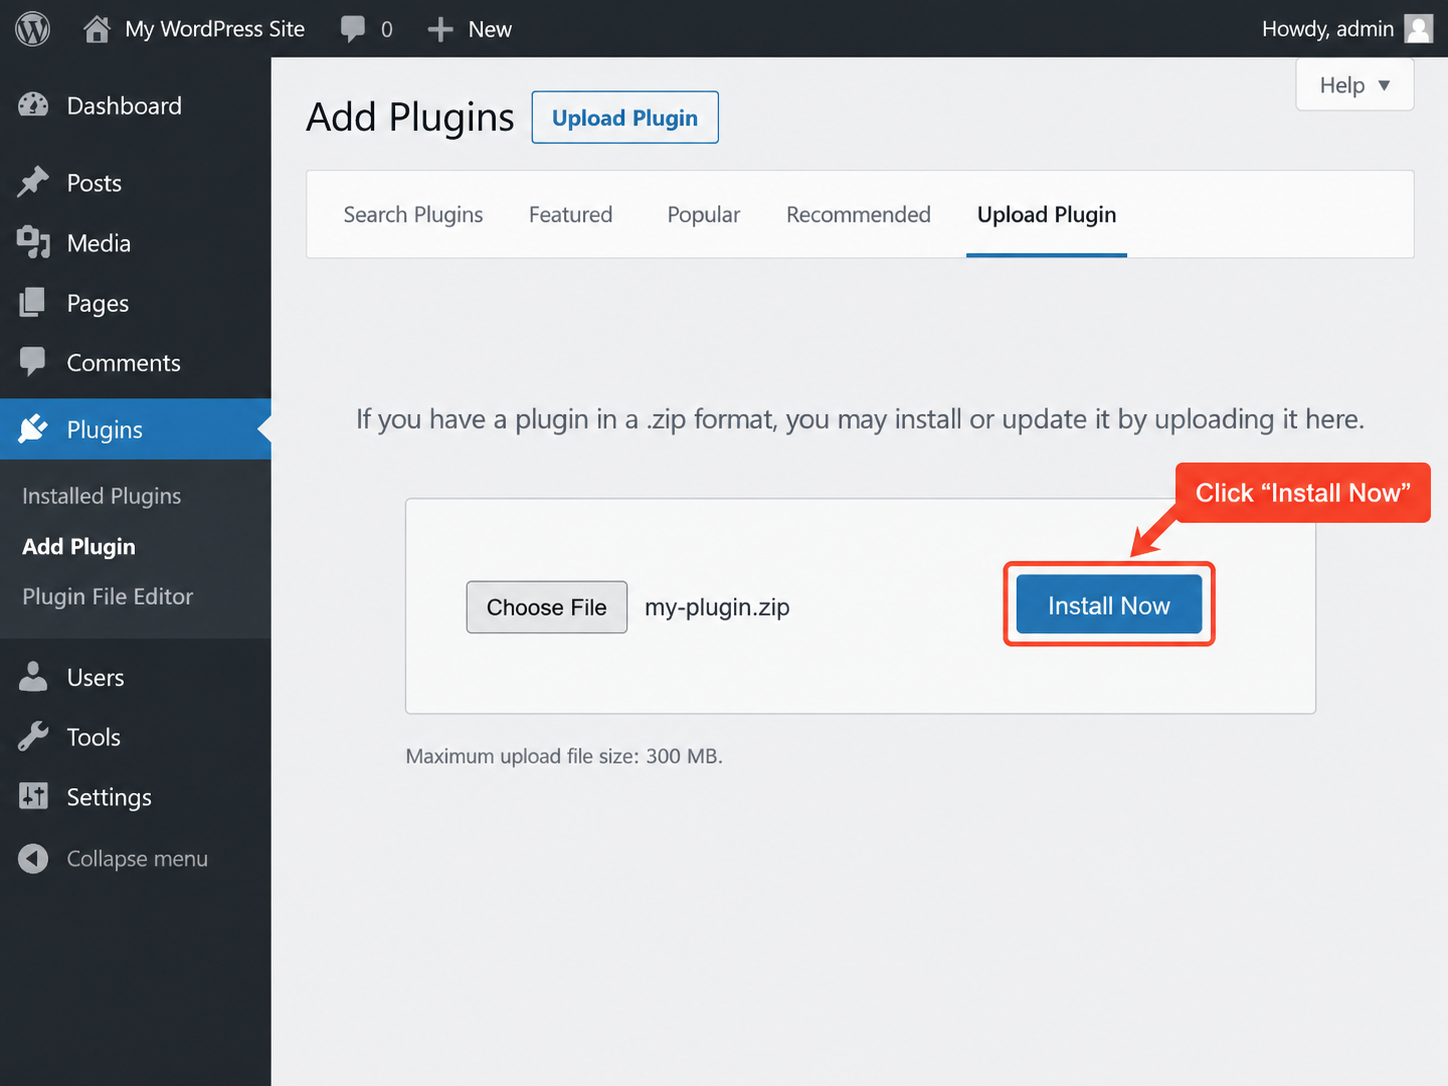
For a plugin, open Plugins in the WordPress dashboard, click Add Plugin, then Upload Plugin, choose the ZIP file and click Install Now. For a theme, open Appearance, then Themes, click Add Theme, then Upload Theme, choose the ZIP file and install it. The Upload Plugin screen shows the name of the chosen ZIP file next to the Install Now button.
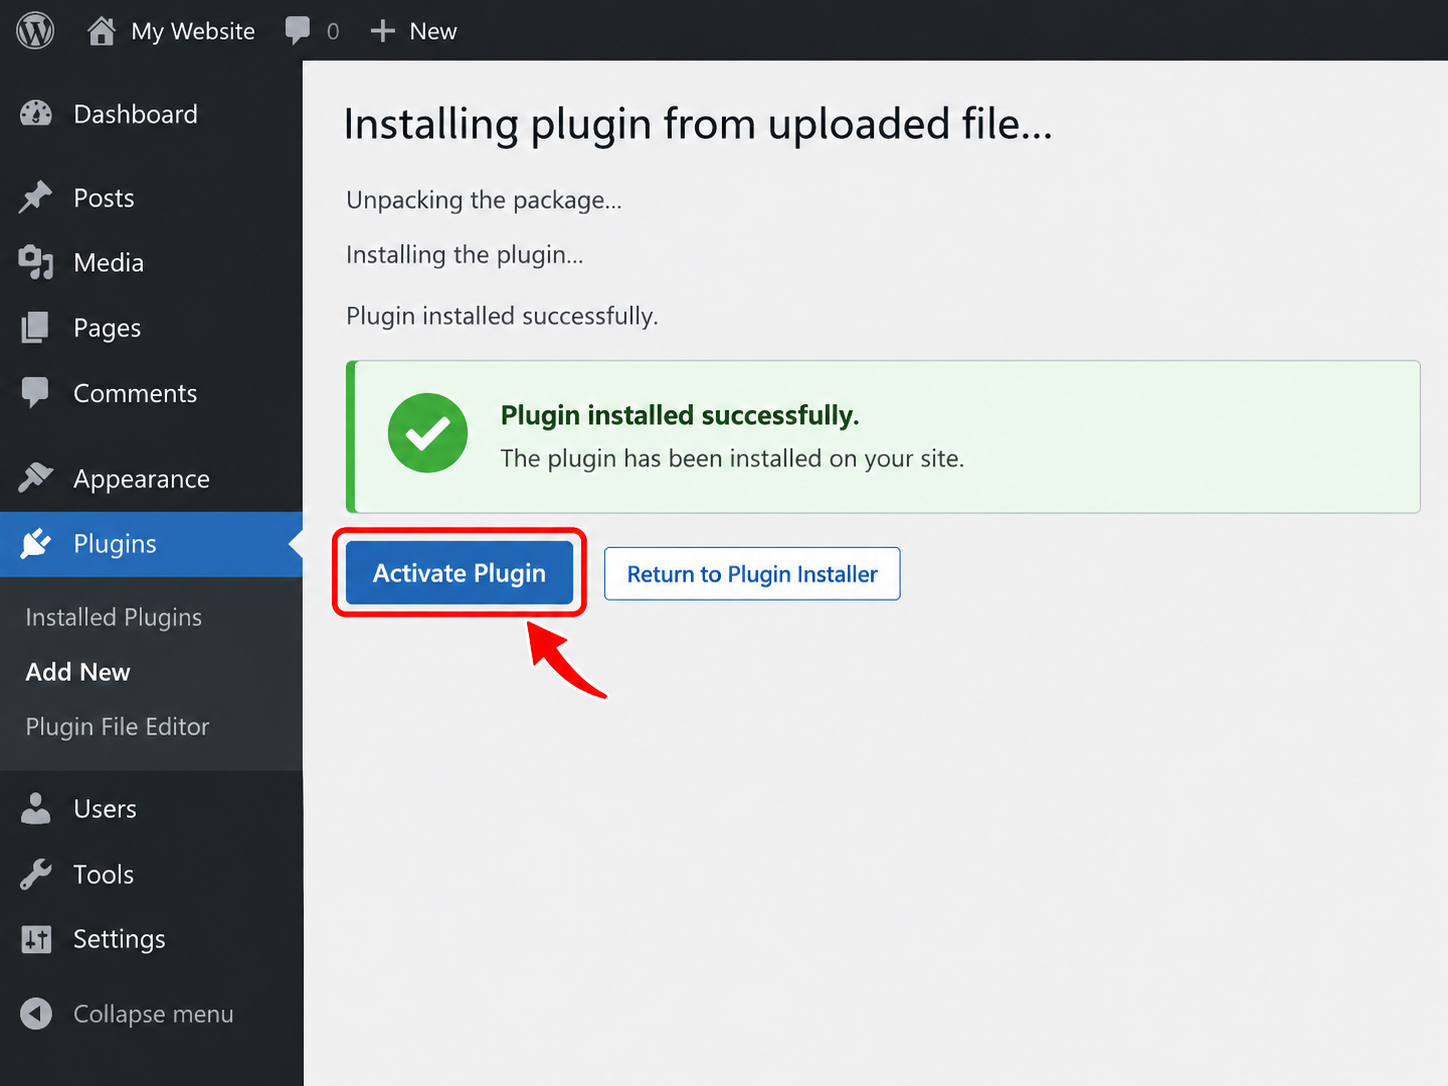
Click Activate Plugin; for a theme, click Activate. After the install, the dashboard shows the message “Plugin installed successfully.” with the Activate Plugin button under it.
The theme or plugin now runs at the version main held at download time. It sits in a folder named after the top folder of the ZIP file, and GitHub names that folder with the repository name, a hyphen and the branch name: repository-name-main. A later switch to a plugin needs a different folder name on the server, the repository name alone without -main, because a plugin connects an installed theme or plugin to its repository only when the folder on the site carries the same name as the repository.
The site does not update itself after the install. A ZIP download carries no later updates, so every later change on GitHub needs a new download and a new upload. A plugin repeats this pull from inside the dashboard, with no ZIP file to upload.
How to Integrate WordPress and GitHub with a Plugin
Integrating WordPress and GitHub with a plugin is the WordPress GitHub integration with no command line: a plugin in the dashboard connects to a GitHub repository, then installs or updates a theme or plugin from it. The integration plugin does the pull itself, so the server needs no Git. Two plugins connect WordPress to GitHub this way, WP Pusher and Git Updater, and each one connects by a different means.
Plugin
Connects by
The site updates
Private repositories
WP Pusher
a GitHub token
with the update button in the WP Pusher list, or on every push with Push-to-Deploy
paid license
Git Updater
header lines in the theme or plugin file
as a normal update in the dashboard when the Version header rises
paid license
In a WordPress GitHub sync, the site follows the repository: WP Pusher updates the installed theme or plugin after every push, by the update button or with Push-to-Deploy, and Git Updater updates it after a push that raises the Version header. Not every GitHub plugin for WordPress does that. GitHub Embed and My Github display repository or profile details on a page, and they deploy nothing. A plugin that integrates WordPress and GitHub installs files on the site, and WP Pusher is the one that connects by a GitHub token.
WP Pusher
WP Pusher is a WordPress plugin that installs and updates a theme or plugin straight from a GitHub repository. As a WordPress GitHub integration, it connects the dashboard to the repository, and the server needs no Git.
WP Pusher needs admin access to the WordPress dashboard, a repository on GitHub and a GitHub token. A private repository and Push-to-Deploy both need the token; only a public repository with Push-to-Deploy unticked installs without it. The repository holds one theme or one plugin at its top level, or the whole WordPress folder with the theme in a subfolder that Step 4 names. Six steps install a theme from GitHub with WP Pusher and keep it updated.
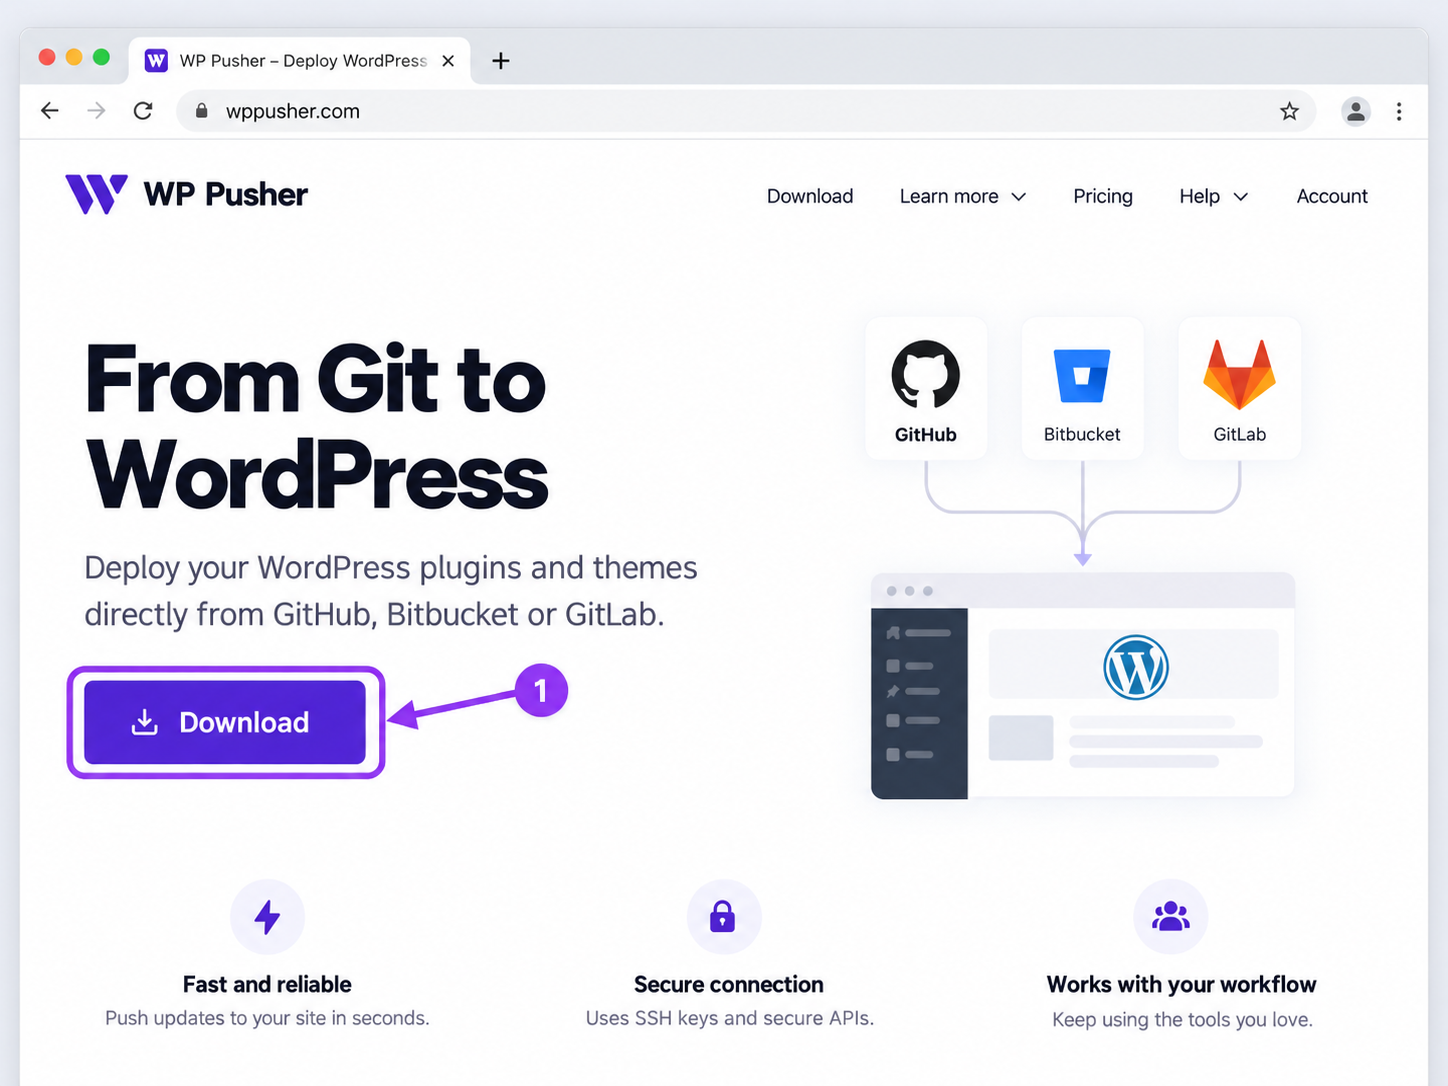
Download WP Pusher as a ZIP file. The WP Pusher website shows the download button for the plugin.
In the WordPress dashboard, open Plugins, click Add Plugin, then Upload Plugin, choose the ZIP file, click Install Now and activate the plugin.
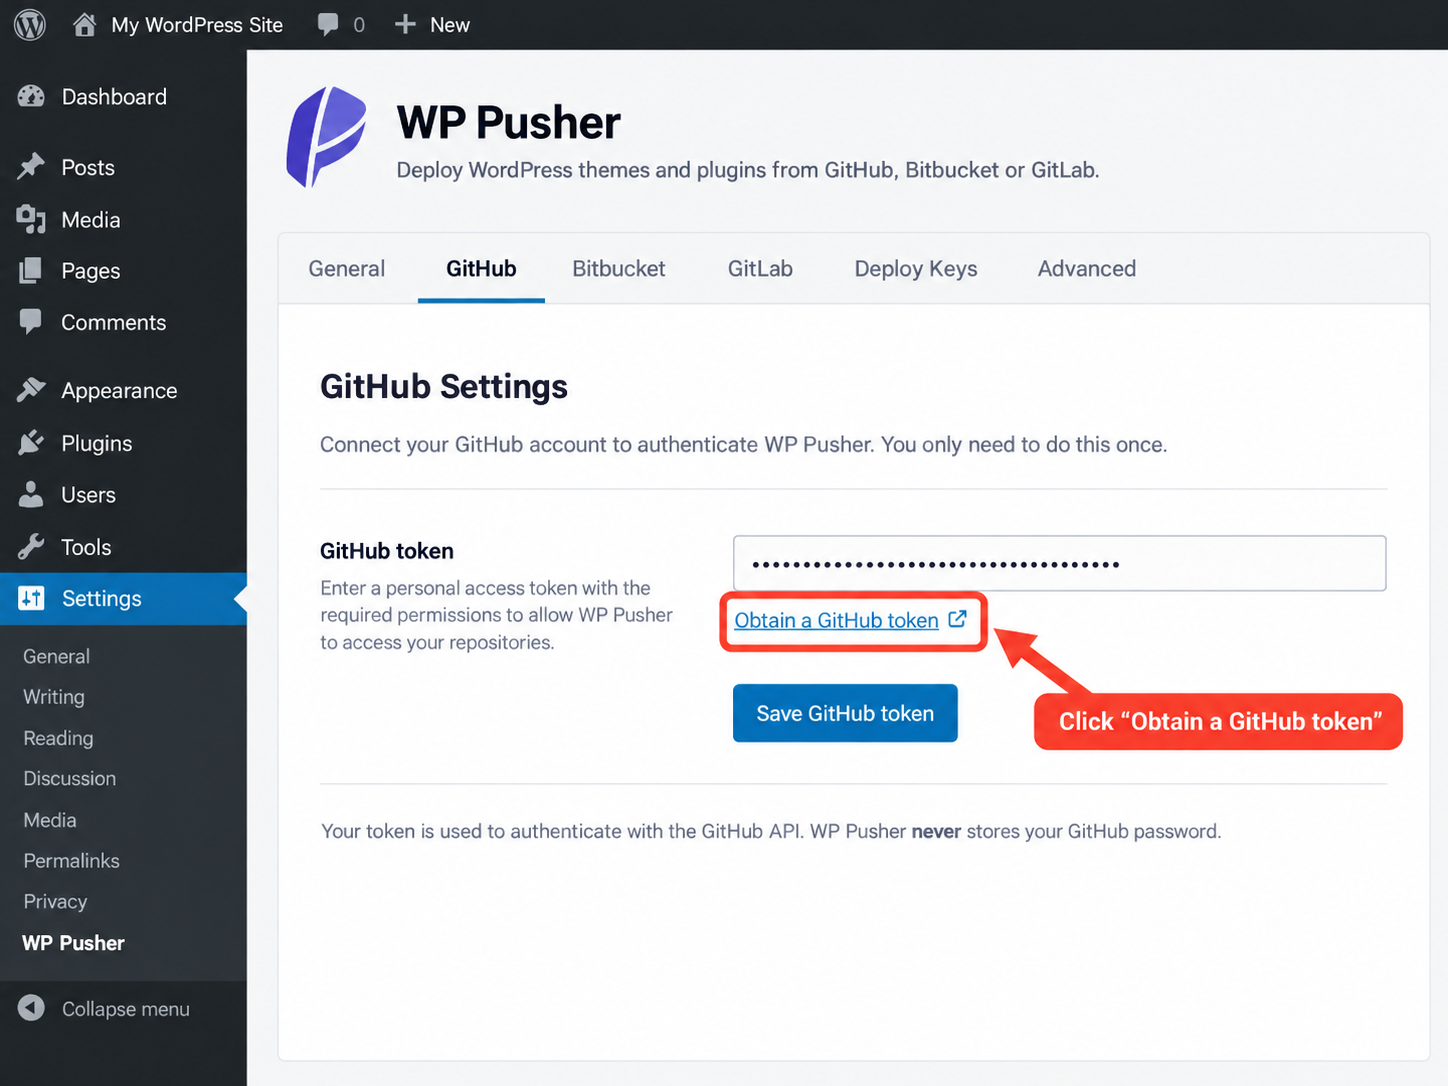
Open the WP Pusher settings and click the GitHub tab. Click Obtain a GitHub token, authorize WP Pusher in the GitHub pop-up, copy the token, paste it into the token field and click Save GitHub token. The GitHub tab shows the token field with Obtain a GitHub token and Save GitHub token.
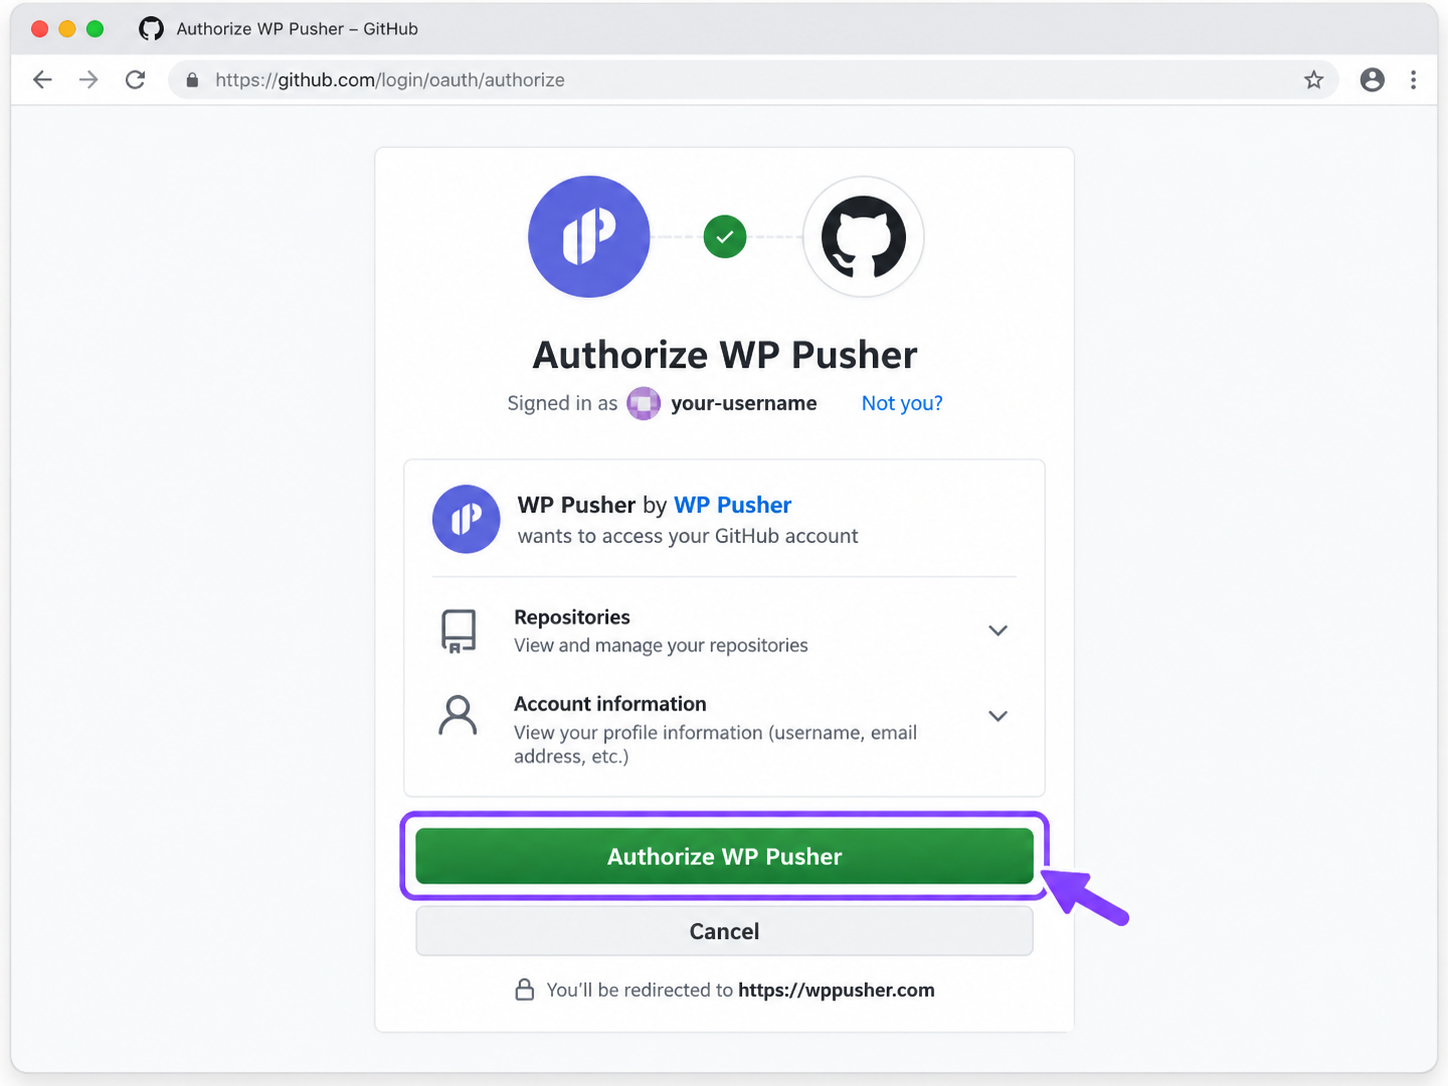
The GitHub pop-up shows the name of the GitHub account and the authorize button.
Open WP Pusher in the dashboard menu and click Install Theme. For a plugin, click Install Plugin.
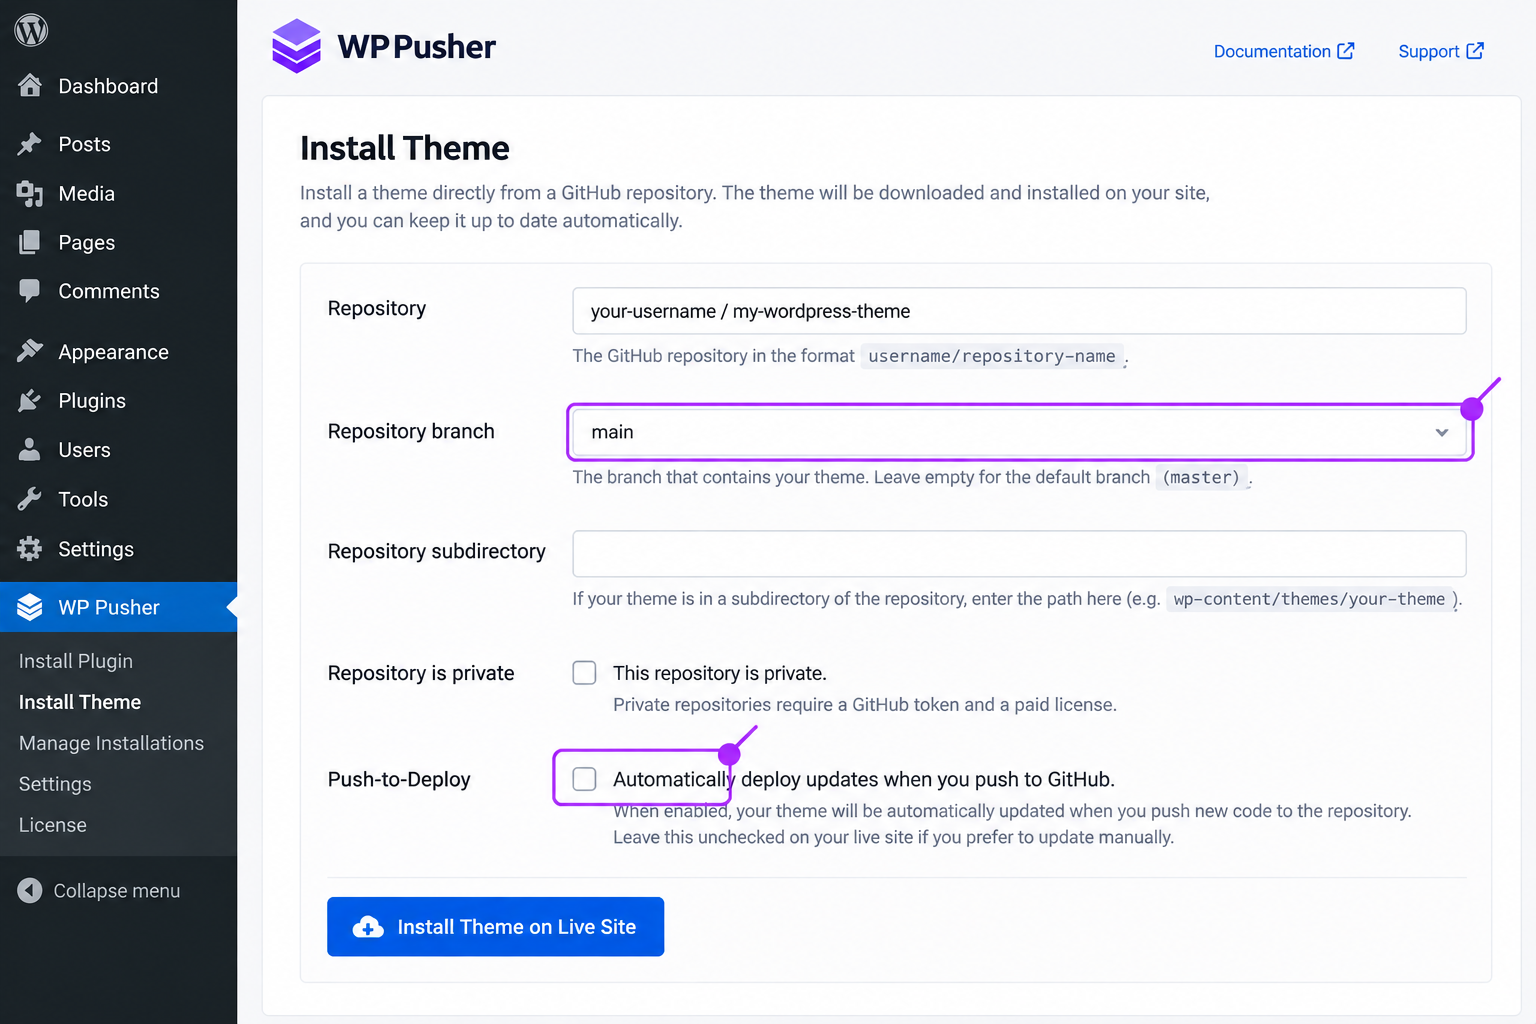
Type the repository as username/repository-name. Type main in the Repository branch field, because a blank field falls back to master. If the repository holds the whole WordPress folder, type the path of the theme folder inside the repository in the Repository subdirectory field. Tick Repository is private for a private repository, which needs the token and a paid license. Tick Push-to-Deploy on a staging site, and keep it unticked on the live site.
The WP Pusher setup guide names every field of this form. For the live site, the form shows the repository, main in the Repository branch field, Push-to-Deploy unticked and the install button.
Click the install button. Then open Appearance, then Themes, and activate the theme. For a theme that is already on the site, tick Link installed theme in the same form before the click on the install button: WP Pusher connects the installed copy to the repository, and its folder on the server needs the same name as the repository.
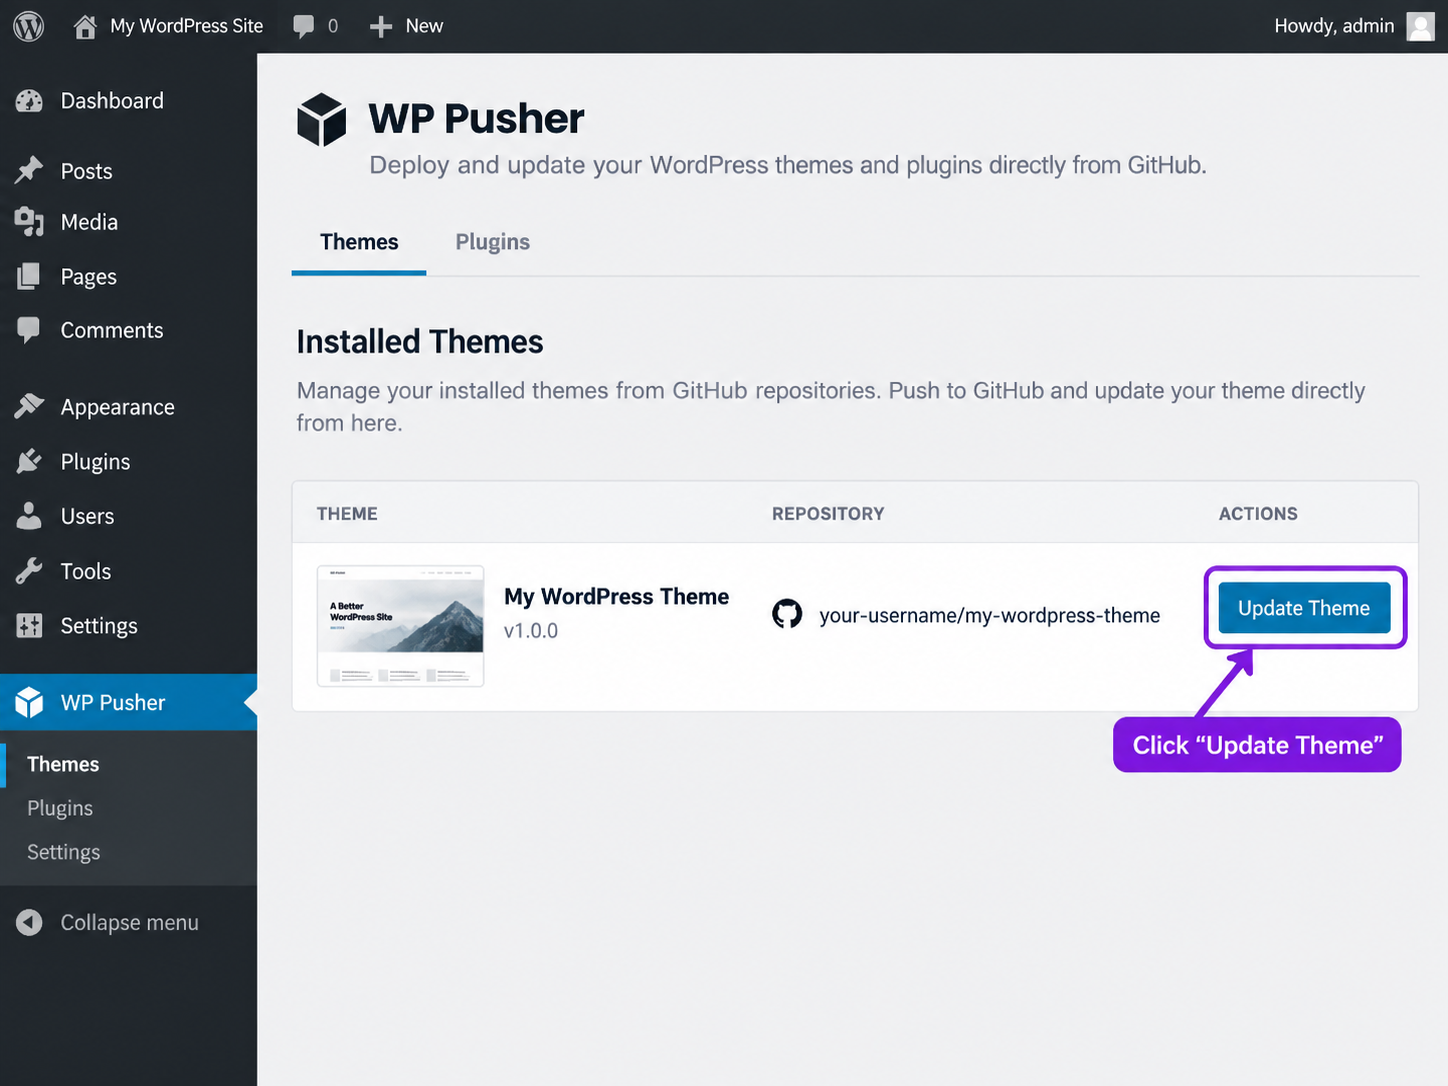
After each push to main, open the Themes list of WP Pusher on the live site and click the update button of the theme. An untested change stays off the live site until that click. On a staging site with Push-to-Deploy ticked, WP Pusher runs the WordPress GitHub sync with no click and updates the theme on every push. The Themes list shows the theme, its repository and the update button.
The theme on the WordPress site now follows the GitHub repository. Git Updater connects a theme or plugin to its repository with header lines.
Git Updater
Git Updater is a WordPress plugin that brings updates from a GitHub repository into the normal WordPress Updates screen. In this WordPress GitHub integration, two header lines in the theme or plugin file connect the site to the repository.
Git Updater needs admin access to the WordPress dashboard and a GitHub repository with a lowercase name and one theme or one plugin at its top level. A repository of the whole WordPress folder does not match that rule, because style.css or the main plugin file sits in a subfolder there. A private repository also needs a Git Updater license, which grants access to private repositories and authenticated requests to GitHub, and a GitHub personal access token that grants read access to that repository. A public repository needs neither. The folder on the site needs the same name as the repository, and Step 4 creates that folder when the theme or plugin is not on the site yet. Six steps connect a theme or plugin to its GitHub repository with Git Updater.
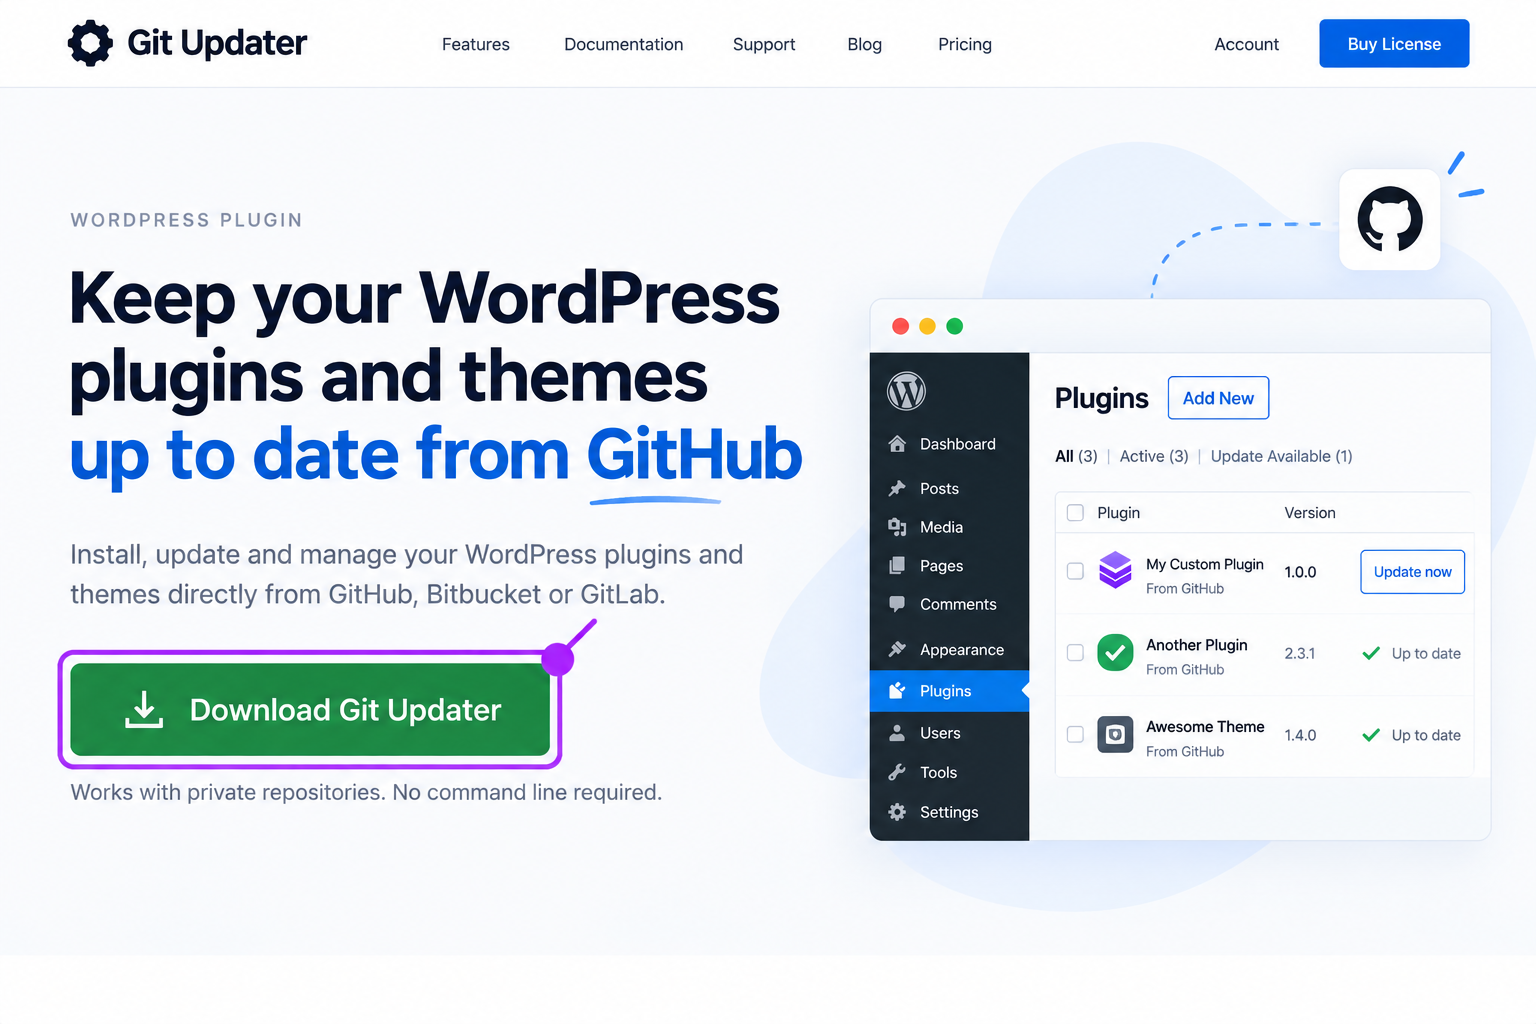
Download Git Updater as a ZIP file. The Git Updater website shows the Download Git Updater button.
In the WordPress dashboard, open Plugins, click Add Plugin, then Upload Plugin, choose the ZIP file, click Install Now and activate the plugin. For a private repository, open the GitHub tab on the Git Updater settings page and add the personal access token.
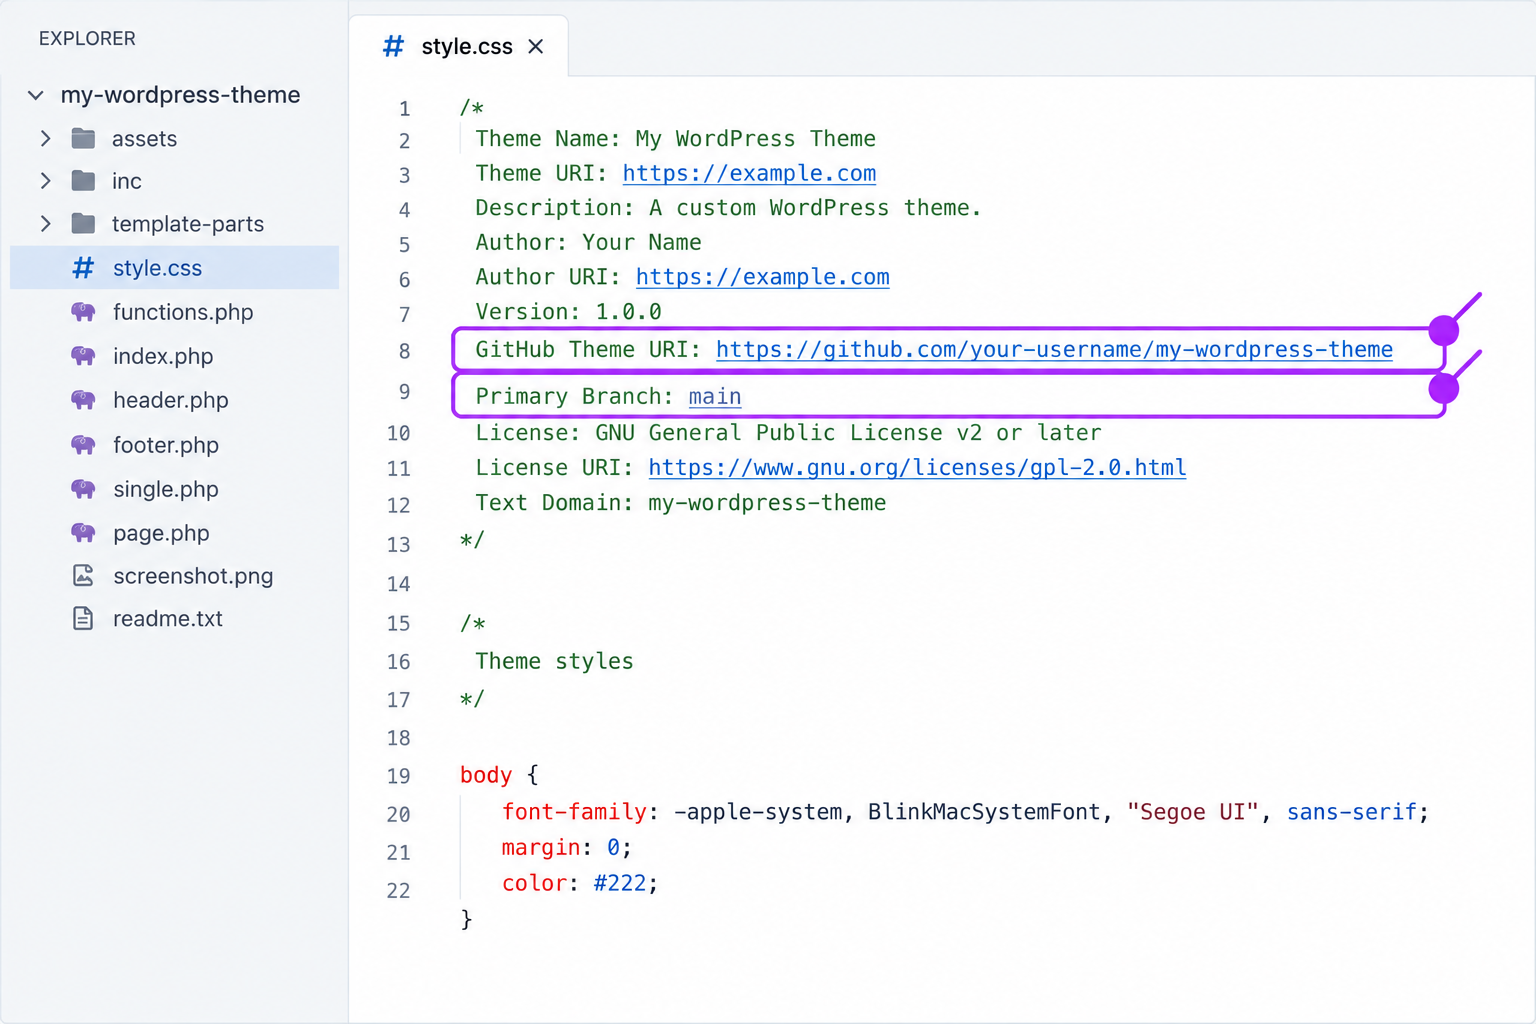
Add two header lines to the theme or plugin in the local copy of the repository. GitHub Theme URI and GitHub Plugin URI point a theme or a plugin to its repository, and the Git Updater repository shows the format of the address, with no .git ending. For a theme, add GitHub Theme URI and Primary Branch: main to the header comment of style.css:
GitHub Theme URI: https://github.com/owner/repository
Primary Branch: main
For a plugin, add GitHub Plugin URI and Primary Branch: main to the header comment of the main file, the PHP file that holds the Plugin Name line:
GitHub Plugin URI: https://github.com/owner/repository
Primary Branch: main
The Primary Branch header names main as the branch Git Updater checks. In an editor, the header comment of style.css shows the Theme Name and Version lines with both added lines.
Commit the change and push it to main on GitHub.
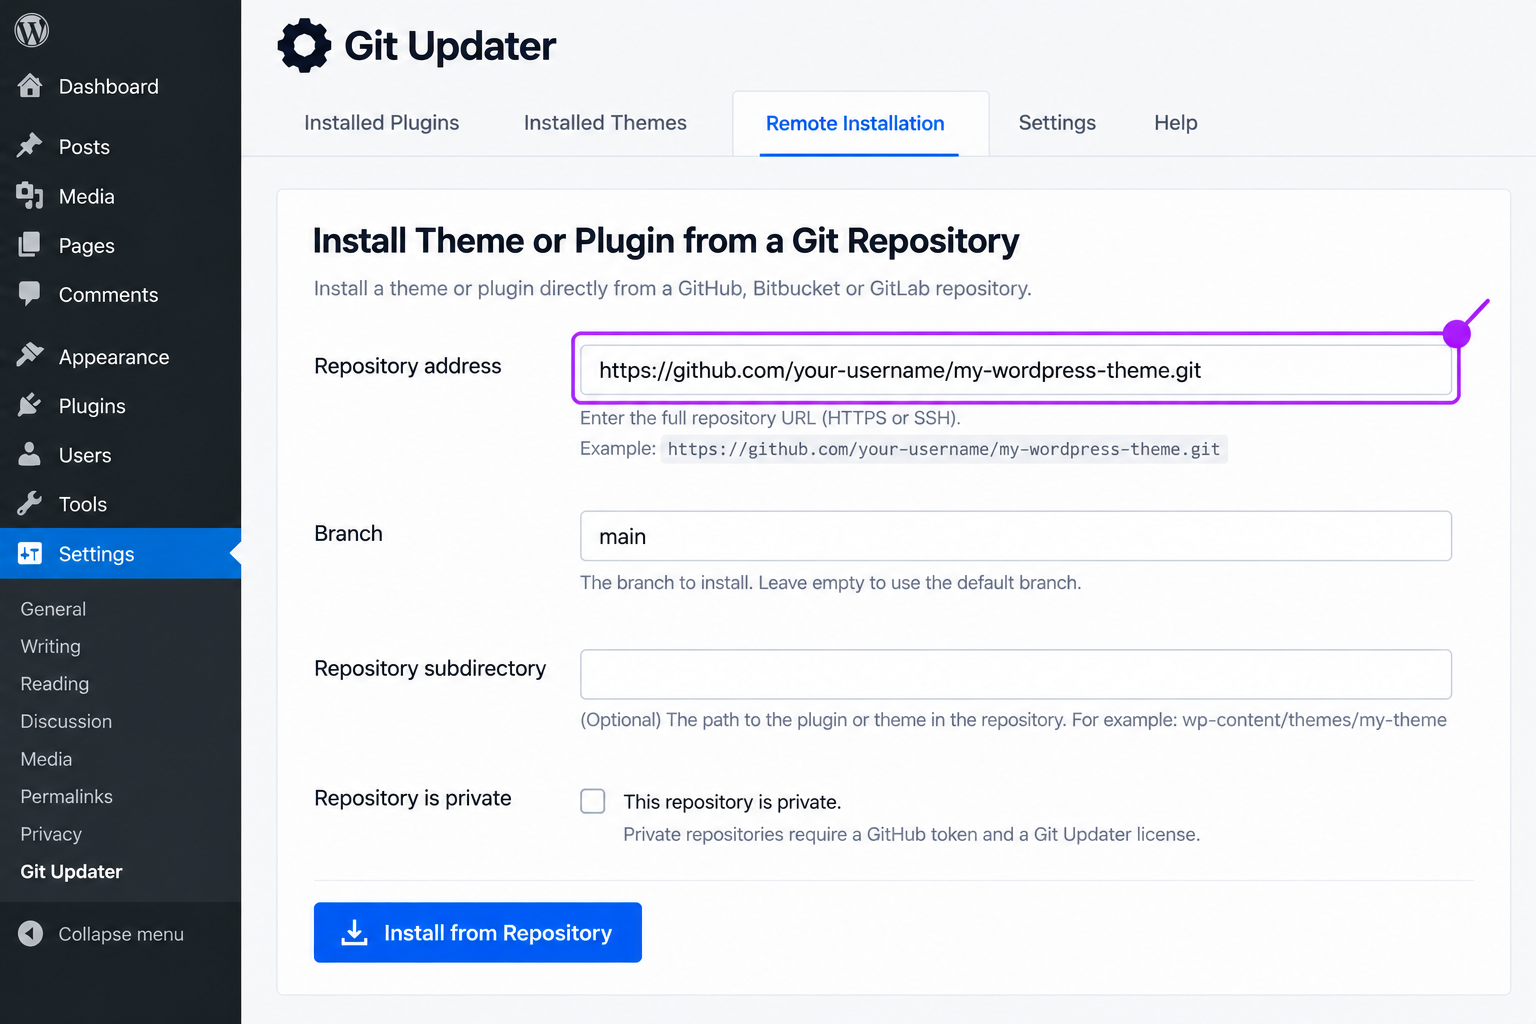
Theme or plugin not on the site yet: open the remote installation tab on the Git Updater settings page, paste the repository address, type main as the branch, because the branch field does not fall back to main, then install the theme or plugin once and activate it. The installed copy carries both header lines. Theme or plugin already on the site: no remote installation. Add both header lines to the installed style.css or main file, and keep the folder named like the repository. The remote installation form shows the repository address and the branch main.
For each release, open style.css or the main file in the repository, raise the number in the Version header, commit and push.
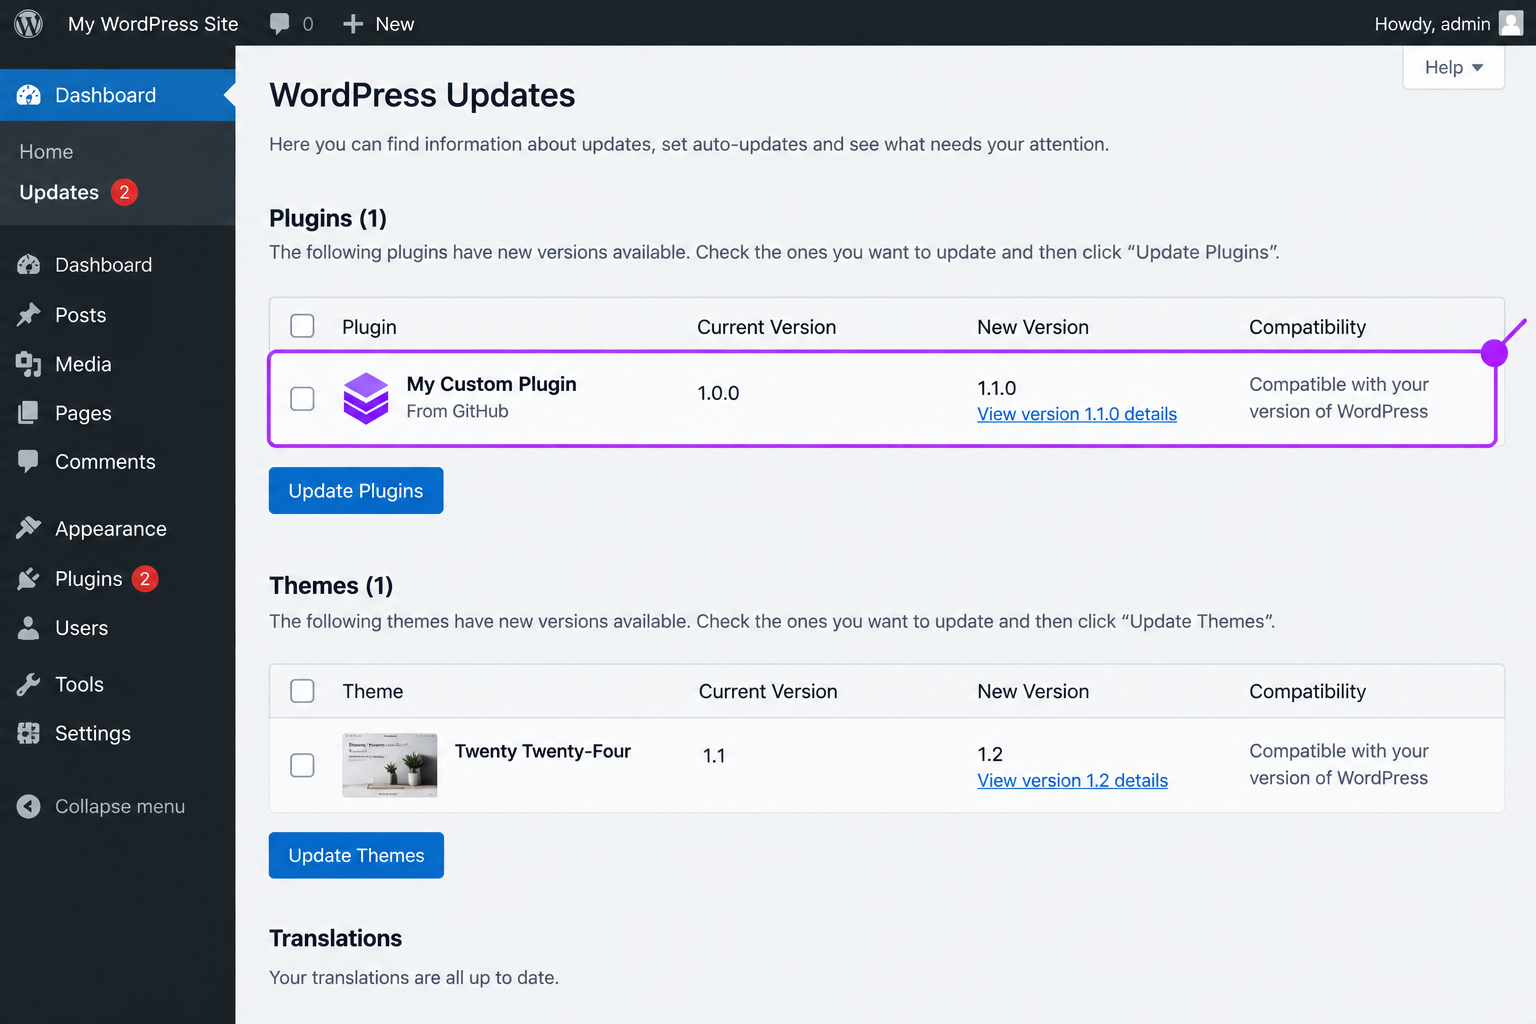
Open the Updates screen of the WordPress dashboard. An update shows once the version in the repository exceeds the installed one; run it. If the row is missing right after a push, Git Updater still holds its last check of the repository in a cache: click Refresh Cache on the Git Updater settings page, and Git Updater checks GitHub again. The Updates screen shows the theme or plugin in its own row with the available update.
Updates from GitHub now arrive on the WordPress site like any other update in the dashboard. With a push to GitHub and a deployment to the site both in place, the same steps repeat for every change as one workflow.
WordPress Git Workflow
A WordPress Git workflow is a repeated loop that carries one change from the local copy to GitHub and on to the live site. Using Git with WordPress day to day needs no new tool: Git is installed once, the repository is created once, and the commit, the push and the deployment are repeated for every change. The workflow repeats the same seven steps each time, from the pull to the deployment.
Switch to main and pull, to start from the newest main.
Create a branch for the change.
Edit the theme or plugin files and test the change on the local site.
Commit and push the branch.
Open a pull request on GitHub and merge it into main.
Test main on the staging site.
Deploy main to the live site with the host panel or the plugin.
A merge on GitHub adds the change to main on GitHub, not on the computer. git pull downloads the newest commits and merges them into the current branch, so the loop switches to main first and pulls second.
One pass of the loop uses six commands on the command line, with header-fix as an example branch name.
After the push, the workflow needs no more commands: the pull request is opened and merged on GitHub, and the deployment runs from the host panel or the plugin.
A WordPress GitHub workflow of this kind checks each change in three places before visitors receive it: the local copy, the branch with its pull request, and the staging site. The first of the three is the local WordPress environment, the copy that holds every change before GitHub receives it.
Local WordPress Environment
A local WordPress environment is a copy of the site that runs on a local computer, used to edit and test a change before it is committed. This local copy holds the Git repository, so each commit is recorded on the computer before a push sends it to GitHub. The copy itself, with its own web server and database, is the product of local WordPress development, a separate task from Git.
One example of a tool that runs the local site is Local, which installs WordPress on the computer. Not every project keeps the standard WordPress folders, though. Composer, a dependency manager for PHP, installs WordPress core, plugins and themes as dependencies, and Bedrock, a WordPress boilerplate project that uses Composer, keeps them in a different folder structure. What the repository of such a project tracks is a question for Composer for WordPress. In either layout, the next thing a change needs is its own Git branch.
Git Branch
A Git branch is a separate line of work inside the repository, so main stays untouched while a change to a WordPress theme or plugin is edited. One branch for one change, such as the header fix of a theme, keeps main ready to deploy, because unfinished work is never on main.
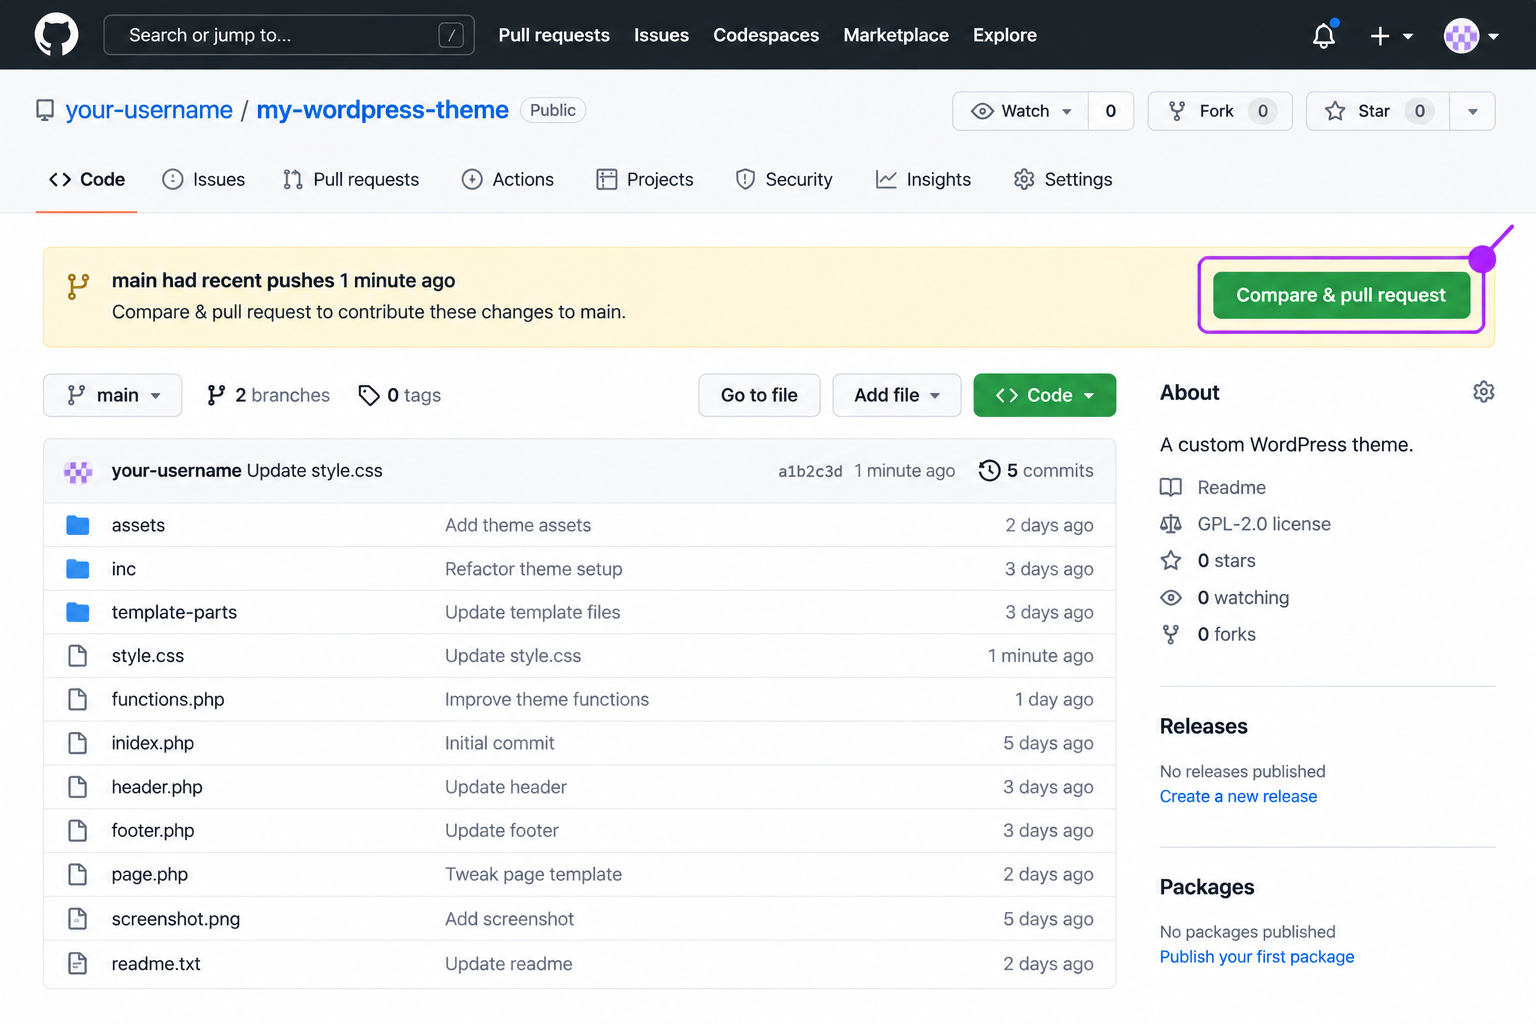
A pull request on GitHub is a proposal to merge the branch into main: it shows the proposed change to the theme or plugin, file by file, so the change can be reviewed before it is added. Right after the branch is pushed to GitHub, the repository page shows a notice with the branch name and a button that opens the pull request.
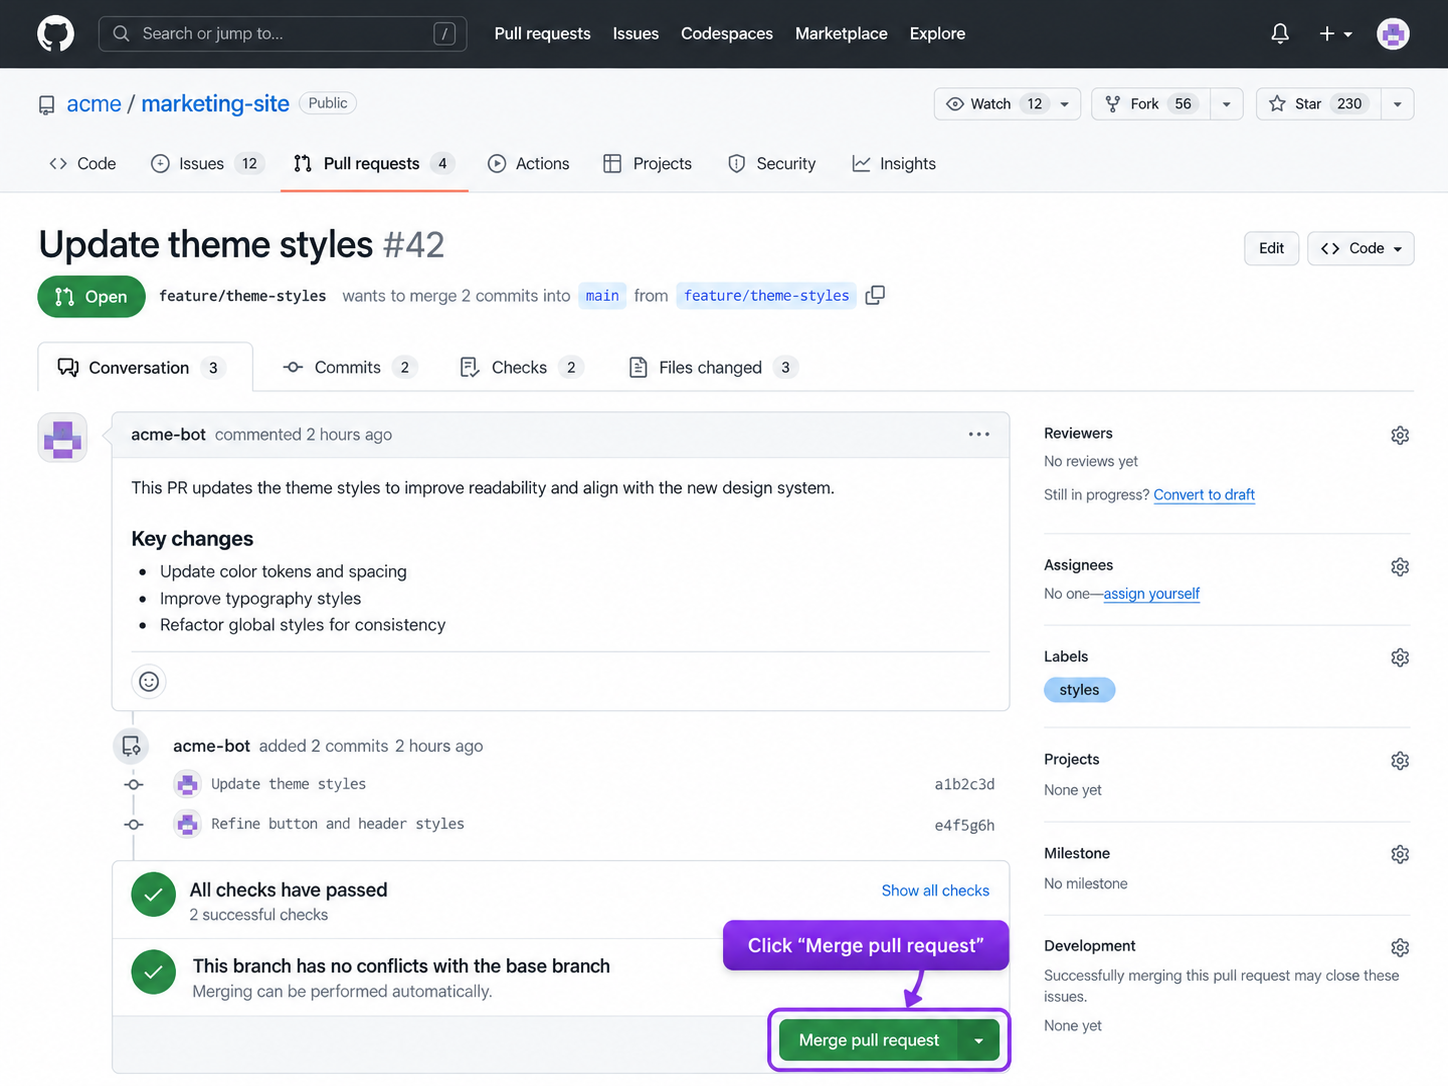
Merging the pull request adds the change to main. The pull request page shows the title, the number of changed files and the merge button.
When the pull request is merged, GitHub Actions, the continuous integration and continuous delivery (CI/CD) platform of GitHub, can run checks or a deployment as a pipeline: an automated set of build, test and deployment steps. The pipeline itself is the subject of WordPress CI/CD deployment. The merged change is tested next on a WordPress staging site.
WordPress Staging Site
A WordPress staging site is a private copy of the live site, used to test a change before the live site shows it to visitors. The host or a plugin creates this copy, not Git, and a WordPress staging site keeps its own files and its own database.
The staging site receives main before the live site, through the same host panel or plugin route. Automatic deployment is a good match for staging, because a broken change there is shown to no visitor; on the live site, a manual pull is the safer choice once main is tested on the staging site.
How code and content are sent from one environment to the next, and how an earlier version is brought back, are the two topics of the WordPress deployment workflow. With main on the live site, one pass of the loop is complete, and every pass uses the same short set of Git commands, from git checkout to git push.
Basic Git Commands for WordPress
The basic Git commands for WordPress are the Git commands used to track WordPress files, push them to a GitHub repository and pull changes back. Git is a command-line tool: each command is typed in a terminal, on the computer or the server that holds the WordPress files.
Command
What it does
git --version
confirms that Git is installed
git init
turns the WordPress folder into a repository
git config
sets the name and email for commits
git add
adds files to the next commit
git status
lists the files to commit
git commit
records the added files
git remote add origin
connects the folder to the GitHub repository
git push
sends commits to GitHub
git clone
copies a GitHub repository to the computer
git checkout
switches to main or creates a branch
git pull
downloads and merges the newest commits
git rm --cached
stops tracking a file that stays on disk
Syntax, options and errors for each command are in the reference on basic Git commands for WordPress. GitHub Desktop commits and pushes with buttons, with no command typed.
The commands track files and send commits. The database of the site is not a file they track. The database, the plugins and the users of a site are managed from the same terminal by the other command-line tool of a WordPress project, WP-CLI.
One more use of GitHub is left for a WordPress site: GitHub can host a static copy of it.
How to Host a Static WordPress Site on GitHub Pages
GitHub does not run WordPress: GitHub Pages hosts static HTML, CSS and JavaScript files and nothing else, so the one way to host WordPress on GitHub is as a static copy of the site. A static WordPress site is that copy, the pages exported as HTML files, and WordPress keeps running elsewhere for editing.
The steps to host a static WordPress site on GitHub Pages run in this order.
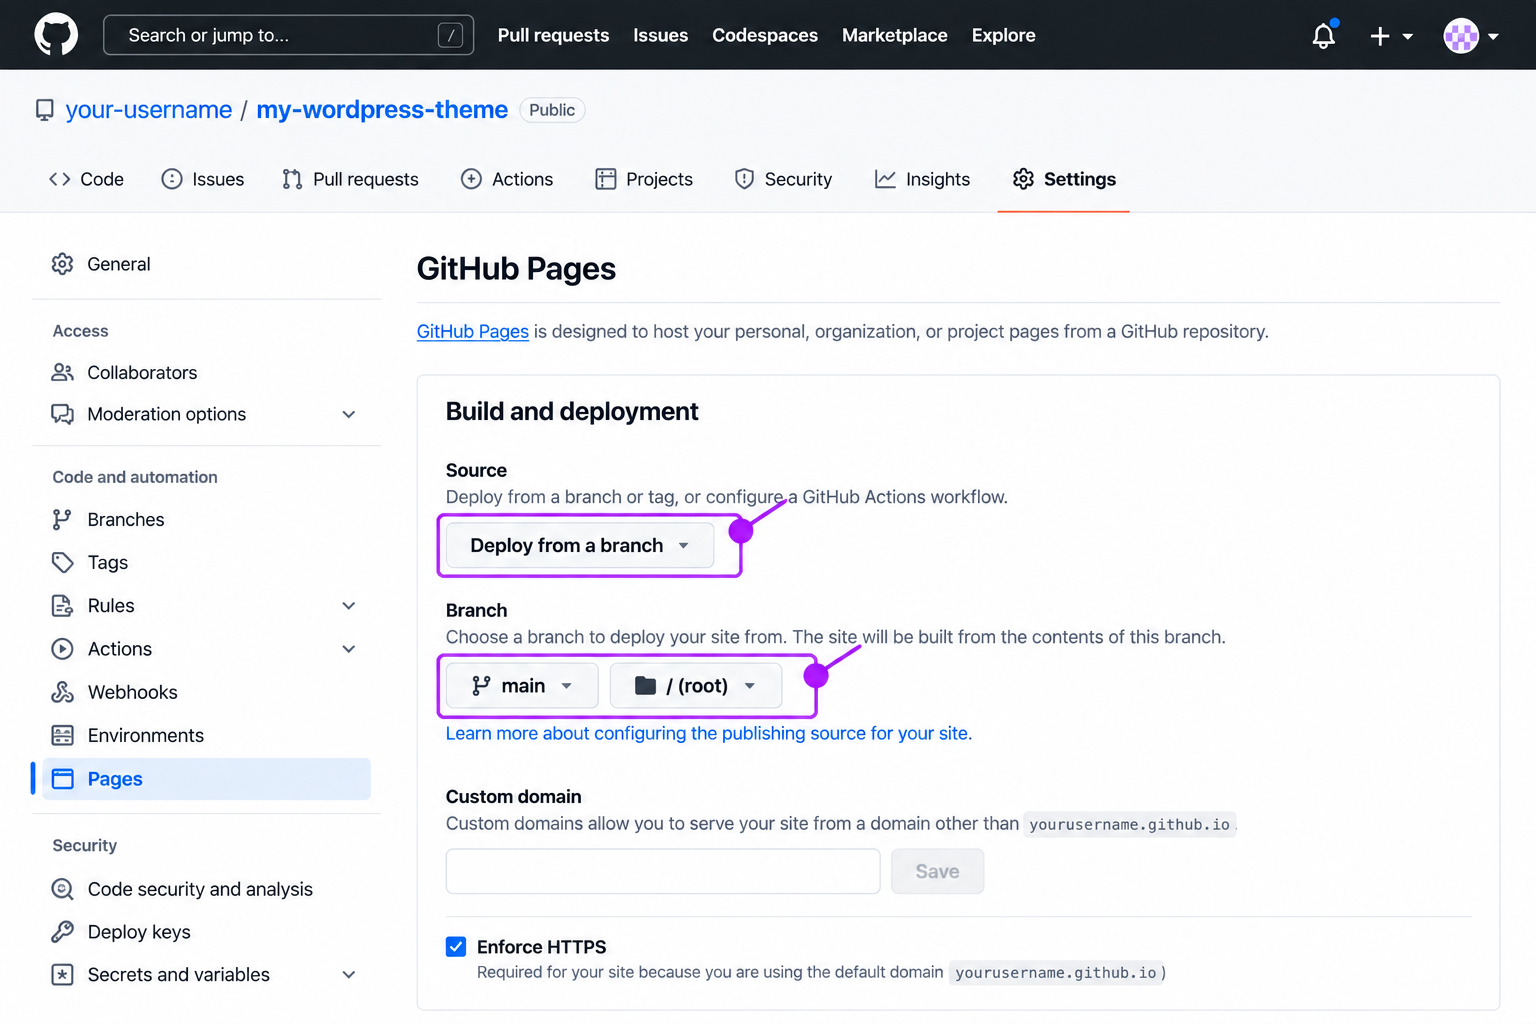
Create a repository named username.github.io on GitHub, with the account name in place of username, and turn on Add README so the new repository holds a main branch. Turn on GitHub Pages for it: open Settings, then Pages, select Deploy from a branch under Source and choose main under Branch. Clone the repository to the computer. In Settings, Pages, the source shows Deploy from a branch and the branch shows main.
Keep WordPress running on that same computer, in a local environment, as the editing copy. Every page is still edited in WordPress, and visitors receive only the exported files.
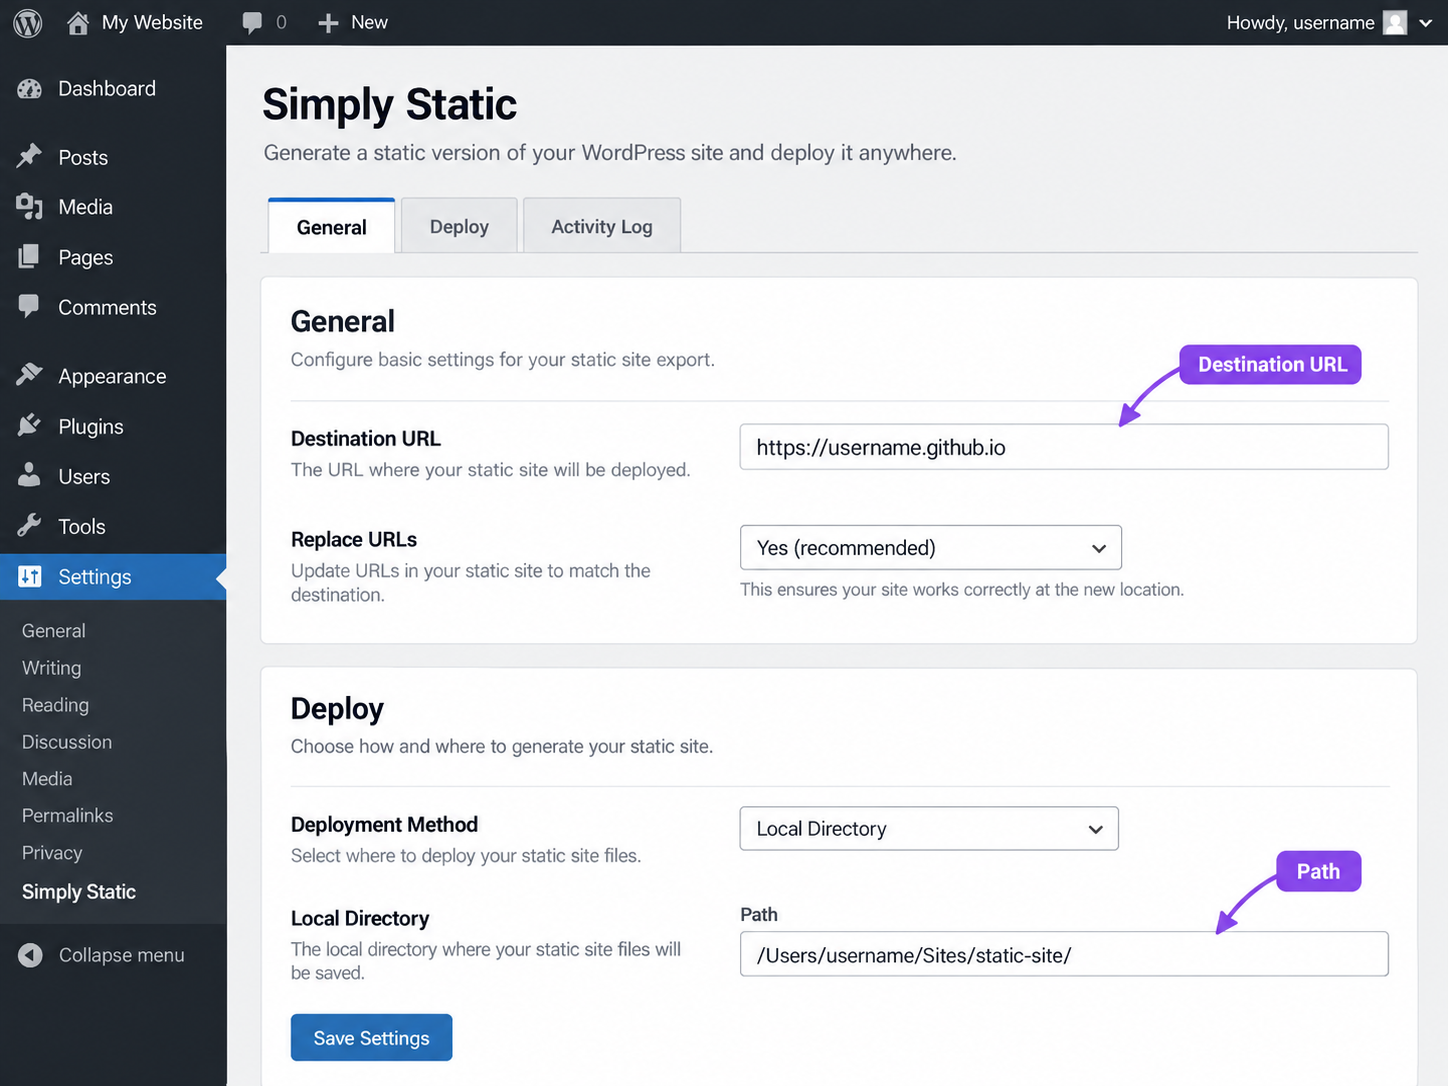
Install and activate Simply Static, a plugin that exports a WordPress site as static files. In its settings, type https://username.github.io as the destination URL and select absolute URLs. Choose the local directory as the delivery method, then paste the path of the cloned repository folder. The settings show the destination URL and the local directory path.
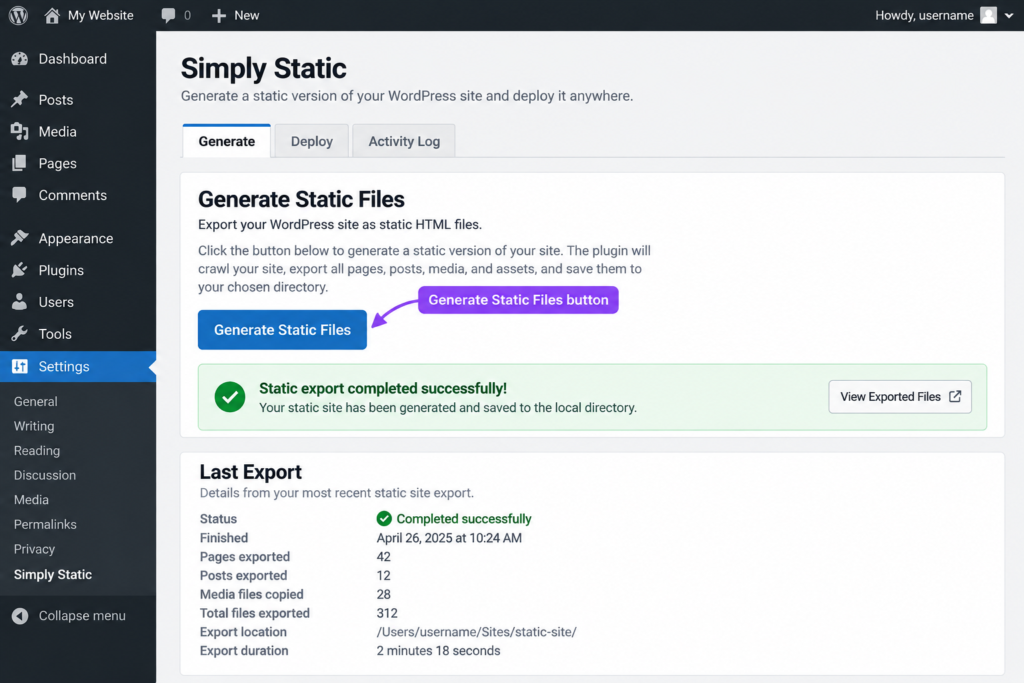
Open Simply Static, Generate and click Generate Static Files. The screen shows the button and the finished export.
WordPress on a remote host is a different case: export a ZIP file there, download it and unpack it into the cloned repository folder.
Before the first commit, create an empty file named .nojekyll in the top folder of the cloned repository. GitHub Pages runs a site build on a branch source by default, and that file turns the build off; the exported files need none. Commit the exported files and push them to main. GitHub Pages serves the static copy, and the site opens at https://username.github.io.
The static copy loses forms, search and comments: each of them needs PHP on every visit, and the copy holds none. Every edit repeats steps 3 and 4, and the pushed files can take up to 10 minutes to appear on the site, according to the GitHub Pages documentation. On a free GitHub account, GitHub Pages is available only for a public repository, so the exported files are public too.
GitHub Pages hosts a site whose pages stay the same for every visitor. A site that needs forms, search or comments stays on WordPress hosting, with GitHub holding its code.




 ChatGPT
  Claude
  Grok
Grok  Gemini